Vegetarian cooking blog

Showing posts with label Desserts. Show all posts

Monday 15 March 2021

EGGLESS PINEAPPLE CAKE

Come Pineapple season and all I can think of is Pineapple Rasam, Pineapple Raita, Pineapple Mor Kuzhambu, Pineapple Rabri and Pineapple Cake. In short, main course to sides to desserts in Pineapple. Oh yes, and salad too...just love the fruit.

This Eggless Pineapple cake is simple and I have followed the same batter used for Upside down orange vanilla cakeI am giving you a base here to which you can add anything you like, be creative, and yet you will have a beautifully moist cake every time. Anyone can make this, no beating, no major whisking. You all know by now the recipes I choose to bake are mostly non-messy ones.

Being an eggless version, this cake is different from the other eggless cakes as I have not used condensed milk or flax egg, but one simple ingredient that we have in our refrigerators. Curd/ yogurt. Yes, that's the base, and I assure the cake will not taste of curd. 

While you are here check out my other cakes like Blueberry CheesecakeNutella fudge browniesApple cake,  Apple crumble, and more...

Here is the recipe for Eggless Pineapple Cake-


      PREP TIME: 10 Mins                                        COOK TIME: 35 Mins
     TOTAL TIME: 45 Mins                                        COURSE:  DESSERT
     CUISINE:  WORLD FOOD                                 SERVINGS: 6
     AUTHOR: Rajni Ram


Ingredients for Cake:

Pineapple 1 small, skin removed and chopped finely(follow instructions under Glaze)

Maida ( refined flour) 1.5 cups ( 1 cup=150 ml)

Curd/ yogurt 1 cup

Sugar ( white) 3/4 of a cup

Baking powder 1 tsp

Baking soda 1/2 tsp

Oil ( refined oil or coconut oil) 1/2 cup

Vanilla essence 2 drops

Sauteed Pineapple chunks(check step 1 under directions)

Requirement: Square or rectangle baking tin/tray


Ingredients for the topping/glaze


Whipping cream 1 cup

Sugar 4 tbsp

Pineapple  chunks 

Cinnamon powder


Directions for glaze/topping

STEP1:

Remove the skin of the Pineapple, and cut it into fine chunks. In a pan melt 1 tbsp butter and add the finely chopped Pineapple. saute. Add 1/4 tsp salt, 1/4 cup water and 1/2 cup brown sugar and start cooking. When the Pineapple is half cooked, add cinnamon powder and continue to cook until the Pineapple is well cooked and yet firm. Remove from flame and cool. The mixture will solidify a bit and appear saucy. Keep aside.

STEP2:

Pour 1 cup pf chilled whipping cream into a mixing bowl and using an electric beater whip it to a consistency where, when the beater whisk is lifted, the cream forms a soft peak and doses not fall of the whisk. (PS: pictures for this step are not here, as the whipped cream frosting was just an impulsive decision, but a good one😀. Picture for this step will be updated as soon as possible). When soft peaks appear to the cream, add 1/4 of the portion of the sauteed pineapple chunks and mix lightly. Keep some Pineapple chunks aside for topping up.


Directions for Cake:

 Preheat oven to 180 c for 10 minutes. Sift the flour and keep ready. In a bowl take the curd, add the sugar and combine until the sugar dissolves completely. Now add the baking powder and baking soda and set aside for 5 minutes. This makes the mixture to froth up and double in size.

After 5 minutes add oil to the curd mixture and combine well. Add the sifted flour and with a spatula or wire whisk combine nicely to form a batter. Add in the vanilla essence and half the quantity the sauteed pineapples(refer instructions for Glaze step1) and mix lightly. Now transfer the cake batter into a previously greased tray. Place the tray in the oven and bake for 35 minutes at 180 C. Check for doneness or keep for a couple of minutes more, if a toothpick comes out sticky, don't go beyond 5 minutes. Cool the cake for 30 minutes, or until completely cool. Now top with the whipped cream topping and remaining Pineapple chunks and dig in.


STEPWISE RECIPE FOLLOWS:


1. Remove the skin of the Pineapple, and cut it into fine chunks. In a pan melt 1 tbsp butter and add the finely chopped Pineapple. saute. Add 1/4 tsp salt, 1/4 cup water and 1/2 cup brown sugar and start cooking. When the Pineapple is half cooked, add cinnamon powder and continue to cook until the Pineapple is well cooked and yet firm. Remove from flame and cool. The mixture will solidify a bit and appear saucy. Keep aside.


2. Preheat oven to 180 c for 10 minutes. Sift the flour and keep ready.


3. In a bowl take the curd, add the sugar and combine until the sugar dissolves completely. Now add the baking powder and baking soda and set aside for 5 minutes. This makes the mixture to froth up and double in size.


4. After 5 minutes add oil to the curd mixture and combine well. Add the sifted flour and with a spatula or wire whisk combine nicely to form a batter. Add in the vanilla essence and half the quantity the sauteed pineapples(refer instructions for Glaze step1) and mix lightly. 


5. Now transfer the cake batter into a previously greased tray. Place the tray in the oven and bake for 35 minutes at 180 C. Check for doneness or keep for a couple of minutes more, if a toothpick comes out sticky, don't go beyond 5 minutes. Cool the cake for 30 minutes, or until completely cool. Now top with the whipped cream topping and remaining Pineapple chunks and dig in.


6. For the frosting:

Pour 1 cup pf chilled whipping cream into a mixing bowl and using an electric beater whip it to a consistency where, when the beater whisk is lifted, the cream forms a soft peak and doses not fall of the whisk. (PS: pictures for this step are not here, as the whipped cream frosting was just an impulsive decision, but a good one😀. Picture for this step will be updated as soon as possible). When soft peaks appear to the cream, add 1/4 of the portion of the sauteed pineapple chunks and mix lightly. Keep some Pineapple chunks aside for topping up.


NOTES:

1. The curd should not be very sour.

2. Feel free to add your choice of fruits, the process of making sauce remains same. But cinnamon does not go well with all fruits, so go easy with cinnamon.

3. If you have extra whipped cream topping left, you may want to consider sandwiching some between two layers of cake.

If you tried this recipe and liked it please comment below. I would love to hear from you. If you have a query about the recipe email us and ill respond as soon as I can.
If you would like to receive our recipes in your mail please leave your mail id at the homepage. Every time Rajjo's Kitchen has a new post we will mail the recipe to you.


Thursday 11 February 2021

STRAWBERRY AND LEMON LOAF

 Strawberries are in season now and what better way than storing up on all the goodness on what they have to offer by making, jams, desserts or just eating them fresh. But of course who can refuse a good bowl of Strawberry and cream...are you a berry addict like me? then this dessert/bread is certainly for you. If you are not a fan of berries you shall become one after tasting this😀.

This as always is a one bowl recipe and one of the simplest. I have used Whole wheat flour in this recipe, which can be easily swapped with Maida/refined flour if you prefer. A simple dish does not need much of a description I believe, therefore lest get to the recipe directly.

While you are here do check out my other bakes like-  Millet Cookies, Easy 2 way Muffins, Upside down Orange Vanilla cake, Oatmeal Cookies, Baked Samosa Pie, Apple Crumble, Pineapple Jam Tart, Blueberry Cheese cake and more...


Here is the recipe for Strawberry Loaf for you-


     PREP TIME: 10                                       COOK TIME: 50Mins
     TOTAL TIME:60 MINS                          COURSE:  DESSERT/BREAD
     CUISINE:  WORLD                               SERVINGS: 1 LOAF
     AUTHOR: Rajni Ram


Ingredients:

Fresh Strawberries 200 gm ( 12 to 15 pcs) chopped into cubes and a few lengthwise
Whole wheat flour 2 cups
Baking Soda 1 tsp
Lemon Juice of 1/2 a lemon
Zest of half a lemon
Egg 1 
Butter 100 gm melted
Milk 1 cup (+ 1/4 cup if required)
Salt a pinch

Lemon Glaze Ingredients:

Sugar 1/4 cup
Lemon juice of 1/2 lemon
Warm water 2 tbsp

Directions for Lemon glaze: Mix together all ingredients until sugar is dissolved and set aside. Do not exceed the water limit mentioned.


Directions for Loaf:
Preheat oven to 180 C for 10 minutes. In a bowl sieve the whole wheat flour along with the baking soda. To this add the sugar and the strawberries chopped to cubes and mix well. In another bowl take the melted butter ,lemon juice, lemon zest and egg and mix well. Add this to the flour and sugar mix, and combine well. Now start adding the milk little by little to make a thick batter. If batter looks very dry add 1/4 cup milk or even less to adjust consistency. Now arrange a loaf tin with parchment/butter paper. Pour the batter into the tin and tap to remove air gaps. Now arrange the reserved strawberries that were cur lengthwise,  on the batter and press gently with your finger. Bake in the oven at 200 C for 50 minutes. Check for doneness by piercing with a toothpick in the center. If undone bake for another 3 to 5 minutes. Remove the cake from oven, prick holes all over it and pour the prepared lemon glaze when hot. Allow to cool completely and then remove from loaf tin. The yummy Strawberry and lemon loaf is ready to serve with tea or as dessert.

STEPWISE RECIPE FOLLOWS:
1. Preheat oven to 180 C for 10 minutes. In a bowl sieve the whole wheat flour along with the baking soda. 


2. To this add the sugar and the strawberries chopped to cubes, add a pinch of salt and mix well.


3. In another bowl take the melted butter, egg, add lemon juice and lemon zest and mix well. Add this to the flour and sugar mix, and combine well. 


4. Now start adding the milk little by little to make a thick batter. If batter looks very dry add 1/4 cup milk or even less to adjust consistency. Now arrange a loaf tin with parchment/butter paper. 


5. Pour the batter into the tin and tap to remove air gaps. Now arrange the reserved strawberries that were cur lengthwise,  on the batter and press gently with your finger. Bake in the oven at 200 C for 50 minutes.


6. Check for doneness by piercing with a toothpick in the center. If undone bake for another 3 to 5 minutes. Remove the cake from oven, prick holes all over it and pour the prepared lemon glaze when hot. Allow to cool completely and then remove from loaf tin.


NOTES:
1. I have used Fresh strawberries as they are in season now. Alternately dried ones can be used. If using frozen strawberries use without thawing.
2. Feel free to use refined flour if you prefer.
3. Egg may be swapped with flax egg, but I have not tried it for this recipe, therefore cannot comment now on the texture. When I make it with flax egg I shall update here.

If you tried this recipe and liked it please comment below. I would love to hear from you. If you have a query about the recipe email us and ill respond as soon as I can.

Wednesday 13 January 2021

KOVA KAJJIKAYALU

 This Indian sweet is so close to my heart as they bring back many memories of places, people and a different time altogether. Kajjikayalu in Telugu means Karanji or Gujiya.

Kova Kajjikayalu or Kobbari Kova Kajjikayalu is a melt in the mouth sweet with a stuffing of coconut and jaggery, covered on the outside with sweetened Kova or Mava. This is a very easy to do recipe.

In this recipe I have gone completely by intuition and not referred any other recipe.  That's why it may be a little different from other ones. 

Typically Almond flour is not used in this sweet, but I have used a little for the smooth texture and so that the Kova is easy to work around with.

Like me, my daughter also likes this sweet or may be she likes it, and so I like it😀. This is one of the most popular sweets at G Pullareddy Sweets of Hyderabad. Every time my parents would visit us they would get this for my daughter as she would always ask for this as a child. After that due to some reasons the connect with Hyderabad broke(oh!only from a proximity point of view, at heart I'm always a Hyderabadi). 

Since a few years we have not tasted this sweet and never dared to make it as it would always be compared to the Pullareddy ones, but then I guess today it had to happen. In my mind it was going on for a while. To bring it to fructification, I had to visualize it in my mind first. I am so happy that it turned out so well the first time. 

Lets go to the recipe right away. While you are here check out my other Indian sweet recipes like - Akkaravadisal, Chakkara Pongal, Pineapple Rabri, Atte ka Sheera, Aval Kesari, Vella Aval, and more...

Here is the recipe of Kova Kajjikayalu-  

  PREP TIME: 20                                         COOK TIME: 20 MINS
 TOTAL TIME:40Mins                                  COURSE:  SWEET
 CUISINE:  INDIAN                                      SERVINGS: 15 PCS
 AUTHOR: Rajni Ram


    Ingredients:

    Kova/Mava(unsweetened) 300 gm

    Sugar 6 tbsp

    Dessicated Coconut 2 cups( freshly grated coconut can also be used)

    Jaggery 1 cup

    Cardamom powder 1/2 tsp

    Almond Flour 3 tbsp 


    Directions:

Take a heavy bottomed Kadai and put the Jaggery and desiccated coconut in it. Sprinkle some water(less than 1/4 cup) in it and put it on flame. Keep stirring over a low flame until the jaggery melts and mixes with the coconut, and the stuffing comes together. If you are able to form a ball with the coconut jaggery mixture, thats the right stage. This takes about 10 minutes. The poornam will leave the bottom of the Kadai when done. Add cardamom powder and, let the stuffing/Poornam cool down. Grate/shred the Kova and keep it ready. Put the shredded Kova in a non stick pan, add the sugar and start stirring. The Kova will loosen up as the sugar melts, but will start solidifying again. Keep stirring until it leaves the bottom of the pan. Transfer it immediately to a plate and let it cool for exactly 5 minutes(not more as, if it cools too much making the cover gets difficult). Now add the Almond flour and combine with a spatula. Divide the Kova into 15 equal portions. Divide the Coconut stuffing also into 15 equal portions, shaping them as ovals. Apply ghee to your fingers and palms.Now take one roundel of Kova and flatten it on your palms with your fingers. Place the coconut stuffing in the centre and seal the edges as shown in the picture. Repeat for all the Kova and stuffing. Cover them with a clean cloth and allow to set for 2 hrs. The outer Kova covering will toughen up a bit as it cools, but will melt in your mouth and the coconut Poornam just takes this simple sweet to a different level. Overall a healthy sweet recipe. Ideal for gifting friends, make it for Diwali or Janmashtami when milk based sweets are made. Make them just of no reason an relish them, just as I made them today.


    STEPWISE RECIPE FOLLOWS:

1.  Take a heavy bottomed Kadai and put the Jaggery and desiccated coconut in it. Sprinkle some water(less than 1/4 cup) in it and put it on flame. Keep stirring over a low flame until the jaggery melts and mixes with the coconut, and the stuffing comes together. If you are able to form a ball with the coconut jaggery mixture, thats the right stage. This takes about 10 minutes. The poornam will leave the bottom of the Kadai when done. Add cardamom powder and, let the stuffing/Poornam cool down.


2. Grate/shred the Kova and keep it ready. Put the shredded Kova in a non stick pan, add the sugar and start stirring. The Kova will loosen up as the sugar melts, but will start solidifying again. Keep stirring until it leaves the bottom of the pan. Transfer it immediately to a plate and let it cool for exactly 5 minutes(not more as, if it cools too much making the cover gets difficult).


3. Now add the 3 tbsp Almond flour and combine with a spatula. Divide the Kova into 15 equal portions. Divide the Coconut stuffing also into 15 equal portions, shaping them as ovals. Apply ghee to your fingers and palms.Now take one roundel of Kova and flatten it on your palms with your fingers. Place the coconut stuffing in the centre and seal the edges as shown in the picture. Repeat for all the Kova and stuffing. Leave to set for 2 hrs. 


    NOTES:

1. I have used Desiccated coconut, but fresh coconut can also be used. Quantity same as above.

2. As I have used only Almond flour I cannot suggest any other flour at the moment. Once i try it out with other lours shall update the recipe. 

3. Almond flour is easily available in shops or almonds can be blanched in hot water dried for 1/2 an hour and then powdered in a mixie. The powder should be fine, without lumps.

4. This sweet can be stored outside for 3 days and in the fridge up to 15 days. Putting it in the fridge makes the Kova cover to become a little hard. Keep it out for a few minutes before consumption if storing in the fridge.

5. Store bought Kova is a light yellow in colour. If making at home it turns out white.


If you tried this recipe and liked it please comment below. I would love to hear from you. If you have a query about the recipe email us and ill respond as soon as I can.

If you would like to receive our recipes in your mail please leave your mail id at the homepage. Every time Rajjo's Kitchen has a new post we will mail the recipe to you.

Sunday 20 December 2020

GAJAR HALWA/ CARROT HALWA

 Gajar Halwa/ Carrot Halwa is a very popular Indian dessert. Mostly a winter dessert. Though it is made frequently with the regular carrots ( English Carrots), using the Delhi Carrots or Red Carrots as they are called gives the best results.

This is one dessert I love and consider it very sacred, so if you are looking for an easy, one pot or microwave recipe, you are going to be disappointed. As far as Gajar Halwa is concerned I am old school. I cook it in milk( and a whole lot of milk) so that the raw taste of the Carrots is gone and the milk crumbles to a Rabri like texture. The taste of such a Halwa is divine. This is one recipe I have never made with regular carrot except in my dessert recipe- Gajar halwa Barfi where I was shaping  it like fudge( Barfi) and using Khoya to speed up the process. Whereas this recipe of Gajar Halwa is a slow cook process. The slower it cooks the better it tastes. Am I disappointing you? Well, make it like this and you will be hooked to it for life. Remember the best things in life come with a lot of patience.

My belief is that when I wait a whole year for the Red Carrots to appear in the Market and then make the Halwa, then it should be made the authentic way. Which does not involve adding condensed milk or Koya or milk powder but in cooking the carrots in milk( whole cream), to perfection.

I use only whole cream milk to make this dessert. So the taste of the Halwa depends entirely on the quality of milk. A full/whole cream milk Halwa will give you better taste and I can say this because I have tried it will all milk varieties available in the market and what works best is whole/full cream milk.

So after the whole mega write up, taking you to the recipe. While you are here do check out my other carrot based desserts like Carrot Kheer( another speciality from Rajjo's Kitchenn) and Gajar Halwa Barfi.


    PREP TIME:30                                   COOK TIME: 1hr
   TOTAL TIME:1hr.30Mins                     COURSE:  DESSERT
   CUISINE:  INDIAN                               SERVINGS: 6
   AUTHOR: Rajni Ram


    Ingredients:


    Carrots ( Preferably Red ones) 1.5 kilo grated

    Milk whole cream/ full cream 2 litres

    Sugar 300 gm

    Cardamom/ Elaichi powder

    Ghee 4 tbsp

    Cashews a new broken


    Directions:

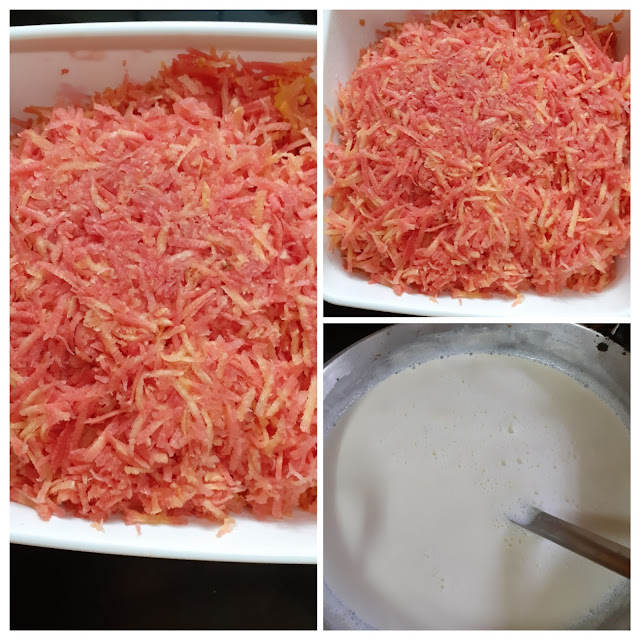
Wash, peel and grate the carrots and keep aside. In a huge thick bottomed vessel/ kadai/ or urli boil the milk. When it comes to a boil, reduce the flame and put in the grated carrots. Start stirring the mixture. The flame can be increased now but constant stirring is required . This process has to continue until almost all the milk dries up. The texture will look like Rabri stickng to carrot. Once all milk dries up, reduce the flame and add the sugar. Continue to stir again. Once the sugar is added the mixture will liquify, continue to stir until all the moisture is absorbed. The halwa will come together but it will not be gooey. Now add the cardamom powder. Fry the nuts in ghee and pour it over the halwa along with the nuts. The healthy and delicious Gajar Halwa is ready.  Serve warm. Bon Appetite. 


    STEPWISE RECIPE FOLLOWS:

1. Wash, peel and grate the carrots and keep aside. In a huge thick bottomed vessel/ kadai/ or Urli boil the milk.


2. When it comes to a boil, reduce the flame and put in the grated carrots. Start stirring the mixture. The flame can be increased now but constant stirring is required . This process has to continue until almost all the milk dries up. Showing you the stages of reduction in pictures below that are self explanatory. 


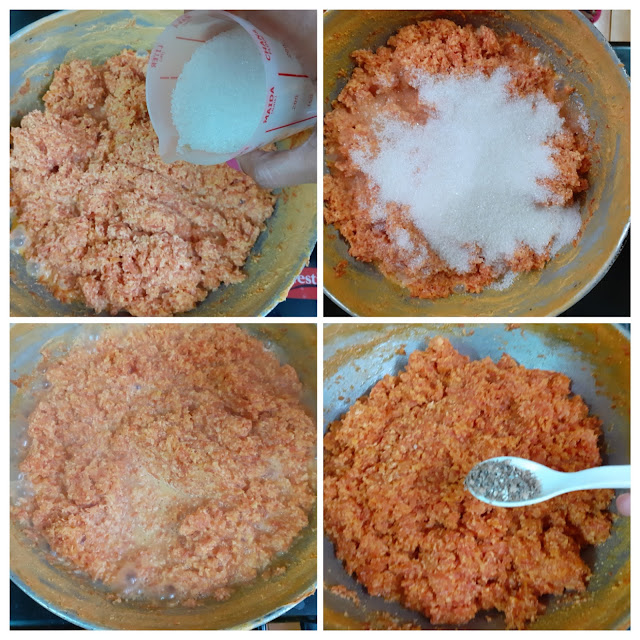
3. Once all milk dries up, reduce the flame and add the sugar. Continue to stir again. Once the sugar is added the mixture will liquefy, continue to stir until all the moisture is absorbed. The Halwa will come together but it will not be gooey. (forgot to click a picture finally to show the final consistency, so have included the one showing the cardamom powder. Please follow that texture for final consistency of Halwa).


4. Now add the cardamom powder. Fry the nuts in ghee and pour it over the Halwa along with the nuts. The healthy and delicious Gajar Halwa is ready.  Serve warm.


    NOTES:

1. While cooking at high heat keep stirring constantly to avoid burning the contents at the bottom of the pan.

2. Actually after sometime of cooking the milk and carrot mixture , it does not overflow from the vessel. That time the stirring can be relaxed a bit, but stir every couple of minutes. If you are following this reduce flame when not stirring.

3. Good quality full cream milk yields the best result, the Halwa can be made with milk of any consistency though. The results may not be what I have described .

4. Feel free to try this with regular Carrots too. Method being the same.

5. Sometimes people try to over power the subtle carrot flavour by adding huge amounts of ghee. This is not required. Pouring ghee at the right time is very important, such that the flavour is enhanced and a lot of ghee is not poured unnecessarily. Check out my Cakkara Pongal post for the directions on how to pour the ghee.


If you tried this recipe and liked it please comment below. I would love to hear from you. If you have a query about the recipe email us and ill respond as soon as I can.

If you would like to receive our recipes in your mail please leave your mail id at the homepage. Every time Rajjo's Kitchen has a new post we will mail the recipe to you.

Monday 7 December 2020

EASY 2 WAY MUFFINS( BLUEBERRY- CHOCOCHIP)

 These Muffins are so easy to bake, the prep is easy too. By now you all know that when I choose to bake, it has to be something that is super easy and fuss free.

So here I am giving you a cup cake dough base which you can customize with your favorite add ins and toppings. These are good for breakfast or as a snack for kids snack box . The muffins can be stored in the refrigerator for upto a week and can be warmed in the oven before serving. 

In this recipe I have topped them with my homemade Paneer Grapes conserve for the blueberry muffin and creamcheese-chocolate topping for the chocochip muffins. There are no pictures to them as the topping came as an after thought. However, I will share the procedure for the cream cheese icing without pictures. As for the conserve, a separate post for it will follow soon.


This is one such recipe where I have not added wheat flour and stuck to just refined flour. Usually I do only wheat flour or mix of wheat and refined flour.

While you are here please try out my other super easy cake recipes like Blueberry cheese cake, Upsidedown Orange Vanilla cake, Apple tea cake, Nutella fudge brownies, and more...


        PREP TIME: 15MINS                                        COOK TIME: 20MINS

       TOTAL TIME: 35 MINS                                       CUISINE: INDIAN

        COURSE : DESSERT                                      SERVINGS: 12 nos

        AUTHOR: RAJNI RAM


Here is the recipe for the Muffins--

Ingredients :

Plain flour 2.5 cups

Sugar 1 cup

Baking powder 3 tsp

Baking soda 1 tsp

Salt 2 pinches

Buttermilk 1cup 

Oil  ( any unflavored oil) 4 tbsp

Butter melted 50 gm ( if using salted skip the salt)

Vanilla essence 1 tsp 

Eggs 2 ( refer notes)


Blueberries 125 gms

Chocochips 50 gm


Directions: 

In a bowl put in all the dry ingredients, that is flour, sugar, baking powder, baking soda and salt and whisk. 

In another bowl put in all the wet ingredients, that is the buttermilk, oil, butter, eggs and the vanilla essence and whisk. Preheat oven to 180 C.

Now slowly add the wet ingredients into the dry ingredients little by little. Combine nicely with a spatula no beater required. Now divide the dough into 2 equal halves. Add Blueberries to one half. Mix it in with very light hands. To another half add chocochip, stir it in light. Scoop the dough into muffin tins lined with muffin liners. Bake at 200 C for 20 minutes. Insert a skewer to check for doneness. Transfer the muffins into a tray to cool. Enjoy these homemade muffins with your favourite beverage.

For Cream cheese icing : in a bowl add 75 gm of cream cheese, 1/2 cup of icing sugar, 2 tbsp cocoa powder, and beat until smooth using an electric beater. The mixture to be smooth and thick and not thin or watery. Use this to top the muffin and enjoy. ( This step is optional and there are no pictures to this step)


STEPWISE RECIPE FOLLOWS:

1. In a bowl put in all the dry ingredients, that is flour, sugar, baking powder, baking soda and salt and whisk. 


2. In another bowl put in all the wet ingredients, that is the buttermilk, oil, butter, eggs and the vanilla essence and whisk. Preheat oven to 180 C.


3. Now slowly add the wet ingredients into the dry ingredients little by little. Combine nicely with a spatula no beater required. Now divide the dough into 2 equal halves.


4. Add Blueberries to one half. Mix it in with very light hands. To another half add chocochip, stir it in light. Scoop the dough into muffin tins lined with muffin liners. Bake at 200 C for 20 minutes. Insert a skewer to check for doneness. Transfer the muffins into a tray to cool.


5. To top the Blueberry muffins use a fruit conserve, preferably berryish and for the chocochip muffins any chocolate icing will do. To follow my style procedure for cream cheese chocolate icing is given above. This step is totally options. The muffins taste just as great even without the toppings.


NOTES:

1. I usually use Olive oil for baking, coconut oil or even refined oil work well.

2. While baking the eggs should always be at room temperature. It's also recommended to have all ingredients at room temperature.

3. Unless a recipe demands chilled butter, always use melted butter for baking.


If you tried this recipe and liked it please comment below. I would love to hear from you. If you have a query about the recipe email us and ill respond as soon as I can.

If you would like to receive our recipes in your mail please leave your mail id at the homepage. Every time Rajjo's Kitchen has a new post we will mail the recipe to you.


Thursday 12 November 2020

DRY FRUIT LADOO

 These Ladoos are absolutely delicious and healthy. In my house, these are made not only during Diwali but all year through. They have a long shelf life and can sometimes substitute for breakfast. People who fast can rely on this for some quick energy. No sugar or honey or jaggery is added and I use minimum ghee(about 3 teaspoons). Yes! this is a whole package of health. Remember good things always come in small packages? This is that package😀.

My daughter gets it packed for hostel without fail every time she comes homes on her break. According to her, whenever she gets up late and is late for breakfast at the mess, she pops in 2 of these ladoos and grabs a glass of milk and her breakfast is taken care of for that day. I don't recommend this on a daily basis, but we all have times when we are running against time, this healthy ladoo comes in handy, it also takes care of sudden hunger pangs. My home always has a stock of these ladoos. And the best part you can customize them as per your desired dry fruits and nuts.

While you are here please check out my other sweet/dessert recipes like- Red Poha Ladoo, Carrot Kheer, Gajar halwa barfi, Maa Ladoo, and more...

Here is the recipe for Dry fruit ladoo-

PREP TIME: 20                                          COOK TIME: 20 MINS
 TOTAL TIME:40Mins                                  COURSE:  SWEET
 CUISINE:  INDIAN                                      SERVINGS: 15 PCS
 AUTHOR: Rajni Ram


     Ingredients:

     Dates ( juicy, fleshy ones) 250 gms deseeded

    Cashewnuts 100 -125 gms

    Almonds 100 gm

    Walnut 75 gm

    Ghee 1 tbsp

    Directions:

Put a pan over the flame and add 1 tsp ghee to it. Now roast all the nuts separately to a nice golden colour. Take care not to burn them, as the burnt smell will reduce the taste and flavour of the ladoo. Transfer them to a plate and cool them. On cooling using the "pulse mode" of your blender, blend them to a coarse mixture. Now to the same pan add another teaspoon ghee and put in the deseeded dates. Keep stirring and mashing them with the back of a spatula. As it turns warm, the dates start getting a little gooey. Now start adding the coarse nut mixture, little by little, until the gooey date paste absorbs most of it( mixture will look semi-dry). All through this process, the flame should be on low. Once your date and nut mixture is combined, remove from flame and cool for 5 minutes. We want a little warmth for binding, so don't let it go too cold. Grease your palms with a little ghee and start making ladoo of them. Repeat for the entire mixture. The yummy and tasty Dry fruit ladoo are ready. Store them in an airtight jar once they are completely cool. 


STEPWISE RECIPE FOLLOWS:

1. Assemble all ingredients. Put a pan over the flame and add 1 tsp ghee to it. Now roast all the nuts separately to a nice golden colour. Take care not to burn them, as the burnt smell will reduce the taste and flavour of the ladoo.


2. Transfer them to a plate and cool them. On cooling using the "pulse mode" of your blender, blend them to a coarse mixture. 


3. Now to the same pan add another teaspoon ghee and put in the deseeded dates. Keep stirring and mashing them with the back of a spatula. As it turns warm, the dates start getting a little gooey. 


4. Now start adding the coarse nut mixture, little by little, until the gooey date paste absorbs most of it( mixture will look semi-dry). All through this process, the flame should be on low. Once your date and nut mixture is combined, remove from flame and cool for 5 minutes. 


5. Grease your palms with a little ghee and start making ladoo of them. Repeat for the entire mixture. The yummy and tasty Dry fruit ladoo are ready. 


NOTES:

1. The amount of nuts required depends upon the juiciness of the dates. The juicier the dates the more nuts will be required.

2. Good quality nuts and dates always give the best taste.

3. During Diwali we all receive lots of dry fruits and nuts and have to stuff everything into our refrigerators to avoid insects accessing them. These ladoos are a great idea to use up all those dry fruits in the best possible way.

4. After adding the required amount of coarse nuts to the dates, if it is still gooey then add more nut mixture after roasting and coarsely grinding them.

5. After adding the nut mixture to dates if you find it is too dry and are not able to make ladoos, them warm up more dates and add to them.


 If you tried this recipe and liked it please comment below. I would love to hear from you. If you have a query about the recipe email us and ill respond as soon as I can.

If you would like to receive our recipes in your mail please leave your mail id at the homepage. Every time Rajjo's Kitchenn has a new post we will mail the recipe to you.

Thursday 5 November 2020

RED POHA LADOO( RED AVAL LADOO)

 Poha is my go-to food many times during the week. Sometimes as breakfast and sometimes as dinner and, sometimes as a quick dessert or as a simple prasad. I like the fact that this humble ingredient is so versatile allowing us to create so many dishes from it. The Poha can even go into the Idli batter to make the Idlis soft and into the Dosa batter to make super crisp Dosas.

Diwali for me is about feasting consciously. There are loads of sweets that can be made with less ghee like these Poha Ladoos. They need less sugar too, which makes them an ideal recipe for Diwali times. In this recipe, I have used the Red Poha that is available at all stores these days. These Poha/rice flakes are made from Red rice. Red rice does not undergo as much processing as regular rice.  Therefore it is rich in fiber, Vitamin B, and minerals like Zinc, Iron, and Magnesium, making it a healthier choice. This Ladoo is easy to make and gets done within no time.

If you make these Ladoos don't forget to tag us.

While you are here check out my other Poha recipes like -SweetPoha, Dahi Pohe(Mor Aval), Aval Kesari...

Here is the recipe of Red Poha Ladoo for you- 

  PREP TIME: 15                                          COOK TIME: 15 MINS
 TOTAL TIME:30Mins                                  COURSE:  SWEETS
 CUISINE:  INDIAN                                      SERVINGS: 12 pcs
 AUTHOR: Rajni Ram


    Ingredients:

    Red Poha/Aval 2cups ( any measure of two cups is fine)

    Sugar 3/4 to 1 cup powdered (depending on your preference)

    Ghee 4 tbsp

    Cashewnuts 6 to 7 broken to bits

    Raisins(Kishmish) 6 to 7

    Cardamom/Elaichi  5 to 6

    Nutmeg/Jaiphal 1 tiny bit


Directions: 

In a Kadai take 1 Tbsp ghee and heat. Add the Red Poha to the ghee and start roasting it, until they become crisp. Keep stirring continuously as we don't want the Poha to turn brown, but to get crisp evenly. Once crisp, transfer to a plate and cool for a few minutes. Now in the blender jar take the sugar and add the cardamom and nutmeg to it and grind them to a fine powder. Transfer the sugar to a plate or vessel and in the same blender jar, grind the roasted Poha to a fine powder. Now transfer the Poha powder to a wide vessel, and add the powdered sugar to it. In a small Kadai take 1/2 tbsp ghee and fry the cashews and raisins until they turn a nice brown. Drop the fried nuts and raisins into the Poha and Sugar mixture. Now in the small Kadai warm(not heat) 3 tbsp ghee. The ghee should have melted and be warm( if your fingers can bear the heat, that is the right temperature for the ghee, be careful while testing, don't scald your fingers). Now mix the Poha sugar and dry nuts mixture well with your fingers, so that the sugar is mixed evenly. Create a well in the center of the Poha flour and pour the ghee into it, rub the ghee nicely into the flour, and start making Ladoo(balls) immediately. The ghee should be warm while making the Ladoo as it gives the right binding. If the ghee is not warm and is at room temperature, the ladoos will not form. Form the ladoos with the entire mixture, you can customize the size to your preference. The tasty and healthy Red Poha Ladoos are ready to gobble. Enjoy. Happy feasting!


STEPWISE RECIPE FOLLOWS:

1. Assemble all ingredients.


2. In a Kadai take 1 Tbsp ghee and heat. Add the Red Poha to the ghee and start roasting it, until they become crisp. Keep stirring continuously, taking care not to brown the Pohas or burn them. Transfer to a plate and cool for a few minutes.


3. Now in the blender jar take the sugar and add the cardamom and nutmeg to it and grind them to a fine powder. Transfer the sugar to a plate or vessel and in the same blender jar, grind the roasted Poha to a fine powder.


4. Now transfer the Poha powder to a wide vessel, and add the powdered sugar to it. In a small Kadai take 1/2 tbsp ghee and fry the cashews and raisins until they turn a nice brown. Drop the fried nuts and raisins into the Poha and Sugar mixture. 


5. Now in the small Kadai warm(not heat) 3 tbsp ghee. The ghee should have melted and be warm, now mix the Poha sugar and dry nuts mixture well with your fingers so that the sugar is mixed evenly. Create a well in the center of the Poha flour and pour the ghee into it, rub the ghee nicely into the flour, and start making Ladoo(balls) immediately. 


6. Form the ladoos with the entire mixture, you can customize the size to your preference. The tasty and healthy Red Poha Ladoos are ready to gobble. Enjoy. 


NOTES:

1. I ground my Poha to a step less than superfine, as then you get a little crunchy feel. One can customize between superfine or a stage before, but take care not grind it coarse, as them forming the ladoos will be difficult.

2. The temperature of the ghee is very important. If it is very hot, you can form the ladoos immediately, so wait for it to turn warm. However, if the ghee is not warm enough, then the ladoos will not form. Add a little warm ghee and form the balls.

3. If you have poured too much ghee, the ladoos will slump and not hold shape. Try to stick to the measure given. However, if you do end up adding too much ghee, roast more poha, grind it to powder, and add it, to form ladoos. 

4. The Poha does not hold much sugar, so stick to the measure given.


  If you tried this recipe and liked it please comment below. I would love to hear from you. If you have a query about the recipe email us and ill respond as soon as I can.

If you would like to receive our recipes in your mail please leave your mail id at the homepage. Every time Rajjo's Kitchen has a new post we will mail the recipe to you.


TOFU AND STIR FRIED VEGETABLES IN HOT SCHEZWAN SAUCE

  Any Tofu lovers? I agree its an acquired taste,but going by the health benefits it has to offer, I try including it in my diet now and the...