Vegetarian cooking blog

Showing posts with label dry snacks. Show all posts

Monday 10 May 2021

WHOLE WHEAT BLUEBERRY MUFFINS

If you haven't realised until now, I am a huge berry fan. Whatever the berry, I will think of a dessert to make. The berry recipes in this blog are proof for it. Berries not only provide our body with antioxidants, but also with micro nutrients, which are essential for a healthy body. so whenever you find berries include them in smoothies, pan cakes, lassi, compote, Jams and more...

This time they had to be muffins as they can be picked off a box and popped in when hungry😀. They stay good in the refrigerator for upto a month. They are easy to pack up on a picnic, road trip and even for hostelers. These are the moistest cup cakes you will find and using good quality berries really enhances the flavour of the cake. I have used dried Blue berries, fresh ones can be used too. 

As I say in all my cake recipes, this too is a single bowl recipe, where you mix dry and wet ingredients in one bowl, line up your muffin tins and bake away.

While you are here check out my other very berry desserts like Blueberry Cheesecake, Berry Smoothie Ice cream, Strawberry and Lemon loaf, Easy 2 way muffins, and more...


Here is the recipe for Whole Wheat Blueberry muffins for you-


     PREP TIME: 10 Mins                                         COOK TIME: 35 Mins
     TOTAL TIME: 45 Mins                                        COURSE:  DESSERT
     CUISINE:  WORLD FOOD                                 SERVINGS: 6
     AUTHOR: Rajni Ram


    Ingredients:

    Whole wheat flour/ Multigrain flour 2.25 cups

    Sugar 1 cup 

    Baking powder 3 tsp

    Baking soda 1 tsp

    Salt 2 pinches

    Eggs 2

    Butter 60 gms

    Oil 4 tbsp

    Buttermilk 1 cup

    Vanilla essence 2 to 3 drops

    Blueberries 100 gms


Directions: Firstly put the oven to preheat at 200 C. Now in a bowl mix all the dry ingredients- wheat flour, sugar, baking powder, baking soda and salt. In a larger bowl mix all wet ingredients- butter, eggs, oil, and vanilla essence. Do not mix in the buttermilk and blueberries now. Now slowly add the dry ingredients into the wet ingredients and stir. Stir in circular motion. The wet ingredients will absorb the flour and turn dry. Now add the buttermilk, a little at a time and stir gently. Take care not to over stir. Finally add the Blueberries and give a gentle stir. Now the batter is ready to fill into the muffin tin/cup cake moulds. Bake at 190 C for 15 minutes. Check for doneness by inserting a toothpick in the centre. If a little wet, then bake another 2 minutes. Enjoy the healthy goodness. Serve when warm.


STEPWISE RECIPE FOLLOWS:

1.  Firstly put the oven to preheat at 200 C. Now in a bowl mix all the dry ingredients- wheat flour, sugar, baking powder, baking soda and salt. 


2. In a larger bowl mix all wet ingredients- butter, eggs, oil, and vanilla essence. Do not mix in the buttermilk and blueberries now.


3. Now slowly add the dry ingredients into the wet ingredients and stir. Stir in circular motion. The wet ingredients will absorb the flour and turn dry. Now add the buttermilk, a little at a time and stir gently. Take care not to over stir.


4. Finally add the Blueberries and give a gentle stir. Now the batter is ready to fill into the muffin tin/cup cake mould. Bake at 190 C for 15 minutes. Check for doneness by inserting a toothpick in the centre. If a little wet, then bake another 2 minutes. Enjoy the healthy goodness. Serve when warm.


NOTES:

1. These cup cakes can be made with any berry.

2. If fresh ones are not available use the dry ones like I have here. If using frozen, then use them directly from the freezer without thawing.

3. You must have noticed that in this recipe I have used both butter and oil. This is to get the super moist texture. If you do not wish to use butter, then use 1/2 cup oil.

4. Since oven settings are different for different oven, start checking for doneness from 13 minutes onward.

5. Whole wheat flour can be substituted with multigrain flour or refined flour if you prefer.


Friday 7 May 2021

BROCCOLI AND ZUCCHINI FRITTERS WITH HUNG CURD DIP

 A combination of Zucchini and Broccoli is a match made in heaven. These two have been used in many dishes from Pastas, Pizzas, Salads and fritters.

The current recipe is of fritters, which are very melt in the mouth and bursting with flavours. Usually fritters have egg added to the batter, but these are eggless fritters. They need not be deep fried at all, but just grilled on the Tava, which makes them healthy too. I had some leftover rice and added it to the batter to make them chunky and give a slightly crisp exterior, whereas the insides are soft.

The hung curd dip goes extremely well with these fritters and is so simple to put together. The fritters and dip are a combination that can be served as snack or starters.

While you are here check out other snack recipes on the blog like- Easy Corn Fritters, Medu Vada, Milagu Vadai/Pepper Vadai, Patra, Easy 2 way Muffins, Mirchi Bajji, and more...


Here is the recipe of Broccoli and Zucchini fritters with Hung Curd Dip-

PREP TIME: 10 Mins                                      COOK TIME: 15 Mins
 TOTAL TIME:30 Mins                                    COURSE:  SNACK
 CUISINE:WORLD                                         SERVINGS: 12 NOS   
 AUTHOR: RAJNI RAM                                      


    Ingredients for Fritters:

    Broccoli 1 small head or half of big one
    Zucchini 1 medium size (grated)
    Leftover rice 1/2 cup
    Parmesan cheese grated 2 tbsp  (optional)
    Chick pea flour/besan 1/2 cup
    Green chillies 2 chopped finely
    Red chilli powder 1 tsp
    Salt as required 
    Coriander powder 1 tsp
    Fennel powder 1 tsp
    cumin powder 1 tsp
    Turmeric powder 1/2 tsp

    Ingredients for Hung Curd Dip:

    Curd 2 cups
    Cucumber 1/2 of small finely chopped
    Onion 1/2 of small one
    Red bell pepper a small piece chopped finely
    Fresh coriander leaves chopped finely
    Salt as required
    Pepper powder 2 pinches

    Directions for Hung Curd Dip:
Take a clean cotton cloth/ Muslin cloth and tie up the curd in it with a vessel at the bottom to collect the water. Leave it undisturbed for an hour or so.  Alternately, put the curd in a double sieve and leave it for an hour, for the excess water to drain away. After an hour, put the thick curd into a bowl and add all the ingredients mentioned under "ingredients for curd dip", and give it a gentle mix. Put it in the fridge until ready to serve.

    Directions for the Fritters:

Put the chopped Broccoli in a bowl, pour hot water over it and keep it covered for 15 minutes. After 15 minutes, drain water and cool the broccoli. Now put the Broccoli in the blender jar and give it a single pulse, such that it becomes a mince. See picture. Now take the left over rice in a bowl and mash it well. To the rice, add the minced broccoli, grated Zucchini, chopped green chilli, salt, red chilli powder, coriander powder, fennel powder, cumin powder, and mix well. Now add Parmesan cheese(optional) and the Besan/chickpea flour and mix well. For the best result, leave this mixture in the fridge for 30 minutes. After 30 minutes, start shaping the mixture into tikkis/pattice and grill them on a girdle/tawa. The healthy fritters are ready to serve.


    STEPWISE RECIPE FOLLOWS:

1. Put the chopped Broccoli in a bowl, pour hot water over it and keep it covered for 15 minutes. After 15 minutes, drain water and cool the broccoli. Now put the Broccoli in the blender jar and give it a single pulse, such that it becomes a mince. See picture.


2. Now take the left over rice in a bowl and mash it well. To the rice, add the minced broccoli, grated Zucchini, chopped green chilli, salt, red chilli powder, coriander powder, fennel powder, cumin powder, and mix well.


3. Now add Parmesan cheese(optional) and the Besan/chickpea flour and mix well. For the best result, leave this mixture in the fridge for 30 minutes. After 30 minutes, start shaping the mixture into tikkis/pattice and grill them on a girdle/tawa. The healthy fritters are ready to serve.


    NOTES:
1. Usually fritters make use of egg. In this recipe I have swapped the egg with chickpea flour/Besan. Therefore, I recommend putting the batter into the fridge for 30 minutes, so that the fritters can be shaped easily.
2. Using Parmesan Cheese(or any cheese) is optional, but I recommend it for that extra punch.
3. The same mixture can be done with egg also. In that case, do not use the chickpea flour and use just 1 egg instead.
4. I have not tried this recipe with flax egg, so I cannot recommend it right now.
5. There is no stepwise recipe for the hung curd dip, as it is pretty simple.


If you tried this recipe and liked it please comment below. I would love to hear from you. If you have a query about the recipe email us and ill respond as soon as I can.

If you would like to receive our recipes on your mail please leave your mail id at the homepage. Every time Rajjo's Kitchen has a new post we will mail the recipe to you.


Friday 23 April 2021

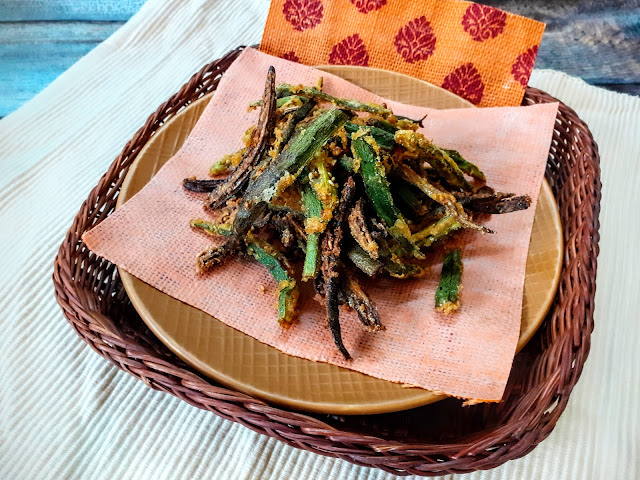
KURKURI BHINDI/KARARI BHINDI/OKRA FRITTERS

 Kurkuri Bhindi Or Karari Bhindi is an accompaniment served in most North Indian Thali's and Buffet. It adds some crunch to the food, can be a starter or even a side dish. A south Indian version of this is available in most south Indian sweet and savory shops. The difference between the North and South Indian recipes is mainly the batter. The south Indian version uses far too much batter, whereas the North Indian version just about coats it. So mine is a fusion of both. While I have opted for less flour and North Indian Masala I have added Till/Sesame from the south Indian version, which gives a extra crunch and flavour. And why I like this version of bhindi/okra is that though it takes a long time to cut the Ladysfinger this way, this can stay fresh for a few days. Before serving just microwave it for 30 seconds and it become crunchy again. So people on the move and ones who love a hot meal after coming back from work, just invest sometime on a week day to make these crunchy fritters, and on a work day just make your self some Dal and Rice, for which the Kurkuri Bhindi is the perfect side dish. As I said, just microwave it for 30 seconds.


Without much detailing getting in to the recipe directly. While you are here check out my other Subji and curry recipes like Paneer KhurchanSouth Indian KurmaMethi wale BainganRoasted Eggplant 2 waysPaneer Mava Curry, Corn Palak Subji, Chakki Ki Shak, Rasakalan and more...

Here's the recipe for Kurkuri Bhindi--


  PREP TIME: 45 Mins                                COOK TIME: 30 Mins
 TOTAL TIME: 30 Mins                                COURSE:  MAIN/ SNACK
 CUISINE: NORTH INDIAN                         SERVINGS: 6
 AUTHOR: Rajni Ram


    Ingredients:

    Bhindi/Okra 400 gm slit lengthwise ( refer picture)

    Rice flour 1/2 cup

    Besan/ Chickpea flour 1/2 cup

    Salt as required

    Turmeric powder 1/2 tsp

    Red Chilli Powder regular 1 tsp

    Red chilli powder Kashmiri 1 tsp

    Coriander powder 1 tsp

    Fennel Powder 1 tsp

    Chaat masala 1/2 tsp

    Sesame seeds 1 tsp

    Lemon juice 2 tbsp

    Oil for the batter 1 tbsp

    Oil for deep frying


    Directions:

Take the split Okra/Bhindi/Ladysfinger in a large bowl and add all the dry spice powders. Add the lemon juice and mix well with your fingers to spread the masalas evenly. Allow to marinate for 30 minutes. Now add both the flours and mix well. Drizzle 1 tbsp oil and mix again nicely with fingers. Heat oil in a Kadai. When a little batter dropped in the oil sizzles immediately, the oil is ready for frying. Take a few pieces of Okra at a time and drop them gently into the oil. Fry until the Bhindi turn light brown. The may seem limp, but as they cool they firm up and become crunchy. The Kurkuri Bhindi is ready to serve with your favourite comfort food, or just as a snack.


    STEPWISE RECIPE FOLLOWS:

 1. Take the split Okra/Bhindi/Ladysfinger in a large bowl and add all the dry spice powders.


2. Add the lemon juice and mix well with your fingers to spread the masalas evenly. Allow to marinate for 30 minutes.


3. Now add both the flours and mix well. Add Sesame seeds. Drizzle 1 tbsp oil and mix again nicely with fingers.


4. Heat oil in a Kadai. When a little batter dropped in the oil sizzles immediately, the oil is ready for frying. Take a few pieces of Okra at a time and drop them gently into the oil. Fry until the Bhindi turn light brown. The may seem limp, but as they cool they firm up and become crunchy. The Kurkuri Bhindi is ready to serve with your favourite comfort food, or just as a snack.


    NOTES:

1. Some recipes recommend removing the seeds from the Bhindi. I have skipped it. If the seeds are tender, they can be retained. Few that may remain in the oil after frying can be filtered and removed.

2. While selecting the Okra's choose tiny to middle sized ones and not the huge ones.

3. Always check the heat of the oil by gently dropping some batter into it. When a little batter dropped in the oil sizzles immediately, the oil is ready for frying.


If you tried this recipe and liked it please comment below. I would love to hear from you. If you have a query about the recipe email us and ill respond as soon as I can.

If you would like to receive our recipes on your mail please leave your mail id at the homepage. Every time Rajjo's Kitchen has a new post we will mail the recipe to you.


Tuesday 23 March 2021

PEPPER VADA/MILAGU VADAI

 Pepper Vada or Milagu Vadai as it is known, is a drier and crisper version of the regular Vada. Simple ingredients and a hack make this a foolproof recipe. Read ahead. This is similar to the Tirupathi style Milagu Vadai.

I tried this recipe the first time during Navarathri this year. It was an instant hit at home as well as my social media pages. A few of you even asked for the recipe and I could not post the recipe immediately as I had not clicked stepwise pictures. So, this time I clicked all the necessary pictures to blog it.

As I always say, some recipes don’t need a huge introduction. The recipe does all the talking. While you are here check out my other savoury recipes like Dhaniya wale Namak Pare, Ratlami Sev, Samosa pie, Masala Wheat flour Papdis, Thattai, Kothimbir Vadi, Moongdal Khastha kachori and more ...

Here is the recipe for Pepper Vada/ Milagu Vadai

PREP TIME: 15 Mins (SOAK 4 HRS)           COOK TIME: 15 Mins
 TOTAL TIME:30 Mins                                   COURSE:  SNACK
 CUISINE:SOUTH INDIAN                           SERVINGS: 25 NOS   
 AUTHOR: RAJNI RAM                                      


Ingredients:

    Urad Dal/ Black lentils( with skin) 1 cup soaked for 4 to 5 hours.

     Salt as required 

     Coarse Pepper powder 2 tsp ( add more if you like it spicy)

     Rice flour 2 tbsp

     Hot oil 2tbsp

     Oil for deep frying


Directions: 

Soak the Urad dal( use with skin for this colour and texture) for 4 to 5 hours. Drain water completely after it soaks and grind it to a coarse batter without adding( or by adding minimum) water. I have ground it without any water and later sprinkled a little over the coarse batter for the right consistency. Now to the coarse batter( check picture for consistency), add salt, coarse pepper powder, and rice flour and, mix well. If you feel the mixture is too dry, sprinkle a little more water. Mix using your fingers to combine well. Now heat the oil kept for deep frying, and when the oil is sizzling hot with a ladle pour 2tbsp into the batter and using a spoon or spatula mix the oil into the batter( don’t use your fingers now as the oil is too hot). Now pinch small portions from the mixture and make balls of it. Slit a zip pouch into two or use a Banana leaf to  flatten the balls. Flatten the ball using the back of a cup or you palm. Pat them quite thin to get them crisp. Make a hole in the centre for even cooking. Now gently drop them into hot oil and fry at medium high until all the bubbles in the oil subside. Repeat the process for the entire batter. These Vadas stay crisp up to a month when stored in an airtight container. They make for a good dry snack for school lunch of kids or adults as they are protein packed. 


STEPWISE RECIPE FOLLOWS:

1. Soak the Urad dal( use with skin for this colour and texture) for 4 to 5 hours. Drain water completely after it soaks and grind it to a coarse batter without adding( or by adding minimum) water. I have ground it without any water and later sprinkled a little over the coarse batter for the right consistency.


2. Now to the coarse batter( check picture for consistency), add salt, coarse pepper powder, and rice flour and, mix well. If you feel the mixture is too dry, sprinkle a little more water. Mix using your fingers to combine well.


3. Now heat the oil kept for deep frying, and when the oil is sizzling hot with a ladle pour 2 tbsp into the batter and using a spoon or spatula mix the oil into the batter( don’t use your fingers now as the oil is too hot). 


4. Now pinch small portions from the mixture and make balls of it. Slit a zip pouch into two or use a Banana leaf to  flatten the balls. Flatten the ball using the back of a cup or you palm. Pat them quite thin to get them crisp. Make a hole in the centre for even cooking.  Now gently drop them into hot oil and fry at medium high until all the bubbles in the oil subside. Repeat the process for the entire batter.


NOTES:

1. This Vada can be made with white Urad dal too ( the de skinned one) . The texture and taste remain the same. Just the colour varies.

2. If using white  Urad dal, just 1 hour of soaking will do. The black lentils take time to soak and so need to be soaked longer.

3. The batter as well as the pepper should be ground coarse for maximum taste.

4. In this Vada Curry leaves are usually not added to the batter as its for long keeping, and any moisture in the curry leaves can affect its shelf life.


If you tried this recipe and liked it please comment below. I would love to hear from you. If you have a query about the recipe email us and ill respond as soon as I can.

If you would like to receive our recipes in your mail please leave your mail id at the homepage. Every time Rajjo's Kitchen has a new post we will mail the recipe to you.


Saturday 6 February 2021

BAJRA AND ALMOND FLOUR COOKIES (MILLET COOKIES)

I surfed the internet to find the easiest Cookie recipe with Millet's (that are trending currently), using ingredients that are easily available in our pantries, I scored and scored but couldn't find anything that interested me. By now those who are following the blog and my social media handles know that when it comes to baking, I choose the most easiest recipes, which can be mixed in a single bowl and stashed in the oven to bake. Zero mess.  

I love baking but I hate the mess that comes with it, so the trials in my kitchen are always on for a fuss free recipe. Though I did not find an ideal cookie recipe with Millet's that would satisfy the hundreds of queries in my mind(millet's are not the easiest to work with), I went adding ingredients purely on intuition to arrive at this recipe. As promised, its the easiest and egg free.

While you are here do checkout other bakes here on the blog like Blueberry Cheesecake, Apple Crumble, Easy 2 way Muffins, Upside down Orange vanilla cake, Oatmeal cookies, Apple tea cake and more...

Here is the simple recipe of the Bajra Almond Flour Cookies for you-


      PREP TIME: 15(+ 30 min resting)        COOK TIME: 15 Mins
     TOTAL TIME:60 MINS                          COURSE:  DESSERT
     CUISINE:  WORLD                               SERVINGS: 12 PIECES
     AUTHOR: Rajni Ram


    Ingredients:

    Bajra flour(Pearl Millet flour) 1.5 cups
    Almond flour 1/4 cup
    Baking powder 1/2 tsp
    Baking soda 1/4 tsp
    Desiccated Coconut 1/4 cup
    Brown sugar 1/2 cup
    Butter 100 gm softened
    Salt 2 pinches
    Black Currants a hand ful
    Vanilla essence 1/2 tsp

    Directions:
    In a bowl add softened butter(keep out of the refrigerator for 1 hr). To this add Brown         sugar and combine until smooth and creamy. In another bowl sieve the Bajra flour(Pearl Millet), baking soda and baking powder. To this add the Almond flour,Vanilla essence, desiccated coconut, salt and the Black Currants and mix well. Add this flour mix to the creamed butter and sugar mixture. Use your hand to combine them well to form a soft dough. Check picture for consistency. You will not need any form of liquid, just the said amount of butter will do. Now keep the kneaded dough in the refrigerator for 30 mins. Pre heat the oven at 180 C for 10 minutes. While the oven is on preheat, get the cookie dough out of the fridge and divide them into balls. Flatten them on your palms and place them on the baking tray lined with parchment or butter paper. Space them a little apart. I got 12 cookies from this dough, so baked 6 in one round and another 6 in the other. Bake at 180 C for 15 mins. Oven temperature are different for different ovens so keep a check from 12 mins. Remove the cookies carefully from the baking tray to a plate. The cookies will be soft when just out of the oven. Don't worry they will turn crunchy on cooling completely. Enjoy the cookies with your favorite beverage. Cheers !!!

    STEPWISE RECIPE FOLLOWS:
1.  In a bowl add softened butter(keep out of the refrigerator for 1 hr). To this add Brown         sugar and combine until smooth and creamy. 


2. In another bowl sieve the Bajra flour(Pearl Millet), baking soda and baking powder. To this add the Almond flour,Vanilla essence, desiccated coconut, salt and the Black Currants and mix well.


3. Add this flour mix, little by little to the creamed butter and sugar mixture. Use your hand to combine them well to form a soft dough. Check picture for consistency. You will not need any form of liquid, just the said amount of butter will do.


4. Now keep the kneaded dough in the refrigerator for 30 mins. Preheat the oven at 180 C for 10 minutes. While the oven is on preheat, get the cookie dough out of the fridge and divide them into balls. Flatten them on your palms and place them on the baking tray lined with parchment or butter paper(picture not taken). Space them a little apart. I got 12 cookies from this dough, so baked 6 in one round and another 6 in the other. Bake at 180 C for 15 mins. 


NOTES:

1. Since I made this recipe completely on intuition cannot say now if brown sugar can be substituted with white sugar or jaggery. When I try this again with white sugar or jaggery I shall update the recipe here.
2. I have used store bough Almond flour, however almond meal/flour can be made at home by blanching almonds, removing the skin, drying them and then powdering them. 
3. Oven temperature are different for different ovens so keep a check from 12 mins. 
4. The cookies will be soft when just out of the oven. Don't worry they will turn crunchy on cooling completely.
5. Also at this point i'm not sure if any other millet flour can be used for this recipe. I shall soon try it out and update here.


 If you tried this recipe and liked it please comment below. I would love to hear from you. If you have a query about the recipe email us and ill respond as soon as I can.

If you would like to receive our recipes on your mail please leave your mail id at the homepage. Every time Rajjo's Kitchen has a new post we will mail the recipe to you.

Friday 18 December 2020

PATRA/ PATRODE WITH BOK CHOY LEAVES ( ALU WADI)

 Patra or Patrode is a simple and healthy snack from western India. It is also called Alu Wadi in some regions. This dish is popular in karnataka too. Different regions, different names same dish. 

In this healthy snack usually the Arbi or Colacassia leaves are used. Spinach leaves can also be used, but they have to be big and thick. Since that variety is not available all the time I decided to give the dish a twist by using a different leaf altogether.  Bok Choy, or Pok choy  is a type of chinese cabbage.  The leaves are thick and nice so I decided to give the Patra a try with these leaves. It was a huge hit in my house and everyone came back for more. 

Since I was making this the first time, I made only a small quantity and with my folks asking for more have promised to make some again very soon. So, what I'm driving at is that if you are one of those people who loves this dish and wait for the Arbi leaves to arrive in the market, well don't wait. Grab some Pok Choy and try it out. The Pok Choy is closer in taste to Spinach with which Patra are made, if not for Arbi/Colaccssia leaves. 

This is a steamed snack just like the Kothimbir Vadi, it can be fried too of you prefer. I have steamed and pan roasted them.

While you are here check out my other snack recipes like Mirchi Bajji, Semolina Cheese balls, Samosa Pie, Potato Cheddar Bake, Dhania wale Namak Parey and more...


Here is the recipe ot Patra with Bok Choy Leaf-


        PREP TIME: 15MINS                              COOK TIME: 30MINS

       TOTAL TIME: 45 MINS                             CUISINE: INDIAN

        COURSE :SNACK                                   SERVINGS: 5

        AUTHOR: RAJNI RAM


Bok choy/ Pok choy 2 heads ( clip leaves carefully, wash and dab dry with towel)

Besan/ Chickpea flour 2 cups

Salt as required

Red chilli powder 1 tsp

Coriander powder 1 tsp

Fennel powder 1 tsp

Turmeric powder 1/2 tsp

Sugar 1/2 tsp

Tamarind pulp 2 tsp diluted in 1/2 cup water or make pulp with Gooseberry size tamarind ball.

Green chilli 1 finely chopped

Ginger 1/2 inch piece finely chopped

Sesame seeds a few 

Kopra / desiccated coconut 2 tsp

Oil 3 tsp for tempering

Directions: 

Carefully cut the leaves from the Bok choy, wash them in water and pat dry. Keep aside. Now in a bowl take the besan and add all the masala powders and salt. Mix well with fingers and now start adding the tamarind water little by little to make a thick paste/ batter. If using tamarind paste add paste along with masalas, mix and then use water to make the paste. The batter has to be smooth and thick that it sticks to the leaves and does not slide off. Now take the leaves, bigger ones. Apply the paste to 3 leaves, and arrange 3 of them over lapping the other as shown in the picture. This is the first layer. On this another 3 paste applied leaves have to be arranged. If the leaves are in different sizes, keep bigger ones below and smaller ones on top. Like this for 3 layers. Now start rolling the leaves from left to right, and as you role more of the paste has to be applied each time you roll the leaf. After rolling completely, apply the besan paste all over the rolled leaf. Place this in a greased cooker vessel.  Repeat for remaining leaves. I made two such rolls.  Place the second roll also in the cooker vessel and keep the vessel in the cooker to steam. Steam for 20 to 25 minutes. Put off the cooker and wait 2 minutes. Now open and cool the steams rolls completely. Once cooled cut them into 1/2 inch thick circles and keep aside. Take oil in a Tava or Pan and heat. Add mustard seeds, Jeera, asafoetida, green chillies, sesame seeds and ginger. When the mustard pops arrange the cut circles on the tava and roast on one side. When it turns a golden brown, flip and roast the other side. Sprinkle some Kopra/ desiccated coconut and remove the Parta off the Tava. Enjoy with some green chutney and chai. Bon Appetit!!!


STEPWISE RECIPE FOLLOWS:


1.Carefully cut the leaves from the Bok choy, wash them in water and pat dry. Keep aside.


2. Now in a bowl take the besan and add all the masala powders and salt. Mix well with fingers and now start adding the tamarind water little by little to make a thick paste/ batter. The batter has to be thick and smooth.


3. Apply the paste to 3 leaves, and arrange 3 of them over lapping the other as shown in the picture. This is the first layer. On this another 3 paste applied leaves have to be arranged. Make 3 such layers.


4. Now start rolling the leaves from left to right, and as you role more of the paste has to be applied each time you roll the leaf. After rolling completely, apply the besan paste all over the rolled leaf. Place this in a greased cooker vessel.  Repeat the process and put both rolls in cooker vessel.


5. Keep the vessel in the cooker to steam. Steam for 20 to 25 minutes. Put off the cooker and wait 2 minutes. Now open and cool the steams rolls completely. Once cooled cut them into 1/2 inch thick circles and keep aside. 


6. Take oil in a Tava or Pan and heat. Add mustard seeds, Jeera, asafoetida, green chillies, sesame seeds and ginger. When the mustard pops arrange the cut circles on the tava and roast on one side. When it turns a golden brown, flip and roast the other side. Sprinkle some Kopra/ desiccated coconut and remove the Parta off the Tava. Enjoy.


NOTES:

1. Select leaves which are fresh and big.

2. At the base of the leaf if the stem is hard, make a V shape cut to remove the hard veins.

3. Ensure the batter is thick like a paste or else it won't stick to the leaf.  Incase the batter turns runny add more besan and adjust spice and continue with the recipe. 

4. While toasting on the Tava take care not to burn them or the taste will change.


Thursday 12 November 2020

DHANIYA WALE NAMAK PARE( NAMAK PARE)

Namak Para's are a simple dry snack made from refined flour or whole wheat flour. They make for a good tea time snack too. Here the flour is combined with salt and spices to form a stiff dough. The dough is then rolled out and cut into diamonds and deep-fried in oil. This is an easy savory recipe to make around festivals like Diwali or Janmashtami where the tradition calls for making some flour-based snacks. One can just make it as a regular tea time snack too.

Yesterday when I entered the kitchen, the idea was to make the regular Namak Para.  As I went to the refrigerator to fetch some flour(oh yes my fridge is the storehouse of my flours), my eyes fell on a bunch of fresh coriander leaves, and the idea of adding them to my Namak Para struck me. Therefore the recipe of this Dhaniya wale Namak Pare. Which means Coriander flavoured Namak Paras.

In this recipe, I have used a mixture of Multigrain flour(storebought) and Refined flour. 

While you are here please check out my other snack recipes like Semolina Cheese balls, Thattai/Nipattu, Ratlami Sev, Masala Wheatflour Papdis, Moong Dal Kachori, and more...

Here is the recipe of Dhaniya wale Namak Pare-

 PREP TIME: 15                                          COOK TIME: 30 MINS
 TOTAL TIME:45Mins                                  COURSE:  SNACK
 CUISINE:  INDIAN                                      SERVINGS: 4 CUPS
 AUTHOR: Rajni Ram


    Ingredients:
    Refined flour/ Maida 1 cup
    Multigrain flour or Whole wheat flour 1 cup
    Semolina/Suji(fine) 4 bsp
    Carrom seeds 1 tsp
    Salt as required
    Cumin seeds/Jeera 1 tsp
    Fresh coriander leaves 1/2 bunch (washed and chopped)
    Green chili 1 chopped
    Ghee 11/4 tbsp ghee
    Oil for deep frying

    Directions:
 In the blender jar put the chopped coriander leaves, green chilli, and cumin seeds and blend to a smooth paste using as little water as possible. Now in a mixing bowl take both the flours, semolina and add salt, carrom seeds, and ghee. Now start rubbing the ghee into the flour. Once nicely mixed, using a spoon add the coriander paste to the flours little by little and start combining. Use as much paste as required for forming a stiff dough(a puri kind of dough). In case all the paste is used up and the flour is still dry then sprinkle little water and combine to form the dough. Let the dough rest for 15 minutes. Now work the dough again for a minute and divide it into 4 parts(ball it up). Now take one ball smear it with little oil and roll it out like a chapati. Keep the thickness medium and don't roll it out too thin. Using a knife cut to form diamonds or squares. Heat oil in a Kadai for deep frying. The right temperature is when to put a tiny bit of dough, it should sizzle immediately. Drop in the diamonds/squares gently into the oil, and fry on low flame until all the bubbles subside and the Namak Para turns a golden brown. It is difficult to retain the green color of the coriander as the flour has to cook through thoroughly, but the flavour and aroma of the coriander are retained and this is a flavour max recipe. The Coriander flavoured Nmak Para is ready.

STEPWISE RECIPE FOLLOWS:
1. In the blender jar put the chopped coriander leaves, green chilli, and cumin seeds and blend to a smooth paste using as little water as possible.


2. Now in a mixing bowl take both the flours, semolina and add salt, carrom seeds, and ghee. Now start rubbing the ghee into the flour.


3. Once nicely mixed, using a spoon add the coriander paste to the flours little by little and start combining. Use as much paste as required for forming a stiff dough(a puri kind of dough). Let the dough rest for 15 mins.


4. Now work the dough again for a minute and divide it into 4 parts(ball it up). Now take one ball smear it with little oil and roll it out like a chapati.


5. Keep the thickness medium and don't roll it out too thin. Using a knife cut to form diamonds or squares. Heat oil in a Kadai for deep frying. 


6. The right temperature is when to put a tiny bit of dough, it should sizzle immediately. Drop in the diamonds/squares gently into the oil, and fry on low flame until all the bubbles subside and the Namak Para turns a golden brown.


NOTES:
1. Use as much coriander paste as required for forming a stiff dough(a puri kind of dough). In case all the paste is used up and the flour is still dry then sprinkle little water and combine to form the dough.
2. In case you wish to make the regular Namak Paras then instead of making the dough using the coriander paste, just use water to make the dough, the remaining ingredients and proportions will remain the same.
3. Using Mint/Pudina for this recipe may not work as the Pudina paste changes colour on blending to a paste and may change further on frying.

If you tried this recipe and liked it please comment below. I would love to hear from you. If you have a query about the recipe email us and ill respond as soon as I can.

If you would like to receive our recipes in your mail please leave your mail id at the homepage. Every time Rajjo's Kitchen has a new post we will mail the recipe to you.

TOFU AND STIR FRIED VEGETABLES IN HOT SCHEZWAN SAUCE

  Any Tofu lovers? I agree its an acquired taste,but going by the health benefits it has to offer, I try including it in my diet now and the...