Vegetarian cooking blog

Showing posts with label Subjis. Show all posts

Monday 24 May 2021

GOAN STYLE LOBIA CURRY/GOAN STYLE BLACK EYED BEAN CURRY

 Black eyed beans or Cow peas as they are called, are legumes that are available all over the globe. In India they are used in many regional cuisines. The Lobia masala is a popular dish in north India, and so is the Eriserry from Kerala cuisine that uses the legume along with Ash gourd and Yam. In Tamilnadu is it made into a Sundal(salad), or used with other vegetables to make a curry. In the Andhra cuisine It is made into a Vada (fritter), the Gujarati cuisine also has its version of the Lobia curry, called Chawli masala. That's how wide the usage of these beans is across India.

Cow Peas/ black eyed beans have a soluble fibre that helps in reducing cholesterol, it is said. These are nutrient dense legumes with the richness of Vitamins- A, B1, B2, B3, B6, C , that helps in healthy cell development. They also are rich in micro nutrients like Magnesium, zinc, iron, and copper(source net.med). These legumes also support weight loss and boost digestive health. That I guess is reason enough to include them in your diet, if you haven't already. 

Though the Lobia Sundal (salad) is a regular feature in my house, and so is the Erissery, and Lobia masala, I recently tried a Goan style Lobia curry and it turned out so good. The Goan spice combination of Coriander seeds, Cumin seeds and coconut, gave a very good dimension to the dish, and it tasted different from the regular Lobia masala. Hence documenting this recipe for you all to try. 

There is also a Lobia Pulav recipe on the blog, do check it out here. Some other interesting and healthy recipes for you to try are- Daliya Mushroom Risotto, Drumstick Rasam, Curry leaves Powder, Dry fruit ladoo, Vegetable Oats Kichdi, Rajma Masala, and more...

Here is the recipe of Goan style Lobia curry- 


PREP TIME: 10Mins+(soak time 4-5 hrs)          COOK TIME: 30 Mins
TOTAL TIME: 40Mins                                        COURSE:  MAIN 
CUISINE:  INDIAN                                             SERVINGS: 4
AUTHOR: Rajni Ram                                                                             


    Ingredients:

    Lobia/cow peas/black eyed beans/ 1 cup soak for 4-5 hrs 
    Onion 1 medium chopped fine
    Tomatoes 2 large pureed
    Coconut 2 tbsp
    Tamarind paste 1 tsp or pulp from a tiny bit of tamarind
    Green chillies 2 split
    Bay leaf 1
    Coriander seeds/dhania 2 tsp
    Cumin seeds/Jeera 1 tsp
    Dry red chillies (regular/spicy ones)1
    Kashmiri or Byadagi chillies 1
    Turmeric powder 1/2 tsp
    Ginger garlic paste 1tsp
    Red chilli powder(regular) 1 tsp
    Kashmiri red chilli powder 1 tsp
    Oil for sauteing

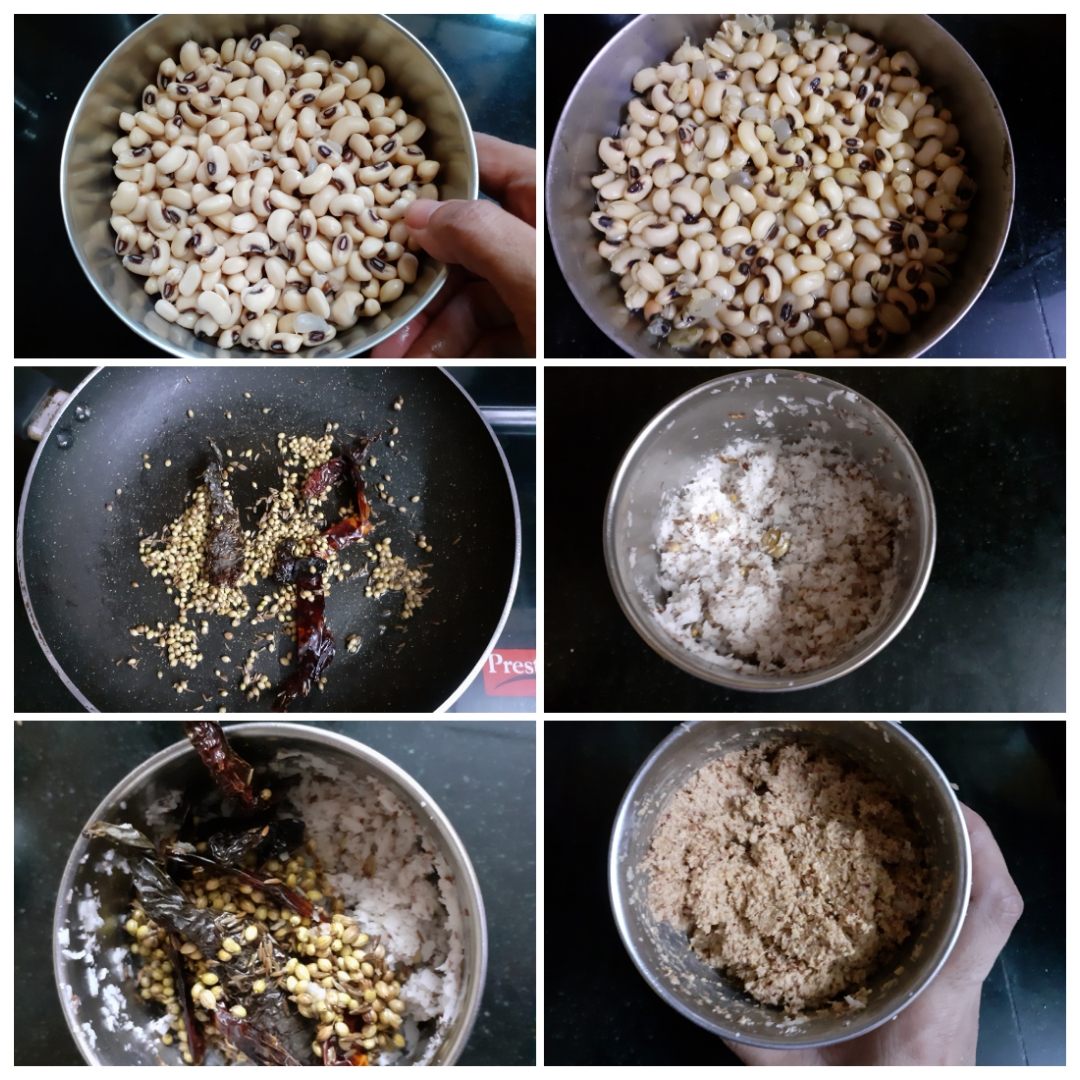
    Directions: Wash and drain the water from Lobia, add fresh water and pressure cook for whistles or until soft.  In a pan, roast the coriander seeds, cumin seeds, dry red chillies, and Kashmiri red chillies until crisp. cool. Now put them in a blender jar along with coconut and grind to a fine paste using little water. Set aside. Now in the same pan take some oil and heat. Add the Bay leaf, followed by cumin seeds, and turmeric powder. When the cumin seeds splutter, add the ginger-garlic paste, and fry. Now drop in the chopped onions and saute. When the onions turn light brown, add the split green chillies and saute another 30 secs. Now add the ground masala paste and fry nicely in the oil. When the mixture becomes dry, add the tomato paste, followed by the cooked Lobia/Black eyed beans, along with the water in which the lobia was cooked. Let the mixture simmer for 5 minutes. Now add, salt, red chilli powder, Kashmiri chilli powder, and further simmer for 10 minutes. Add water if required to adjust consistency. After 5 minutes, add the tamarind paste, and cook for just a minute and switch off the flame. Garnish with finely chopped coriander leaves and serve hot with Rotis or rice.
     

    Serving Suggestions- Roti, White rice, Pulav, Naan, Paratha, Masala bath, and more...

    STEPWISE RECIPE FOLLOWS:


1. Wash and drain the water from Lobia, add fresh water and pressure cook for whistles or until soft.  In a pan, roast the coriander seeds, cumin seeds, dry red chillies, and Kashmiri red chillies until crisp. cool. Now put them in a blender jar along with coconut and grind to a fine paste using little water. Set aside.


2. Now in the same pan take some oil and heat. Add the Bay leaf, followed by cumin seeds, and turmeric powder. When the cumin seeds splutter, add the ginger-garlic paste, and fry. Now drop in the chopped onions and saute. 


3. When the onions turn light brown, add the split green chillies and saute another 30 secs. Now add the ground masala paste and fry nicely in the oil. When the mixture becomes dry, add the tomato paste, followed by the cooked Lobia/Black eyed beans, along with the water in which the lobia was cooked. Let the mixture simmer for 5 minutes.


4. Now add, salt, red chilli powder, Kashmiri chilli powder, and further simmer for 10 minutes. Add water if required to adjust consistency. After 5 minutes, add the tamarind paste, and cook for just a minute and switch off the flame. Garnish with finely chopped coriander leaves and serve hot with Rotis or rice.


NOTES:

1. There is another variety of the Lobia which are red in colour and resemble kidney beans/Rajma. This curry can be made with those red coloured beans too.
2. The spice level of this curry is medium. Feel free to increase or decrease as per taste. 
3. Usually when i refer to "oil of sauteing" in the ingredient list, I mean the regular refined oil. When i use a specific oil like Coconut or Sesame, I always specify. 

This is how I served my Goan style Lobia curry with Roti, Cucumber Raita, and Beetroot Halwa to make it a complete meal.


If you tried this recipe and liked it please comment below. I would love to hear from you. If you have a query about the recipe email us and ill respond as soon as I can.

If you would like to receive our recipes on your mail please leave your mail id at the homepage. Every time Rajjo's Kitchenn has a new post we will mail the recipe to you.


Tuesday 18 May 2021

ONE POT LAUKI WADIYAN CURRY

 Lauki or Bottle gourd is a healthy summer vegetable, available perennially. It has many health benefits, but many don't prefer it because of its bland taste. How many times would an elder at home or our mother have tried to feed it to us on the sly 😀? All for a good cause though. Lauki belongs to the cucumber family, and is very light on the tummy. That's one of the reasons it is summers most preferred vegetable.  

This vegetable is also called by several other names all over India like Doodhi, Ghiya, Sorakkai, to name a few. This vegetable packs a lot of Vitamins like-  Vitamin A, Vitamin B, Vitamin C, Vitanin E, Vitamin K and minerals like - Potassium, Iron and Manganese. Lauki has many electrolytes which makes it the ideal summer vegetable, that replenishes the water lost in sweating. All these advantages make Lauki a wholesome vegetable that fights off infections and helps in detoxification.

Coming to the next element in the recipe which is Urad dal Wadi, which are basically sun dried lentil dumplings. They can be broken to bits and fried, then added to subjis to pack in that extra flavour and crunch. They are also a nice way to add proteins to diet, when you want a break from the usual dal. 

In this recipe, I have combined the goodness these both have to offer and what I have is a super delicious curry. I have cooked this in the one pot method, which makes it very easy, and also a work day lunch or dinner option. It can be paired with rice or Rotis and you have amazing lunch/dinner ready in a jiffy. The Wadiyan or the lentil dumplings are just an add on, which can be done away with altogether if you prefer having just Lauki Ki Subji, or can be swapped with Soya chunks. For the fussy Lauki eaters, adding Wadiyan or Soya chunks is a good idea.

Last but not the least, requesting readers to not judge the pictures taken this time. As I finished all prep for the curry, the tube light in my kitchen got fused. Our kitchen doesn't get enough natural light, so I depend on two tube lights for lighting while I click pictures for the blog. With one gone, the light from one was not adequate. Since we are in the midst of the Pandemic, we were unable to step out to buy one immediately, and my husband has created a kind of bio bubble at home😅

While you are here check out other curry and subji recipes like- Corn Palak Subji, Chakki ki Shak, Miloni Babycorn and Bell Peppers curry, Bhindi Aloo, Paneer Khurchan, and more...

Let's get to the recipe right away.


     PREP TIME: 15 Mins                                            COOK TIME: 15 Mins
     TOTAL TIME: 30 Mins                                           COURSE:  MAIN
     CUISINE:  NORTH INDIAN                                  SERVINGS: 4
     AUTHOR: Rajni Ram 


     Ingredients:

     Lauki/Bottle gourd/Sorakai 250 gms skin peeled and, diced finely
    Tomatoes 2 large blanched and skin peel and chopped finely
    Onion 1 finely chopped
    Wadiyan/ sundried lentil dumplings about 5 
    Cumin Seeds 1 tsp
    Turmeric powder 1/2 tsp
    Ginger garlic paste 1/2 tsp
    Salt as required
    Red chilli powder 1 tsp
    Coriander powder 1 to 2 tsp
    Fennel powder 1 tsp
    Water 1 cup
    Fresh coriander leaves 2 tbsp finely chopped
    Garam Masala powder 1/2 tsp
    Oil for sauteeing


    Directions: Blanch the tomatoes for 10 mins in hot water, cool them, peel the skin and     chop finely. Break the Wadiyan to small pieces and keep aside. In a cooker take 1 tbsp oil and heat. Drop the broken Wadiyan into the oil and fry until brown. take care not to burn them. Remove and drain on absorbant paper. Now to the same oil add the cumin seeds, turmeric powder, chopped onions, and ginger garlic paste and saute, until onions turn light brown. Now add the blanched and chopped tomatoes and saute for 30 seconds. Add the diced Bottle gourd/lauki, salt, red chilli powder, coriander powder, fennel powder, and stir everything together. Now add 1 cup water, stir again, close cooker and cook until 4 to 5 whistles. Allow the pressure to settle. Now open cooker, add the fried Wadiyan, chopped coriander leaves and garam masala powder. The subji is ready to serve. Enjoy with hot rice or Rotis. Bon Appetit.

STEPWISE RECIPE FOLLOWS:

1. Blanch the tomatoes for 10 mins in hot water, cool them, peel the skin and chop finely. Break the Wadiyan to small pieces and keep aside. In a cooker take 1 tbsp oil and heat. Drop the broken Wadiyan into the oil and fry until brown. take care not to burn them. Remove and drain on absorbent paper.


2. Now to the same oil add the cumin seeds, turmeric powder, chopped onions, and ginger garlic paste and saute, until onions turn light brown. 


3. Now add the blanched and chopped tomatoes and saute for 30 seconds. Add the diced Bottle gourd/lauki, salt, red chilli powder, coriander powder, fennel powder, and stir everything together. Now add 1 cup water, stir again, close cooker and cook until 4 to 5 whistles. Allow the pressure to settle.


4. Now open cooker, add the fried Wadiyan, chopped coriander leaves and garam masala powder. The subji is ready to serve. Enjoy with hot rice or Rotis. Bon Appetit.


NOTES:

1. The Wadiyan or the lentil dumplings are just an add on, which can be done away with altogether if you prefer having just Lauki Ki Subji, or can be swapped with Soya chunks. For the fussy Lauki eaters, adding Wadiyan or Soya chunks is a good idea.

2. To use Soya chunks instead of Wadiyan, cook the soya chunks as per pack instructions. cool them and rinse a couple of times. Now they can be substuted instead of the Wadiyan at the end(need not be fried). They can be added as whole or mince. Still better is to add the tiny Soya granules.


Friday 23 April 2021

KURKURI BHINDI/KARARI BHINDI/OKRA FRITTERS

 Kurkuri Bhindi Or Karari Bhindi is an accompaniment served in most North Indian Thali's and Buffet. It adds some crunch to the food, can be a starter or even a side dish. A south Indian version of this is available in most south Indian sweet and savory shops. The difference between the North and South Indian recipes is mainly the batter. The south Indian version uses far too much batter, whereas the North Indian version just about coats it. So mine is a fusion of both. While I have opted for less flour and North Indian Masala I have added Till/Sesame from the south Indian version, which gives a extra crunch and flavour. And why I like this version of bhindi/okra is that though it takes a long time to cut the Ladysfinger this way, this can stay fresh for a few days. Before serving just microwave it for 30 seconds and it become crunchy again. So people on the move and ones who love a hot meal after coming back from work, just invest sometime on a week day to make these crunchy fritters, and on a work day just make your self some Dal and Rice, for which the Kurkuri Bhindi is the perfect side dish. As I said, just microwave it for 30 seconds.


Without much detailing getting in to the recipe directly. While you are here check out my other Subji and curry recipes like Paneer KhurchanSouth Indian KurmaMethi wale BainganRoasted Eggplant 2 waysPaneer Mava Curry, Corn Palak Subji, Chakki Ki Shak, Rasakalan and more...

Here's the recipe for Kurkuri Bhindi--


  PREP TIME: 45 Mins                                COOK TIME: 30 Mins
 TOTAL TIME: 30 Mins                                COURSE:  MAIN/ SNACK
 CUISINE: NORTH INDIAN                         SERVINGS: 6
 AUTHOR: Rajni Ram


    Ingredients:

    Bhindi/Okra 400 gm slit lengthwise ( refer picture)

    Rice flour 1/2 cup

    Besan/ Chickpea flour 1/2 cup

    Salt as required

    Turmeric powder 1/2 tsp

    Red Chilli Powder regular 1 tsp

    Red chilli powder Kashmiri 1 tsp

    Coriander powder 1 tsp

    Fennel Powder 1 tsp

    Chaat masala 1/2 tsp

    Sesame seeds 1 tsp

    Lemon juice 2 tbsp

    Oil for the batter 1 tbsp

    Oil for deep frying


    Directions:

Take the split Okra/Bhindi/Ladysfinger in a large bowl and add all the dry spice powders. Add the lemon juice and mix well with your fingers to spread the masalas evenly. Allow to marinate for 30 minutes. Now add both the flours and mix well. Drizzle 1 tbsp oil and mix again nicely with fingers. Heat oil in a Kadai. When a little batter dropped in the oil sizzles immediately, the oil is ready for frying. Take a few pieces of Okra at a time and drop them gently into the oil. Fry until the Bhindi turn light brown. The may seem limp, but as they cool they firm up and become crunchy. The Kurkuri Bhindi is ready to serve with your favourite comfort food, or just as a snack.


    STEPWISE RECIPE FOLLOWS:

 1. Take the split Okra/Bhindi/Ladysfinger in a large bowl and add all the dry spice powders.


2. Add the lemon juice and mix well with your fingers to spread the masalas evenly. Allow to marinate for 30 minutes.


3. Now add both the flours and mix well. Add Sesame seeds. Drizzle 1 tbsp oil and mix again nicely with fingers.


4. Heat oil in a Kadai. When a little batter dropped in the oil sizzles immediately, the oil is ready for frying. Take a few pieces of Okra at a time and drop them gently into the oil. Fry until the Bhindi turn light brown. The may seem limp, but as they cool they firm up and become crunchy. The Kurkuri Bhindi is ready to serve with your favourite comfort food, or just as a snack.


    NOTES:

1. Some recipes recommend removing the seeds from the Bhindi. I have skipped it. If the seeds are tender, they can be retained. Few that may remain in the oil after frying can be filtered and removed.

2. While selecting the Okra's choose tiny to middle sized ones and not the huge ones.

3. Always check the heat of the oil by gently dropping some batter into it. When a little batter dropped in the oil sizzles immediately, the oil is ready for frying.


If you tried this recipe and liked it please comment below. I would love to hear from you. If you have a query about the recipe email us and ill respond as soon as I can.

If you would like to receive our recipes on your mail please leave your mail id at the homepage. Every time Rajjo's Kitchen has a new post we will mail the recipe to you.


Monday 19 April 2021

CORN PALAK SUBJI

 Palak is a very versatile green. It is mineral rich, healthy and fibrous. Any add-in that goes into it, gets its flavour enhanced. In my house I have been called the female Popeye for a reason. I love Palak/Spinach in all forms. Be it the simple Keerai Masiyal, Keerai Molagootal or the delicious Palak Paneer, Palak Paneer Paratha, or the simple Spinach curry in coconut milk. 

One of my favourite Palak/Spinach recipes is also this delicious Subji Palak Corn. This is a simple everyday subji that one can make even on a busy day if their greens are washed and blanched. Highly nutritious and high on Iron and the corn not only gives the green a contrast with its yellow, but also balances the tanginess from the tomatoes and palak combination. This combination of Spinach and corn is classic and in all cuisines including World cuisine you will find a few recipes dedicated to this.


I have used Sweet Corn in this recipe as only this was available at the time I was cooking this dish. My preferred corn is Makai aka Maize, but sadly since we forget to promote what is local and regional, doing a dis service to our farmers, our indigenous varieties suffer. Let us get back our own Maize/Cholam/Makai, which are very rarely seen even during rainy season when they are most likely to be found. Do give this a thought.

Getting to the recipe right away-


     PREP TIME: 15 Mins                                            COOK TIME: 25 Mins
     TOTAL TIME: 40Mins                                           COURSE:  MAIN
     CUISINE:  NORTH INDIAN                                  SERVINGS: 4
     AUTHOR: Rajni Ram


    Ingredients:

    Ingredients
    Palak 1 bunch
    Corn Kernels 100 gm
    Onion 1 large or 2 small
    Green chillies 2
    Tomato 2 large to medium size
    Ginger- garlic paste 1 tsp
    Cloves 2
    Bay leaf 1 small 
    Cardamom 2 
    Cumin seeds 1 tsp
    Turmeric powder 1/2 tsp
    Salt as required
    Garam masala powder 1/2 tsp
    Coriander powder 2 tsp
    Fennel Powder 1 tsp
    Red chilli powder 1 tsp
    Cream 2 tbsp
    Oil for sauteeing

Directions:
Chop the Palak roughly and blanch them, I usually put them in the microwave for 2 mins. Alternately just put them in boiling water for 5 minutes. Drain the water and pour cold water over the Palak, this helps in keeping the green colour intact. Puree the Palak and keep ready. Cook the Corn kernels, and keep aside. 
Now in a karahi pour some oil and heat. Add 2 cloves followed by Cumin seeds and drop in the chopped onions. Saute for a minute, add the green chillies and continue to saute for 30 seconds, finally add the tomatoes and cook until the tomatoes turn mushy. Cool them. Now blend the onion-tomato mixture to a puree. In the same karahi take another 2 tsp of oil and heat.  Add the cumin seeds followed by turmeric powder and pour the onion-tomato mixture. Fry it nicely in the oil. Now add salt, followed by coriander powder, red chilli powder, fennel powder and continue to cook. Now add the Palak Puree. Stir well to combine the tomato and palak puree. Be careful as the palak splutters a lot while cooking, you can keep the karahi partially covered.  After about 3-4 minutes of cooking the Palak and tomato mixture will come together, at that stage add the cooked corn, cook for two more minutes, add the cream and garam masala powder and turn of the flame immediately. The delicious Corn palak is ready to serve.

Serving suggestions: with Rotis, Parathas, Kulcha, with rice varieties like Jeera rice, Mayar Pulav, 
Flavoured rice, vegetable pilaf etc;


STEPWISE RECIPE FOLLOWS:

1. Chop the Palak roughly and blanch them, I usually put them in the microwave for 2 mins. Alternately just put them in boiling water for 5 minutes. Drain the water and pour cold water over the Palak, this helps in keeping the green colour intact. Puree the Palak and keep ready. Cook the Corn kernels, and keep aside. 


2. Puree the Palak and set aside. In a karahi take oil and heat. Put in the cloves and cumin seeds, and as the cumin splutters add turmeric powder followed by onions and sauté for a minute. Add the green chillies and sauté for 30 seconds and now add the tomatoes and sauté until mushy. Cool and grind to a purée, along with 1 tsp ginger garlic paste.


3. In the same karahi take 2 tsp oil and heat. Now add the cumin seeds, Bay leaf, cloves and cardamom and  pour in the tomato and onion paste and fry nicely in the oil. 


 Now add salt, followed by coriander powder, red chilli powder, fennel powder and continue to cook. 


Now add the Palak Puree. Stir well to combine the tomato and palak puree. Be careful as the palak splutters a lot while cooking, you can keep the karahi partially covered. Add little water to dilute if required.  After about 3-4 minutes of cooking the Palak and tomato mixture will come together, at that stage add the cooked corn, cook for two more minutes.


Now add the cream and garam masala powder and turn of the flame immediately. The delicious Corn palak is ready to serve.


NOTES:
1. Blanching ( putting the Palak in hot water) is a critical step followed by dipping it in cold water.
2. Don’t overcook the Palak, it loses its colour and taste.


If you tried this recipe and liked it please comment below. I would love to hear from you. If you have a query about the recipe email us and i'll respond as soon as I can.


Tuesday 23 February 2021

MENTHIYA KEERAI KOOTU/SOUTH INDIAN METHI DAL

Fenugreek or Methi green are my most favorite greens and i wish they were perennial. That said, even though they can be grown at home perennially, its always good to eat seasonal food, to get the maximum benefits out of them. These slightly bitter greens have loads of benefits to offer and one should make the most of it. 
As said earlier I love these greens, so even in my regular North Indian subji's I use a few sprigs for flavour. On my blog you will find Methi used in different ways like the Aloo Methi Paratha, Methi Wale Baingan and more...
Today I am  posting a simple everyday South Indian recipe which is Menthiya Keerai kootu or Methi dal. This is different from the North Indain version as here ground coconut paste is used for flavouring, which reduces the bitterness of the Methi and ehances its flavour. I prefer using Moongdal for this kootu though Tuvar dal also can be used. Let's get to the recipe right away.

This is a simple recipe that gets done in under 30 minutes. The dal can be pre cooked to make quick dinner after a long day at work. Just this Kootu and some Rice and one is in for a super healthy and satiating meal.

Here is the recipe for Menthiya Keerai Kootu  

    PREP TIME: 10 MINS                               COOK TIME:15 MINS

    TOTAL TIME: 25 MINS                               COURSE: MAIN 

    CUISINE: SOUTH INDIAN                          SERVINGS: 4

    AUTHOR: RAJNI RAM


Ingredients:
Methi green/Fenugreek greens 1 bunch
Moong dal 1/2 cup Roasted to light brown
Tomato 1 finely chopped
Grated Coconut 2 tbsp
Cumin 1 tsp
Turmeric powder 1 tsp
Sambar powder 1 tsp
Red chilli powder 1 tsp
Dry red chillies 2 whole
Mustard seeds 1 tsp
Urad dal 2 tsp 
Chana dal 1 tsp
Oil for tempering (I used coconut oil)

Directions:
In a Karahi dry roast the Moong Dal to a light brown colour and pressure cook for 4 whistles. In a pan, take the Methi leaves and add 1 cup water followed by turmeric powder and salt and cook. When the leaves are half done add Sambar powder and red chilli powder and continue to cook. Add chopped tomatoes and cook for another minute. Now add the cooked dal and give it a nice mix. Add grated coconut, mix well, cook for 2 minutes and put off the flame. In a small Tadka Kadai take some oil for tempering. When oil is hot add the mustard seeds, followed by Urad dal, Chana dal , broken dry red chilli, and asafoetida. Pour the tempering in to the Methi dal and the delicious and healthy Menthiya Keerai kootu is ready.

Serving Suggestions: This Methi dal or Menthiya Keerai kootu goes very well with Vathakuzhambu rice, Rasam rice, Paruppu podi. And me, I love them with Rotis too.  

STEPWISE RECIPE FOLLOWS:

1. In a Karahi dry roast the Moong Dal to a light brown colour and pressure cook for 4 whistles, with a little turmeric powder. In a pan, take the Methi leaves and add 1 cup water followed by turmeric powder and salt and cook.


2. In a pan, take the Methi leaves and add 1 cup water followed by turmeric powder and salt and cook. When the leaves are half done add Sambar powder and red chilli powder and continue to cook. Add chopped tomatoes and cook for another minute. 


3. Now add the cooked dal and give it a nice mix. Add grated coconut, mix well, cook for 2 minutes and put off the flame.


4.  In a small tadka Kadai take some oil for tempering. When oil is hot add the mustard seeds, followed by Urad dal, Chana dal , broken dry red chilli, and asafoetida. Pour the tempering in to the Methi dal and the delicious and healthy Menthiya Keerai kootu is ready.


NOTES:
1. Dry roasting the Moong dal gives a good flavour, aroma and texture to the Kootu. I always have a roasted batch ready.
2. I have used Coconut oil for enhanced flavour as i used it for all south Indian tempering except Sambar and Rasam. One can use refined oil too.
3. Not over cooking the Methi greens is important, other wise the taste is lost.


If you tried this recipe and liked it please comment below. I would love to hear from you. If you have a query about the recipe email us and ill respond as soon as I can.

Friday 8 January 2021

BHINDI ALOO (EVERY DAY SUBJIS)

This Subji is a simple stir fry with a mix of Ladyfinger and Potatoes as the name suggests. This is perfect for those rush hours in the morning or after work evenings when you want something simple that can be made with the least effort. This dish of Bhindi Aloo goes well with Rice and Roti or other flatbread varieties. It is healthy and becomes a good lunch box item for kids. 

Without much detailing getting in to the recipe directly. While you are here check out my other Subji and curry recipes like Paneer Khurchan, South Indian Kurma, Methi wale Baingan, Roasted Eggplant 2 ways, Paneer Mava Curry and more...


PREP TIME: 15 MINS                               COOK TIME:15 MINS

TOTAL TIME: 30 MINS                              COURSE:MAIN 

CUISINE:INDIAN                                        SERVINGS: 4

AUTHOR: RAJNI RAM


    Ingredients:

    Onion 1 large cut into petals

    Bhindi/Okra/Ladysfinger 200 gm cut to 1 inch length

    Potato 1 large or 2 medium diced

    Cumin Seeds 1 tsp

    Turmeric powder 1/2 tsp

    Red chilli powder 1 tsp

    Coriander powder 1 tsp

    Fennel powder 1 tsp

    Amchur powder 1/4 tsp

    Garam Masala 1/2 tsp

    Salt as required

    Oil for sauteing


Directions: 

In a Kadai or Pan heat oil. When its hot add the Cumin seeds and let them crackle. Add the turmeric powder followed by the chopped onions and saute until the onions start turning brown. Now add the diced potatoes and continue to saute. When the Potatoes are half done add the Bhindi and continue to saute. Keep stirring in between so that the vegetables don't burn. When the Ladysfinger are half done add salt, stir nicely, and cover the Kadai for precise 2 minutes. After 2 minutes open the lid and add Red chilli powder, Coriander powder, fennel powder and Amchur(dry mango) powder and mix nicely. Check for doneness of the Aloo and Bhindi by mashing between your fingers. When done add the Garam Masala powder and turn off the stove. The simple and healthy Bhindi Aloo is ready to serve wit our choice of rice or roti.   


     STEPWISE RECIPE FOLLOWS:

1. In a Kadai or Pan heat oil. When its hot add the Cumin seeds and let them crackle. Add the turmeric powder followed by the chopped onions and saute until the onions start turning brown.


2. Now add the diced potatoes and continue to saute. When the Potatoes are half done add the Bhindi and continue to saute. Keep stirring in between so that the vegetables don't burn. 


3. When the Ladysfinger are half done, add salt, stir nicely, and cover the Kadai for precise 2 minutes. After 2 minutes open the lid and add Red chilli powder, Coriander powder, fennel powder and Amchur(dry mango) powder and mix nicely. 


4.  Check for doneness of the Aloo and Bhindi by mashing between your fingers. When done add the Garam Masala powder and turn off the stove. The simple and healthy Bhindi Aloo is ready to serve wit our choice of rice or roti.   


    NOTES:

1. The Bhindi/Ladysfinger can sometimes turn slimy. To avoid this Pre cut the Bhindi and keep in the fridge or put it on a paper to absorb the moisture. 

2. Alternately you can squeeze 1/4 of a lemon if you find that it is turning slimy.

3. Adding quarter spoon of sugar helps to retain the green colour of the Bhindi.

4. If after adding all Masala powders if you subji still looks a little moist and not crisp and dry, add 1 tbsp bread crumbs.


If you tried this recipe and liked it please comment below. I would love to hear from you. If you have a query about the recipe email us and ill respond as soon as I can.

If you would like to receive our recipes in your mail please leave your mail id at the homepage. Every time Rajjo's Kitchen has a new post we will mail the recipe to you.

Wednesday 30 December 2020

PANEER KHURCHAN

Paneer Khurchan is a simple dish made with the most minimum ingredients. It is a simple subji to go with Rotis, Phulkas, Parathas and also Dal chawal. The beauty of this dish is that, it is mildly spiced and flavoured and is the best option for those days when the craving is for a simple meal.

This dish gets its name from the Hindi word "Khurachna" which means to scrape. In this recipe the Paneer can be added as either scrapings or as strips. Capsicum and tomatoes and some simple masalas are combined to bring out the flavours of the dish.

A simple dish doesn't need a big introduction, just its simplicity will do. So here's taking you to the recipe directly. While you are here please check out my other subji recipe like- Mushroom Do Pyaaza, Mixed Vegetable Curry, Palak Paneer, Creamy Palak in Coconut Milk, Mirch Ka Salan and more...


Here is the recipe for Paneer Khurchan-

PREP TIME: 10 MINS                               COOK TIME:15 MINS

TOTAL TIME: 25 MINS                              COURSE: MAIN 

CUISINE: NORTH INDIAN                        SERVINGS: 4

AUTHOR: RAJNI RAM


    Ingredients:

    Paneer 200 gm cut into strips

    Capsicum 1 large cut into thin strips

    Spring Onions/ Onions (one bunch/ 1 large)

    Tomatoes 2 large chopped fine 

    Cumin 1 tsp

    Turmeric powder 1/2 tsp

    Ginger-garlic paste 1 tsp

    Salt as required

    Red chilli powder(regular) 1tsp

    Kashmiri red chilli powder(optional) 1/2 tsp

   Coriander powder 1 tsp

    Green chilli 1 slit lengthwise

    Garam masala powder 1/2 tsp

    Oil for sautéing


    Directions:

In a Pan or Kadai pour 1/2 tbsp oil and heat. When the oil is hot add the cumin seeds, followed by turmeric powder and the Spring onion(if in season or  use regular onion). Sauté until the onions start turning brown and add the spring onion greens to it(if using). Sauté 30 seconds and add the ginger-garlic paste. Continue to sauté for another 30 seconds. Now add the chopped Capsicum strips and sauté on high heat, so that the capsicum don't release much moisture. Sauté until the Capsicum are half cooked. They should retain the crunch and not turn limp. Now add the chopped tomatoes, followed by salt, red chilli powder, Coriander powder and Kashmiri red chilli powder and sauté until the tomatoes break and turn mushy. Now add the Paneer strips and the slit green chilli and toss well such that the masalas evenly coat the paneer. Cover and cook on low heat for 2 minutes. Remove cover, stir and add the Garam  Masala and serve the hot Paneer Khurchan with rice or flat brad of your choice. Enjoy. Bon Appetit.


    STEPWISE RECIPE FOLLOWS:

1. In a Pan or Kadai pour 1/2 tbsp oil and heat. When the oil is hot add the cumin seeds, followed by turmeric powder and the Spring onion or regular onion.


2.  Sauté until the onions start turning brown and add the spring onion greens to it(if using). Sauté 30 seconds and add the ginger-garlic paste. Continue to sauté for another 30 seconds. Now add the chopped Capsicum strips and sauté on high heat, so that the capsicum don't release much moisture.


3. Sauté until the Capsicum are half cooked. They should retain the crunch and not turn limp. Now add the chopped tomatoes, followed by salt, red chilli powder, Coriander powder and Kashmiri red chilli powder and sauté until the tomatoes break and turn mushy. 


4. Now add the Paneer strips and the slit green chilli and toss well such that the masalas evenly coat the paneer. Cover and cook on low heat for 2 minutes. Remove cover, stir and add the Garam  Masala and serve hot.


    NOTES:

1. The dish actually uses regular onions. At the time i made these recipes Spring onions were in season, hence I used them. The Spring onion greens also impart a nice flavour to the dish.

2. No whole spices are used in this recipe.

3. While sautéing the Capsicum on high heat, keep stirring continuously so that they don't get charred.


If you tried this recipe and liked it please comment below. I would love to hear from you. If you have a query about the recipe email us and ill respond as soon as I can.

If you would like to receive our recipes in your mail please leave your mail id at the homepage. Every time Rajjo's Kitchen has a new post we will mail the recipe to you.

TOFU AND STIR FRIED VEGETABLES IN HOT SCHEZWAN SAUCE

  Any Tofu lovers? I agree its an acquired taste,but going by the health benefits it has to offer, I try including it in my diet now and the...