Vegetarian cooking blog

Showing posts with label LUNCHBOX RECIPES. Show all posts

Thursday 10 June 2021

CABBAGE PULAV/CABBAGE RICE

 Cabbage is one of the most underrated vegetable I feel, which remains unexplored beyond the Vegetable Manchurian, Kimchi and Poriyal(stir fry) or Subji and in salads. Thanks to the colourful varieties(read red and purple cabbage), this vegetable is gaining popularity again. Many don't like its smell when cooked. The best way to tackle this is by open pan cooking. 

Weight watchers speak about Bottle gourd, Broccoli and Cauliflower, but the cabbage always takes a back seat, never gets its due. This probably may be because, other than the everyday Kootu/subjis or the special occasion Manchurian, we don't think about it much. I have been a Cabbage lover right from childhood. A simple Cabbage and coconut stir fry (aka Poriyal) is enough to make me happy. I have also taken to trying other recipes from this vegetable, which can be cooked on a regular everyday basis and the health benefits this vegetable has to offer can be enjoyed. 

To state a few benefits of this simple and highly nutritive vegetable- It is nutrient dense. Low on calories and high on micro nutrients and vitamins. It is said to keep a check on inflammation, High on Vitamin C, Helps improve digestion, It is an excellent source of Vitamin K, easy to cook and quite inexpensive as compared to the gourmet vegetables. (source-health line). So, we should reap the benefits of this vegetable, what say?

I have come up with this simple cabbage pulav, which is tasty and easy to cook. Even your fussy and picky eaters will lap this up. I have kept the recipe and Masalas very simple here, as this is planed as a simple everyday dish, and a whole meal in itself, which can be relished with just a Raita.   

While you are here check out other everyday recipes like- One Pot Tadke wali Dal, Zucchini and Potato wheat Dosa, Goan style Lobia curry, Watermelon rind Kootu, Menthiya Keerai Kootu, Corn Palak subji, Dosakaya Chutney, and more...

Here goes the Cabbage pulav recipe-


 PREP TIME: 20 Mins                                            COOK TIME: 20 Mins
 TOTAL TIME:40 Mins                                            COURSE:  MAIN
 CUISINE:  NORTH INDIAN                                  SERVINGS: 5
 AUTHOR: Rajni Ram


    Ingredients:
     Rice 1 cup precooked and cooled ( I used regular Sona Masoori)
    Cabbage 1/2 of a medium one. chopped to think strips
    Capsicum 1 medium chopped to strips
    Tomato 1 large chopped 
    Cumin seeds 1 tsp
    Fennel seeds 1/2 tsp
    Shah jeera/ Caraway seeds 1/2 tsp
    Cinnamon 1 inch stick
    Turmeric powder 1/2 tsp
    Salt as required
    Red chilli powder(regular) 1 tsp
    Coriander powder 1 tsp
    Fennel Powder 1 tsp
    Garam Masala powder 1/2 tsp
    Oil for sauteing 1 tbsp 
    Fresh coriander leaves chopped for garnish


   Directions: Precook 1 cup rice, spread it on a plate to cool and keep aside. In a Kadai heat the oil. Add the cumin seeds, fennel seeds and Shah jeera, Cinnamon stick, and fry until light brown. To this add the chopped capsicum and stir fry for 2 minutes. Add turmeric powder, and saute for another 2 minutes. Now add the tomatoes and continue to saute, until they become a little tender. Now drop in the Cabbage strips, and saute for 2 minutes. Add salt, Red chilli powder, coriander powder, fennel powder and stir fry well. The cabbage will release water, keep sauteing until it becomes almost dry and the cabbage is well cooked, but firm and crunchy. Now add the garam masala, cook for a minute, and finally add the cooked rice. Give everything a nice stir so that the rice is well coated with vegetables and spices. Garnish with fresh coriander leaves and serve hot with some chilled Raita.


STEPWISE RECIPE FOLLOWS:

1. Precook 1 cup rice, spread it on a plate to cool and keep aside. In a Kadai heat the oil. Add the cumin seeds, fennel seeds and Shah jeera, Cinnamon stick, and fry until light brown. 


2. To this add the chopped capsicum and stir fry for 2 minutes. Add turmeric powder, and saute for another 2 minutes. Now add the tomatoes and continue to saute, until they become a little tender.


3. Now drop in the Cabbage strips, and saute for 2 minutes. Add salt, Red chilli powder, coriander powder, fennel powder and stir fry well. The cabbage will release water, keep sauteing until it becomes almost dry and the cabbage is well cooked, but firm and crunchy. 


4. Now add the garam masala, cook for a minute, and finally add the cooked rice. Give everything a nice stir so that the rice is well coated with vegetables and spices. Garnish with fresh coriander leaves and serve hot .


NOTES:

1. Instead of the regular cabbage one can also use Purple or Red cabbage.
2. Other vegetables or soya chunks can also be added.


  If you tried this recipe and liked it please comment below. I would love to hear from you. If you have a query about the recipe email us and ill respond as soon as I can.

If you would like to receive our recipes on your mail please leave your mail id at the homepage. Every time Rajjo's Kitchenn has a new post we will mail the recipe to you.


Friday 23 April 2021

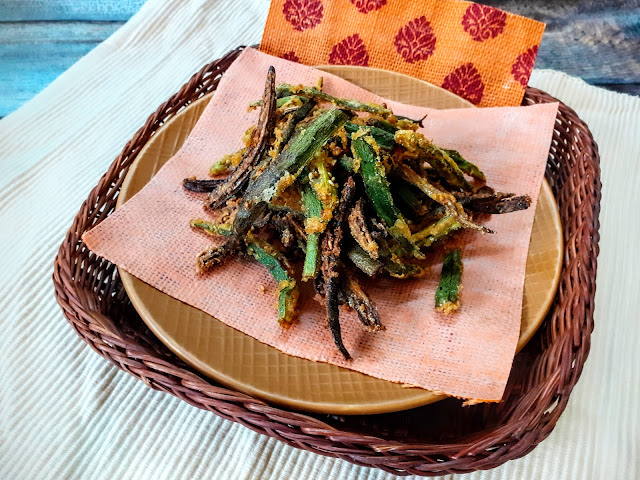
KURKURI BHINDI/KARARI BHINDI/OKRA FRITTERS

 Kurkuri Bhindi Or Karari Bhindi is an accompaniment served in most North Indian Thali's and Buffet. It adds some crunch to the food, can be a starter or even a side dish. A south Indian version of this is available in most south Indian sweet and savory shops. The difference between the North and South Indian recipes is mainly the batter. The south Indian version uses far too much batter, whereas the North Indian version just about coats it. So mine is a fusion of both. While I have opted for less flour and North Indian Masala I have added Till/Sesame from the south Indian version, which gives a extra crunch and flavour. And why I like this version of bhindi/okra is that though it takes a long time to cut the Ladysfinger this way, this can stay fresh for a few days. Before serving just microwave it for 30 seconds and it become crunchy again. So people on the move and ones who love a hot meal after coming back from work, just invest sometime on a week day to make these crunchy fritters, and on a work day just make your self some Dal and Rice, for which the Kurkuri Bhindi is the perfect side dish. As I said, just microwave it for 30 seconds.


Without much detailing getting in to the recipe directly. While you are here check out my other Subji and curry recipes like Paneer KhurchanSouth Indian KurmaMethi wale BainganRoasted Eggplant 2 waysPaneer Mava Curry, Corn Palak Subji, Chakki Ki Shak, Rasakalan and more...

Here's the recipe for Kurkuri Bhindi--


  PREP TIME: 45 Mins                                COOK TIME: 30 Mins
 TOTAL TIME: 30 Mins                                COURSE:  MAIN/ SNACK
 CUISINE: NORTH INDIAN                         SERVINGS: 6
 AUTHOR: Rajni Ram


    Ingredients:

    Bhindi/Okra 400 gm slit lengthwise ( refer picture)

    Rice flour 1/2 cup

    Besan/ Chickpea flour 1/2 cup

    Salt as required

    Turmeric powder 1/2 tsp

    Red Chilli Powder regular 1 tsp

    Red chilli powder Kashmiri 1 tsp

    Coriander powder 1 tsp

    Fennel Powder 1 tsp

    Chaat masala 1/2 tsp

    Sesame seeds 1 tsp

    Lemon juice 2 tbsp

    Oil for the batter 1 tbsp

    Oil for deep frying


    Directions:

Take the split Okra/Bhindi/Ladysfinger in a large bowl and add all the dry spice powders. Add the lemon juice and mix well with your fingers to spread the masalas evenly. Allow to marinate for 30 minutes. Now add both the flours and mix well. Drizzle 1 tbsp oil and mix again nicely with fingers. Heat oil in a Kadai. When a little batter dropped in the oil sizzles immediately, the oil is ready for frying. Take a few pieces of Okra at a time and drop them gently into the oil. Fry until the Bhindi turn light brown. The may seem limp, but as they cool they firm up and become crunchy. The Kurkuri Bhindi is ready to serve with your favourite comfort food, or just as a snack.


    STEPWISE RECIPE FOLLOWS:

 1. Take the split Okra/Bhindi/Ladysfinger in a large bowl and add all the dry spice powders.


2. Add the lemon juice and mix well with your fingers to spread the masalas evenly. Allow to marinate for 30 minutes.


3. Now add both the flours and mix well. Add Sesame seeds. Drizzle 1 tbsp oil and mix again nicely with fingers.


4. Heat oil in a Kadai. When a little batter dropped in the oil sizzles immediately, the oil is ready for frying. Take a few pieces of Okra at a time and drop them gently into the oil. Fry until the Bhindi turn light brown. The may seem limp, but as they cool they firm up and become crunchy. The Kurkuri Bhindi is ready to serve with your favourite comfort food, or just as a snack.


    NOTES:

1. Some recipes recommend removing the seeds from the Bhindi. I have skipped it. If the seeds are tender, they can be retained. Few that may remain in the oil after frying can be filtered and removed.

2. While selecting the Okra's choose tiny to middle sized ones and not the huge ones.

3. Always check the heat of the oil by gently dropping some batter into it. When a little batter dropped in the oil sizzles immediately, the oil is ready for frying.


If you tried this recipe and liked it please comment below. I would love to hear from you. If you have a query about the recipe email us and ill respond as soon as I can.

If you would like to receive our recipes on your mail please leave your mail id at the homepage. Every time Rajjo's Kitchen has a new post we will mail the recipe to you.


Friday 8 January 2021

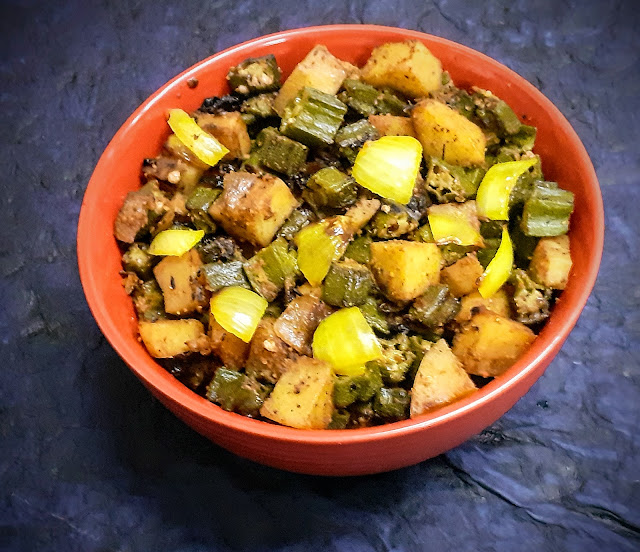
BHINDI ALOO (EVERY DAY SUBJIS)

This Subji is a simple stir fry with a mix of Ladyfinger and Potatoes as the name suggests. This is perfect for those rush hours in the morning or after work evenings when you want something simple that can be made with the least effort. This dish of Bhindi Aloo goes well with Rice and Roti or other flatbread varieties. It is healthy and becomes a good lunch box item for kids. 

Without much detailing getting in to the recipe directly. While you are here check out my other Subji and curry recipes like Paneer Khurchan, South Indian Kurma, Methi wale Baingan, Roasted Eggplant 2 ways, Paneer Mava Curry and more...


PREP TIME: 15 MINS                               COOK TIME:15 MINS

TOTAL TIME: 30 MINS                              COURSE:MAIN 

CUISINE:INDIAN                                        SERVINGS: 4

AUTHOR: RAJNI RAM


    Ingredients:

    Onion 1 large cut into petals

    Bhindi/Okra/Ladysfinger 200 gm cut to 1 inch length

    Potato 1 large or 2 medium diced

    Cumin Seeds 1 tsp

    Turmeric powder 1/2 tsp

    Red chilli powder 1 tsp

    Coriander powder 1 tsp

    Fennel powder 1 tsp

    Amchur powder 1/4 tsp

    Garam Masala 1/2 tsp

    Salt as required

    Oil for sauteing


Directions: 

In a Kadai or Pan heat oil. When its hot add the Cumin seeds and let them crackle. Add the turmeric powder followed by the chopped onions and saute until the onions start turning brown. Now add the diced potatoes and continue to saute. When the Potatoes are half done add the Bhindi and continue to saute. Keep stirring in between so that the vegetables don't burn. When the Ladysfinger are half done add salt, stir nicely, and cover the Kadai for precise 2 minutes. After 2 minutes open the lid and add Red chilli powder, Coriander powder, fennel powder and Amchur(dry mango) powder and mix nicely. Check for doneness of the Aloo and Bhindi by mashing between your fingers. When done add the Garam Masala powder and turn off the stove. The simple and healthy Bhindi Aloo is ready to serve wit our choice of rice or roti.   


     STEPWISE RECIPE FOLLOWS:

1. In a Kadai or Pan heat oil. When its hot add the Cumin seeds and let them crackle. Add the turmeric powder followed by the chopped onions and saute until the onions start turning brown.


2. Now add the diced potatoes and continue to saute. When the Potatoes are half done add the Bhindi and continue to saute. Keep stirring in between so that the vegetables don't burn. 


3. When the Ladysfinger are half done, add salt, stir nicely, and cover the Kadai for precise 2 minutes. After 2 minutes open the lid and add Red chilli powder, Coriander powder, fennel powder and Amchur(dry mango) powder and mix nicely. 


4.  Check for doneness of the Aloo and Bhindi by mashing between your fingers. When done add the Garam Masala powder and turn off the stove. The simple and healthy Bhindi Aloo is ready to serve wit our choice of rice or roti.   


    NOTES:

1. The Bhindi/Ladysfinger can sometimes turn slimy. To avoid this Pre cut the Bhindi and keep in the fridge or put it on a paper to absorb the moisture. 

2. Alternately you can squeeze 1/4 of a lemon if you find that it is turning slimy.

3. Adding quarter spoon of sugar helps to retain the green colour of the Bhindi.

4. If after adding all Masala powders if you subji still looks a little moist and not crisp and dry, add 1 tbsp bread crumbs.


If you tried this recipe and liked it please comment below. I would love to hear from you. If you have a query about the recipe email us and ill respond as soon as I can.

If you would like to receive our recipes in your mail please leave your mail id at the homepage. Every time Rajjo's Kitchen has a new post we will mail the recipe to you.

Monday 19 October 2020

TOMATO RICE/TAMATAR PULAV

 Tomato Rice is a very simple recipe and I love making it just for this reason. It is a quick fix in many ways. Whether I have to head out in a hurry or have to fix a lunchbox in a short time, this dish is always my option. This dish also necessarily does not need a side dish to go with it. Any stir fry will do, or just by itself, it is great too. This dish has all the goodness of tomatoes, so it is rich in vitamin C, in lycopene that is good for the skin, a decent amount of fibre.

I keep my tomato rice very simple, subtly flavoured with the minimum of spices. In this dish, I don't use any pungent spice like cloves, cardamom, cinnamon, or even onion, garlic, or ginger. I just let the Tomatoes do all the talking😀and the flavor is always bang on. The most concession I can make is adding fresh green peas to the rice. I don't puree my tomatoes too, I love to keep it rustic.

While you are here do check out my other rice varieties like Lemon Rice, Coriander rice, Lobia pulav, Masala rice, Flavoured rice, Coconut rice,  and more...

Here is the recipe for Tomato Rice for you--

 PREP TIME: 10 Mins                                COOK TIME: 20Mins
 TOTAL TIME:30Mins                                 COURSE:  MAIN
 CUISINE:  SOUTH INDIAN                       SERVINGS: 5
 AUTHOR: Rajni Ram


   Ingredients:

   Tomatoes 4 big chopped fine chopped finely

   Rice 1 cup pre-cooked and cooled

   Cashewnuts a few

   Green chillies 2 slit lengthwise

   Curry leaves a few

   Dry red chillies 2 broken

   Chana dal(yellow gram) 1/2 tbsp

   Urad dal 1/2 tbsp

   Mustard 1 tsp

   Turmeric powder 1/2 tsp

   Salt as required

   Red chilli powder 1 tsp(add more for more spice

   Coriander powder 2 tsp

   Oil for sauteeing


Directions:

Cook 1 cup rice, spread it on a plate to cool, and drizzle some oil over it so that the grains do not stick. Now in a Karahi heat oil and add the Cashewnuts to it and fry until light brown. Remove them onto a plate. Now to the same oil add the mustard seeds, Chana dal, urad dal, dry red chillies, and fry until the dals turn light brown. To this add the slit green chillies and curry leaves. Saute for 30 secs. Now add the turmeric powder and chopped tomatoes and saute for a minute. Now add salt, followed by red chilli powder and coriander powder, and cover the Karahi and cook until the tomatoes become mushy and the oil is released. Remove the lid and mash the tomatoes with the back of a ladle, so that it turns saucy. Now add the rice little by little and mix well. The tomato gravy must nicely coat the rice. Check for salt and spice and adjust if required. Put off the flame and add the fried Cashews. The yummy and tangy Tomato rice is ready.


Serving Suggestions: With any stir fry vegetable or Potato roast, Sepankazhangu(Colaccasia)roast, or just by itself.


STEPWISE RECIPE FOLLOWS:

1. Assemble all ingredients. Cook 1 cup rice, spread it on a plate to cool and drizzle some oil over it so that the grains do not stick.

2. Now in a Karahi heat oil and add the Cashewnuts to it and fry until light brown. Remove them onto a plate. Now to the same oil add the mustard seeds, Chana dal, urad dal, dry red chillies, and fry until the dals turn light brown.


3. Now add the slit green chillies and curry leaves. Saute for 30 secs. Now add the turmeric powder and chopped tomatoes and saute for a minute. 


4. Now add salt, followed by red chilli powder and coriander powder, and cover the Karahi and cook until the tomatoes become mushy and the oil is released.


5. Remove the lid and mash the tomatoes with the back of a ladle, so that it turns saucy. Now add the rice little by little and mix well. The tomato gravy must nicely coat the rice.


NOTES:

1. One can use Basmathi rice if they prefer. I have used regular raw rice.

2. I have kept the rice simple in flavour, if one wants onion and garlic can be added after adding the green chillies and sauteed well before adding the tomatoes.

3. Along with regular chilli powder, Kashmiri chilli powder can also be used for colour. I have used 1tsp regular red chilli powder and half teaspoon Kashmiri powder.  


If you tried this recipe and liked it please comment below. I would love to hear from you. If you have a query about the recipe email us and ill respond as soon as I can.

If you would like to receive our recipes on your mail please leave your mail id at the homepage. Every time Rajjo's Kitchen has a new post we will mail the recipe to you.


Tuesday 4 August 2020

BEETROOT PARATHA

Parathas are flatbreads stuffed with grated or mashed vegetables. Sometimes the vegetables are not stuffed but mixed in with the dough. This Paratha is one such recipe.

I resisted making these parathas for a whole month. I like Beetroot Poriyal( dry subji) a lot and I love Beetroot Halwa, but the thought of Beetroot in paratha sounded a little off track. My girl kept trying to convince me that I should give it a try and I kept dodging, saying I couldn't imagine a sweetish paratha. The internet has a quite many beetroot paratha recipes, but I refused to look at them. Then one day when I ran out of options to cook dinner, I thought why not give it a try. But the challenge was to balance the sweetness with some spice and at the same time the beetroot is a mild vegetable and also spices do not go very well with it, so I decided to keep it simple.

I am more than willing to say I don’t regret making the Beetroot Paratha at all. It tasted so good and the lovely aroma while cooking the parathas was difficult to resist. So much so RK who isn’t a beetroot liker at all gave the parathas a thumbs up. Beetroot paratha is definitely becoming a regular at my house.

While you are here please check out other recipes on Rajjo’s Kitchen like

Here is the recipe of Beetroot Paratha for you—

PREP TIME: 15Mins                                COOK TIME: 25 MINS
TOTAL TIME: 40 MINS                            COURSE:  BREADS 
CUISINE: INDIAN                                    SERVINGS: 6
                                                                  AUTHOR: Rajni Ram     


Ingredients:
Beetroot 1 Medium  grated
Whole wheat flour 3 cups
Ginger 1 inch piece chopped
Green chillies 3 
Salt as per taste
Red chilli powder 1 tsp
Coriander powder 1 tsp
Water as required for making dough
Ol for cooking Parathas

Directions:
Grate the Beetroot and keep ready. In a mixer grind the green chillies and ginger to a fine paste without adding water. Now in a bowl/dish take 3 cups of wheat flour, salt as required, red chilli powder, coriander powder and the green chilli- ginger paste. Now add in the grated beetroot and start combining with your hand. Do not add any water at this stage. The beetroot also will release some moisture. So once you have combined the flour, spices and the wheat flour nicely, then start adding water little by little. The consistency should be like that of Chapati dough. Rest the dough for 15 minutes and then pinch small portions of the dough and form balls. This quantity yields 12 Parathas. Now dust each ball with flour and roll out to form a medium-sized Paratha. The dough must be rolled out a little thick. The colourful and delicious Beetroot Paratha is ready. Enjoy this colourful and flavourful Paratha. Bon Appetit.
 
Serving Suggestions: Usually parathas are served with pickle, butter and raita or curd. For this particular paratha, I suggest excluding the pickle as they will be very diverse in taste.

STEPWISE RECIPE FOLLOWS:

1. Assemble all ingredients. Grate the Beetroot, make a paste of the green chillies and ginger and keep ready.


2. In a bowl or dish take 3 cups of whole wheat flour. Add the red chilli powder coriander powder, salt plus the chilli- ginger paste to this.


3. Now add the grated beetroot and mix well. Don't add any water at this stage keep mixing it with your hands until all the moisture of the beetroot is absorbed by the wheat flour.


4. Now add water a little at a time and start combining to form a dough. The dough should neither be stiff not too loose. It should resemble the Chapati dough in consistency.


5. Now pinch small portions of the dough and shape them to balls. This quantity gives around 12 of them. Now dust each ball with flour and roll it out into a thick Paratha. Cook both sides on a hot girdle drizzling some oil, until tiny light brown dots appear. The yummy beetroot paratha is ready to tuck in.


NOTES:
1. The flavour of this Paratha is very subtle, so the spice powders should be used minimally.
2. This is a no onion- no garlic paratha, it is best kept that way as the pungency of garlic may not go with the taste.
3. Coriander leaves could be added if you prefer, but I have not used them in this recipe.

If you tried this recipe and liked it please comment below. I would love to hear from you.

If you want the recipes emailed to you leave your id in the homepage near the📧
icon. Whenever we have a new post the recipe will be mailed to you. Thank you for showing interest in Rajjo's Kitchen.


Saturday 25 July 2020

KOTHIMBIR VADI

Kothimbir Vadi is a savory Maharashtrian snack. It is made of Fresh coriander leaves and Besan/gram flour. Coriander as I have mentioned in my previous posts is my favourite herb. So when there is a recipe predominantly with coriander leaves how could I let it go and hence the post.
This recipe is very simple, flavourful( this word is used many times across this blog if you notice, as I believe the flavour is a very important entity to any food.) and healthy. This snack has a strong resemblance to Gujarath's Muthias( will blog this soon).

Traditionally this snack is deep-fried, but now one can shallow fry or saute in a small amount of oil too. This dish is cooked twice as it is steamed first and then shallow fried. It is soft and moist when steamed and develops a nice crunch when fried. It goes very well with the sweet chutney and garlic chutney and makes for a great tea time snack. Made to bite-size pieces can be served as a starter in get-togethers. I have really wanted to try this recipe for a long while and I'm happy I did. Everyone at home was pleased by this dish😊.

While you are here please view other recipes by Rajjos kitchen like 
Moong dal Kachoris, and more...

here is the recipe of Kothimbir Vadi for you--

PREP TIME: 15 Mins                                            COOK TIME: 25 Mins
TOTAL TIME: 40 Mins                                          COURSE:  SNACK
CUISINE: MAHARASHTRIAN                             SERVINGS: 4
                                                                              AUTHOR: Rajni Ram


Ingredients:

Fresh Coriander finely chopped 2 cups
Besan/Gram flour 1 cup
Green chillies 2-3
Ginger 1 inch piece
Garlic(optional)
Salt as per taste
Turmeric powder 1/2 tsp
Red Chilli powder 1 tsp( or as per taste)
Jaggery 1 tsp
Tamarind pulp 1 tsp
Curd 1/2 cup
Water as required
cooking soda 1/2 tsp
Mustard seeds 1 tsp
Jeera/cumin seeds 1tsp
Asafoetida 1 tsp
Grated coconut 1 tbsp
sesame seeds(white) 1 tsp


Directions:
Get the steamer/ pressure cooker ready for steaming. By the time the batter gets ready, the water would have heated and the batter can be steamed immediately, after mixing.
Make a coarse paste of green chillies, ginger, and garlic(if using).In a dish take the Gram flour/besan, add the ginger-green chilli paste, followed by salt, turmeric powder, red chilli powder, jaggery, tamarind pulp. Mix nicely. Now add the curd and stir with a spatula. It will be a semi-wet mixture. Add in the chopped coriander leaves followed by a little water( around 1/2 cup) and make a thick batter. The batter should not be runny, so add water little at a time. Grease a plate or flat vessel with oil and before pouring the batter into the greased plate/ vessel add the cooking soda and stir nicely so that the soda combines well with the batter. Immediately pour the batter into the greased plates, tap the plate lightly, so that the batter settles evenly and place it into the steamer. Steam for 15 minutes. After steaming, remove and cool completely. Cut them into squared or diamonds and keep aside. Heat sufficient oil in a flat pan and put in the tempering of mustard and cumin seeds. As they splutter, add asafoetida and place the cut vadi pieces and fry until they turn brown. Keep turning sides for equal cooking. Remove when all sides are lightly brown and crisp. In the same pan drop the grated coconut and seame and roast until they turn light brown. Now scatter this on the fried Kothimbir Vadi for nice flavour.  Kothimbir Vadi is ready to serve with garam chai...Enjoy. Bon Appetit.


STEPWISE RECIPE FOLLOWS:
1. Assemble all ingredients. Wash the coriander leaves well and drain all moisture, chop them finely.

2.  Pour water into a steamer and get it going, so that by the time the batter is ready the steamer is ready. Make a coarse paste of the chilli and ginger(and garlic too if using) and keep ready.

3. Now in a dish take the besan and add the green chilli and ginger paste, salt, followed by turmeric powder, red chilli powder, jaggery, tamarind pulp. Add the curd and mix well with a spatula. It should be a semi-wet mixture.


4. Now put in the chopped coriander and mix well. Add water little at a time to make a smooth, yet thick batter. The batter should not be runny. Grease a plate or a flat dish with oil.


5. Now just before pouring the batter into the plate, add the cooking soda and mix well. Pour the batter into the greased plate and set it in the steamer for 15 minutes.


6. After steaming, remove the plate and cool completely. Cut into squares or diamonds and set aside. In a flat pan, pour sufficient oil for shallow frying. Add the mustard seeds, cumin seeds and asafoetida and place the cut Vadi pieces into the oil. Fry each side until light brown and crisp. Remove from pan. Repeat for all the pieces. 

7. Now in the same pan put in the grated coconut and Sesame seeds and saute until light brown. Put this on tempering on the vadi for a nice flavour. The Kothimbir Vadi is ready.


NOTES:
1. The ratio of coriander leaf to Besan is 2:1, stick to that. More quantity scale up the measures in the same proportion.
2. Wash and drain the coriander leaves well before chopping.
3. I have not used garlic, but it can be added.
4. If you like the Vadis deep-fried, go ahead and fry them. 


If you tried this recipe and liked it please comment below. I would love to hear from you.

If you want the recipes emailed to you leave your id in the homepage near the📧
icon. Whenever we have a new post the recipe will be mailed to you. Thank you for showing interest in Rajjo's Kitchen.


Friday 24 July 2020

STUFFED KUZHI PANIYARAM(SAVORY)

Kuzhi Paniyarams are basically Lentil and rice batter dumplings. The batter is fermented and then poured into a Paniyaram pan which gives them the shape. Most often in South Indian homes the Kuzhi Paniyaram or Kuzhi appam as we call it is made from the Idli batter itself. When the batter becomes a little sour it is made into Paniyaram. That is because the Idli/Dosa batter is made for a whole week as a quick breakfast or dinner option. So day 1 is Idli, day 2 Dosa and day 3 onwards its Paniyaram and dosa with the batter, as sour Idlis are not that great to taste. However, when I have guests over I prefer making the batter especially for this as it makes the crust crisp and enhances the taste of the Paniyaram to a different level and the texture on the inside of the Paniyaram is lovely.

There are many variations of the Paniyaram batter. It is usually made with Urad dal and rice, Raagi(Finger millet)flour, Jowar(Sorghum) flour, Bajra(Pearl millet) flour, etc can also be used in the batter. The proportions of the Dal and rice also vary from home to home. The Paniyaram batter is used as it is or sometimes, finely chopped Onion, grated Carrots, and other vegetables can also be added. 

I have stuffed the Paniyaram with a mashed potato spicy stuffing which tastes wonderful, I have also added finely chopped onions, green chillies, ginger and curry leaves to the batter. This combination of onion in the batter and the Potato stuffing within is a perfect one.
I personally don't like using the non-stick Paniyaram pan for this dish, as the traditional brass or iron ones give the Paniyaram its crispy exterior. If you have only the non-stick one with you, that's fine too. 
Kuzhi Paniyarams can be served as Breakfast, starters or even for dinner with any chutney. 

While you are here please check out other recipes of mine like  Dahi Pohe, Adai,

PREP TIME: 20 Mins(+4 hrs soak)                    COOK TIME: 40 Mins
TOTAL TIME: 60 Mins                                      COURSE:  SNACK/TIFFIN
CUISINE: SOUTH INDIAN                               SERVINGS: 4
                                                                              AUTHOR: Rajni Ram


Here is the recipe of Stuffed Kuzhi Paniyaram--

Ingredients for batter:
Urad dal/black gram(whole without skin) 1 cup
Idli Rice/Boiled rice 1.5 cup
Raw rice(any variety except Basmathi) 1.5 cup
Methi seeds/fenugreek seeds 1 tsp

Ingredients for stuffing:

Potatoes 4 medium(boiled)
Turmeric powder 1/2 tsp
Red chilli powder 1 tsp
Mustard seeds/Rai 1 tsp
Cumin seeds/jeera 1 tsp
Asafoetida 1/4 tsp
Curry leaves a few (finely chopped)
Salt as per taste
oil for tempering and for greasing the Paniyaram pan.

Directions for Batter:
Soak the dal and both rice varieties along with a teaspoon of methi seeds in a huge vessel for 3-4 hours and grind to a smooth paste to a batter of medium consistency(should resemble Idli batter). Add salt, and leave to ferment for 6-8 hours for a perfect texture of the Paniyaram. While grinding add little water at a time, the batter should be a smooth one, but not runny.

Directions for Stuffing:
Boil the potatoes, peel the skin and mash them well. Now in a pan pour some oil and heat. Add the mustard seeds, as they crackle, add the Cumin followed by turmeric powder, red chilli powder, salt, asafoetida and curry leaves. Nicely fry the masala in the oil for 30 seconds and drop the mashed potato into the tempering and mix nicely, so that the tempering is evenly distributed. Cool the mixture.
After it ferments temper the batter with mustard seeds and asafoetida.

Directions for Paniyaram:
Chop Onions, green chillies, ginger and curry leaves finely and add them to the fermented batter and stir well.
Put the Paniyaram pan on the flame and let it heat up. Pour oil into the moulds(if using a traditional metal pan, only the first round will need 1 tsp oil per mould, rest of the batches will need only a few drops). Wait for 1/2 a minute, let the oil heat up, now reduce the flame and with a small round ladle pour 1 scoop of batter into each mould, now take the stuffing little at a time with a spoon and drop it in the centre of the batter. Now cover up the stuffing with  1/2 scoop of batter and increase heat. Drizzle little oil around the corners of each mould, reduce the flame and slowly loosen them from the sides. Now flip each Paniyaram and cook the other side. When done loosen it from the mould and remove it. The crispy and tasty Kuzhi Paniyarams are ready..serve them with Tomato Coconut chutney or Tomato onion chutney. Enjoy. Bon Appetit.

STEPWISE RECIPE FOLLOWS:
1. Soak the dal and rice along with 1 tsp methi seeds for 3 hours minimum and grind to a smooth paste of medium consistency(Idli batter consistency). Add the salt, mix and allow to ferment for 6 to 8 hours.


2. Preparation of stuffing--Boil Potatoes, peel and mash them. In a pan take 1 tbsp oil and heat. Now add the mustard, followed by cumin, turmeric powder, salt, red chilli powder, asafoetida and curry leaves. Fry the masala for 30 seconds and add the mashed potato to the tempering and mix well. The tempering should have coated the potatoes well. Check for salt and spice. The stuffing should be a little spicy.


3. To the fermented batter add finely chopped onions, ginger, green chillies and curry leaves and stir nicely. Temper the batter with mustard seeds, cumin seeds and asafoetida.


4. Now put the Paniyaram pan on the flame and heat. Pour 1 tsp oil in each mould. Once the oil is heated, using a small round ladle, pour 1 scoop of batter into each mould. Now with a spoon drop little of the stuffing in the centre of the batter, now pour more batter to cover the stuffing. Drizzle some oil in the corners and cook for 1/2 a minute. Now loosen the edges of the paniyaram using a fork/ spoon or thin metal wire to flip them around, cook them and remove them from the pan when done. For doneness when you stick the metal wire or toothpick in the centre of the paniyaram, it should come out clean. 
(I have included a short video so that you understand the process of cooking the Paniyaram in the pan.)


5. Repeat this process for the entire batter or how many ever you wish to serve, the remaining batter can be stored in the fridge and used to make uthappam.
The Paniyaram is ready to serve. It goes well with all chutneys or just by itself as it has a stuffing. It can be served with Sambar too.


How do make this recipe without a Paniyaram pan?
well, make a thicker batter, and also make small balls of the stuffing. Now take the stuffing and drop it in the batter, use your hands to coat the stuffing with batter and deep fry them in a Kadai of oil.


NOTES:
1. As the recipe involves soaking and fermentation, plan your time. In winters give more time for fermentation.
2. The onion, green chillies, ginger and curry leaves can also be sauteed in oil and added to the batter.
3. If using a nonstick paniyaram pan, I recommend drizzling it with some oil for a crunchy exterior. 
4. Only small amounts of the stuffing as to put in the center of the batter, not too much of it. 

If you tried this recipe and liked it please comment below. I would love to hear from you.


TOFU AND STIR FRIED VEGETABLES IN HOT SCHEZWAN SAUCE

  Any Tofu lovers? I agree its an acquired taste,but going by the health benefits it has to offer, I try including it in my diet now and the...