Vegetarian cooking blog

Showing posts with label Indian Sweets. Show all posts

Saturday, 22 May 2021

BEETROOT HALWA

 I have a long standing relationship with Beetroot. I have liked it as a child and continue to do so. What I meant by long standing relationship is that, when I was anemic for a certain period, I was advised to eat Beetroot and Pomegranate regularly. And yes Dates too. These three are always part of my diet even now. I cook Beetroot in many forms. Stir fry, Falafel, Paratha, Salad and more. But my most favourite version is of this dessert, Beetroot Halwa. In fact I prefer Beetroot halwa to Carrot Halwa. 

If you have followed my Carrot halwa recipe you will see that I have followed the same method. These root vegetables have an earthy taste and smell. So to make a dessert with them, it is necessary to get rid of the earthy taste. That's done by boiling them in milk( a good amount of it). This not only removes that raw taste, but add that nice milkiness that we require for a Halwa or any fudge kind of recipe.

If not boiling them in milk, you need something like unsweetened Mava or Khoya, which is dehydrated milk to get rid of the taste. This version I have done in my Gajar Halwa Barfi recipe. It is a very quick version of the Carrot Halwa itself. Finally, this halwa is such a guilt free dish because a lot of sugar is not needed owing to the natural sweetness of the beets, and ghee has been used only for frying the nuts.

Coming to the vegetable itself and why one must include it in their diet is because they are packed with essential vitamins, minerals, some of  which have medicinal properties. Another popular reason is that they have any nutrients, and fewer calories, so it is good for weight watchers. It helps keep blood pressure in check. They also have a decent amount of Fiber, folate and Vitamin C. Isn't this reason enough for it to be a part of our meal plan?

I am cooking this Halwa on a day I have excess milk, so you will see me using my regular milk vessel, instead of my Kadai or Pan which I usually prefer. This is also Pandemic time, so no house help around. The more vessels I use, the more clean up I end up doing... getting the drift๐Ÿ˜‰?

While you are here check out other dessert recipes of mine like- Carrot Kheer, Gajar/Carrot Halwa, Moong Dal Halwa, Dry fruit ladoo, Red Poha Ladoo, Sweet Potato Puranpoli, and more...

Here is the recipe for Beet root Halwa.  


     PREP TIME: 10 Mins                                      COOK TIME: 40 Mins
     TOTAL TIME: 50 Mins                                      COURSE:  DESSERT
     CUISINE:  INDIAN                                            SERVINGS: 6
     AUTHOR: Rajni Ram


    Ingredients:

    Beetroot 2 medium around 250 gm grated

    Milk 500 ml

    Sugar 3/4 cup

    Cardamom powder 2 pinches

    Cashewnuts few broken to bits

    Pistachio a few (optional)

    Ghee for frying nuts

    Directions: Boil Milk in a Pan/Kadai or heavy bottomed vessel.  Once boiled, add the grated beetroot and cook. Keep stirring continuously, so that the milk doesn't get burnt. This is an important step. If the milk sticks to the bottom of the vessel and burns, the dessert will not taste good any more. The stirring and cooking process has to continue until the mixture becomes almost dry. This takes about 40 to 45 minutes, if done on medium flame, while stirring constantly. I have indicated the steps of evaporation of milk in the mixture, in my pictures. When the mixture is almost dry, it is time to add the sugar. Keep stirring again. The mixture will liquefy. Not to worry. Keep stirring, and it will start solidifying again. Keep stirring until the mixture no more sticks to the bottom of the pan. This is the right consistency. Switch off the flame and, add cardamom powder. Now in a small tadka Kadai heat some ghee, drop in the broken cashew pieces and fry until golden brown. Pour this over the Halwa and enjoy warm. Garnish with Pistachios if you prefer.


STEPWISE RECIPE FOLLOWS:

1.  Boil Milk in a Pan/Kadai or heavy bottomed vessel.  Once boiled, add the grated beetroot and cook. Keep stirring continuously, so that the milk doesn't get burnt. This is an important step. If the milk sticks to the bottom of the vessel and burns, the dessert will not taste good any more.


2. The stirring and cooking process has to continue until the mixture becomes almost dry. This takes about 40 to 45 minutes, if done on medium flame, while stirring constantly. I have indicated the steps of evaporation of milk in the mixture, in my pictures.


3. When the mixture is almost dry, it is time to add the sugar. Keep stirring again. The mixture will liquefy. Not to worry. Keep stirring, and it will start solidifying again. Keep stirring until the mixture no more sticks to the bottom of the pan. This is the right consistency.


4. Switch off the flame and, add cardamom powder. Now in a small tadka Kadai heat some ghee, drop in the broken cashew pieces and fry until golden brown. Pour this over the Halwa and enjoy warm. Garnish with Pistachios if you prefer.


    NOTES:

1. Once can easily double up measures for more quantity.

2. If you are a beginner, you may want to know that, as you cook the beets in milk, their colour pales, but once the sugar is added, it becomes all bright again. So you are doing good. Do not worry.

3. Sometimes if the beets are too juicy, inspite of trying to dry the mixture, a small amount of moisture remains. If you don't prefer that, just add 1 tbsp of milk powder and you get the perfect texture.


If you tried this recipe and liked it please comment below. I would love to hear from you. If you have a query about the recipe email us and ill respond as soon as I can.

If you would like to receive our recipes on your mail please leave your mail id at the homepage. Every time Rajjo's Kitchenn has a new post we will mail the recipe to you.


Sunday, 2 May 2021

MOONG DAL HALWA

Moong dal Halwa is an Indian dessert made from yellow lentils. It is basically a fudge and is very rich because of the amount ghee/ clarified butter added to it. Though I make many sweet varieties and desserts, I’m not generally the one who will stay until dessert. I’m immensely intuitive while I create sweet dishes, but I don’t crave sweets much. But this halwa is very close to my heart because it probably is the first sweet dish I ever liked. Thanks to our stint in Delhi, I have got to taste the best ones.

Infact, I liked this sweet dish so much that I have attempted to make it in the past, failed miserably and had given up on ever trying it again. But last year during the pandemic lockdown I was craving it badly, and as you know “ when you want something very badly, the universe conspires to make it happen” ๐Ÿ˜„. So I had a viola moment during Diwali,  while I was documenting the sweets and savoury prepared by me, when a simple method to make this halwa struck m

If you have attempted making this halwa any time or have searched the net for the recipe, all of them will tell you it takes 3 to 4 hours to get this sweet dish done. The actual recipe asks to soak and grind the lentils and them cook it in milk/ water and then add the sweetening agent. As I have claimed here on the blog before, I will take a short cut as long as it does not alter the taste, flavour and texture of the dish. And I took a short cut to this recipe and I don’t regret it because the outcome was just like the original. 

If you follow the procedure as given here by me without altering I’m sure it’s a no fail recipe. And why stand by the stove for hours when you can get the same taste and flavour in an hour's time? Having failed at this recipe many times, and knowing what went wrong each time, this time the recipe was made with so much conviction of technique that it turned out wonderfully. 

While you are here do check out other dessert recipes like Carrot kheer, Strawberry and Lemon loaf, Red Poha Ladoo, Shrikhand, Malpua with Gulab Jamun mix, Akkaravadisal, Sweet Poha, and more...

Here is the recipe of Moong Dal Halwa-


      PREP TIME: 10 Mins                                      COOK TIME: 50 Mins
     TOTAL TIME: 60 Mins                                      COURSE:  DESSERT
     CUISINE:  INDIAN                                            SERVINGS: 6
     AUTHOR: Rajni Ram


    Ingredients:

    Moong dal split ( yellow lentils) 1 cup

    Milk 1 cup

    Water 2 cups

    Sugar 1 cup

    Saffron strands a few (optional)

    Yellow food colour/turmeric powder for colour 2 pinches

    Ghee 100 GM approx

    Cardamom/ Elaichi powder 1/4 tsp

    Almonds and Pistachio chopped a few


    Directions:

The foremost and important step is dry roasting the dal to a light brown colour. This has to be done patiently on low heat. On this depends the entire recipe. First put a pan/ kadai on flame and warm it. Now put the dal and start the roasting procedure by stirring constantly. This step can be done ahead. Cool the roasted dal and grind it in a blender. For a smooth texture of halwa grind it finely, for a grainy texture grind it coarse. Whole dal should not be visible. Now put this ground dal powder in a pan, add one cup milk, followed by 2 cups water, and stir to make it lump free. Now put the pan on the flame, add the food colour/turmeric powder, and start cooking the mixture on medium flame. Slowly the mixture will start thickening. If adding saffron strands, add now. Keep stirring gently, scraping the sides of the pan from time to time. Once the mixture thickens, check if there is any rawness in the smell. That is, if the dal smell/ taste is still coming. If yes, add another ladle of milk and continue to stir again. If your mixture has thickened and there is no raw smell or taste, add the sugar gently and start stirring again. As the sugar melts the dal mixture will liquefy. Don’t worry and continue to stir. The mixture will start thickening again. Now is the time to start pouring the ghee. Pour one ladle at a time and stir until the ghee is absorbed. Continue this process until no more ghee gets absorbed, but remains on the halwa. You will also notice that at this stage your mixture/ halwa no longer sticks to the pan/ kadai bottom, but comes out clean while stirring. Another way to tell the Halwa is done, is when you take a little of it in your fingers and try to form a ball, you should be able to do it. Add the cardamom powder and nuts and transfer the halwa to a container.  The delicious Moong dal halwa is ready to relish .


    STEPWISE RECIPE FOLLOWS:

1. First out a pan/ kadai on flame and warm it. Now put the dal and start the roasting procedure by stirring constantly. This step can be done ahead. Cool the roasted dal and grind it in a blender. For a smooth texture of halwa grind it finely, for a grainy texture grind it coarse. 


2. Now put this ground dal powder in a pan, add one cup milk, followed by 2 cups water, and stir to make it lump free. Now put the pan on the flame, add the food colour/turmeric powder, and start cooking the mixture on medium flame.


3. Slowly the mixture will start thickening. Keep stirring gently, scraping the sides of the pan from time to time. If adding saffron strands, add now. Once the mixture thickens, check if there is any rawness in the smell. That is, if the dal smell/ taste is still coming. If yes, add another ladle of milk and continue to stir again. If your mixture has thickened and there is no raw smell or taste, add the sugar gently and start stirring again.


4. As the sugar melts the dal mixture will liquefy. Don’t worry and continue to stir. The mixture will start thickening again. Now is the time to start pouring the ghee. Pour one ladle at a time and stir until the ghee is absorbed. Continue this process until no more ghee gets absorbed, but remains on the halwa. 


5. You will also notice that at this stage your mixture/ halwa no longer sticks to the pan/ kadai bottom, but comes out clean while stirring. Another way to tell the Halwa is done, is when you take a little of it in your fingers and try to form a ball, you should be able to do it. Add the cardamom powder and nuts and transfer the halwa to a container. The delicious Moong dal halwa is ready to relish .


    NOTES:

1. The foremost and important step is dry roasting the dal to a light brown colour. This has to be done patiently on low heat. On this depends the entire recipe.
2. Ensure the Kadai is warm before you put in the dal for roasting. This way the Dal will get roasted evenly and quickly.
3. I like a grainy texture, so while grinding, I stopped just before super fine.
4. Adding more ghee than required will subdue the taste of the dal. When the dal mixture no longer takes in the ghee, as soon as poured and stirred, stop adding any more ghee.
5. I used a non stick pan for making the Halwa and recommend the same for now. I will soon be trying in a regular kadai and shall update the recipe then.
6. I have kept my Halwa colour yellow, by frying it to a light brown and then adding turmeric powder(which is a natural colour). If you prefer a browner version, roast the dal to a deeper brown and proceed with the recipe. 
7. I have used turmeric powder instead of food colour, as it is natural and two pinches of it do not make a difference to the taste of the halwa.


If you tried this recipe and liked it please comment below. I would love to hear from you. If you have a query about the recipe email us and ill respond as soon as I can.

If you would like to receive our recipes on your mail please leave your mail id at the homepage. Every time Rajjo's Kitchen has a new post we will mail the recipe to you.


Thursday, 1 April 2021

SWEET POTATO PURAN POLI

Every year during Vaikunta Ekadashi and Shiv Rathri the elders in my family like to have Sweet Potato, as is the custom. Shiva Rathri and Vaikunta Ekadashi both are celebrated in winter and the carbs from the Sweet potato give the much needed warmth. This could have been the reason this custom was formed. 

So instead of just giving them the plain boiled one, I prefer giving it to them as these Puran Polis. This is quite a simple recipe and needs no pre planing. Sweet potatoes are also high on fiber and minerals, therefore they are perfect for people on a fast. Sweet Potatoes promote gut health, they support healthy vision and also support the immune system. Isn't this reason enough for us to include this healthy  tuber.

While you choose the sweet Potatoes at the market, choose the fat ones, chop off the tips before boiling, as that's where you may find some rough fibres. 

There is a lot more one can do with Sweet Potatoes than just making a subji and I for sure am going to explore every one of them and bring it here for you all.

Let's get to the recipe of this yummy Sweet potato stuffed flat bread which can be had as dessert, can be a holi offering(prasad), or even a snack.

While you are here check out my other dessert recipes like Gajar ka Halwa, Carrot kheer, Eggless Pineapple cake, Strawberry and Lemon loaf, Dry fruit ladoo, Shrikand, Aval Kesari, Mal Pua, Akkaravadisal and more...

Here is the recipe of Sweet Potato Puran Poli--

PREP TIME: 30 Mins                                      COOK TIME:30 Mins
TOTAL TIME: 20Mins                                     COURSE: DESSERT/SWEET
CUISINE:   INDIAN                                         SERVINGS: 4
AUTHOR: Rajni Ram


Ingredients for dough:

Wheat flour 2 cups
salt a pinch
oil 1 tsp
water to knead

Ingredients for stuffing:

Sweet potatoes 2 large or 3 medium ( pressure cook for 3 whistles, peel skin and mash)
jaggery 1/2 cup
cardamom powder 1 tsp
Ghee/ clarified butter 1 tbsp
Ghee for cooking Polis

Directions:
 For dough- combine flour adding the salt and oil and little water at a time and combine to form a soft yet stiff dough, like that of Paratha dough.

For stuffing: Pressure cook, peel and mash the sweet potatoes. Now ina kadai put in the mashed sweet potatoes followed by the jaggery and keep stirring. The jaggery will begin to melt. Keep stirring so that the jaggery combines well with the sweet potato and thickens a little. Now add cardamom powder and ghee and mix well. Allow the stuffing to cool.
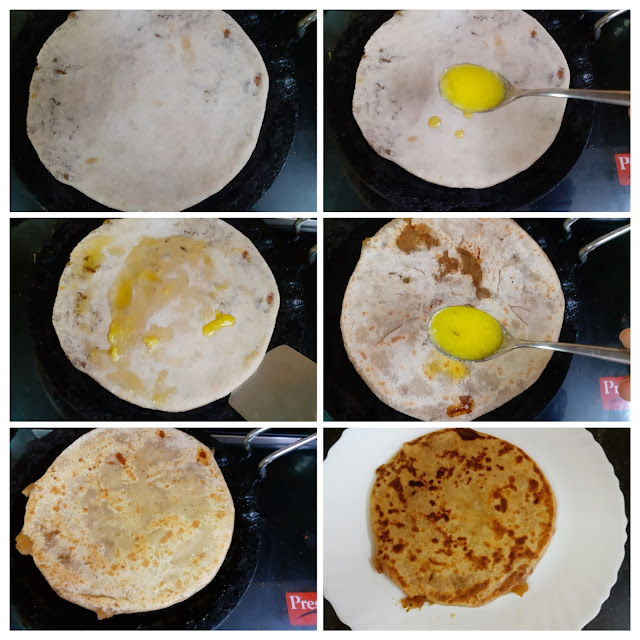
Now divide the dough into 10 equal parts and divide the stuffing also. Take one ball of the dough at a time, dust it with flour and roll into a small puri, put the stuffing in the centre, and seal the edges. dust with little flour again and roll out into a thick Chapathi. Heat a girdle/Tava and put the Poli ( stuffed roti) on it. Cook on one side and apply some ghee, flip over and cook on the other side and apply more ghee. Repeat for all the dough and stuffing. Enjoy hot. This can be stored in the fridge for uptio 4 das and warmed up as required.


STEPWISE RECIPE FOLLOWS: 

1. For dough- combine flour adding the salt and oil and little water at a time and combine to form a soft yet stiff dough, like that of Paratha dough.


2. For stuffing: Pressure cook, peel and mash the sweet potatoes. Now ina kadai put in the mashed sweet potatoes followed by the jaggery and keep stirring. The jaggery will begin to melt. Keep stirring so that the jaggery combines well with the sweet potato and thickens a little.


3. Now add cardamom powder and ghee and mix well. Allow the stuffing to cool.


4. Now divide the dough into 10 equal parts and divide the stuffing also. Take one ball of the dough at a time, dust it with flour and roll into a small puri, put the stuffing in the centre, and seal the edges. dust with little flour again and roll out into a thick Chapathi. 


5. Heat a girdle/Tava and put the Poli ( stuffed roti) on it. Cook on one side and apply some ghee, flip over and cook on the other side and apply more ghee. Repeat for all the dough and stuffing. Enjoy hot.


NOTES:

1. Let the  jaggery melt in the heat from the sweet potato, do not add any water. If the mixture is lose, the stuffing will tend to come out of the Roti.
2. Ghee can be smeared even after both sides are cooked.
3. Brown or unrefined sugar can be added in place  of jaggery.

If you tried this recipe and liked it please comment below. I would love to hear from you. If you have a query about the recipe email us and ill respond as soon as I can.

If you would like to receive our recipes on your mail please leave your mail id at the homepage. Every time Rajjo's Kitchen has a new post we will mail the recipe to you.


Wednesday, 13 January 2021

KOVA KAJJIKAYALU

 This Indian sweet is so close to my heart as they bring back many memories of places, people and a different time altogether. Kajjikayalu in Telugu means Karanji or Gujiya.

Kova Kajjikayalu or Kobbari Kova Kajjikayalu is a melt in the mouth sweet with a stuffing of coconut and jaggery, covered on the outside with sweetened Kova or Mava. This is a very easy to do recipe.

In this recipe I have gone completely by intuition and not referred any other recipe.  That's why it may be a little different from other ones. 

Typically Almond flour is not used in this sweet, but I have used a little for the smooth texture and so that the Kova is easy to work around with.

Like me, my daughter also likes this sweet or may be she likes it, and so I like it๐Ÿ˜€. This is one of the most popular sweets at G Pullareddy Sweets of Hyderabad. Every time my parents would visit us they would get this for my daughter as she would always ask for this as a child. After that due to some reasons the connect with Hyderabad broke(oh!only from a proximity point of view, at heart I'm always a Hyderabadi). 

Since a few years we have not tasted this sweet and never dared to make it as it would always be compared to the Pullareddy ones, but then I guess today it had to happen. In my mind it was going on for a while. To bring it to fructification, I had to visualize it in my mind first. I am so happy that it turned out so well the first time. 

Lets go to the recipe right away. While you are here check out my other Indian sweet recipes like - Akkaravadisal, Chakkara Pongal, Pineapple Rabri, Atte ka Sheera, Aval Kesari, Vella Aval, and more...

Here is the recipe of Kova Kajjikayalu-  

  PREP TIME: 20                                         COOK TIME: 20 MINS
 TOTAL TIME:40Mins                                  COURSE:  SWEET
 CUISINE:  INDIAN                                      SERVINGS: 15 PCS
 AUTHOR: Rajni Ram


    Ingredients:

    Kova/Mava(unsweetened) 300 gm

    Sugar 6 tbsp

    Dessicated Coconut 2 cups( freshly grated coconut can also be used)

    Jaggery 1 cup

    Cardamom powder 1/2 tsp

    Almond Flour 3 tbsp 


    Directions:

Take a heavy bottomed Kadai and put the Jaggery and desiccated coconut in it. Sprinkle some water(less than 1/4 cup) in it and put it on flame. Keep stirring over a low flame until the jaggery melts and mixes with the coconut, and the stuffing comes together. If you are able to form a ball with the coconut jaggery mixture, thats the right stage. This takes about 10 minutes. The poornam will leave the bottom of the Kadai when done. Add cardamom powder and, let the stuffing/Poornam cool down. Grate/shred the Kova and keep it ready. Put the shredded Kova in a non stick pan, add the sugar and start stirring. The Kova will loosen up as the sugar melts, but will start solidifying again. Keep stirring until it leaves the bottom of the pan. Transfer it immediately to a plate and let it cool for exactly 5 minutes(not more as, if it cools too much making the cover gets difficult). Now add the Almond flour and combine with a spatula. Divide the Kova into 15 equal portions. Divide the Coconut stuffing also into 15 equal portions, shaping them as ovals. Apply ghee to your fingers and palms.Now take one roundel of Kova and flatten it on your palms with your fingers. Place the coconut stuffing in the centre and seal the edges as shown in the picture. Repeat for all the Kova and stuffing. Cover them with a clean cloth and allow to set for 2 hrs. The outer Kova covering will toughen up a bit as it cools, but will melt in your mouth and the coconut Poornam just takes this simple sweet to a different level. Overall a healthy sweet recipe. Ideal for gifting friends, make it for Diwali or Janmashtami when milk based sweets are made. Make them just of no reason an relish them, just as I made them today.


    STEPWISE RECIPE FOLLOWS:

1.  Take a heavy bottomed Kadai and put the Jaggery and desiccated coconut in it. Sprinkle some water(less than 1/4 cup) in it and put it on flame. Keep stirring over a low flame until the jaggery melts and mixes with the coconut, and the stuffing comes together. If you are able to form a ball with the coconut jaggery mixture, thats the right stage. This takes about 10 minutes. The poornam will leave the bottom of the Kadai when done. Add cardamom powder and, let the stuffing/Poornam cool down.


2. Grate/shred the Kova and keep it ready. Put the shredded Kova in a non stick pan, add the sugar and start stirring. The Kova will loosen up as the sugar melts, but will start solidifying again. Keep stirring until it leaves the bottom of the pan. Transfer it immediately to a plate and let it cool for exactly 5 minutes(not more as, if it cools too much making the cover gets difficult).


3. Now add the 3 tbsp Almond flour and combine with a spatula. Divide the Kova into 15 equal portions. Divide the Coconut stuffing also into 15 equal portions, shaping them as ovals. Apply ghee to your fingers and palms.Now take one roundel of Kova and flatten it on your palms with your fingers. Place the coconut stuffing in the centre and seal the edges as shown in the picture. Repeat for all the Kova and stuffing. Leave to set for 2 hrs. 


    NOTES:

1. I have used Desiccated coconut, but fresh coconut can also be used. Quantity same as above.

2. As I have used only Almond flour I cannot suggest any other flour at the moment. Once i try it out with other lours shall update the recipe. 

3. Almond flour is easily available in shops or almonds can be blanched in hot water dried for 1/2 an hour and then powdered in a mixie. The powder should be fine, without lumps.

4. This sweet can be stored outside for 3 days and in the fridge up to 15 days. Putting it in the fridge makes the Kova cover to become a little hard. Keep it out for a few minutes before consumption if storing in the fridge.

5. Store bought Kova is a light yellow in colour. If making at home it turns out white.


If you tried this recipe and liked it please comment below. I would love to hear from you. If you have a query about the recipe email us and ill respond as soon as I can.

If you would like to receive our recipes in your mail please leave your mail id at the homepage. Every time Rajjo's Kitchen has a new post we will mail the recipe to you.

Sunday, 20 December 2020

GAJAR HALWA/ CARROT HALWA

 Gajar Halwa/ Carrot Halwa is a very popular Indian dessert. Mostly a winter dessert. Though it is made frequently with the regular carrots ( English Carrots), using the Delhi Carrots or Red Carrots as they are called gives the best results.

This is one dessert I love and consider it very sacred, so if you are looking for an easy, one pot or microwave recipe, you are going to be disappointed. As far as Gajar Halwa is concerned I am old school. I cook it in milk( and a whole lot of milk) so that the raw taste of the Carrots is gone and the milk crumbles to a Rabri like texture. The taste of such a Halwa is divine. This is one recipe I have never made with regular carrot except in my dessert recipe- Gajar halwa Barfi where I was shaping  it like fudge( Barfi) and using Khoya to speed up the process. Whereas this recipe of Gajar Halwa is a slow cook process. The slower it cooks the better it tastes. Am I disappointing you? Well, make it like this and you will be hooked to it for life. Remember the best things in life come with a lot of patience.

My belief is that when I wait a whole year for the Red Carrots to appear in the Market and then make the Halwa, then it should be made the authentic way. Which does not involve adding condensed milk or Koya or milk powder but in cooking the carrots in milk( whole cream), to perfection.

I use only whole cream milk to make this dessert. So the taste of the Halwa depends entirely on the quality of milk. A full/whole cream milk Halwa will give you better taste and I can say this because I have tried it will all milk varieties available in the market and what works best is whole/full cream milk.

So after the whole mega write up, taking you to the recipe. While you are here do check out my other carrot based desserts like Carrot Kheer( another speciality from Rajjo's Kitchenn) and Gajar Halwa Barfi.


    PREP TIME:30                                   COOK TIME: 1hr
   TOTAL TIME:1hr.30Mins                     COURSE:  DESSERT
   CUISINE:  INDIAN                               SERVINGS: 6
   AUTHOR: Rajni Ram


    Ingredients:


    Carrots ( Preferably Red ones) 1.5 kilo grated

    Milk whole cream/ full cream 2 litres

    Sugar 300 gm

    Cardamom/ Elaichi powder

    Ghee 4 tbsp

    Cashews a new broken


    Directions:

Wash, peel and grate the carrots and keep aside. In a huge thick bottomed vessel/ kadai/ or urli boil the milk. When it comes to a boil, reduce the flame and put in the grated carrots. Start stirring the mixture. The flame can be increased now but constant stirring is required . This process has to continue until almost all the milk dries up. The texture will look like Rabri stickng to carrot. Once all milk dries up, reduce the flame and add the sugar. Continue to stir again. Once the sugar is added the mixture will liquify, continue to stir until all the moisture is absorbed. The halwa will come together but it will not be gooey. Now add the cardamom powder. Fry the nuts in ghee and pour it over the halwa along with the nuts. The healthy and delicious Gajar Halwa is ready.  Serve warm. Bon Appetite. 


    STEPWISE RECIPE FOLLOWS:

1. Wash, peel and grate the carrots and keep aside. In a huge thick bottomed vessel/ kadai/ or Urli boil the milk.


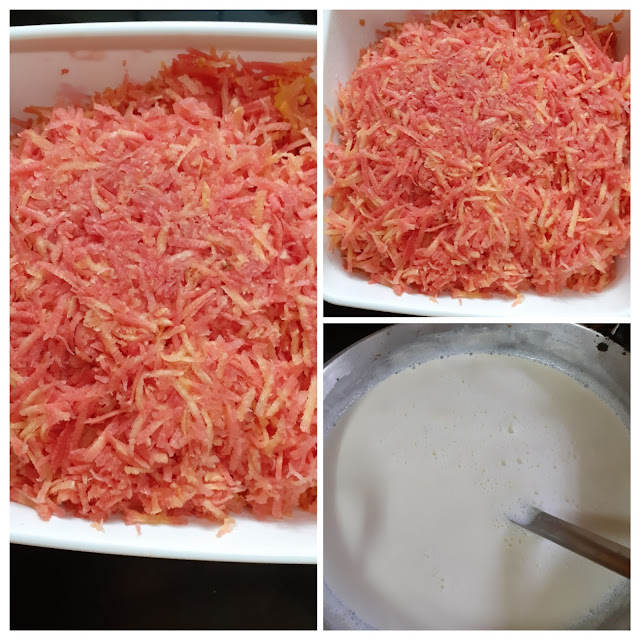
2. When it comes to a boil, reduce the flame and put in the grated carrots. Start stirring the mixture. The flame can be increased now but constant stirring is required . This process has to continue until almost all the milk dries up. Showing you the stages of reduction in pictures below that are self explanatory. 


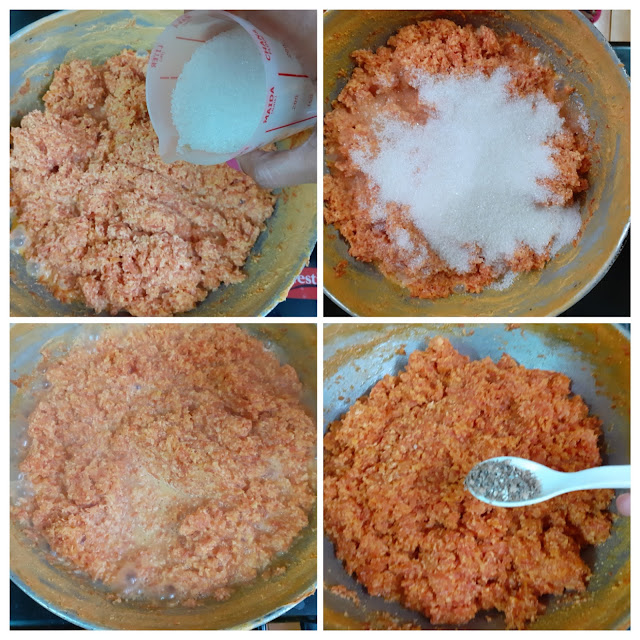
3. Once all milk dries up, reduce the flame and add the sugar. Continue to stir again. Once the sugar is added the mixture will liquefy, continue to stir until all the moisture is absorbed. The Halwa will come together but it will not be gooey. (forgot to click a picture finally to show the final consistency, so have included the one showing the cardamom powder. Please follow that texture for final consistency of Halwa).


4. Now add the cardamom powder. Fry the nuts in ghee and pour it over the Halwa along with the nuts. The healthy and delicious Gajar Halwa is ready.  Serve warm.


    NOTES:

1. While cooking at high heat keep stirring constantly to avoid burning the contents at the bottom of the pan.

2. Actually after sometime of cooking the milk and carrot mixture , it does not overflow from the vessel. That time the stirring can be relaxed a bit, but stir every couple of minutes. If you are following this reduce flame when not stirring.

3. Good quality full cream milk yields the best result, the Halwa can be made with milk of any consistency though. The results may not be what I have described .

4. Feel free to try this with regular Carrots too. Method being the same.

5. Sometimes people try to over power the subtle carrot flavour by adding huge amounts of ghee. This is not required. Pouring ghee at the right time is very important, such that the flavour is enhanced and a lot of ghee is not poured unnecessarily. Check out my Cakkara Pongal post for the directions on how to pour the ghee.


If you tried this recipe and liked it please comment below. I would love to hear from you. If you have a query about the recipe email us and ill respond as soon as I can.

If you would like to receive our recipes in your mail please leave your mail id at the homepage. Every time Rajjo's Kitchen has a new post we will mail the recipe to you.

Thursday, 12 November 2020

DRY FRUIT LADOO

 These Ladoos are absolutely delicious and healthy. In my house, these are made not only during Diwali but all year through. They have a long shelf life and can sometimes substitute for breakfast. People who fast can rely on this for some quick energy. No sugar or honey or jaggery is added and I use minimum ghee(about 3 teaspoons). Yes! this is a whole package of health. Remember good things always come in small packages? This is that package๐Ÿ˜€.

My daughter gets it packed for hostel without fail every time she comes homes on her break. According to her, whenever she gets up late and is late for breakfast at the mess, she pops in 2 of these ladoos and grabs a glass of milk and her breakfast is taken care of for that day. I don't recommend this on a daily basis, but we all have times when we are running against time, this healthy ladoo comes in handy, it also takes care of sudden hunger pangs. My home always has a stock of these ladoos. And the best part you can customize them as per your desired dry fruits and nuts.

While you are here please check out my other sweet/dessert recipes like- Red Poha Ladoo, Carrot Kheer, Gajar halwa barfi, Maa Ladoo, and more...

Here is the recipe for Dry fruit ladoo-

PREP TIME: 20                                          COOK TIME: 20 MINS
 TOTAL TIME:40Mins                                  COURSE:  SWEET
 CUISINE:  INDIAN                                      SERVINGS: 15 PCS
 AUTHOR: Rajni Ram


     Ingredients:

     Dates ( juicy, fleshy ones) 250 gms deseeded

    Cashewnuts 100 -125 gms

    Almonds 100 gm

    Walnut 75 gm

    Ghee 1 tbsp

    Directions:

Put a pan over the flame and add 1 tsp ghee to it. Now roast all the nuts separately to a nice golden colour. Take care not to burn them, as the burnt smell will reduce the taste and flavour of the ladoo. Transfer them to a plate and cool them. On cooling using the "pulse mode" of your blender, blend them to a coarse mixture. Now to the same pan add another teaspoon ghee and put in the deseeded dates. Keep stirring and mashing them with the back of a spatula. As it turns warm, the dates start getting a little gooey. Now start adding the coarse nut mixture, little by little, until the gooey date paste absorbs most of it( mixture will look semi-dry). All through this process, the flame should be on low. Once your date and nut mixture is combined, remove from flame and cool for 5 minutes. We want a little warmth for binding, so don't let it go too cold. Grease your palms with a little ghee and start making ladoo of them. Repeat for the entire mixture. The yummy and tasty Dry fruit ladoo are ready. Store them in an airtight jar once they are completely cool. 


STEPWISE RECIPE FOLLOWS:

1. Assemble all ingredients. Put a pan over the flame and add 1 tsp ghee to it. Now roast all the nuts separately to a nice golden colour. Take care not to burn them, as the burnt smell will reduce the taste and flavour of the ladoo.


2. Transfer them to a plate and cool them. On cooling using the "pulse mode" of your blender, blend them to a coarse mixture. 


3. Now to the same pan add another teaspoon ghee and put in the deseeded dates. Keep stirring and mashing them with the back of a spatula. As it turns warm, the dates start getting a little gooey. 


4. Now start adding the coarse nut mixture, little by little, until the gooey date paste absorbs most of it( mixture will look semi-dry). All through this process, the flame should be on low. Once your date and nut mixture is combined, remove from flame and cool for 5 minutes. 


5. Grease your palms with a little ghee and start making ladoo of them. Repeat for the entire mixture. The yummy and tasty Dry fruit ladoo are ready. 


NOTES:

1. The amount of nuts required depends upon the juiciness of the dates. The juicier the dates the more nuts will be required.

2. Good quality nuts and dates always give the best taste.

3. During Diwali we all receive lots of dry fruits and nuts and have to stuff everything into our refrigerators to avoid insects accessing them. These ladoos are a great idea to use up all those dry fruits in the best possible way.

4. After adding the required amount of coarse nuts to the dates, if it is still gooey then add more nut mixture after roasting and coarsely grinding them.

5. After adding the nut mixture to dates if you find it is too dry and are not able to make ladoos, them warm up more dates and add to them.


 If you tried this recipe and liked it please comment below. I would love to hear from you. If you have a query about the recipe email us and ill respond as soon as I can.

If you would like to receive our recipes in your mail please leave your mail id at the homepage. Every time Rajjo's Kitchenn has a new post we will mail the recipe to you.

Thursday, 5 November 2020

RED POHA LADOO( RED AVAL LADOO)

 Poha is my go-to food many times during the week. Sometimes as breakfast and sometimes as dinner and, sometimes as a quick dessert or as a simple prasad. I like the fact that this humble ingredient is so versatile allowing us to create so many dishes from it. The Poha can even go into the Idli batter to make the Idlis soft and into the Dosa batter to make super crisp Dosas.

Diwali for me is about feasting consciously. There are loads of sweets that can be made with less ghee like these Poha Ladoos. They need less sugar too, which makes them an ideal recipe for Diwali times. In this recipe, I have used the Red Poha that is available at all stores these days. These Poha/rice flakes are made from Red rice. Red rice does not undergo as much processing as regular rice.  Therefore it is rich in fiber, Vitamin B, and minerals like Zinc, Iron, and Magnesium, making it a healthier choice. This Ladoo is easy to make and gets done within no time.

If you make these Ladoos don't forget to tag us.

While you are here check out my other Poha recipes like -SweetPoha, Dahi Pohe(Mor Aval), Aval Kesari...

Here is the recipe of Red Poha Ladoo for you- 

  PREP TIME: 15                                          COOK TIME: 15 MINS
 TOTAL TIME:30Mins                                  COURSE:  SWEETS
 CUISINE:  INDIAN                                      SERVINGS: 12 pcs
 AUTHOR: Rajni Ram


    Ingredients:

    Red Poha/Aval 2cups ( any measure of two cups is fine)

    Sugar 3/4 to 1 cup powdered (depending on your preference)

    Ghee 4 tbsp

    Cashewnuts 6 to 7 broken to bits

    Raisins(Kishmish) 6 to 7

    Cardamom/Elaichi  5 to 6

    Nutmeg/Jaiphal 1 tiny bit


Directions: 

In a Kadai take 1 Tbsp ghee and heat. Add the Red Poha to the ghee and start roasting it, until they become crisp. Keep stirring continuously as we don't want the Poha to turn brown, but to get crisp evenly. Once crisp, transfer to a plate and cool for a few minutes. Now in the blender jar take the sugar and add the cardamom and nutmeg to it and grind them to a fine powder. Transfer the sugar to a plate or vessel and in the same blender jar, grind the roasted Poha to a fine powder. Now transfer the Poha powder to a wide vessel, and add the powdered sugar to it. In a small Kadai take 1/2 tbsp ghee and fry the cashews and raisins until they turn a nice brown. Drop the fried nuts and raisins into the Poha and Sugar mixture. Now in the small Kadai warm(not heat) 3 tbsp ghee. The ghee should have melted and be warm( if your fingers can bear the heat, that is the right temperature for the ghee, be careful while testing, don't scald your fingers). Now mix the Poha sugar and dry nuts mixture well with your fingers, so that the sugar is mixed evenly. Create a well in the center of the Poha flour and pour the ghee into it, rub the ghee nicely into the flour, and start making Ladoo(balls) immediately. The ghee should be warm while making the Ladoo as it gives the right binding. If the ghee is not warm and is at room temperature, the ladoos will not form. Form the ladoos with the entire mixture, you can customize the size to your preference. The tasty and healthy Red Poha Ladoos are ready to gobble. Enjoy. Happy feasting!


STEPWISE RECIPE FOLLOWS:

1. Assemble all ingredients.


2. In a Kadai take 1 Tbsp ghee and heat. Add the Red Poha to the ghee and start roasting it, until they become crisp. Keep stirring continuously, taking care not to brown the Pohas or burn them. Transfer to a plate and cool for a few minutes.


3. Now in the blender jar take the sugar and add the cardamom and nutmeg to it and grind them to a fine powder. Transfer the sugar to a plate or vessel and in the same blender jar, grind the roasted Poha to a fine powder.


4. Now transfer the Poha powder to a wide vessel, and add the powdered sugar to it. In a small Kadai take 1/2 tbsp ghee and fry the cashews and raisins until they turn a nice brown. Drop the fried nuts and raisins into the Poha and Sugar mixture. 


5. Now in the small Kadai warm(not heat) 3 tbsp ghee. The ghee should have melted and be warm, now mix the Poha sugar and dry nuts mixture well with your fingers so that the sugar is mixed evenly. Create a well in the center of the Poha flour and pour the ghee into it, rub the ghee nicely into the flour, and start making Ladoo(balls) immediately. 


6. Form the ladoos with the entire mixture, you can customize the size to your preference. The tasty and healthy Red Poha Ladoos are ready to gobble. Enjoy. 


NOTES:

1. I ground my Poha to a step less than superfine, as then you get a little crunchy feel. One can customize between superfine or a stage before, but take care not grind it coarse, as them forming the ladoos will be difficult.

2. The temperature of the ghee is very important. If it is very hot, you can form the ladoos immediately, so wait for it to turn warm. However, if the ghee is not warm enough, then the ladoos will not form. Add a little warm ghee and form the balls.

3. If you have poured too much ghee, the ladoos will slump and not hold shape. Try to stick to the measure given. However, if you do end up adding too much ghee, roast more poha, grind it to powder, and add it, to form ladoos. 

4. The Poha does not hold much sugar, so stick to the measure given.


  If you tried this recipe and liked it please comment below. I would love to hear from you. If you have a query about the recipe email us and ill respond as soon as I can.

If you would like to receive our recipes in your mail please leave your mail id at the homepage. Every time Rajjo's Kitchen has a new post we will mail the recipe to you.


TOFU AND STIR FRIED VEGETABLES IN HOT SCHEZWAN SAUCE

  Any Tofu lovers? I agree its an acquired taste,but going by the health benefits it has to offer, I try including it in my diet now and the...