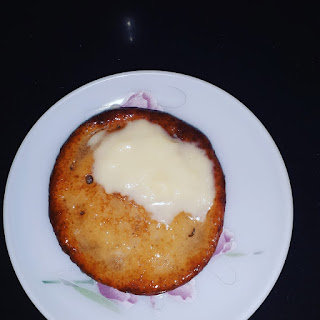
Vegetarian cooking blog

Showing posts with label Indian Sweets. Show all posts

Tuesday 3 November 2020

SHRIKHAND ( KESAR)

 It is a double whammy when you get a probiotic as dessert. Under this category come sweet dishes like Misthti Doi, Bappa Doi, and Shrikhand. The previous two I am yet to try and blog.  But the Shrikhand is something that I love making and relish eating. 

This is one recipe that used to make in our Delhi days when curd was in excess or a little sour. Then there was a period when I entirely stopped making Shrikhand and relied on the store-bought one. Until recently when Aishu( pointed out that " amma you haven't made Shrikhand in ages"), that I decided to whip it up again. (The advantage of homemade Shrikhand is that we can customize the sugar, as per requirement. I find the store-bought ones very sweet).

But this time the Mantra was to make it in a much simpler way, in the past, this was a half-day procedure for me as it involved making hung curd, and that took anywhere between 3 to 5 hours, depending on the milk we use.

So I improvised my previous method to a smarter one, by using a mix of Greek Yogurt and homemade curd.

While you are here try out my other Indian dessert recipes like Pineapple Rabri, Thengai Therattipal, Atte ka Sheera, Gajar Halwa Barfi,  Akkaravadisal, Sweet Poha, Carrot Kheer, and more...

Here is the recipe for Shrikhand( very detailed pictures are missing because this was supposed to be a causal post for social media and turned out that many people requested the recipe). So I am blogging it with minimum pictures, but I shall compensate for that with a good set of instructions.

 PREP TIME: 5 MINS                      PROCESS TIME: 45 MINS
 TOTAL TIME: 60 MINS         COURSE: DESSERT
 CUISINE: INDIAN                  SERVINGS: 6  
 AUTHOR: RAJNI RAM


    Ingredients:

    Greek yogurt( any brand) 400 gm

    Homemade Curd 400 gm

    Sugar 1/2 cup powdered ( add more if you prefer it sweeter)

    Kesar powder a pinch 

    Kesar stands soaked in warm water a pinch

   Elaichi/ Cardamom

Directions: Take a clean Muslin or cotton cloth, which will allow water to pass out. Spread the cloth into a bowl and empty the Greek yogurt plus homemade curd into it. Collect the edges and tie it such that all the water is able to drain away. I usually tie it to the Kitchen sink tap, so that the excess water from the curd drains away into the sink. Allow 45 minutes to pass. Now untie the cloth from the dripping arrangement. Almost all the excess water from the curd must have dripped away and the hung curd is now ready. Transfer the hung curd to a bowl in which you can whip/beat it. Now with an electric beater, at low speed start beating the hung curd. Beat for a minute until the hung curd looks like cream. Now add the powdered sugar and beat again for 30 seconds. Add in the colour, the cardamom powder, and a little of the water in which the kesar strands were soaked( about 2 tsp). Use a spatula to combine well until the kesar colour is evenly spread. Garnish with Kesar strands and the yummy probiotic Shrikhand is ready. Put it in the refrigerator until ready to serve.


Serving Suggestions: Puri and Shrikhand is a match made in heaven. In my house, we like it with Parathas and Rotis too.


STEPWISE RECIPE FOLLOWS:

1. Take a clean Muslin or cotton cloth and spread it into a bowl and empty the Greek yogurt plus homemade curd into it.


2. Collect the edges and tie it such that all the water is able to drain away.  Allow 45 minutes to pass. Now untie the cloth from the dripping arrangement. Almost all the excess water from the curd must have dripped away and the hung curd is now ready.


3. Transfer the hung curd to a bowl in which you can whip/beat it. Now with an electric beater, at low speed start beating the hung curd. Beat for a minute until the hung curd looks like cream.


4. Now add the powdered sugar and beat again for 30 seconds. Add in the colour, the cardamom powder, and a little of the water in which the kesar strands were soaked( about 2 tsp). Use a spatula to combine well until the kesar colour is evenly spread.


5. Garnish with Kesar strands and the yummy probiotic Shrikhand is ready. Put it in the refrigerator until ready to serve.


NOTES:

1. Always add powdered sugar, so that the consistency of the Shrikhand does not go runny.

2. I have made a variant of Rose flavour too. I had some homemade Rose syrup, so tried it out. One can buy storebought ones and try. Use the rose syrup in place of the kesar colour and proceed.

3. This recipe can be made with homemade curd too. It takes longer for the water from the curd to drain. The rest of the recipe is the same.

 If you tried this recipe and liked it please comment below. I would love to hear from you. If you have a query about the recipe email us and ill respond as soon as I can.
If you would like to receive our recipes in your mail please leave your mail id at the homepage. Every time Rajjo's Kitchen has a new post we will mail the recipe to you.

Friday 9 October 2020

GAJAR HALWA BARFI

 A Barfi is the Indian cousin of the western Fudge. In a Barfi either milk or flour is a base along with fruit or vegetables or dry fruits or a combination of them. This is a sweet dish I tried just for fun and I really did not have an idea of the quantities. I just went by gut feeling and it ended up in something really yummy. It is a twist to the regular Gajar Halwa and tales just 1/4 of the time to get it done. It took me precisely 20 minutes for the entire cooking process, 5 minutes for grating the Carrot. It needs a 20-minute chilling time(in the refrigerator). 

I tried this out with small quantities of everything as I was trying it for the first time. Since it turned out very well, it is blog-worthy and worth a try by everyone. I usually make Gajar Halwa only when the Delhi Carrots(the orangish-red ones) arrive in Chennai, and I make it 3 to 4 times before the season gets over. Since I was trying a Barfi I went ahead with the regular carrots. 

While you are here check out my Indian sweet recipe collection like- Pineapple Rabri, Atte Ka Sheera, Unni Appam, Aval Kesari, Thengai Therattipal, Maa Ladu, Vella Aval, Chakkara Pongal, Carrot Kheer, and more...

Here is the recipe for Gajar Halwa Barfi for you-

   PREP TIME: 5                                    COOK TIME: 20Mins
   TOTAL TIME:25Mins                          COURSE:  DESSERT
   CUISINE:  INDIAN                             SERVINGS: 6
   AUTHOR: Rajni Ram


Ingredients:

Carrots 2 big shredded

Kova/Khoya/Mava 100gm(store-bought)

Sugar 1/2 cup

Milk 1/4 cup

Ghee 6 tsp

Cardamom powder 1/4 tsp

Broken nuts for garnish


Directions:

Grease a small plate with ghee and keep ready. In a Kadai or pan take 2 tsp ghee and heat. Drop the grated carrot onto the Kadai or pan and saute on high for a minute. Now add the milk, reduce the flame, and cook the carrots for 5 minutes. The carrots should cook but not turn limp. Now add the grated Khoya/Mava and continue to cook for few minutes. Once the Mava is added the mixture becomes a little thick, now add the sugar and stir, the mixture liquefies a little as the sugar melts. Keep stirring for a few minutes and the mixture will start to thicken up. When the mixture no longer sticks to the bottom of the pan, its time to transfer it into a greased plate. Another method to check for doneness of the mixture is to wet your hands, take a small amount of the carrot mixture, and try to form a ball. If the ball retains shape its time to transfer into the greased plate. Spread the mixture evenly on the plate, sprinkle some chopped nuts on top, and press it gently with the ladle back or your palm. Put the plate into the fridge for 20 minutes. Bring it out, cut into diamonds or squares and it's ready to serve. Enjoy the dessert. Bon Appetite.


STEPWISE RECIPE FOLLOWS:

1. Assemble all ingredients. Grease a small plate with ghee and keep ready. In a Kadai or pan take 2 tsp ghee and heat. Drop the grated carrot onto the Kadai or pan and saute on high for a minute.


2. Now add the milk, reduce the flame, and cook the carrots for 5 minutes. The carrots should cook but not turn limp. Now add the grated Khoya/Mava and continue to cook for few minutes.


3. Once the Mava is added the mixture becomes a little thick, now add the sugar and stir, the mixture liquefies a little as the sugar melts. Keep stirring for a few minutes and the mixture will start to thicken up. When the mixture no longer sticks to the bottom of the pan, its time to transfer it into a greased plate. Before transferring to a greased plate add cardamom powder and 2 tsp ghee.


4. Another method to check for doneness of the mixture is to wet your hands, take a small amount of the carrot mixture, and try to form a ball. If the ball retains shape its time to transfer into the greased plate. Before transferring to a greased plate add cardamom powder and 2 tsp ghee.


5. Spread the mixture evenly on the plate, sprinkle some chopped nuts on top, and press it gently with the ladle back or your palm. Put the plate into the fridge for 20 minutes. Bring it out, cut into diamonds or squares and it's ready to serve. 


RECIPE VIDEO HERE 👇


NOTES:

1. The process is not lengthy, but stirring from time to time is required.

2. Don't want the Barfi? no worry- just don't refrigerate, temper with dry fruits and nuts fried in ghee, and enjoy as Instant Gajar Halwa😃.

3. I have not added any colour as the Carrots were so bright themselves. One can add food colour of they prefer a deeper colour.

4. Adding 2 tsp of ghee on the mixture before spreading on the plate, helps in even and smooth spreading. Alternately apply little ghee to the back of the ladle with which you will spread the mixture.


If you tried this recipe and liked it please comment below. I would love to hear from you. If you have a query about the recipe email us and ill respond as soon as I can.

If you would like to receive our recipes in your mail please leave your mail id at the homepage. Every time Rajjo's Kitchen has a new post we will mail the recipe to you.

Saturday 19 September 2020

AKKARAVADISAL ONE POT

 This is a very traditional South Indian sweet dish. Lord Mahavishnu is offered this sweet as prasad(holy offering). The main ingredients are Rice, moong dal, jaggery, milk, and ghee. The ingredients are similar to the Sweet  Pongal but both taste very different. It tastes heavenly when served a little warm. Without much ado let’s get to the recipe right away.

This recipe already exists on this blog, but I am adding another method to make it, which is the one-pot method. One can choose whichever method they find doable. The results are the same for both, just a few steps vary which I will guide you through here.

While you are here check out my other Indian Sweet recipes like Malpua, Pineapple Rabri, Atte ka Sheera, Chakkarai Pongal, Aval Kesari, Unni appam, Sugiyan, and many more...  


Here is the recipe of One -Pot Akkaravadisal for you-

  PREP TIME: 15                                         COOK TIME: 20Mins
 TOTAL TIME:40Mins                                  COURSE:  DESSERT
 CUISINE: SOUTH INDIAN                         SERVINGS: 5
 AUTHOR: Rajni Ram


   Ingredients:

   Rice 1 cup
   Moong dal/ green gram 1/4 cup
   Milk  6 cups
   Jaggery 1 cup 
   Water 1/4 cup
   Sugar ( optional) 1 tbsp
   Ghee 3/4 cup
   Cardamom/ elaichi powder 1 tsp
   Saffron ( optional) 2 pinches, soaked in warm milk
   Raw camphor( optional) 1 pinch powdered
   Cashewnuts 8 to 10
   Raisins 8 to 10

   DIRECTIONS:
  Dry roast the Moong dal directly in the cooker to a light brown     colour. Stir constantly and take care not to burn the dal. It will give   out a nice aroma. Put the jaggery in a separate vessel, add water, and  bring to a boil. Put off the heat and stir to dissolve the jaggery.   Keep aside. Now to the roasted moong dal in the cooker, add the   washed rice. Pour 2 cups milk and 1 cup water, close the cooker and  cook for 5 to 6 whistles ( flame should be on low throughout,   otherwise there are chances of the milk overflowing through the   sides). Once pressure releases open the cooker and mash the   contents well. Put the cooker on flame again and strain the liquid   jaggery into the cooker directly. Pour another 2 cups milk and stir   nicely. There may be lumps, break them down patiently by stirring.   Like I always say add 2 teaspoons of sugar to any jaggery dish to   enhance the taste of jaggery. Add more milk if the 2 cups of milk get   absorbed. We want a texture that is semi-solid and smooth, not   lumpy. Now add the cardamom powder, raw camphor(optional), and   add in the raisins and nuts fried in ghee. The one-pot   Akkaravadisal is ready to serve. Enjoy BonAppetit. This is a popular Prasad(holy offering) dish that can be offered during Pujas.

STEPWISE RECIPE FOLLOWS:
1.  Assemble all ingredients.

2. Dry roast the Moong dal directly in the cooker to a light brown colour. Stir constantly and take care not to burn the dal. It will give out a nice aroma. Now to the roasted moong dal in the cooker, add the washed rice. Pour 2 cups milk and 1 cup water, close the cooker and cook for 5 to 6 whistles ( flame should be on low throughout, otherwise there are chances of the milk overflowing through the sides).


3. Until the pressure releases let’s get the jaggery ready. In a small vessel take the jaggery, add 1/4 cup water and bring to a boil, put out the stove, and stir the jaggery to dissolve it. 

4. Once pressure releases open the cooker and mash the contents well. Put the cooker on flame again and strain the liquid jaggery into the cooker directly. Pour another 2 cups milk and stir nicely. There may be lumps, break them down patiently by stirring. Add two spoons sugar.


5. Add milk in which the saffron strands were soaked followed by Cardamom powder, raw camphor(optional). Finally, add the nuts and raisins fried in ghee. 


NOTES:
1. The only glitch in this method is the milk overflowing from the cooker or the milk sticking to the bottom of the cooker. To manage this the flame should be on low through out until the whistles are over.
2. We are straining the jaggery to remove impurities in the jaggery. I  recommend not missing this step.
3. To get that smooth texture and consistency add more milk if required. 

If you tried this recipe please do comment below, we would love to hear fom you.
If you leave us your mail id, recipes can directly be mailed to you, whenever we have a new post. 

Show some love-like and follows us on Instagram and Facebook. 

Saturday 12 September 2020

MALPUA WITH GULAB JAMUN MIX AND PANEER

 Malpua is a sweet dish close to my heart and I have taste both the Bengali version and the ones made in the north. I like both of them equally. My hands have been itching to try out this recipe that I thought of and scoured the internet to find if such a one exists. There are a hundred recipes of Malpua with Gulab Jamun mix, but what makes this one different is the use of Paneer(cottage cheese) and Wheat flour. Using Paneer makes the Malpuas soft and fluffy on the inside and wheat flour gives it a little crunch on the exterior.

This is the first time I'm trying out this version and I am happy that it turned out well. Sometimes our hunches do work, and this time the hunch was to use paneer with the mix. The Bengali version of Malpua uses Chenna or paneer along with refined flour though.

The sugar syrup here is a very thin one as it is only to keep the Malpuas moist. I have also made an instant Rabri, the recipe of which I am posting, but I am not uploading the pictures as I couldn't click any, since the Rabri here was made as an afterthought.

I have a Pineapple Rabri recipe here on the blog which you can refer to. This is the authentic way of making Rabri. Whereas what I have made with the Malpua is a shortcut one, which was made as an accompaniment with the Malpua.

While you are on this page please check out my other sweet/dessert recipes like      Apple cake, Carrot Kheer, Unni Appam, Blueberry Cheesecake, Maa Ladoo,          Berry Smoothie Icecream, and more...

Here is the recipe of Malpua from Gulab Jamun Mix-

PREP TIME: 10Mins                                      COOK TIME: 30 Mins
TOTAL TIME: 40Mins                                    COURSE: DESSERT/SWEET
CUISINE:   INDIAN                                        SERVINGS: 4
AUTHOR: Rajni Ram


Ingredients:

Gulab Jamun Mix 1 cup

Paneer 100 gm minced

wheat flour 1/2 cup

Sugar 1 tbsp( for batter)

Milk 1 cup (or more if required)

Sugar for syrup 1 cup

Water for sugar syrup 1/2 cup

Elaichi/green cardamom 2 pods

Fennel seeds 2 pinches

Oil for frying

Directions for making the batter:

In a bowl take the Gulab Jamun Mix. Mince the paneer in a blender and add it to the Gulab Jamun mix in the bowl, add the wheat flour followed by the 1 tablespoon sugar. Nicely mix them all together to a dry mixture. Now adding milk little by little whisk to form a pouring consistency batter( like dosa batter or a little thicker). Now add the fennel seeds to the batter and mix. 


Directions to make the sugar syrup:

In a pan/ flat vessel take one cup sugar, add 1/2 cup water, and put it on the flame. Stirring continuously so that the sugar dissolves, allow it to boil for 2 to 3 minutes, and put off the flame. String consistency of the syrup is not required in this recipe. Add 2 cardamom pods while boiling the syrup. 

Directions for making the Malpua:

Next, take oil for frying in a flat Karahi or pan preferably and heat. The flame should be medium-high. The oil should not be too hot, nor warm. When you put a little batter, it should sizzle. Now take a scoop of batter in a ladle and pour it into the hot oil. The batter will spread out by itself, like pancakes. Cook on one side and flip it over and cook on the other until both sides are equally golden brown. Remove from oil and drop in the sugar syrup for 10 seconds. Remove and store in a container. If storing for more than a day, let the Malpuas remain in the sugar syrup itself, so that they stay moist. Enjoy the sweet dish. Bon Appetit.

Directions to make instant Rabri ( optional) No pictures for this.

Ingredients:

Milk 1 cup

Sugar 2 tsp

Milk powder 2 tbsp

Directions for Rabri: Take one cup of milk and boil. When it reduces to half, add 2 tsp sugar and 2 tablespoons of milk powder and stir nicely. Within 2 minutes it will reach the desired consistency. Put off the flame and let it cool completely before plating.


STEPWISE RECIPE FOLLOWS:

1. Assemble all ingredients. In a bowl add the Gulab Jamun mix, Paneer, wheat flour, sugar, and mix. Now add milk little by little to make a batter of flowing consistency. Add fennel seeds, mix it in, and keep the batter aside.


2. To prepare the sugar syrup, add 1/2 cup water to 1 cup sugar and put it on the flame to boil. Keep stirring for the sugar to dissolve and boil for 2 to 3 minutes, not more. Put off flame and cool. Add 2 cardamom pods while boiling.


3. In a flat pan/Karahi take oil for deep frying and heat. The flame should be medium-high and the oil should be hot, but not smoking hot. When the batter is poured, it should sizzle.  Now take a scoop full of batter and pour it in the oil. Let it spread by itself. Fry until it turns golden brown on one side and then flip it and fry until golden brown on the other side too.


4. Now put the fried Malpua into the sugar syrup and remove after a few seconds if serving immediately. If storing for a day, let the Malpuas remain in the syrup so that they remain moist.


5. Serve warm with Rabri or just as it is. 


NOTES:

1. If the sugar syrup solidifies after some time, add a tablespoon of water and put it on the flame and keep the flame very low. The syrup will loosen. Put off the flame. You can keep repeating this process until all the Malpuas are fried,  if required.

2. A flat pan or Kadai is the perfect one for frying this sweet as in a curved Kadai the batter may turn to a ball and roundish, instead of a flat pancake-like shape.

3. Before pouring the batter, check if the oil is hot, by dropping some batter gently into the oil. If it sizzles immediately, the oil is ready for frying.


If you tried this recipe and liked it please comment below. I would love to hear from you. If you have a query about the recipe email us and ill respond as soon as I can.

If you would like to receive our recipes in your mail please leave your mail id at the homepage. Every time Rajjo's Kitchen has a new post we will mail the recipe to you.


Thursday 20 August 2020

AVAL KESARI/POHA KESARI

This recipe of the humble Poha(beaten rice flakes)/Aval cooked in sugar syrup is one of my favourites.  I make it whenever I have a sweet craving or as an offering(Prasad) for Pujas at home. It is similar to the Kesari Bath made with Sooji/Rava  Sometimes I make with a combination of other Pohe recipes, to serve during Navarathri when guests visit home.

 Poha is also one of the main offerings during Janmashtami and Ganesh Chaturthi. Lord Krishna is known to have loved them and Pohe is what his friend Sudama got him as a gift. 
Usually, during these two festivals, people just offer the Pohe and jaggery with coconut scraping as a dry mixture for Prasad. I have observed that though there are few who like it this way, many don't enjoy it dry. So what I prefer doing is putting it in sugar syrup and stirring it dry, with a dash of ghee, cardamom powder and raw camphor, it tastes absolutely divine. 
This recipe is a simple one and gets done in 15 minutes. As I always say the tastiest dishes are usually the simplest. Let's get to the recipe right away.

While you are here please visit my other Indian sweet recipes such as 
Here is the recipe of Aval Kesari/ Poha Kesari for you-

PREP TIME: 10Mins                                      COOK TIME: 10 Mins
TOTAL TIME: 20Mins                                    COURSE: DESSERT/SWEET
CUISINE: SOUTH  INDIAN                           SERVINGS: 4
AUTHOR: Rajni Ram


Ingredients:
Poha ( thin) 1 cup
Sugar 1/2 cup ( if you prefer less reduce to 1/4cup)
Ghee 1.5 tbsp
Water 1.5 cup
Raisins a few 
Cardamom powder 1/4 tsp
Kesari colouring/ orange food colouring  1 pinch
Raw camphor a pinch ( optional)

Directions:
Take 1 tbsp ghee in a Karahi and heat. Add the raisins and fry them until they fluff up. Remove from flame and keep aside. To the same ghee in Karahi add the Poha/ Aval and fry nicely until crisp. To be roasted on low flame, without burning them. Transfer to the dry mixer and cool for 5 mins. Grind it to a Rava/ Sooji like texture and keep aside. Now in the same Karahi add 1.5 cups of water and heat. Add the Kesari powder/ colouring and the sugar and bring it to a boil. Add the raw camphor nos if using. When the water starts boiling slowly drop in the grounded Poha while stirring constantly. Keep stirring until the mixture thickens and the Piha leaves the sides of the Karahi. Add the cardamom powder, followed by the raisins and 1/2 tbsp ghee and mix well. The Aval Kesari is ready to serve.

STEPWISE RECIPE FOLLOWS:
1. Assemble all ingredients. Take 1 tbsp ghee, fry the raisins and keep aside.

2. To the same ghee add the Poha and fry nicely until crisp. Transfer it to a dry mixer and cool.


3. Now grind it to a Rava/ Sooji like texture and keep aside.


4. Now to the same karahi add 1.5 cup water, Kesari colour and sugar and bring to a boil. Add the raw camphor now if using.


5. When the water boils, slowly drop in the ground Aval/ Poha little by little and stir constantly. Keep stirring until the mixture thickens.


6. Now add the Raisins, cardamom powder and 1/2 spoon ghee to the Poha and mix well. The Aval Kesari is ready to serve to the guest, or to give as an offering. 


NOTES:
1. Thick Poha/ Aval can also be used for this but the amount of ghee, water will double up.
2. The Aval is not to be soaked but roasted to get the desired texture.
3. I added 1/4 cup sugar which might be a little less sweet, so up to 1/2 cup sugar can be added.

If you tried this recipe and liked it please comment below. I would love to hear from you.
If you want the recipes emailed to you leave your id in the homepage near the📧
icon. Whenever we have a new post the recipe will be mailed to you. Thank you for showing interest in Rajjo's Kitchen.


Tuesday 18 August 2020

UNNI APPAM/NEI APPAM/SWEET APPAM

 This Appam recipe is the Kerala style Appam, made with soaked raw Rice, Jaggery, Banana and Cardamom. It is one of the most simple recipes and is also one of the main offerings in festivals like Janmashtami, and Ganesh Chaturthi. In our house, it is also an instant snack that my mother would make in a jiffy apart from the soak time. Usually, an Appam mould/ Appa karai is required for this, but some also make it by directly pouring a ladle of batter into the oil and deep-frying. If fried without a mould the shape is flat like that of a Pancake, whereas the one made in a mould is round. It is best made with ghee, though oil too can be substituted for ghee.

Grinding the batter to the right consistency is a critical step, as too dilute a batter will affect the moulding of the appam and the batter may just scatter away in the oil. Therefore I have mentioned the right way to grind the batter in the recipe. Once the batter is ground we are just five minutes away from yummy tasting Nei Appams.

While you are here look at my other Sweet dish recipes like Sugiyan, Vella Aval, Akkaravadisal, Chakkara Pongal, Maa Ladoo, Carrot Kheer, Pineapple Rabri and more.

Here is the recipe of Sweet Appam/ Unni Appam for you-- 

PREP TIME: 10Mins+ 1 hr(soak)                        COOK TIME: 30Mins
TOTAL TIME: 40Mins                                          COURSE: DESSERT/SWEET
CUISINE: SOUTH  INDIAN                                 SERVINGS:15 pcs
AUTHOR: Rajni Ram


Ingredients:

Raw Rice 1 cup  soaked for 1-hour minimum ( 1 cup equals 200 gm) ( refer note1)

Jaggery 1 cup powdered/shredded

Banana 1/2 to 3/4 th of 1 large 

Cardamom powder 1/2 tsp

Coconut grated or cut to small pieces 2 Tbsp

Directions:

Soak the Rice for a minimum of 1 hour and up to a maximum of 1.5 hours. After soaking, drain all water and out the rice into a blender. Grind it first to a Rava/Sooji like texture without adding water, now add little water and grind to a smooth paste. Take care not to add too much water, as adding jaggery will liquify it further. So try to use only 1/4 cup water to get a smooth texture. Now add the Jaggery and grind again. Add coconut grating and blitz. Mash the bananas with your fingers and add them to the batter and bring again to a smooth batter. Transfer to a vessel and add the cardamom powder. The Appam batter is now ready.

Now put the Appam mould/Appam Chetty or Appa Karal on flame and heat it well.  Spoon in the ghee into the moulds liberally. Let the ghee heat up, now spoon the batter into the moulds and fry on one side until golden brown, using a kambi/skewer or a fork, to loosen the edges of the Appam and flip it to the other side and fry until golden brown. To check for doneness, pierce the appam with the skewer/toothpick or fork in the center, if it comes out clean, remove appams from the mould. The delicious Unni appam/ Sweet Paniyarams/ Nei Appams are ready. Enjoy. Bon Appetit.

STEPWISE RECIPE FOLLOWS:

1. Soak rice for 1 hour. It can be soaked up to a maximum of 1.5 hours.


2. After an hour drain all the water and put the rice ina blender and grind it without any water at first to a Rava/Sooji like texture.


3. Now add water little by little and grind it to a smooth paste. Water should be used minimally. I used around 1/4 cup water to grind. Check cup measurement given above.


4. Now add the jaggery again and grind to a smooth paste, add the coconut gratings and blitz again.


5. Now mash 3/4 of a Banana with your fingers and add it to the paste, grind once again to a smooth batter. The consistency should be that of dosa batter. Transfer it to a vessel and add the cardamom powder. The appam batter is ready. Have added a mini video to show the consistency of the batter.


6. Put an Appam Chetty on the flame. Spoon in the ghee and heat it. Now spoon in the batter into the moulds and fry on now side until a golden brown. Using a skewer or fork loosen the edges of the appam and gently flip it to the other side and fry again to a golden colour. Repeat for all batter. The Sweet Appams are now ready. 


NOTES:

1. Any raw rice variety can be used other than Basmathi as the Basmathi rice does not have a lot of starch content that is required for binding. The appams turn out rubbery with it.

2. While grinding if you end up with a runny batter accidentally, then add rice flour a tablespoon at a time until you achieve the right consistency.

3. If the batter splits or breaks apart in the ghee either your batter is runny or too much jaggery has been added. So modify accordingly and fry.

4. It is ideal to fry these appams in ghee/clarified butter as it tastes best. But oil also can be used.

5. Banana varieties that are sweet can be used. Avoid the slight sour ones like Poovan. 

6. Always start with frying a single Appam first so that if something needs to be adjusted it can be done and then the rest can be fried.

If you tried this recipe and liked it please comment below. I would love to hear from you. If you have a query about the recipe email us and ill respond as soon as I can.

If you would like to receive our recipes on your mail please leave your mail id at the homepage. Every time Rajjo's Kitchen has a new post we will mail the recipe to you.


Monday 10 August 2020

THENGAI THERATTIPAL/ PALKOVA(COCONUT INFUSED)

 Therattipal or Palkova is a dehydrated milk sweet, made with only two ingredients-Milk and Sugar. Therattipal is a traditional recipe made for festivals like Janmashtami and Deepawali. In our house, Therattipal is the main offering to Krishna apart from Sweet Appam and for Deepawali too we start the festival with a spoon of the Therattipal immediately after Ganga Snanam.

This time I have given a twist to the Therattipal and added roasted coconut gratings to it, which enhances the taste of this sweet dish. Anyway until we add the coconut the method of the recipe is the same. Usually, no cardamom powder is added to this sweet as the milk taste is what should pervade, but if one does prefer, it can always be added.

The coconut flavour is mild and not very intense. The milk and the coconut combine really well to give a different taste which is a welcome change from the regular Therattipal.  

This recipe if made with pure organic cows milk tastes divine, as while the milk reduces you can see the natural fat bubbling out. And it tastes as though ghee has been added to it. These days since we all use milk packets or tetra pack cartons of milk we don't see this process happening naturally and so we add a teaspoon of ghee at the end. its an optional step and the sweet will still taste the same, if not added.

While you are here please check out my other Sweet dish recipes like -

 Atte ka Sheera, Sugiyan, Carrot Kheer, Vella Aval, Maa Ladoo, Pineapple Rabri, Chakkara Pongal and many more...

The same recipe can be followed for regular Therattipal/Palkova too. Only the coconut doesn't have to be added.

Here is the recipe for Thengai Therattipal/Palkova(coconut-infused)-

PREP TIME: 5Mins                                      COOK TIME: 1 hr
TOTAL TIME: 1 hr 05Mins                            COURSE: DESSERT
CUISINE: SOUTH  INDIAN                          SERVINGS: 4

AUTHOR: Rajni Ram


Ingredients:

Milk (toned milk) 1.5 litres (refer to note1)                                                                Sugar 140 gm approx (reduce if you prefer less)                                                        Coconut (grated) 1 cup

Directions:

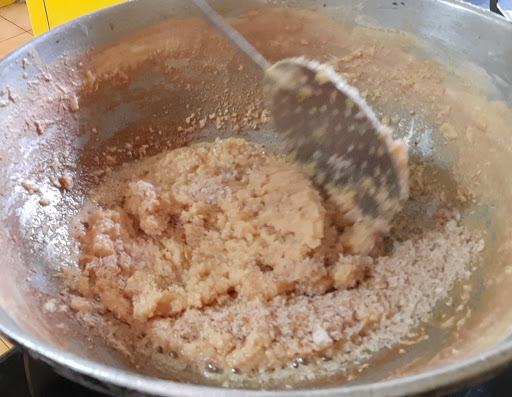
Pour the milk into a heavy-bottomed vessel or Kadai and begin to boil. It has to be reduced by almost 3/4 of the quantity by stirring constantly. For the first 10-15 minutes, constant stirring is required, thereafter keep flame on medium heat and keep stirring from time to time. As the moisture from the milk evaporates the consistency of the milk becomes denser and the texture also starts becoming granular/thready. Keep stirring until the milk has lost almost all moisture(check picture for reference) and now add in the sugar and start stirring again. Once the sugar is added the reduced milk mixture liquifies a little, it is normal and nothing to worry about. Continue stirring until the mixture loses all the moisture al does not stick to the bottom of the pan anymore. Another way to check is to put a little   Palkova in a plate, just wet your hands with water, and try to take a small bit of the Palkova and shape it to a mini ball. If the ball forms, you can turn off the flame. Now in In another Kadai, put 1/2 tsp ghee and drop in the coconut gratings and start roasting it until it becomes dry and it is a nice brown in colour. Transfer it to a plate and cool it. Once cooled, add to the Palakova/Therattipal, switch on the flame and mix nicely until the coconut and the Therattipal are well integrated and switch off the flame. After adding the coconut the mixture turns a little drier. It is natural so nothing to worry. Offer it to Krishna or just have it as dessert. Enjoy. Bon Appetit.                                                                                                                If you want just regular Therattipal stop the procedure after adding sugar and reducing it again. Add a teaspoon of ghee for a nice sheen.   


STEPWISE RECIPE FOLLOWS:

1. Start by boiling the milk in a heavy-bottomed vessel or Kadai.


2. Keep stirring constantly for the first 10 to 15 minutes and keep scraping the sides of the vessel as the milk solids keep depositing there.


3. Now on medium heat and stirring every once in awhile reduce the milk until almost all moisture gets evaporated.


4. Now add in the sugar and start stirring again. The mixture liquified a little again but it is natural and again will solidify.


5. Keep stirring until the mixture does not stick to the bottom of the vessel any more. Another method to check for doneness is to take a little amount of the Therattipal and put it on a plate. Wet your fingers and take a small quantity and try to form a ball. If you are able to form a ball, that is the right consistency. Put off the flame.


6. In a small Kadai take little ghee and add a cup of grated coconut and start roasting until it becomes dry and turns a nice brown in colour. When the coconut is dry, it will not stick to the Kadai anymore. Transfer it to a plate and cool.


7. After it cools completely add it to the Therattipal, switch on the flame and stir nicely until the coconut is well integrated with the Therattipal. Once the coconut is absorbed, the mixture will become drier, this is natural and there is no need to worry. Add a teaspoon of ghee finally, just for some sheen. The Thengai Therattipal is now ready.


QUICK VIDEO OF METHOD HERE:


NOTES:

1. I have used Tetrapack toned milk. The more fat content in the milk the lesser the evaporation time. You can use full cream milk too.

2. It took around 1 hour to reduce 1.5 litres of milk. 

3. If you don't wish to add the coconut, the process can be stopped after adding sugar, reducing further and performing the test to see if a ball is formed.

4. If one prefers less sugar, it can be reduced a little.

5. There are many short cut methods to evaporate milk by adding milk powder etc; I use this method for making small amounts of Rabri for jalebis and other such dishes, but I don't recommend the shortcut method for Therattipal, as this whole sweet dish is about the texture and taste. 

6. Cheese too is used for quick evaporation, but again it changes the taste and texture.


TOFU AND STIR FRIED VEGETABLES IN HOT SCHEZWAN SAUCE

  Any Tofu lovers? I agree its an acquired taste,but going by the health benefits it has to offer, I try including it in my diet now and the...