Vegetarian cooking blog

Showing posts with label North Indian Recipes. Show all posts

Wednesday 30 December 2020

PANEER KHURCHAN

Paneer Khurchan is a simple dish made with the most minimum ingredients. It is a simple subji to go with Rotis, Phulkas, Parathas and also Dal chawal. The beauty of this dish is that, it is mildly spiced and flavoured and is the best option for those days when the craving is for a simple meal.

This dish gets its name from the Hindi word "Khurachna" which means to scrape. In this recipe the Paneer can be added as either scrapings or as strips. Capsicum and tomatoes and some simple masalas are combined to bring out the flavours of the dish.

A simple dish doesn't need a big introduction, just its simplicity will do. So here's taking you to the recipe directly. While you are here please check out my other subji recipe like- Mushroom Do Pyaaza, Mixed Vegetable Curry, Palak Paneer, Creamy Palak in Coconut Milk, Mirch Ka Salan and more...


Here is the recipe for Paneer Khurchan-

PREP TIME: 10 MINS                               COOK TIME:15 MINS

TOTAL TIME: 25 MINS                              COURSE: MAIN 

CUISINE: NORTH INDIAN                        SERVINGS: 4

AUTHOR: RAJNI RAM


    Ingredients:

    Paneer 200 gm cut into strips

    Capsicum 1 large cut into thin strips

    Spring Onions/ Onions (one bunch/ 1 large)

    Tomatoes 2 large chopped fine 

    Cumin 1 tsp

    Turmeric powder 1/2 tsp

    Ginger-garlic paste 1 tsp

    Salt as required

    Red chilli powder(regular) 1tsp

    Kashmiri red chilli powder(optional) 1/2 tsp

   Coriander powder 1 tsp

    Green chilli 1 slit lengthwise

    Garam masala powder 1/2 tsp

    Oil for sautéing


    Directions:

In a Pan or Kadai pour 1/2 tbsp oil and heat. When the oil is hot add the cumin seeds, followed by turmeric powder and the Spring onion(if in season or  use regular onion). Sauté until the onions start turning brown and add the spring onion greens to it(if using). Sauté 30 seconds and add the ginger-garlic paste. Continue to sauté for another 30 seconds. Now add the chopped Capsicum strips and sauté on high heat, so that the capsicum don't release much moisture. Sauté until the Capsicum are half cooked. They should retain the crunch and not turn limp. Now add the chopped tomatoes, followed by salt, red chilli powder, Coriander powder and Kashmiri red chilli powder and sauté until the tomatoes break and turn mushy. Now add the Paneer strips and the slit green chilli and toss well such that the masalas evenly coat the paneer. Cover and cook on low heat for 2 minutes. Remove cover, stir and add the Garam  Masala and serve the hot Paneer Khurchan with rice or flat brad of your choice. Enjoy. Bon Appetit.


    STEPWISE RECIPE FOLLOWS:

1. In a Pan or Kadai pour 1/2 tbsp oil and heat. When the oil is hot add the cumin seeds, followed by turmeric powder and the Spring onion or regular onion.


2.  Sauté until the onions start turning brown and add the spring onion greens to it(if using). Sauté 30 seconds and add the ginger-garlic paste. Continue to sauté for another 30 seconds. Now add the chopped Capsicum strips and sauté on high heat, so that the capsicum don't release much moisture.


3. Sauté until the Capsicum are half cooked. They should retain the crunch and not turn limp. Now add the chopped tomatoes, followed by salt, red chilli powder, Coriander powder and Kashmiri red chilli powder and sauté until the tomatoes break and turn mushy. 


4. Now add the Paneer strips and the slit green chilli and toss well such that the masalas evenly coat the paneer. Cover and cook on low heat for 2 minutes. Remove cover, stir and add the Garam  Masala and serve hot.


    NOTES:

1. The dish actually uses regular onions. At the time i made these recipes Spring onions were in season, hence I used them. The Spring onion greens also impart a nice flavour to the dish.

2. No whole spices are used in this recipe.

3. While sautéing the Capsicum on high heat, keep stirring continuously so that they don't get charred.


If you tried this recipe and liked it please comment below. I would love to hear from you. If you have a query about the recipe email us and ill respond as soon as I can.
If you would like to receive our recipes in your mail please leave your mail id at the homepage. Every time Rajjo's Kitchen has a new post we will mail the recipe to you.

Sunday 20 December 2020

GAJAR HALWA/ CARROT HALWA

 Gajar Halwa/ Carrot Halwa is a very popular Indian dessert. Mostly a winter dessert. Though it is made frequently with the regular carrots ( English Carrots), using the Delhi Carrots or Red Carrots as they are called gives the best results.

This is one dessert I love and consider it very sacred, so if you are looking for an easy, one pot or microwave recipe, you are going to be disappointed. As far as Gajar Halwa is concerned I am old school. I cook it in milk( and a whole lot of milk) so that the raw taste of the Carrots is gone and the milk crumbles to a Rabri like texture. The taste of such a Halwa is divine. This is one recipe I have never made with regular carrot except in my dessert recipe- Gajar halwa Barfi where I was shaping  it like fudge( Barfi) and using Khoya to speed up the process. Whereas this recipe of Gajar Halwa is a slow cook process. The slower it cooks the better it tastes. Am I disappointing you? Well, make it like this and you will be hooked to it for life. Remember the best things in life come with a lot of patience.

My belief is that when I wait a whole year for the Red Carrots to appear in the Market and then make the Halwa, then it should be made the authentic way. Which does not involve adding condensed milk or Koya or milk powder but in cooking the carrots in milk( whole cream), to perfection.

I use only whole cream milk to make this dessert. So the taste of the Halwa depends entirely on the quality of milk. A full/whole cream milk Halwa will give you better taste and I can say this because I have tried it will all milk varieties available in the market and what works best is whole/full cream milk.

So after the whole mega write up, taking you to the recipe. While you are here do check out my other carrot based desserts like Carrot Kheer( another speciality from Rajjo's Kitchenn) and Gajar Halwa Barfi.


    PREP TIME:30                                   COOK TIME: 1hr
   TOTAL TIME:1hr.30Mins                     COURSE:  DESSERT
   CUISINE:  INDIAN                               SERVINGS: 6
   AUTHOR: Rajni Ram


    Ingredients:


    Carrots ( Preferably Red ones) 1.5 kilo grated

    Milk whole cream/ full cream 2 litres

    Sugar 300 gm

    Cardamom/ Elaichi powder

    Ghee 4 tbsp

    Cashews a new broken


    Directions:

Wash, peel and grate the carrots and keep aside. In a huge thick bottomed vessel/ kadai/ or urli boil the milk. When it comes to a boil, reduce the flame and put in the grated carrots. Start stirring the mixture. The flame can be increased now but constant stirring is required . This process has to continue until almost all the milk dries up. The texture will look like Rabri stickng to carrot. Once all milk dries up, reduce the flame and add the sugar. Continue to stir again. Once the sugar is added the mixture will liquify, continue to stir until all the moisture is absorbed. The halwa will come together but it will not be gooey. Now add the cardamom powder. Fry the nuts in ghee and pour it over the halwa along with the nuts. The healthy and delicious Gajar Halwa is ready.  Serve warm. Bon Appetite. 


    STEPWISE RECIPE FOLLOWS:

1. Wash, peel and grate the carrots and keep aside. In a huge thick bottomed vessel/ kadai/ or Urli boil the milk.


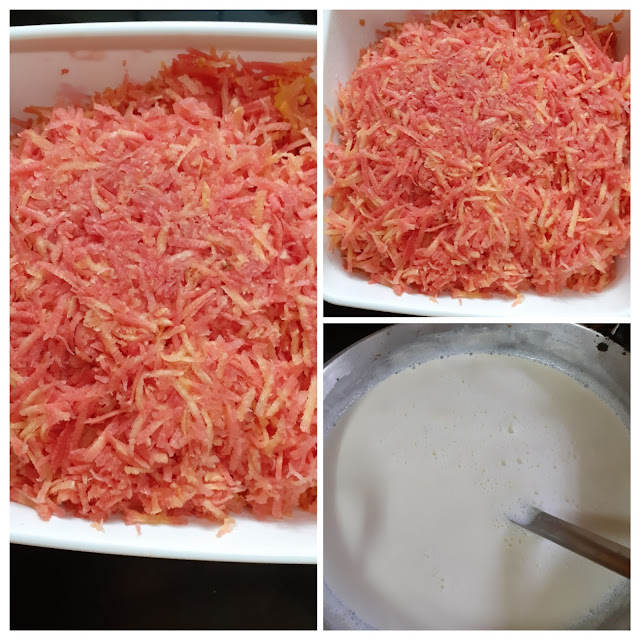
2. When it comes to a boil, reduce the flame and put in the grated carrots. Start stirring the mixture. The flame can be increased now but constant stirring is required . This process has to continue until almost all the milk dries up. Showing you the stages of reduction in pictures below that are self explanatory. 


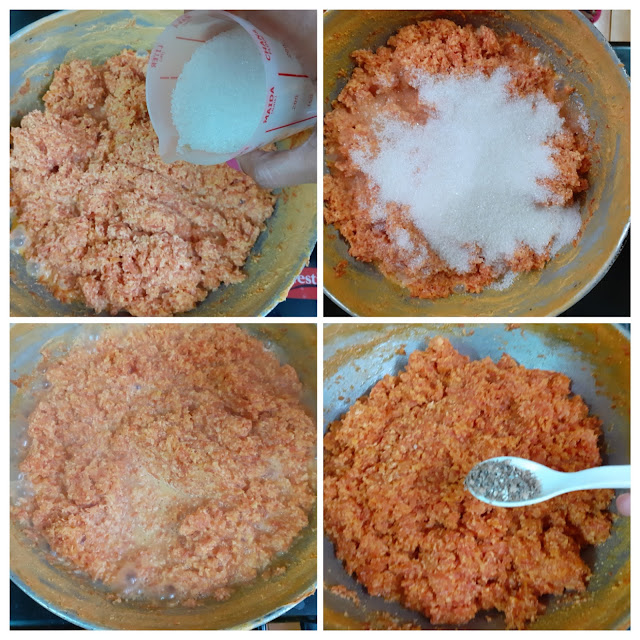
3. Once all milk dries up, reduce the flame and add the sugar. Continue to stir again. Once the sugar is added the mixture will liquefy, continue to stir until all the moisture is absorbed. The Halwa will come together but it will not be gooey. (forgot to click a picture finally to show the final consistency, so have included the one showing the cardamom powder. Please follow that texture for final consistency of Halwa).


4. Now add the cardamom powder. Fry the nuts in ghee and pour it over the Halwa along with the nuts. The healthy and delicious Gajar Halwa is ready.  Serve warm.


    NOTES:

1. While cooking at high heat keep stirring constantly to avoid burning the contents at the bottom of the pan.

2. Actually after sometime of cooking the milk and carrot mixture , it does not overflow from the vessel. That time the stirring can be relaxed a bit, but stir every couple of minutes. If you are following this reduce flame when not stirring.

3. Good quality full cream milk yields the best result, the Halwa can be made with milk of any consistency though. The results may not be what I have described .

4. Feel free to try this with regular Carrots too. Method being the same.

5. Sometimes people try to over power the subtle carrot flavour by adding huge amounts of ghee. This is not required. Pouring ghee at the right time is very important, such that the flavour is enhanced and a lot of ghee is not poured unnecessarily. Check out my Cakkara Pongal post for the directions on how to pour the ghee.


If you tried this recipe and liked it please comment below. I would love to hear from you. If you have a query about the recipe email us and ill respond as soon as I can.

If you would like to receive our recipes in your mail please leave your mail id at the homepage. Every time Rajjo's Kitchen has a new post we will mail the recipe to you.

Tuesday 17 November 2020

METHI WALE BAINGAN

 This is a very regular Sabji and goes amazingly well with both Rotis and Rice. I chanced upon this recipe while browsing the net. I fell in love with the recipe instantly because my favourite greens Methi are used in it. This subji can be made with both fresh methi and Kasuri Methi and gives a wonderful flavour and taste to the dish. From the time I saw this recipe I have made it a couple of times and is a hit with everyone at home. 

I have used the small variety of brinjal as it releases less moisture when roasted, the big globe eggplants have a lot of moisture and are not the right choice for this recipe. The only requirement for this recipe is a small amount of patience while roasting the Brinjals. Alternately one can bake them in the oven. For this method check out my Roasted eggplant 2 ways recipe.

Apart from being aromatic and flavorful, the Methi greens are also good for health as they are rich in iron and high in fibre. In this recipe, I have used Kasuri Methi as it gives a more intense aroma and flavour compared to fresh ones. The fresh methi is also a little bitter, so refer to notes on how much fresh Methi to use.

While you are here please check out my other curry and subji recipes like Brinjal Pepper masala, Gutti Vankaya Kura, Mava Paneer Curry, Mirch ka Salan, Dum Aloo Ajwaini, and more...

Here is the recipe of Methi Wale Baigan for you-


  PREP TIME: 30                                          COOK TIME: 10Mins
 TOTAL TIME:40Mins                                  COURSE:  MAIN
 CUISINE: NORTH INDIAN                         SERVINGS: 6
 AUTHOR: Rajni Ram


      Ingredients:

    Eggplants/Brinjal ( small variety )10 nos cut into slices of                 medium thickness

   Onion 1 large cut finely

   Green chillies 2 finely chopped

   Tomatoes 1 large or 2 medium chopped finely

   Ginger garlic paste 1tsp

   Kasuri Methi(dry Methi leaves) 2 tbsp (can go up to 3tbsp)

   Mustard seeds 1tsp

   Cumin seeds 1tsp

   Salt as required

   Turmeric powder 1/2 tsp

   Red chilli powder 1 to 1.5 tsp

   Coriander powder 2 tsp

   Fennel powder 1 tsp

   Garam Masala powder (optional) 1/2 tsp

   Oil for roasting the brinjal and for sauteeing

Directions:

Wash the Brinjals and slice them into circles of medium thickness. Wipe away the moisture with an absorbent towel and set aside. Heat a nonstick pan, add 2 tsp oil and arrange the Brinjal slices in it. Roast on now side until it becomes a nice brown, then flip and roast the other side. (To bake it check out my Roasted Brinjal 2 ways recipe). Repeat this process for all brinjal slices and set aside.

Now in the same pan add 1tbsp oil for sauteeing and heat it. Add mustard seeds and when they crackle put the cumin seeds in. Add the turmeric powder followed by the chopped onions and green chillies. Fry until the onions turn a nice brown. Now add the chopped tomatoes and stir for a minute. Now add the salt, chilli powder, coriander powder and the fennel powder and saute nicely until the tomatoes are cooked and the mixture is semi-dry. The rawness of masalas should have gone. Now add the Kasuri methi and saute for another minute for the flavour to infuse. Now add the roasted Brinjals into the pan and toss nicely, such that the masala is well mixed with the brinjal, close and cook for a minute. Top up with 1 tsp Kasuri Methi and garam masala powder. Serve hot.

Serving Suggestions: With Rotis, Parathas or with Dal Chawal, Rajma Chawal etc.


STEPWISE RECIPE FOLLOWS:

1. Wash the Brinjals and slice them into circles of medium thickness. Wipe away the moisture with an absorbent towel and set aside. Heat a nonstick pan, add 2 tsp oil and arrange the Brinjal slices in it. Roast on now side until it becomes a nice brown, then flip and roast the other side.


2. Now in the same pan add 1tbsp oil for sauteeing and heat it. Add mustard seeds and when they crackle put the cumin seeds in. Add the turmeric powder followed by the ginger garlic paste and chopped onions, and green chilliesFry until the onions turn a nice brown. 


3. Now add the chopped tomatoes and stir for a minute. Now add the salt, chilli powder, coriander powder and the fennel powder and saute nicely until the tomatoes are cooked and the mixture is semi-dry.


4. Now add the Kasuri methi and saute for another minute for the flavour to infuse. Now add the roasted Brinjals into the pan and toss nicely, such that the masala is well mixed with the brinjal. Close and cook for a minute. Put off flame, top up with 1 tsp Kasuri Methi and garam masala powder. Serve hot.


NOTES:

1. If using fresh Methi leaves for this dish, use only half a bunch, as a big quantity can turn the dish bitter. 

2. The big eggplants are not best suited for this dish as they release more moisture and that can make the brinjals soggy. 

3. Since we did not add any salt or masalas to the Baigans while pan-roasting them, be liberal with the masala you add to the onion-tomato mixture.


If you tried this recipe and liked it please comment below. I would love to hear from you. If you have a query about the recipe email us and ill respond as soon as I can.

If you would like to receive our recipes in your mail please leave your mail id at the homepage. Every time Rajjo's Kitchen has a new post we will mail the recipe to you.


Sunday 15 November 2020

MIRCH KA SALAN

This recipe is one of the most flavourful dish from the Hyderabadi  cuisine. This dish is made from a particular type of Chilli called Banana Peppers or Bajji Milagai. You will find a mention of this in my Mirapakaya Bajji or Mirchi Bajji post. Like I have said in that post, there is also a Jaipuri style of making this dish, but today I am sharing the recipe of the Hydrrabadi style.

Usually, people think that this is a very spicy dish, but it is not so at all. Once the  chillies are deseeded the right way and lightly sauteed in oil, one can enjoy just the flavour of the chillies in the dish. 

While you are here please check out my other curry recipes like Dum Aloo Ajwaini, Palak Paneer, Matar Paneer, Mixed Vegetable Curry, Mava Paneer Curry, Rajma, Choley and more...

Here is the recipe of the flavour max dish Mirch Ka Salan.


 PREP TIME: 15                                          COOK TIME: 15 MINS
 TOTAL TIME:30Mins                                  COURSE:  MAIN
 CUISINE: NORTH INDIAN                         SERVINGS: 6
 AUTHOR: Rajni Ram


    Ingredients:

    Banana Peppers orBajji Milagai 10 nos
    Onion 1 large minced or ground roughly
    Raw peanuts 1handful 
    Cashewnuts 4 -5( optional)
    Coriander Seeds 1 heaped tbsp
    Cumin seeds 1 tsp
    Dry red chillies 2 ( reduce for less spice)
    Till/ white sesame
    Tamarind pulp 2 tsp ( or less) 
    Garam masala 1/2 tsp
    Mustard seeds 1 tsp
    Curry leaves a few
    Oil for sauteeing 

Directions:
Heat 2 tsp oil in a big Karahi or pan ( big enough to hold 10 big chillies). Add the peanuts and roast them for 20 seconds, now add the coriander seeds, cumin seeds, dry red chillies, cashewnuts( if using) and sesame seeds and continue to toast until they all turn light brown and crisp. Set aside to cool. Now pour 2 tbsp oil and put in few chillies at a time and saute them until they get a light brown tint. Repeat for all chillies and set aside. Now put all the roasted masalas in the blender jar and grind it to a fine paste using little water. To the oil remaining after sauteeing the chillies( add more oil if required), put in the mustard seeds, and as they crackle add the curry leaves and onion and turmeric powder. Fry it nicely until it starts turning brown. Now add the ground paste and fry it in oil nicely. Keep stirring or the paste will stick to the pan bottom. Once the raw smell of the peanuts is gone add 1.5cups water and required salt and stir. Now add the sauteed chillies and cover and cook for 5 minutes or until the gravy comes to the desired consistency. Finally add the tamarind pulp and garam masala and put off the flame. The flavourful Mirch ka Salan Curry is ready.

Deseed and slit chillies as shown...


STEPWISE RECIPE FOLLOWS:

1. Heat 2 tsp oil in a big Karahi or pan ( big enough to hold 10 big chillies). Add the peanuts and roast them for 20 seconds, now add the coriander seeds, cumin seeds, dry red chillies, cashewnuts( if using) and sesame seeds and continue to toast until they all turn light brown and crisp. Set aside to cool.


2. Now pour 2 tbsp oil and put in few chillies at a time and saute them until they get a light brown tint. Repeat for all chillies and set aside.


3. Now put all the roasted masalas in the blender jar and grind it to a fine paste using little water. To the oil remaining after sauteeing the chillies( add more oil if required), put in the mustard seeds, and as they crackle add the curry leaves, ground onion paste and turmeric powder. Fry it nicely until it starts turning brown.


4. Now Add the ground paste and fry it in oil nicely. Keep stirring or the paste will stick to the pan bottom.
 Once the raw smell of the peanuts is gone add 1.5cups water and required salt and red chilli powder and stir. Now add the sauteed chillies and cover and cook for 5 minutes or until the gravy comes to the desired consistency. 


5. Finally add the tamarind pulp and garam masala and put off the flame. The flavourful Mirch ka Salan Curry is ready.


NOTES:
1. Deseeding the chillies is very critical to this dish. They have to be removed  properly.
2. Frying the chillies is also an important step. It helps in taljng away the hotness of the chilli.
3. Once these two steps are done, this recipe is a breeze.
4. If you like you can add 2 teaspoons of desiccated coconut while roasting the masalas. It gives a nice taste and flavour to the dish.
5. While frying/sauteeing the chillies a lot of moisture escapes and the oil splitters out a little..that's why we are using very little oil to sautee them. Once you put the chillies in, you can cover it a bit, leaving some space for steam to escape. This way there is little mess.
6. I usually prefer sauteeing my chillies ahead if I'm making the curry for dinner, as by then the gas stove can be cleaned once and for all.


If you tried this recipe and liked it please comment below. I would love to hear from you. If you have a query about the recipe email us and ill respond as soon as I can.

If you would like to receive our recipes in your mail please leave your mail id at the homepage. Every time Rajjo's Kitchen has a new post we will mail the recipe to you.


Wednesday 4 November 2020

DUM ALOO AJWAINI (ONE POT)

Dum Aloo Ajwaini is a recipe that is a little different from the regular Dum Aloo, because of a "magical masala paste' I add just before turning off the flame and that masala is what makes this a flavour blast dish, that goes very well with Pulav, plain rice and all types of flatbreads.

I spotted this recipe in a flights inhouse magazine many many years ago and I have always made it this way ever since, with small creative bursts from time to time. 
I have also adapted this recipe to the one-pot style. The only time-consuming factor is scraping the peels of the baby potatoes. Don't worry though, you can easily make the same with regular potatoes, by dicing them to cubes. The one-pot style also helps in better absorption of the masalas by the potatoes than pan cooking, hence for this particular recipe, I always follow the one-pot style. 

While you are here please check out other Subji/curry recipes of mine like- Mava Paneer Curry, Roasted Eggplant 2 ways, Creamy Palak in coconut milk, Stuffed Karela/Bittergourd, Mushroom Do Pyaaza, Palak Paneer, and more...

Here is the recipe of Dum Aloo Ajwaini for you-

  PREP TIME: 15                                          COOK TIME: 15 MINS
 TOTAL TIME:30Mins                                  COURSE:  MAIN
 CUISINE: NORTH INDIAN                         SERVINGS: 6
 AUTHOR: Rajni Ram


    Ingredients for the gravy:

    Baby Potatoes 250 gms jackets peeled(refer note 1)
    Onion 1 large chopped finely
    Tomato Puree 1 cup
    Ginger garlic paste 1 tsp
    Salt as required
    Red chilli powder(regular) 1 tsp 
    Red chilli powder Kashmiri 1/2 tsp
    Coriander powder 1 tsp
    Fennel Powder 1 tsp
    Garam Masala Powder 1/2 tsp
    Oil for tempering the masalas 1 tbsp

    To be ground to a paste:
    Fresh coriander leaves 1/2 a bunch
    Ajwain/Carrom seeds 1/2 tsp
    Cashew nuts 5 to 6
    Curd 1/2 a cup

Directions:
In a small pressure cooker take oil for tempering and heat. Add the Jeera and fry for 30 seconds. When they crackle add the ginger garlic paste and fry for 30 seconds. Now add the chopped onions and saute until they start turning light brown. Add the turmeric powder and saute another 30 seconds. Now add the peeled Baby potatoes and saute nicely until the oil coats all the potatoes. Now add the tomato puree followed by salt, Regular red chilli powder, Kashmiri red chilli powder, Coriander powder, fennel powder, and stir everything together nicely. Pour about 1 to 1.5 cups of water and close the cooker. Allow 3 to 4 whistles to come and put off the cooker immediately. We don't want overcooked potatoes, so take care to switch off on time(refer notes).
While the pressure releases lets grind the "magic masala"😀.
Put all ingredients mentioned under 'to be ground to a paste', except curd, into the blender jar, and give it a good spin. Now add the curd and blitz to a smooth paste. When the pressure from the cooker releases, open the cooker pour this paste in, switch on the flame on low and cook for 3 minutes, stirring in the masala paste nicely, such that it gets evenly mixed in the gravy. Add the garam masala and put off the flame. The spicy, tangy and flavourful Ajwaini Dum Aloo is ready.

Serving Suggestion: with Rotis, Paratha, Kulcha, Pulav, vegetable rice or with plain rice.

STEPWISE RECIPE FOLLOWS:

1. In a small pressure cooker take oil for tempering and heat. Add the Jeera and fry for 30 seconds. 


2.When they crackle add the ginger garlic paste and fry for 30 seconds. Now add the chopped onions and saute until they start turning light brown. Add the turmeric powder and saute another 30 seconds. 


3. Now add the peeled Baby potatoes and saute nicely until the oil coats all the potatoes. 


4.  Now add the tomato puree followed by salt, Regular red chilli powder, Kashmiri red chilli powder, Coriander powder, fennel powder, and stir everything together nicely. Pour about 1 to 1.5 cups of water and close the cooker. Allow 3 to 4 whistles to come and put off the cooker immediately. 


5. Put all ingredients mentioned under 'to be ground to a paste', except curd, into the blender jar, and give it a good spin. Now add the curd and blitz to a smooth paste. 


6. Pour this paste into the cooker once the pressure releases, switch on the flame on low, and let it simmer for just 3 minutes. Stir nicely, so that the masala gets mixed wit the gravy.


7. Finally, add the garam masala powder and put off the flame. The Dum Aloo Ajwaini si ready to serve.


NOTES:
1. If one feels peeling the baby Potatoes is cumbersome the big ones also can be used after dicing them to bigger cubes.
2. If using the big potatoes switch off the flame exactly in 3 whistles, as they cook faster.
3. Mint leaves can also be used in place of coriander leaves, but reduce the quantity as they are more pungent compared to coriander leaves.

If you tried this recipe and liked it please comment below. I would love to hear from you. If you have a query about the recipe email us and ill respond as soon as I can.

If you would like to receive our recipes in your mail please leave your mail id at the homepage. Every time Rajjo's Kitchen has a new post we will mail the recipe to you.


Tuesday 3 November 2020

SHRIKHAND ( KESAR)

 It is a double whammy when you get a probiotic as dessert. Under this category come sweet dishes like Misthti Doi, Bappa Doi, and Shrikhand. The previous two I am yet to try and blog.  But the Shrikhand is something that I love making and relish eating. 

This is one recipe that used to make in our Delhi days when curd was in excess or a little sour. Then there was a period when I entirely stopped making Shrikhand and relied on the store-bought one. Until recently when Aishu( pointed out that " amma you haven't made Shrikhand in ages"), that I decided to whip it up again. (The advantage of homemade Shrikhand is that we can customize the sugar, as per requirement. I find the store-bought ones very sweet).

But this time the Mantra was to make it in a much simpler way, in the past, this was a half-day procedure for me as it involved making hung curd, and that took anywhere between 3 to 5 hours, depending on the milk we use.

So I improvised my previous method to a smarter one, by using a mix of Greek Yogurt and homemade curd.

While you are here try out my other Indian dessert recipes like Pineapple Rabri, Thengai Therattipal, Atte ka Sheera, Gajar Halwa Barfi,  Akkaravadisal, Sweet Poha, Carrot Kheer, and more...

Here is the recipe for Shrikhand( very detailed pictures are missing because this was supposed to be a causal post for social media and turned out that many people requested the recipe). So I am blogging it with minimum pictures, but I shall compensate for that with a good set of instructions.

 PREP TIME: 5 MINS                      PROCESS TIME: 45 MINS
 TOTAL TIME: 60 MINS         COURSE: DESSERT
 CUISINE: INDIAN                  SERVINGS: 6  
 AUTHOR: RAJNI RAM


    Ingredients:

    Greek yogurt( any brand) 400 gm

    Homemade Curd 400 gm

    Sugar 1/2 cup powdered ( add more if you prefer it sweeter)

    Kesar powder a pinch 

    Kesar stands soaked in warm water a pinch

   Elaichi/ Cardamom

Directions: Take a clean Muslin or cotton cloth, which will allow water to pass out. Spread the cloth into a bowl and empty the Greek yogurt plus homemade curd into it. Collect the edges and tie it such that all the water is able to drain away. I usually tie it to the Kitchen sink tap, so that the excess water from the curd drains away into the sink. Allow 45 minutes to pass. Now untie the cloth from the dripping arrangement. Almost all the excess water from the curd must have dripped away and the hung curd is now ready. Transfer the hung curd to a bowl in which you can whip/beat it. Now with an electric beater, at low speed start beating the hung curd. Beat for a minute until the hung curd looks like cream. Now add the powdered sugar and beat again for 30 seconds. Add in the colour, the cardamom powder, and a little of the water in which the kesar strands were soaked( about 2 tsp). Use a spatula to combine well until the kesar colour is evenly spread. Garnish with Kesar strands and the yummy probiotic Shrikhand is ready. Put it in the refrigerator until ready to serve.


Serving Suggestions: Puri and Shrikhand is a match made in heaven. In my house, we like it with Parathas and Rotis too.


STEPWISE RECIPE FOLLOWS:

1. Take a clean Muslin or cotton cloth and spread it into a bowl and empty the Greek yogurt plus homemade curd into it.


2. Collect the edges and tie it such that all the water is able to drain away.  Allow 45 minutes to pass. Now untie the cloth from the dripping arrangement. Almost all the excess water from the curd must have dripped away and the hung curd is now ready.


3. Transfer the hung curd to a bowl in which you can whip/beat it. Now with an electric beater, at low speed start beating the hung curd. Beat for a minute until the hung curd looks like cream.


4. Now add the powdered sugar and beat again for 30 seconds. Add in the colour, the cardamom powder, and a little of the water in which the kesar strands were soaked( about 2 tsp). Use a spatula to combine well until the kesar colour is evenly spread.


5. Garnish with Kesar strands and the yummy probiotic Shrikhand is ready. Put it in the refrigerator until ready to serve.


NOTES:

1. Always add powdered sugar, so that the consistency of the Shrikhand does not go runny.

2. I have made a variant of Rose flavour too. I had some homemade Rose syrup, so tried it out. One can buy storebought ones and try. Use the rose syrup in place of the kesar colour and proceed.

3. This recipe can be made with homemade curd too. It takes longer for the water from the curd to drain. The rest of the recipe is the same.

 If you tried this recipe and liked it please comment below. I would love to hear from you. If you have a query about the recipe email us and ill respond as soon as I can.

If you would like to receive our recipes in your mail please leave your mail id at the homepage. Every time Rajjo's Kitchen has a new post we will mail the recipe to you.

Wednesday 14 October 2020

ALOO METHI PARATHA

There is no doubt that Aloo Parathas are the king of Parathas. But once the Methi leaves season comes, I make these Aloo Methi Parathas which are healthy as the Methi leaves are rich in iron and fiber. They lift the regular Aloo paratha to a different level. The Methi leaves themselves are very aromatic and when added to any dish they enhance the flavour and aroma of that dish manifold.

Aloo Methi is a popular north Indian subji that I have stuffed into these Parathas. which makes this dish a wholesome lunchbox option for kids and adults alike. It is also a good way to make kids eat the Methi leaves.

Using fresh methi leaves also gives the Parathas wonderful texture. I have not tried this paratha with Kasoori methi as firstly a huge amount of it will be required because dried leaves will lack volume, and secondly nothing can compensate for the taste of fresh methi leaves.

While you are here please check out my other flatbread/ Paratha recipes like Beetroot Paratha, Missi Roti, Garlic Lachcha paratha, and more...


Here is the recipe for Aloo Methi Paratha for you-

  PREP TIME: 20                                      COOK TIME: 30Mins
 TOTAL TIME:50Mins                               COURSE:  BREADS
 CUISINE:  INDIAN                                  SERVINGS: 6
 AUTHOR: Rajni Ram


   Ingredients for stuffing:

   Aloo/ Potatoes 5 medium-sized,  boil, skin peeled and mashed

   Methi leaves/Fenugreek leaves 1 bunch finely chopped

   Salt as required

   Red chili powder 1 tsp(or more as per spice)

   Turmeric powder 1/2 tsp

   Coriander powder  2 tsp

   Fennel powder 1 tsp

   Garam masala powder 1/2 tsp

   Mustard seeds 1/2 tsp

   Cumin seeds 1/2 tsp

   Oil for tempering 1 tbsp


   Ingredients for dough:

   Whole wheat flour 3 cups

   Salt a pinch

   Oil 1 tsp

   Water for kneading

   Oil for cooking the Parathas


Directions for making the stuffing:

Chop the Methi leaves finely and wash them thoroughly. Drain all the water and keep aside. Boil the potatoes, peel the skin, and mash them.  In a pan or Kadai take 1 tbsp oil and heat. Drop the mustard seeds and as they crackle add the cumin seeds and turmeric powder. Now add the washed and drained Methi leaves and saute. Add salt followed by red chilli powder, coriander powder, fennel powder and continue to saute. The methi leaves will release moisture, keep sauteeing and let the moisture dry out. Now add the mashed potato to the Methi leaves, little by little, and mix them nicely. The Methi leaves should have combined evenly with the potato mash. Finally, add some Garam masala powder, mix once again, and allow the mixture to cool.  


Directions to make the dough:

Take 3 cups whole wheat flour in a big mixing bowl, add a pinch of salt, a teaspoon of oil and mix well. Now adding water, a little at a time, combine to follow a slightly tough dough. A loose dough will not help in spreading the filling well. Rest the dough for 20 minutes.


Directions to make the Paratha:

Take the dough and pinch it into balls and divide it into 12 equal portions. Now dust one ball at a time in flour and roll it out into a palm-sized circle. Take about 2 tbsp of stuffing and put it in the center of the circle. Bring all the sides together and seal the stuffing. Now dust the stuffing filled ball in flour again and roll it out into a thick and medium-sized circle. Heat a girdle/tava and put the Paratha on it. Drizzle some oil over it and cook on one side. Flip over and cook on the other side too, drizzling a little oil on it. Cook both sides until brown dots appear. Repeat for all the dough and stuffing. The yummy and wholesome, one meal parathas are ready. Enjoy. Bon Appetit.


Serving suggestions-- as it is filled with a proper subji it actually doesn't need anything to go with. One can just enjoy them with a dollop of butter and plain curd. 


STEPWISE RECIPE FOLLOWS:

1. Chop the Methi leaves finely and wash them thoroughly. Drain all the water and keep aside. Boil the potatoes, peel the skin, and mash them.


2. In a pan or Kadai take 1 tbsp oil and heat. Drop the mustard seeds and as they crackle add the cumin seeds and turmeric powder. Now add the washed and drained Methi leaves and saute.


3. Add salt followed by red chilli powder, coriander powder, fennel powder and continue to saute. The methi leaves will release moisture, keep sauteeing and let the moisture dry out. Now add the mashed potato to the Methi leaves, little by little, and mix them nicely. 


4. The Methi leaves should have combined evenly with the potato mash. Finally, add some Garam masala powder, mix once again, and allow the mixture to cool.  


5. Take 3 cups whole wheat flour in a big mixing bowl, add a pinch of salt, a teaspoon of oil and mix well. Now adding water, a little at a time, combine to follow a slightly tough dough. Rest the dough for 20 minutes.


6. Take the dough and pinch it into balls and divide it into 12 equal portions. Now dust one ball at a time in flour and roll it out into a palm-sized circle. Take about 2 tbsp of stuffing and put it in the center of the circle. Bring all the sides together and seal the stuffing.


7. Now dust the stuffing filled ball in flour again and roll it out into a thick and medium-sized circle. 


8. Heat a girdle/tava and put the Paratha on it. Drizzle some oil over it and cook on one side. Flip over and cook on the other side too, drizzling a little oil on it. Cook both sides until brown dots appear. Repeat for all the dough and stuffing.


NOTES:

1. One can try the paratha using Kasoori Methi, but I have not tested this method, as I have mentioned above, it might not give the right texture and flavor.
2. Some potatoes absorb a lot of water while cooking, therefore choose ones that cook a little dry. Alternately don't overcook the potatoes. Cook them adequately and grate them through. I don't mind a few potato lumps in between, so I don't process them so much.
3. I don't use garlic or onions in this recipe and so cannot tell how the taste will be.


If you tried this recipe and liked it please comment below. I would love to hear from you. If you have a query about the recipe email us and ill respond as soon as I can.

If you would like to receive our recipes in your mail please leave your mail id at the homepage. Every time Rajjo's Kitchen has a new post we will mail the recipe to you.


TOFU AND STIR FRIED VEGETABLES IN HOT SCHEZWAN SAUCE

  Any Tofu lovers? I agree its an acquired taste,but going by the health benefits it has to offer, I try including it in my diet now and the...