Vegetarian cooking blog

Showing posts with label North Indian Recipes. Show all posts

Friday 23 April 2021

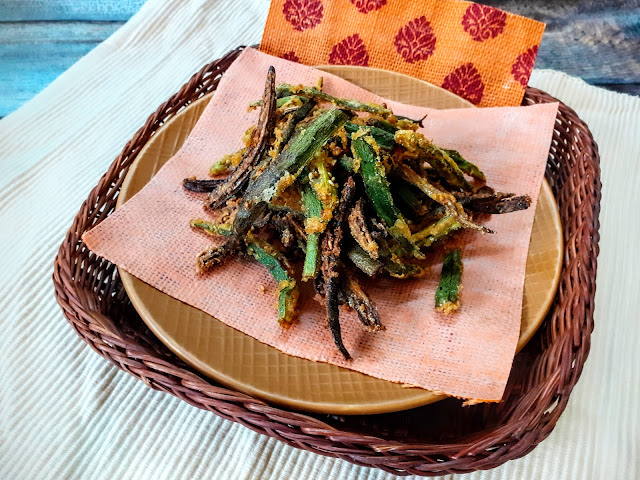
KURKURI BHINDI/KARARI BHINDI/OKRA FRITTERS

 Kurkuri Bhindi Or Karari Bhindi is an accompaniment served in most North Indian Thali's and Buffet. It adds some crunch to the food, can be a starter or even a side dish. A south Indian version of this is available in most south Indian sweet and savory shops. The difference between the North and South Indian recipes is mainly the batter. The south Indian version uses far too much batter, whereas the North Indian version just about coats it. So mine is a fusion of both. While I have opted for less flour and North Indian Masala I have added Till/Sesame from the south Indian version, which gives a extra crunch and flavour. And why I like this version of bhindi/okra is that though it takes a long time to cut the Ladysfinger this way, this can stay fresh for a few days. Before serving just microwave it for 30 seconds and it become crunchy again. So people on the move and ones who love a hot meal after coming back from work, just invest sometime on a week day to make these crunchy fritters, and on a work day just make your self some Dal and Rice, for which the Kurkuri Bhindi is the perfect side dish. As I said, just microwave it for 30 seconds.


Without much detailing getting in to the recipe directly. While you are here check out my other Subji and curry recipes like Paneer KhurchanSouth Indian KurmaMethi wale BainganRoasted Eggplant 2 waysPaneer Mava Curry, Corn Palak Subji, Chakki Ki Shak, Rasakalan and more...

Here's the recipe for Kurkuri Bhindi--


  PREP TIME: 45 Mins                                COOK TIME: 30 Mins
 TOTAL TIME: 30 Mins                                COURSE:  MAIN/ SNACK
 CUISINE: NORTH INDIAN                         SERVINGS: 6
 AUTHOR: Rajni Ram


    Ingredients:

    Bhindi/Okra 400 gm slit lengthwise ( refer picture)

    Rice flour 1/2 cup

    Besan/ Chickpea flour 1/2 cup

    Salt as required

    Turmeric powder 1/2 tsp

    Red Chilli Powder regular 1 tsp

    Red chilli powder Kashmiri 1 tsp

    Coriander powder 1 tsp

    Fennel Powder 1 tsp

    Chaat masala 1/2 tsp

    Sesame seeds 1 tsp

    Lemon juice 2 tbsp

    Oil for the batter 1 tbsp

    Oil for deep frying


    Directions:

Take the split Okra/Bhindi/Ladysfinger in a large bowl and add all the dry spice powders. Add the lemon juice and mix well with your fingers to spread the masalas evenly. Allow to marinate for 30 minutes. Now add both the flours and mix well. Drizzle 1 tbsp oil and mix again nicely with fingers. Heat oil in a Kadai. When a little batter dropped in the oil sizzles immediately, the oil is ready for frying. Take a few pieces of Okra at a time and drop them gently into the oil. Fry until the Bhindi turn light brown. The may seem limp, but as they cool they firm up and become crunchy. The Kurkuri Bhindi is ready to serve with your favourite comfort food, or just as a snack.


    STEPWISE RECIPE FOLLOWS:

 1. Take the split Okra/Bhindi/Ladysfinger in a large bowl and add all the dry spice powders.


2. Add the lemon juice and mix well with your fingers to spread the masalas evenly. Allow to marinate for 30 minutes.


3. Now add both the flours and mix well. Add Sesame seeds. Drizzle 1 tbsp oil and mix again nicely with fingers.


4. Heat oil in a Kadai. When a little batter dropped in the oil sizzles immediately, the oil is ready for frying. Take a few pieces of Okra at a time and drop them gently into the oil. Fry until the Bhindi turn light brown. The may seem limp, but as they cool they firm up and become crunchy. The Kurkuri Bhindi is ready to serve with your favourite comfort food, or just as a snack.


    NOTES:

1. Some recipes recommend removing the seeds from the Bhindi. I have skipped it. If the seeds are tender, they can be retained. Few that may remain in the oil after frying can be filtered and removed.

2. While selecting the Okra's choose tiny to middle sized ones and not the huge ones.

3. Always check the heat of the oil by gently dropping some batter into it. When a little batter dropped in the oil sizzles immediately, the oil is ready for frying.


If you tried this recipe and liked it please comment below. I would love to hear from you. If you have a query about the recipe email us and ill respond as soon as I can.
If you would like to receive our recipes on your mail please leave your mail id at the homepage. Every time Rajjo's Kitchen has a new post we will mail the recipe to you.


Monday 19 April 2021

CORN PALAK SUBJI

 Palak is a very versatile green. It is mineral rich, healthy and fibrous. Any add-in that goes into it, gets its flavour enhanced. In my house I have been called the female Popeye for a reason. I love Palak/Spinach in all forms. Be it the simple Keerai Masiyal, Keerai Molagootal or the delicious Palak Paneer, Palak Paneer Paratha, or the simple Spinach curry in coconut milk. 

One of my favourite Palak/Spinach recipes is also this delicious Subji Palak Corn. This is a simple everyday subji that one can make even on a busy day if their greens are washed and blanched. Highly nutritious and high on Iron and the corn not only gives the green a contrast with its yellow, but also balances the tanginess from the tomatoes and palak combination. This combination of Spinach and corn is classic and in all cuisines including World cuisine you will find a few recipes dedicated to this.


I have used Sweet Corn in this recipe as only this was available at the time I was cooking this dish. My preferred corn is Makai aka Maize, but sadly since we forget to promote what is local and regional, doing a dis service to our farmers, our indigenous varieties suffer. Let us get back our own Maize/Cholam/Makai, which are very rarely seen even during rainy season when they are most likely to be found. Do give this a thought.

Getting to the recipe right away-


     PREP TIME: 15 Mins                                            COOK TIME: 25 Mins
     TOTAL TIME: 40Mins                                           COURSE:  MAIN
     CUISINE:  NORTH INDIAN                                  SERVINGS: 4
     AUTHOR: Rajni Ram


    Ingredients:

    Ingredients
    Palak 1 bunch
    Corn Kernels 100 gm
    Onion 1 large or 2 small
    Green chillies 2
    Tomato 2 large to medium size
    Ginger- garlic paste 1 tsp
    Cloves 2
    Bay leaf 1 small 
    Cardamom 2 
    Cumin seeds 1 tsp
    Turmeric powder 1/2 tsp
    Salt as required
    Garam masala powder 1/2 tsp
    Coriander powder 2 tsp
    Fennel Powder 1 tsp
    Red chilli powder 1 tsp
    Cream 2 tbsp
    Oil for sauteeing

Directions:
Chop the Palak roughly and blanch them, I usually put them in the microwave for 2 mins. Alternately just put them in boiling water for 5 minutes. Drain the water and pour cold water over the Palak, this helps in keeping the green colour intact. Puree the Palak and keep ready. Cook the Corn kernels, and keep aside. 
Now in a karahi pour some oil and heat. Add 2 cloves followed by Cumin seeds and drop in the chopped onions. Saute for a minute, add the green chillies and continue to saute for 30 seconds, finally add the tomatoes and cook until the tomatoes turn mushy. Cool them. Now blend the onion-tomato mixture to a puree. In the same karahi take another 2 tsp of oil and heat.  Add the cumin seeds followed by turmeric powder and pour the onion-tomato mixture. Fry it nicely in the oil. Now add salt, followed by coriander powder, red chilli powder, fennel powder and continue to cook. Now add the Palak Puree. Stir well to combine the tomato and palak puree. Be careful as the palak splutters a lot while cooking, you can keep the karahi partially covered.  After about 3-4 minutes of cooking the Palak and tomato mixture will come together, at that stage add the cooked corn, cook for two more minutes, add the cream and garam masala powder and turn of the flame immediately. The delicious Corn palak is ready to serve.

Serving suggestions: with Rotis, Parathas, Kulcha, with rice varieties like Jeera rice, Mayar Pulav, 
Flavoured rice, vegetable pilaf etc;


STEPWISE RECIPE FOLLOWS:

1. Chop the Palak roughly and blanch them, I usually put them in the microwave for 2 mins. Alternately just put them in boiling water for 5 minutes. Drain the water and pour cold water over the Palak, this helps in keeping the green colour intact. Puree the Palak and keep ready. Cook the Corn kernels, and keep aside. 


2. Puree the Palak and set aside. In a karahi take oil and heat. Put in the cloves and cumin seeds, and as the cumin splutters add turmeric powder followed by onions and sauté for a minute. Add the green chillies and sauté for 30 seconds and now add the tomatoes and sauté until mushy. Cool and grind to a purée, along with 1 tsp ginger garlic paste.


3. In the same karahi take 2 tsp oil and heat. Now add the cumin seeds, Bay leaf, cloves and cardamom and  pour in the tomato and onion paste and fry nicely in the oil. 


 Now add salt, followed by coriander powder, red chilli powder, fennel powder and continue to cook. 


Now add the Palak Puree. Stir well to combine the tomato and palak puree. Be careful as the palak splutters a lot while cooking, you can keep the karahi partially covered. Add little water to dilute if required.  After about 3-4 minutes of cooking the Palak and tomato mixture will come together, at that stage add the cooked corn, cook for two more minutes.


Now add the cream and garam masala powder and turn of the flame immediately. The delicious Corn palak is ready to serve.


NOTES:
1. Blanching ( putting the Palak in hot water) is a critical step followed by dipping it in cold water.
2. Don’t overcook the Palak, it loses its colour and taste.


If you tried this recipe and liked it please comment below. I would love to hear from you. If you have a query about the recipe email us and i'll respond as soon as I can.


Thursday 15 April 2021

CHAKKI KI SHAK/ CHAKKI KI SUBJI

 The cuisine of  Madhya Pradesh ( central India) has been unexplored by me so far. Recently while looking up the internet I saw this interesting recipe called Chakki Ki Shak from the MP cuisine. I found the recipe simple and interesting and as I don’t have this cuisine on the blog I gave it a try and the dish turned out so delicious that I had to blog it. 

While looking up this recipe in detail I also came to know of many more interesting vegetarian  recipes from the region and I will surely bring them all here over a period of time. If you are following the blog you know by now that when I try a new recipe it has to turn out well thrice, and that takes time.

Before we delve into the recipe, I must tell you that MP being the center of India is surrounded by various states and hence there is a similarity of cuisine between them. I found some dishes bearing similarities with Rajasthani and Maharashtrian cuisine. Wheat, Jowar, and Maize form the staple food, do you see that’s how “Bhutte Ka Kees” is a specialty from MP, Bafla which is made of whole wheat flour is also a famous dish from the region. The current dish Chakki ki Shak is a curry  made of whole wheat flour and some aromatic spices. The flour dumplings are simmered in a tangy sauce.

While you are here check out my other curry recipes like Miloni Baby corn and Bell Peppers curry, kadai Paneer( gravy), Kathrikai Masala Kuzhambu, Pachai Mochai Kuzhambu, Keerai Molagootal, Mirch Ka Salan, Dum Aloo Ajwaini, Pachai Sundakkai Kuzhambu and more...

Here is the recipe for Chakki ki shak-


 PREP TIME: 15                                          COOK TIME: 15 Mins
 TOTAL TIME: 30 Mins                                COURSE:  MAIN
 CUISINE: INDIAN/MP                                SERVINGS: 6
 AUTHOR: Rajni Ram


    Ingredients to make Chakki:

    Whole wheat flour 1.5 cups

    Oil 1 tsp

    Carrom seeds/ Ajwain 1 tsp

    Salt as required

    Red chilli powder 1 tsp

    Turmeric powder 1/2 tsp

    Water as required to make a dough


    Ingredients for making the curry:

    Cumin Seeds 1 tsp

    Cardamom 2 pods

    Cloves 2-3

    Onions 2 small finely chopped

    Tomatoes 3 large

    Curd 1/2 cup 

    Cashewnuts 8 to 10

    Red chilli powder( regular) 1 tsp

    Red chilli powder( Kashmiri) 1 tsp

    Coriander powder 2 tsp

    Fennel powder 1 tsp

    Turmeric powder 1/2 tsp

    Garam masala powder 1/2 tsp

    Fresh coriander 1 tsp finely chopped


    Directions for making Chakki ( wheat dumplings)

In a bowl take the flour add the oil, salt and all spices and using water form a soft dough. It should be like roti dough. Immerse this dough in water for 15 minutes. After 15 minutes, scrub the flour lightly with your fingers, the water will become hazy. Throw this water. Pour some more water on the dough and scrub again and discard the water. The dough is now ready to be made to Chakki. Get the steamer ready, as the water in the steamer is getting boiled, smear your steamer plate with oil and spread this dough evenly on the plate using your fingers. Now place this in the steamer for 10 to 15 mins. Remove and cool the chakki. On cooling, cut into diamonds or squares. In a pan take some oil for shallow frying, and fry the Chakki to a golden brown. Drain on absorbent paper and keep aside.


   Directions for gravy preparation: 

In a blender add the chopped Tomatoes, and cashewnuts and blend to a smooth paste. In a Pan or Kadai take 1 tbsp oil and heat. Add the cumin seeds, cardamom and cloves and fry until aromatic. Now add the finely chopped onions ,turmeric powder,  and saute until light brown. Now add the ground paste followed by all the spice powders- red chilli powder(both regular and Kashmiri), coriander powder, fennel powder and mix well. Cook for two minutes until the raw smell goes away. Now add half a cup of curd and stir continuously for 2 minutes. Add 2 cups water and gently drop in the cooled and cut Chakki(wheat flour dumplings). Cover and cook the dumplings in this gravy until they turn soft and the gravy thickens up. Depending on what you are serving the Chakki Ki Shak with you can thin down or thicken the gravy. Finally add Garam masala powder and fresh coriander leaves and switch off the flame. 

Serving Suggestion: With Roti, Paratha, Naan or Plain or Jeera rice.


    STEPWISE RECIPE FOLLOWS:

1. In a bowl take the flour add the oil, salt and all spices and using water form a soft dough. It should be like roti dough. Immerse this dough in water for 15 minutes. After 15 minutes, scrub the flour lightly with your fingers, the water will become hazy. Throw this water. Pour some more water on the dough and scrub again and discard the water.


2. Get the steamer ready, as the water in the steamer is getting boiled, smear your steamer plate with oil and spread this dough evenly on the plate using your fingers. Now place this in the steamer for 10 to 15 mins. Remove and cool the chakki. On cooling, cut into diamonds or squares. In a pan take some oil for shallow frying, and fry the Chakki to a golden brown. Drain on absorbent paper and keep aside.


3. In a blender add the chopped Tomatoes, and cashewnuts and blend to a smooth paste. In a Pan or Kadai take 1 tbsp oil and heat. Add the cumin seeds, cardamom and cloves and fry until aromatic. Now add the finely chopped onions ,turmeric powder,  and saute until light brown. Now add the ground paste followed by all the spice powders- red chilli powder(both regular and Kashmiri), coriander powder, fennel powder and mix well. Cook for two minutes.


4.  Now add half a cup of curd and stir continuously for 2 minutes. Add 2 cups water and gently drop in the cooled and cut Chakki(wheat flour dumplings). Cover and cook the dumplings in this gravy until they turn soft and the gravy thickens up.


6. Finally add Garam masala powder and fresh coriander leaves and switch off the flame. 


    NOTES:

1. Since most recipes suggested soaking and washing the dough, i have followed it. One can also try steaming the dough, cutting to pieces and frying also.

2. The gravy can be allowed to thicken further if serving with Rotis.

3. Whichever the method, resting the dough for 15 mins is essential. 


If you tried this recipe and liked it please comment below. I would love to hear from you. If you have a query about the recipe email us and i'll respond as soon as I can.

If you would like to receive our recipes on your mail please leave your mail id at the homepage. Every time Rajjo's Kitchenn has a new post we will mail the recipe to you.


  This is my meal with Chakki Ki Sakh. I served it with Jeera Pulav, Bombay Potatoes and Beet root Raita.


Monday 1 February 2021

KADAI PANEER (GRAVY)

Kadai Paneer is a dish I like and make very frequently at home. I have this weekly one day is Paneer day compulsorily policy. Here on my blog I have another Kadai Paneer recipe which is a Semi dry version of this recipe. Though the Masala is same, the way I made it is slightly different. The Semi dry Kadai Paneer recipe is good to go with Rotis, and other flat breads and is a good lunch box recipe as it doesn't have much in the name of gravy and so is not messy at all, to carry in a box.

This gravy version is a great option to go with rice dishes like Matar Pulav, Jeera Rice, Biriyani etc. This version is what you will find at Dhabas in the North India. Considering Dhaba meals are supposed to be reasonably priced, do you think they would use Cashewnuts and cream etc, to thicken their gravy? Well, they use a very everyday ingredient that is found in Indian Kitchens and is gaining popularity the world over for its high protein quotient (and we have been using it since ages, that's India for us, a treasure house of recipes and food culture). Any guesses as to what that ingredient is? Besan. Yes, the humble chickpea flour. To find out how to use it, read the recipe and try it out and you will agree that it tastes delicious.

While you are here try out my other Paneer recipes likes Palak Paneer, Mava Paneer Curry, Paneer Khurchan, Malpua with Gulab Jamun mix and Paneer, and more...


Here goes the recipe for Kadai Paneer gravy style-

    PREP TIME: 15                                                   COOK TIME:15 MINS

    TOTAL TIME: 30 MINS                                         COURSE: MAIN 

    CUISINE: NORTH INDIAN                                   SERVINGS: 5

     AUTHOR: RAJNI RAM


    Ingredients:

    Paneer 200 gm cubed

    Onion 1 large cut into petals

    Onion 1 medium size chopped finely

    Capsicum 1 medium cut to large cubes

    Green chillies 2 slit lengthwise

    Ginger garlic paste 1 tsp

    Garlic 3 to 4 cloves (big ones)

    Tomatoes  2 large pureed

    Tomato 1 medium diced

    Turmeric powder 1/2 tsp

    Salt as required

    Cumin seeds 1 tsp

    Besan/ Chick pea flour 1.5 tbsp roasted on low flame until aromatic

    Methi seeds/ Fenugreek seeds 2 pinches

    Garam Masala Powder 1/2 tsp


    To be ground:

    Coriander seeds 1 tbsp

    Cloves 2

    Jeera/ Cumin seeds 1 tsp

    Dry red chilli 2 regular and 1 Kashmiri  dry red chilli (optional)


    Directions:

Take a Kadai and heat it, add the Besan and saute on low flame until it turns aromatic and light brown in colour. Keep stirring so that the Besan does not burn. Once aromatic, transfer to a plate. Now in the same kadai take 1 tbsp oil and drop in the Onion petals and saute for 1 minute. Now add the cubed capsicum and continue to saute over high flame for another 1 minute. Take care to stir constantly and the onion and capsicum should not overcook or turn limp. Transfer to a plate. Now in the same kadai take some more oil and add cumin seeds. Once they start crackling add the slit green chillies and saute for 30 secs. Now add the finely chopped onions and crushed garlic and continue to saute until the onion starts turning brown. In the meanwhile roast and grind the spices mentioned under "to be ground" and set aside. Grind them coarse and not very fine. Now add this powder to the sauteed onions, add turmeric powder, and if the mixture looks dry add another teaspoon of oil and saute the masalas in oil. Now add the roasted Besan and saute until the mixture starts appearing crumbly, but dry. To this add the tomato puree and mix nicely. Smoothen out all the lumps from the Besan. Add salt, followed by 1 to 1.5 cups water, drop in the diced tomatoes and cook for 5 minutes. Check for taste and add red chilli powder if required and adjust salt if required. Now add the cubed Paneer pieces , and the previously sauteed onion and capsicum and stir nicely. Add the fenugreek/Methi seeds. Cook until the gravy thickens. If you are particular about adding cream add now(this step is optional). Add garam masala powder and put off the flame. The yummy Kadai Paneer gravy style is ready. Enjoy with your favourite rice or Flat bread. Bon Appetit.


     STEPWISE RECIPE FOLLOWS:

1. Take a Kadai and heat it, add the Besan and saute on low flame until it turns aromatic and light brown in colour. Keep stirring so that the Besan does not burn. Once aromatic, transfer to a plate.


2. Now in the same kadai take 1 tbsp oil and drop in the Onion petals and saute for 1 minute. Now add the cubed capsicum and continue to saute over high flame for another 1 minute. Take care to stir constantly and the onion and capsicum should not overcook or turn limp. Transfer to a plate. 


3. Now in the same kadai take some more oil and add cumin seeds. Once they start crackling add the slit green chillies and saute for 30 secs. Now add the finely chopped onions and crushed garlic and continue to saute until the onion starts turning brown.


4. In the meanwhile roast and grind the spices mentioned under "to be ground" and set aside. Grind them coarse and not very fine. Now add this powder to the sauteed onions, add turmeric powder, and if the mixture looks dry add another teaspoon of oil and saute the Masalas in oil. 


5. Now add the roasted Besan and saute until the mixture starts appearing crumbly, but dry. To this add the tomato puree and mix nicely. Smoothen out all the lumps from the Besan. Add salt, followed by 1 to 1.5 cups water, drop in the diced tomatoes and cook for 5 minutes. Check for taste and add red chilli powder if required and adjust salt if required. 


6. Now add the cubed Paneer pieces , and the previously sauteed onion and capsicum and stir nicely. Add the Methi seeds and cook until the gravy thickens. If you are particular about adding cream add now(this step is optional). Add Garam Masala powder and put off the flame. Garnish with coriander leaves. The yummy Kadai Paneer gravy style is ready.


    NOTES:

1. Roast the Besan very carefully. Any burnt taste or flavour will change the taste of the dish. I always have a bottle of roasted Besan in my kitchen it helps to thicken gravies in a jiffy.

2. The roast and ground powder can be made ahead and stored in a bottle. This called the Kadai Masala because of which the dish gets its name.

3. I have not used cream in this dish. If you prefer adding cream, do go ahead and do so. I have specifically mentioned when to do so. 


If you tried this recipe and liked it please comment below. I would love to hear from you. If you have a query about the recipe email us and ill respond as soon as I can.

If you would like to receive our recipes in your mail please leave your mail id at the homepage. Every time Rajjo's Kitchen has a new post we will mail the recipe to you.


Wednesday 20 January 2021

GARLIC NAAN

 Usually when we think of Naan we think of eating it at a restaurant. That's also the reason why I have never attempted to make this at home until now. But the Pandemic has made us all crave restaurant style food at home and so the search for the perfect Naan recipe, which can be made at home easily, without any sophisticated gadgets was on. 

Its also common knowledge that an Iron Kadai is used to cook the Naan. But I wanted to get the dough right. One which will yield perfect Naans without much effort and also I did not want to make the instant one with baking soda, because when baking soda is used  the dough must go on the girdle immediately without resting it. I always prefer resting the dough, be it Roti's, Paratha's or Naan. So, in this recipe I have used yeast, because that is what gives the perfect texture and fluffiness to the Naan.

As far as possible I try to use less, or no Maida, but, to get the fluffiness the Maida needs to be added, whereas taste and nutrition comes from wheat. So in this recipe I have used both. The result was fluffy and perfectly cooked Naan's.   

While you are here check out my other bread recipes like Aloo Methi Paratha, Beetroot Paratha, Missi Roti and more...

Here is the recipe of Garlic Naan for you-


    PREP TIME: 10 MINS+ 2 hrs                               COOK TIME:15 MINS

    TOTAL TIME: 2 hr 25 MINS                                  COURSE: MAIN 

    CUISINE: NORTH INDIAN                                   SERVINGS: 5

     AUTHOR: RAJNI RAM


    Ingredients for dough:

    Whole Wheat flour 2 cups

    Maida 2 cups

    Water(lukewarm) 1 cup ( refer note1)

    Dry yeast 2 tsp

    Sugar 1 tbsp

    Salt to taste or 1 tsp

    Oil 3 tbsp

    Curd 2 tbsp

    Milk less than1/2 cup

    Fresh coriander leaves finely chopped

    Kalonji/ Nigella seeds  2 tsp


   For Garlic butter:

   Table butter/salted butter 50 gm

   Garlic 2 pods minced

   Coriander leaves finely chopped 1 tsp

Directions to make Garlic butter: Put all ingredients in a microwave safe bowl and microwave for 30 seconds, alternately put the ingredients in a bowl and melt the butter.

Directions: 

In a large mixing bowl take both the flours, add the salt and mix well. Now in a bowl take lukewarm water, add the sugar followed by the yeast. Let this stand for 10 mins or until the yeast blooms and becomes frothy. Now to the bowl of bloomed yeast add the oil, milk and curd and mix well. Now use this mixture to knead the dough. Add little at a time to knead the dough. In case after using the whole mixture the dough is still dry, add water to make the dough. The dough will be sticky, but stiff. Grease a container and put the dough in it to rest 2 hours. After 2 hours, the dough would have doubled up in size. Take it out, punch to release the air inside and knead again. Now divide the dough into 10 equal portions. Dust a little flour and roll out in oval shape. Sprinkle the Kalonji/Nigella seeds and fresh coriander and gently press it on the rolled dough. Take an iron Kadai (non stick doesn't give the best results), and invert it over the gas flame. When it is hot, stick the rolled out Naan on it and cook. When done the Naan comes out easily, without sticking. Now remove the Naan from the Kadai and transfer over direct flame and cook on both sides like how you would a Phulka. Transfer to a plate, apply the garlic butter over it and serve hot. 


Serving Suggestions: Serve this Naan with Paneer Butter Masala, Mava Paneer Curry. Also goes well with Dal Makhni, Paneer Khurchan, Choley or Rajma.


STEPWISE RECIPE FOLLOWS:

1. In a large mixing bowl take both the flours, add the salt and mix well. Now in a bowl take lukewarm water, add the sugar followed by the yeast. Let this stand for 10 mins or until the yeast blooms and becomes frothy.


2. Now to the bowl of bloomed yeast add the oil, milk and curd and mix well. Now use this mixture to knead the dough. Add little at a time to knead the dough. In case after using the whole mixture the dough is still dry, add water to make the dough. The dough will be sticky, but stiff. Grease a container and put the dough in it to rest 2 hours. ( Please add the sugar, curd and milk, those pictures are not here and will be added as soon as possible)


3. After 2 hours, the dough would have doubled up in size. Take it out, punch to release the air inside and knead again. Now divide the dough into 10 equal portions. Dust a little flour and roll out in oval shape. Sprinkle the Kalonji/Nigella seeds and fresh coriander and gently press it on the rolled dough


4. Take an iron Kadai (non stick doesn't give the best results), and invert it over the gas flame. When it is hot, stick the rolled out Naan on it and cook. When done the Naan comes out easily, without sticking. Now remove the Naan from the Kadai and transfer over direct flame and cook on both sides like how you would a Phulka. Transfer to a plate, apply the garlic butter over it and serve hot. 


    NOTES:

1. The dry yeast must always be added to lukewarm water and not hot water. The temperature of the water is right if your finger immersed in water is able to bear the heat.

2. The Naan can be customized with whatever you prefer, if not garlic. Just apply plain butter without garlic for butter Naan or top it up with cheese for Cheese Naan. 

3. The dough should have risen well for the perfect turnout. So plan making the dough ahead.


If you tried this recipe and liked it please comment below. I would love to hear from you. If you have a query about the recipe email us and ill respond as soon as I can.

Friday 8 January 2021

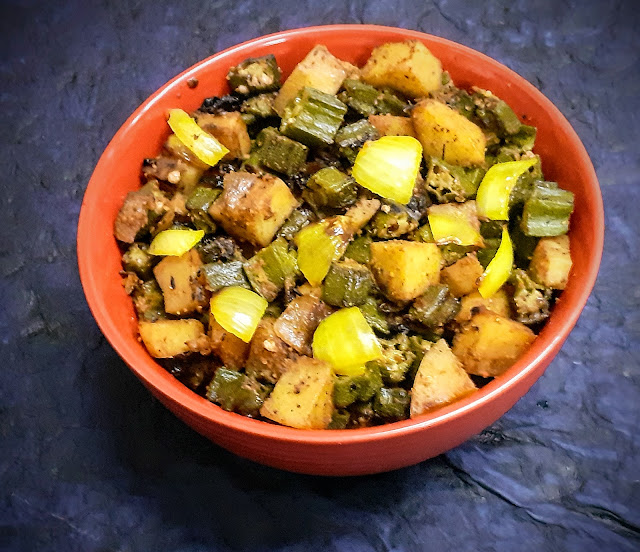
BHINDI ALOO (EVERY DAY SUBJIS)

This Subji is a simple stir fry with a mix of Ladyfinger and Potatoes as the name suggests. This is perfect for those rush hours in the morning or after work evenings when you want something simple that can be made with the least effort. This dish of Bhindi Aloo goes well with Rice and Roti or other flatbread varieties. It is healthy and becomes a good lunch box item for kids. 

Without much detailing getting in to the recipe directly. While you are here check out my other Subji and curry recipes like Paneer Khurchan, South Indian Kurma, Methi wale Baingan, Roasted Eggplant 2 ways, Paneer Mava Curry and more...


PREP TIME: 15 MINS                               COOK TIME:15 MINS

TOTAL TIME: 30 MINS                              COURSE:MAIN 

CUISINE:INDIAN                                        SERVINGS: 4

AUTHOR: RAJNI RAM


    Ingredients:

    Onion 1 large cut into petals

    Bhindi/Okra/Ladysfinger 200 gm cut to 1 inch length

    Potato 1 large or 2 medium diced

    Cumin Seeds 1 tsp

    Turmeric powder 1/2 tsp

    Red chilli powder 1 tsp

    Coriander powder 1 tsp

    Fennel powder 1 tsp

    Amchur powder 1/4 tsp

    Garam Masala 1/2 tsp

    Salt as required

    Oil for sauteing


Directions: 

In a Kadai or Pan heat oil. When its hot add the Cumin seeds and let them crackle. Add the turmeric powder followed by the chopped onions and saute until the onions start turning brown. Now add the diced potatoes and continue to saute. When the Potatoes are half done add the Bhindi and continue to saute. Keep stirring in between so that the vegetables don't burn. When the Ladysfinger are half done add salt, stir nicely, and cover the Kadai for precise 2 minutes. After 2 minutes open the lid and add Red chilli powder, Coriander powder, fennel powder and Amchur(dry mango) powder and mix nicely. Check for doneness of the Aloo and Bhindi by mashing between your fingers. When done add the Garam Masala powder and turn off the stove. The simple and healthy Bhindi Aloo is ready to serve wit our choice of rice or roti.   


     STEPWISE RECIPE FOLLOWS:

1. In a Kadai or Pan heat oil. When its hot add the Cumin seeds and let them crackle. Add the turmeric powder followed by the chopped onions and saute until the onions start turning brown.


2. Now add the diced potatoes and continue to saute. When the Potatoes are half done add the Bhindi and continue to saute. Keep stirring in between so that the vegetables don't burn. 


3. When the Ladysfinger are half done, add salt, stir nicely, and cover the Kadai for precise 2 minutes. After 2 minutes open the lid and add Red chilli powder, Coriander powder, fennel powder and Amchur(dry mango) powder and mix nicely. 


4.  Check for doneness of the Aloo and Bhindi by mashing between your fingers. When done add the Garam Masala powder and turn off the stove. The simple and healthy Bhindi Aloo is ready to serve wit our choice of rice or roti.   


    NOTES:

1. The Bhindi/Ladysfinger can sometimes turn slimy. To avoid this Pre cut the Bhindi and keep in the fridge or put it on a paper to absorb the moisture. 

2. Alternately you can squeeze 1/4 of a lemon if you find that it is turning slimy.

3. Adding quarter spoon of sugar helps to retain the green colour of the Bhindi.

4. If after adding all Masala powders if you subji still looks a little moist and not crisp and dry, add 1 tbsp bread crumbs.


If you tried this recipe and liked it please comment below. I would love to hear from you. If you have a query about the recipe email us and ill respond as soon as I can.

If you would like to receive our recipes in your mail please leave your mail id at the homepage. Every time Rajjo's Kitchen has a new post we will mail the recipe to you.

TOFU AND STIR FRIED VEGETABLES IN HOT SCHEZWAN SAUCE

  Any Tofu lovers? I agree its an acquired taste,but going by the health benefits it has to offer, I try including it in my diet now and the...