Vegetarian cooking blog

Showing posts with label World Food. Show all posts

Tuesday 6 October 2020

VEGETABLE MANCHURIAN(WITH GRAVY)

 Who doesn't like Vegetable Manchurian? This is the most Indianised Chinese dish, that has been customized to the Indian palette. The dry version of this dish aka Vegetable Manchurian dry is one of the most popular Starters offered at all weddings, get-togethers, parties, and the like. This also happens to be my most favourite starter.   I also have a recipe on this blog for Fried rice with these dry Manchurians, do check it out. The only difference is that I have used Cauliflowers instead of cabbage in the fried rice recipe. Fried rice and Manchurian with gravy are a match made in heaven, so do try out the combination from the recipes in my blog.

This is a no-fail recipe and turns out well every time that I make it, which is why I make it frequently. In this recipe, I have used 1 whole medium-sized cabbage( oh yes that's how much we like this dish), one can customize it as per their requirements though.

While you are here please do check out my other Indo Chinese recipes like Schezwan fried rice(with Soya chunks), Cauliflower fried rice and other dessert recipes like Pineapple jam tarts and Apple crumble.

Here is the recipe for Vegetable Manchurian(with gravy) for you-  


   PREP TIME: 20 Mins                      COOK TIME: 40 Mins
   TOTAL TIME:60Mins                       COURSE:  MAIN
   CUISINE:  FUSION                         SERVINGS: 5
   AUTHOR: RAJNI RAM


   Ingredients for the Manchurian dough:

   Cabbage 1 medium-sized (shredded)

   Carrot 1 (shredded)

   Spring onions 1 bunch chopped finely

   Onion 1 finely chopped

   Green chillies 2 finely chopped 

   Ginger 1/2 inch piece finely chopped

   Salt as per taste

   Pepper powder 1 tsp

   Maida 1/2 to 3/4 of a cup

   Rice flour 1/4 cup


   Ingredients for the gravy:

   Garlic 3 cloves finely chopped(reserve some for garnish)

   Ginger 1/2 inch piece

   Green chillies 2 finely chopped

   Spring onion greens 1 tbsp finely chopped

   Onion 1 small finely chopped

   Tomato puree 1/4 cup or puree of 1 large Tomato

   Green Capsicum 1/4 of a whole chopped medium-sized

   Red Bell pepper 1/4 of a whole chopped medium-sized

   Tomato sauce 2 tbsp

   Chilli sauce 2 tsp(add for more spice)

   Soy sauce 1 tbsp

   Vinegar 1 tbsp

   Cornflour 2 tbsp

   Salt as required

   Pepper powder 1tsp

   Oil for frying the Manchurian

   Directions to make the Manchurian:

In a bowl take the shredded Cabbage, add to it rest of the vegetables like shredded carrot, spring onions, onions, green chillies and ginger. Add salt and pepper powder and combine well using your fingers. Now add Maida/refined flour, followed by rice flour and combine nicely. It needn't become a dough, but you should be able to form a ball that doesn't go flat or break. Now divide the mixture into lemon sized balls( I got around 20 of them with this quality). Heat oil in a wok or Kadai and fry the balls in medium heat until a golden brown. Keep them aside.


Directions for making the gravy:

Heat oil in a pan and add the finely chopped green chillies, ginger and garlic to it. Saute for 30 seconds. Now add the spring onion greens and saute. Add the onions and continue to saute, until the sweat a bit. Remember all sauteeing to be done in high heat and with constant stirring. Now add the tomato puree and cook for a minute. Add salt and pepper powder and continue to cook for another minute. When the raw smell from the tomato puree is gone, drop in the both the Red and Green capsicum. Saute for another 30 seconds. You can add a teaspoon of sugar at this stage(optional). Now add the tomato sauce, followed by the red chilli sauce. Stir nicely. Now add the soya sauce followed by Vinegar, stir and cook for a minute. Prepare the cornflour mix by adding 1/2 cup water to 2 tbsp of cornflour. Pour this mix into the prepared sauce and stir continuously for a minute. Now dilute the sauce to the consistency you prefer by adding water. I have added 1 cup as I like a thick gravy. Simmer for 2 minutes on low heat and the gravy is ready. Now arrange the Manchurian balls in a serving dish and pour the gravy over it. Enjoy hot with any Fried rice varieties. Bon Appetit. 

 STEPWISE RECIPE FOLLOWS:

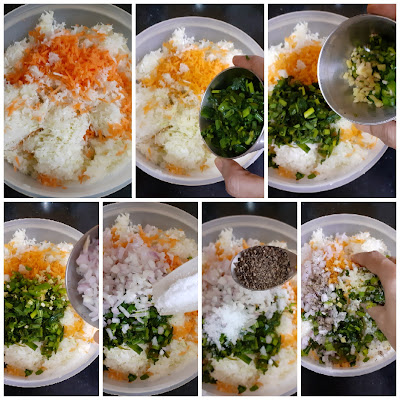
1. In a bowl take the shredded Cabbage, add to it rest of the vegetables like shredded carrot, spring onions, onions, green chillies and ginger. Add salt and pepper powder and combine well using your fingers. 


2. Now add Maida/refined flour, followed by rice flour and combine nicely. Now divide the mixture into lemon sized balls( I got around 20 of them with this quality). Heat oil in a wok or Kadai and fry the balls in medium heat until a golden brown. Keep them aside.


3. Heat oil in a pan and add the finely chopped green chillies, ginger and garlic to it. Saute for 30 seconds. Now add the spring onion greens and saute. 


4. Add the onions and continue to saute, until the sweat a bit. Remember all sauteeing to be done in high heat and with constant stirring. Now add the tomato puree and cook for a minute. Add salt and pepper powder and continue to cook for another minute.


5.  When the raw smell from the tomato puree is gone, drop in the both the Red and Green capsicum. Saute for another 30 seconds. Now add the tomato sauce, followed by the red chilli sauce. Stir nicely. Now add the soya sauce followed by Vinegar, stir and cook for a minute. 


6. Prepare the cornflour mix by adding 1/2 cup water to 2 tbsp of cornflour. Pour this mix into the prepared sauce and stir continuously for a minute. 


7. Now dilute the sauce to the consistency you prefer by adding water. Simmer for 2 minutes on low heat and the gravy is ready. Now arrange the Manchurian balls in a serving dish and pour the gravy over it. Enjoy hot with any Fried rice varieties.


Notes:

1. The gravy for any wet Manchurian is the same, so one can experiment with other vegetables like Cauliflower, Potato, Brocolli, Soya Chunks beside others. If you make Manchurian with any other interesting vegetable do let us know. We love learning.

2. I usually make a slightly thick gravy as that's how we like this dish. If you prefer a lighter one, feel free to dilute the gravy by adding little warm water.

3. If you make an excess of the Manchurian balls, don't fret, as you can mix them ina onion tomato paste, add some spices, add Schezwan sauce and get it to the consistency of a dry paste. Toss in the balls into this paste, mix nicely and stir fry and you have a dry Manchurian at hand😀 to relish.


If you tried this recipe and liked it please comment below. I would love to hear from you. If you have a query about the recipe email us and ill respond as soon as I can.
If you would like to receive our recipes in your mail please leave your mail id at the homepage. Every time Rajjo's Kitchen has a new post we will mail the recipe to you.


Monday 14 September 2020

HOMEMADE PESTO

 Pesto is a simple sauce made of fresh Basil leaves, Parmesan cheese, pine nuts, garlic, Olive oil, pepper, and salt. Other greens like Spinach or onion greens can also be used. Basil is fragrant and imparts a lot of flavour so is more commonly used. Pinenuts can also be substituted with other nuts like walnut, cashew nut, etc.

I make this Pesto sauce very frequently as I like using it as a dip for finger food, as a spread on toast, and thin it down a bit and use it as a sauce for pasta. This is a simple 5-minute recipe and needs no cooking. Along with the Basil leaves, I have added Onion greens also. This is optional.

The basil leaves I have used here are Italian Basil. The commonly available ones are Italian Basil and Thai Basil. In Tamil, these are called Vibuthi Pachai and are medicinal. 

While you are here also check out my Schezwan sauce recipe which is also a simple 5 minute one.

Here is the recipe for Pesto sauce for you. This does not have a stepwise recipe as it is a simple one.


PREP TIME: 5Mins                                      COOK TIME: 2 Mins
TOTAL TIME: 7 Mins                                COURSE:  SAUCE
CUISINE: WORLD FOOD                        QUANTITY: 100 GM APPROX
AUTHOR: Rajni Ram


Ingredients:

Basil leaves 1 cup 

garlic 3 to 5 cloves

Parmesan cheese 1/2 cup shredded

pepper 1tsp

salt as per taste

Cashew nuts 6 nos

Onion greens one handful finely chopped

Olive oil 1/4 cup or more


  Directions:

Put all the ingredients in a blender except the oil and grind to a coarse paste. Now add half the quantity of oil and blend again. A slightly grainy Pesto tastes better than a smooth one. After grinding transfer to a container and top up with the remaining Olive oil and store. Use as required. Add more oil if required. The green and flavourful sauce is ready.


NOTES:

1. Using other cheese like Cheddar will alter the taste a bit and the consistency will differ. Mozarella is not the preferred cheese for this recipe.

2. For that lovely green colour add other greens like blanched Spinach or Onion greens.

3. Be liberal with the olive oil, and use a good quality olive oil for better flavour.


If you tried this recipe and liked it please comment below. I would love to hear from you. If you have a query about the recipe email us and ill respond as soon as I can.
If you would like to receive our recipes in your mail please leave your mail id at the homepage. Every time Rajjo's Kitchen has a new post we will mail the recipe to you.


Tuesday 1 September 2020

POTATO CHEDDAR BAKE

This is a very simple recipe and a great finger food/ starter option at get-togethers. Most of the prep can be done ahead and the baking can be done half an hour before serving. This dish can also be a tea time snack and the kids will love it. To make it healthy I have used roasted oats to coat the potatoes instead of cornflour. The baking can be easily replaced by the grilling method( on a girdle /tava).
 The cheddar cheese used in this recipe gives it a sharp taste and a crisp texture, the coriander and oregano give it a herby flavour.   The Cheddar cheese can be easily replaced by Parmesan Cheese, and it also tastes just as good.  I usually don't use a baking/parchment paper for this recipe and directly bake it on the baking tray, but this time I thought why not put it on a baking sheet, which turned put to be a wrong choice as I had to wait for 10 minutes to remove the potatoes from the sheet, so please don't repeat the same. Just grease the baking tray and follow the recipe without the baking sheet.

While you are here please have a look at my other snack recipes like Semolina Cheese Balls, Kothimbir Vadi, Moong dal Kachoris, Baked Wheatflour Papdis, and more...

Here is the recipe for Potato Cheddar Bake for you-

      PREP TIME: 20 Mins                                          COOK TIME: 20 Mins
     TOTAL TIME:40Mins                                           COURSE:  DESSERT
     CUISINE:  WORLD FOOD                                  SERVINGS: 6
     AUTHOR: Rajni Ram


Ingredients:

Potatoes small size( baby potatoes can also be used) 5 
Cheddar cheese/Parmesan Cheese 200 gm grated
Oats (instant) roasted 1 cup
Salt as required
Red chilli powder 1.5 tsp
Oregano 2 tsp(divided)
Black pepper powder 1/2 tsp
Peri-Peri powder 1/2 tsp(use more if you prefer)
Coriander leaves finely chopped

Method: Wash and peel the p[otatoes and slice them as shown in the picture. Heat water ina kettle/saucepan and pour the boiling water over the sliced potatoes and cover it and leave it for half an hour. After half an hour drain the water. Prick a fork into the potato, it should pierce with a little resistance. The potatoes should not overcook. Now dry roast the Oats in a pan until crisp ( approx 3 to 4 mins on low heat). Cool it. Put it ina grinder and powder it fine. To the oats powder add salt, red chilli powder and oregano and set aside. To the grated cheese add the pepper powder, salt and Peri Peri powder and mix nicely. Grease a baking tray( don't use a baking sheet as seen in the picture, read intro) with oil, spread a thin sheet of cheese mixture on the tray. Now take a slice of the potato, cover it with the oats powder nicely, such that both sides are coated well and arrange on the baking tray on top of the cheese layer. Repeat for half the amount of potato slices, and keep arranging them on the baking tray next to each other. Now sprinkle the cheese mixture over the potatoes, sprinkle oregano powder, top with some finely chopped coriander and put the tray in the oven. Bake at 200C for 20 minutes. The cheese should have melted and formed a crunchy layer over the potatoes. The cheese and crunchy Potato Cheddar Bake is ready to serve. Enjoy. Bon Appetit.

STEPWISE RECIPE FOLLOWS:

1. Assemble all ingredients. Peel and slice potatoes. Grate the cheese. Roast and powder the oats.


2. Pour boiling water over the sliced potatoes and let it stand covered for half an hour. Drain the water and prick a potato slice with a fork to check doneness. It fork should pierce it with little resistance. The potato should not be overcooked or mushy.


3. Now powder the roasted oats and add salt, chilli powder and oregano to it and set aside.


4. Take the grated cheese and add pepper powder, Peri-Peri powder(or red chilli powder) and a pinch of salt and mix well.


5. Now grease a baking tray with oil and spread the cheese mixture as a thin film on it. Now roll each potato slice in the roasted and spiced oats powder, such that both sides are well coated and arrange on the baking tray over the cheese mixture. This has to be done in two batches, as potatoes should not be overlapped for more than two layers.


6. Repeat for all potato slices and arrange them next to one another in the tray. Cover with more cheese mixture, sprinkle oregano powder over it, garnish with finely chopped coriander and pop it in the oven. Bake at 200 C for 20 minutes.
The Cheese should have melted and formed a crisp crust over the potatoes. The cheesy and delicious potato cheddar bake is ready.


NOTES:
1. As said in the introduction don't use a baking paper as it takes time to remove the potatoes off the tray.
2. Parmesan cheese can also be used instead of Cheddar or a half and half mix of both can be done.
3. If Peri-Peri powder is not available use regular red chilli powder or Cumin pepper powder that we use for Rasam 😉.
4. The preparation of this dish can be done ahead, like blanching the potatoes, making the oat powder mix, making the cheese mixture etc and the baking can be done closer to serving time.

If you tried this recipe and liked it please comment below. I would love to hear from you. If you have a query about the recipe email us and ill respond as soon as I can.

If you would like to receive our recipes on your mail please leave your mail id at the homepage. Every time Rajjo's Kitchen has a new post we will mail the recipe to you.


Wednesday 26 August 2020

APPLE CAKE(TEA CAKE)

 Until recently I did not know that such delicious cakes could be made using Apples. I mostly stuck to making the Apple Crumble. I came across this recipe some time ago, and as you know I have to try it thrice without errors for it to feature on the blog. So here is the recipe that is foolproof, also no whisking, just mixing, so mess at all.

This cake has a very delicate flavour and is a crumbly cake, it is very light and a great tea time cake. What more, it is healthy and kids will love it( you could just drizzle chocolate sauce or Nutella over it for them). It tastes best when warm and keeps good for 2 days at room temperature. Just warm before you serve and it is fresh again.

The apple slices that you see in the picture make it look sophisticated, but it is not such a difficult cake to make. The apple slices on top can be excluded altogether, as the cake batter has them already, but I like them with a lot of apples and the glaze and hence I make it this way.

While you are here please check out my other cake recipes like                     Blueberry Cheesecake, Nutella Fudge brownies, Apple Crumble and Pineapple Jam Tart. 

Here is the recipe of Apple Cake for you-

      PREP TIME: 20 Mins                                          COOK TIME: 40 Mins
     TOTAL TIME:60Mins                                           COURSE:  DESSERT
     CUISINE:  WORLD FOOD                                  SERVINGS: 6
     AUTHOR: Rajni Ram


Ingredients for coating apples:

Apples 3 large( any variety) cut half to cubes and half of them in slices.

Cinnamon powder 3 tsp( divided)

Butter 3 tbsp ( divided) 

Sugar 2 tbsp (divided)

Dry Ingredients:

Flour/ Maida 1.5 cups 

Baking powder 2 tsp

Salt 1/2 tsp

Wet Ingredients:

Butter 60 gm melted

Oil ( refined) 1/2 cup

Eggs 2

Sugar ( white) 3/4 cup

Vanilla essence 1 tsp

Glaze:

Honey 2 tbsp.

Directions: 

First, peel the apples and chop 1 1/2 apples to small cubes and another 1 1/2 to slices. Pug them in two separate bowls.

Divide and add the cinnamon powder, butter, and sugar between both the bowls equally and mix. Set aside.

Preheat the oven to 200 c and start preparing the cake batter.

Put all the dry ingredients in one bowl and mix well.

In another bowl combine all wet ingredients( refer to ingredients above)Now add the wet ingredients to the dry ingredients and combine nicely using a spatula. No electric beater required. Once nicely combined, mix in the apples chopped to cubes to the batter and mix gently.

Grease a baking tray and line it with parchment paper/ baking paper. Pour the batter into the tray, tap it once gently and place it in the oven. Bake at 200 C for 50 minutes or until a toothpick comes out clean. Once done remove from oven and leave to cool down a bit. Cut when still warm and serve. The delicious Apple cake is ready to serve.

STEPWISE RECIPE FOLLOWS:

1. Assemble all ingredients.  Chop 1 half of the Apples to cubes and the other half to slices. Put them in 2 separate bowls.

2. Divide and add the butter, cinnamon powder, and sugar in both bowls, mix nicely and set aside.


3. Preheat oven to 200 C. Now put all dry ingredients in a separate bowl and mix.


4. Take all wet ingredients in another bowl and combine well. Now mix the wet ingredients to the dry ingredients and combine well.


 5. Now add the cubed apples to the batter and fold gently. Grease a circular cake mould and line with parchment/baking paper. Now scoop in the batter into the mould.


6. Take the sliced apples and arrange them like a fan on the batter. Now it is ready to be popped into the oven. Bake at 200C for 50 minutes or until a skewer comes out clean.


Allow it to cool for 5 minutes and apply the honey over it with a brush and cool it. The honey gives the apples a beautiful glaze. Serve them a little warm.


NOTES:

1. Any variety of apples can be used for this recipe.

2. This cake has a crumbly texture, you will know if you look at the picture. It is super moist.

3. It holds good for 3 days at room temperature, for long storage put it in the fridge and warm just before serving.

4. It is also a good snack box idea for kids as it can be made ahead, just remove from the refrigerator, warm it and allow it to sweat, then pack.

5. This cake can be made without the sliced apples on top too. Just mix the chopped apple and scoop mixture into the baking tin/ tray and bake. 


If you tried this recipe and liked it please comment below. I would love to hear from you. If you have a query about the recipe email us and ill respond as soon as I can.

If you would like to receive our recipes on your mail please leave your mail id at the homepage. Every time Rajjo's Kitchen has a new post we will mail the recipe to you.


Friday 14 August 2020

MUSHROOM RISOTTO WITH DALIYA( WHEAT BROKENS)


Risotto is an Italian dish made of rice. It is cooked in a broth until creamy and combined with sauteed onions, other vegetables, and cheese.

This recipe of Mushroom Risotto is tasty and healthy at the same time. This recipe was spotted by my girl while browsing the internet and she had been asking me to make it for her. So decided to give it a try, and it really tastes delicious and therefore it gets to feature on my blog. I do make the regular Risotto once in a while but the use of Daliya seemed very novel and different to me. 

In this recipe, I have replaced the rice with Daliya(broken Wheat that is coarse). Lapsi or Wheat Rava also can be used. The key to a good Risotto lies in the broth and the Parmesan cheese. A large variety of vegetables can be used in making the broth.

If you are a regular at making Risotto follow the same process as with rice. Beginners may want to follow the recipe carefully. I have put in a video too for guidance.

The Risotto made with rice makes use of wine to enhance the taste. I have kept this wheat Risotto very simple with everyday ingredients. Simple ingredients make for great flavour always.

This recipe requires about 1 litre of vegetable broth. I made the broth at home, if you use broth cubes, that is fine too.

In this recipe, I have not given the stepwise instructions, but I have included a video of the whole process instead. Hope you find the video helpful.

While you are here please do check out my other recipes like Apple Crumble, Blueberry Cheesecake, Nutella Fudge Brownies, Schezwan fried rice,              Berry Smoothie Icecream, Creamy Tomato pasta and more...

Here is the recipe of Mushroom Risotto with Daliya for you-

  PREP TIME: 20 Mins                                         COOK TIME: 40 Mins
 TOTAL TIME:60Mins                                          COURSE:  MAIN
 CUISINE:  WORLD FOOD                                 SERVINGS: 3
 AUTHOR: Rajni Ram


  Ingredients for Broth:

  Carrot 1

  Cucumber 1

  Onion 1 large

  Broccoli 4 to 5 florets

  French Beans a few

  Garlic 4 to 5 cloves

  Coriander/ Cilantro few sprigs

  Salt as per taste


  Ingredients for Risotto                                                                                                                                                                                                                       

   Mushrooms 200 gm

  Daliya (broken Wheat) 1 cup washed

  Garlic 8 cloves (divided)

  Onion 1 cup  (chopped)

  Vegetable broth 4 to 5 cups approx.

  Salt as required

  Pepper powder 1 to 1.5 tsp

  Parmesan Cheese 3 tbsp (add more if you prefer)

  Directions for broth:

Chop all the vegetables mentioned under Broth, put them in a saucepan, add 1 litre + 1 cup water and salt and boil for 10 minutes. Cool completely and use as required. Other vegetables that you may like can also be added to make the broth.  

Directions for Risotto:

In a pan take 1 tablespoon butter and heat, add the garlic and saute on high for 30 seconds, now add the chopped mushrooms and saute for a minute. Flame to be on high throughout sauteeing. Add the salt and continue to saute. The mushroom will release a lot of moisture, continue to saute, and let the moisture dry. When the moisture is almost dry add the pepper powder and continue to saute until all the moisture has evaporated. Transfer the sauteed mushrooms to another vessel. 

Now in the same pan add 1 tablespoon butter and heat. Add the crushed garlic and saute for 30 seconds. Now add the finely chopped onions and continue to saute. Saute on high flame. When the onion turns translucent add the Daliya and stir nicely. Add 1 cup of broth, stir, and cover the pan and cook for 5 minutes on low flame. Open the lid after 5 minutes, pour 1 more cup of broth, stir well and cover and cook again on low flame for 5 minutes. Now when you open the pan, the Daliya would be cooked, now we only have to get it soft. Add another cup of broth, and salt, stir and cook on low flame. The pan need not be covered now. As you cook the Daliya keep mashing with the back of a ladle to get a creamy texture. Now add pepper powder and stir well. add another cup of broth, stir and continue cook on low flame. Once all the water is absorbed, add in the sauteed mushrooms and give it a stir. Add the last cup of broth now and cook on a low flame. Now when the water gets absorbed, add 3 tablespoons of Parmesan Cheese, stir nicely, so that the cheese melts and gives the Risotto its gooey and creamy texture. Put off the flame. If you like cheese you can add more than 3 tablespoons too. In all 4 to 5 cups of broth is required to get that creamy texture.

The healthy and delicious Mushroom Risotto is ready. Enjoy hot. Bon Appetit.


SHORT VIDEO OF THE METHOD HERE🠇                              


NOTES:

1. Any variety of vegetables can be added to the broth, in addition to the mentioned ones.

2. Around 4 to 5 cups of broth is required for this recipe. If in case the broth gets over, and you still have to add a cup, plain water can be added. 

3. Parmesan is the most recommended cheese for this recipe, as cheddar will become tough and stretchy once cooked, whereas Parmesan is a softer one.

4. In place of, or in addition to mushrooms, Broccoli also can be used.  


  If you tried this recipe and liked it please comment below. I would love to hear from you. If you have a query about the recipe email us and ill respond as soon as I can.

If you would like to receive our recipes on your mail please leave your mail id at the homepage. Every time Rajjo's Kitchen has a new post we will mail the recipe to you.


Tuesday 4 August 2020

CREAMY TOMATO PASTA

Well, who doesn't love pink Pasta? Yes, pink pasta. Usually, pink pasta is made with a combination of white sauce and tomato pasta sauce. In this recipe, I have used a lot of tomato puree and milk, some cream, and loads of Parmesan cheese. The sauce is extremely slurpy and delicious. The sauce can be used as it is or one can add-in as per their preference.

I am also letting you into a little secret of how restaurants get that creamy texture. I have also used Pangritato(toasted bread crumbs) which takes this dish to a completely different level. This Pasta sauce is very easy to make and the dish gets done very quickly. 

I  have used Spaghetti and a few pieces of Macaroni just for some aesthetic effect and nothing else. You can avoid it completely, or use only Macaroni instead of Spaghetti or use both like I did. Children are sure to love this recipe and adults too and the bowl will be clean.
The use of parmesan cheese gives a nice sharp taste to the sauce. Feel free to add other herbs like Basil, I have used only Italian seasoning. 

While you are here visit other recipes of mine like Schezwan Fried rice,

Here is the recipe of Creamy Tomato pasta for you--


PREP TIME: 20 MINS                                          COOK TIME: 20 MINS
TOTAL TIME: 40 MINS                                        SERVINGS: 4
 CUISINE:  WORLD FOOD                               AUTHOR: Rajni Ram


Ingredients:

Spaghetti 1 packet (300 gm)
Macaroni 1 handful(optional)
Tomato puree 200 to 250 ml
Cream (medium or high fat) 1/2 cup
Milk 1 cup
Parmesan cheese 1 cup and a little more
Bread slice 1(for the Pangritato)
Pepper powder 1 tsp
Red chilli powder 1 tsp
Garlic 5 pods crushed
Onion 1 finely chopped
Chilli flakes 2 tsp(divided)
Oregano or Italian seasoning 2 tsp(divided)
Cilantro/Coriander leaves finely chopped 2 tsp
Olive oil/butter 2 tbsp

Directions:
Cook the pasta aldente( a little undone- just put off the flame 2 minutes than the recommended time on the pasta packet). Reserve 2 cup of the water in which the pasta cooked and drain the remaining. Pour cold water over pasta, drain it completely and place the pasta in a colander. 
Put 1 tsp of chilli flakes and Italian seasoning in 1 cup of the reserved pasta water and pour this water over the pasta in the colander, the water will drain away but the flakes and the seasoning will stick to the pasta. This step is what gives that flavouring in restaurants( 1 secret revealed).
Now in a wok or pan add 2 tbsp Olive oil/butter and heat. add the crushed garlic and saute for 30 seconds and add the onion. Continue to saute until the onions turn transparent. Now reduce the heat and pour in all other ingredients into the pan, like tomato puree, cream, milk and 3/4 cup of parmesan cheese. Stir the contents nicely over a medium flame until the cheese melts completely and the sauce starts bubbling. Add the reserved cup of pasta water to the sauce and dilute it, this is what gives the sauciness when the sauce becomes thick again( secret 2 revealed😃). Now add the pepper powder, red chilli powder and salt to the sauce and continue to cook. The sauce will now become dense ad thick if it's too thick then dilute again by adding 1/4 cup water. The sauce should be thick and stick to the pasta and not run all over it. Now add the cooked pasta to the sauce and mix nicely. The sauce should have covered all the pasta nicely. Now add the chopped Cilantro, Italian seasoning and top up with the remaining Parmesan cheese, cover and cook for a minute. Put off the flame and serve immediately. Yummy saucy pasta is ready. Enjoy. Bon Appetit. 

For the Pangritato: Toast one bread slice with a little butter until crisp and powder it. this powder is Pangritato, basically toasted bread crumbs.
They are used a lot in  Italian cooking.


STEPWISE RECIPE FOLLOWS:
1. Assemble all ingredients.
Cooking the pasta perfectly- Take about 2 litres of water in a big vessel( I prefer a flat and broad one) and boil it. When it begins to boil add a teaspoon of salt(reduce heat before you add salt or the boiling water will overflow), a teaspoon of oil and add the pasta. Keep stirring and cooking it and keep checking in between if it is done. Remember that you have put off the flame while it's still a little undone or let's say when it is 3/4 done. Remember to reserve 2 cups of this water and drain the rest. Immediately pour some cold water over the pasta and drain it. Place the pasta in a colander. Add 1 tsp of red chilli flakes and oregano seasoning to 1 cup of the reserved pasta water, a pinch of salt and pour it over the pasta that is cooling. This step ensures that the pasta is full of flavours.


2. In a wok/pan add 2 tbsp butter or olive oil and heat. Add the crushed garlic and saute for 30 seconds. Now add the onions and saute until they turn translucent.

3. Now reduce the flame to low and add the tomato puree, cream, milk and 3/4 of the  Parmesan cheese and cook until the cheese melts. Keep stirring. The sauce will thicken. Now pour the remaining pasta water or regular water is fine too if you don't have enough pasta water and dilute the sauce.

4. Now add the salt, red chilli powder, pepper powder, chilli flakes and simmer the sauce until it thickens again. Now put in the pasta into the sauce and mix it nicely, the movement should be from bottom to top so that the sauce spreads evenly over the pasta. 


5. Finally, reduce the flame and top up the pasta with the remaining cheese and cook covered for a minute until the cheese melts. Now put off the flame and add the Pangritato. Enjoy this yummy pasta piping hot.


NOTES:
1. For any pasta recipe to turn out well, cooking the pasta carefully is very important.
2. Zucchini, Broccoli, Red onions etc can be added to the sauce. if adding them, add after sauteeing the onions and saute them also for 3 minutes.
3. If Parmesan is not available Cheddar also can be used, but definitely, there will be a difference in taste.
4. The sauce I made was just enough to put the pasta in, you can make more if you like it very saucy.
5. If you forget to reserve the pasta water, it is fine. Just continue with regular water or vegetable broth if you have. 
6. I have added Macaroni only for the aesthetics, it fine if the recipe is made without it too.
 

If you tried this recipe and liked it please comment below. I would love to hear from you.

If you want the recipes emailed to you leave your id in the homepage near the📧
icon. Whenever we have a new post the recipe will be mailed to you. Thank you for showing interest in Rajjo's Kitchen.


Thursday 30 July 2020

BLUEBERRY CHEESECAKE(BAKED)

This is an epic post because I love Blueberries(any berry for that matter) and I  have perfected this Blueberry cheesecake finally. And for a recipe to feature on my blog, I should have perfected it before I put it out before you, and that is when I have tried it out 3 times without any mishaps. 
Over the years I have tried this recipe quite many times and it would taste fine but,  consistency wise there would be some glitch or the other. Also in India, we don't get fresh Blueberries very often, and even if we do they are expensive. So in this recipe, I have used dried Blueberries that are available in all departmental stores. I wanted to give you a recipe in which things are accessible. The Cream Cheese I have used here is also available at all outlets with a Chiller isle. The recommended one is Philadelphia Cream cheese but I have not used that, just to try if other brands work fine, and yes they do. 
This Cheesecake turning out so well is a dream come true for me, as its always been my wish to make one. Since I love berries I have loaded my Cheesecake with a lot of them, one can reduce the quantity too if they desire. 
This recipe is a no-mess, one-bowl recipe so not much of clean up is required. It is light and creamy with a blueberry topping. The thing about them being baked is that they hold well at room temperature, but since I am using a blueberry topping I had to refrigerate for 2 hours. The topping is just an option and is not at all mandatory.
I have simplified the recipe quite a bit. In this recipe, I'm giving stepwise instructions directly.

while you are here please try my other recipes like Apple Crumble, 
Pineapple Jam tarts, Nutella fudge brownies, Berry Smoothie Icecream, and more...

Here is the recipe of Blueberry Cheesecake for you-


     PREP TIME: 20 Mins                                          COOK TIME: 40 Mins
     TOTAL TIME:60Mins                                           COURSE:  DESSERT
     CUISINE:  WORLD FOOD                                  SERVINGS: 6
     AUTHOR: Rajni Ram

Ingredients for Base:

 Marie Biscuit 1 sheet(20 nos)
Unsalted butter 100 gm
Sugar 2 tbsp(powdered or fine sugar)

Ingredients for Filling:

Creamcheese 320 gm softened(keep out of the refrigerator for 1 hour)
Plain flour/Maida 1 tbsp
Sourcream/Curd 1/3 cup
White Sugar 1/2 cup 
Vanilla extract 1.5 tsp
Zest of Lemon- Grate the rind of one whole lemon
Eggs 2
Blueberries(dried) 250 gm (soak in warm water for 30 mins and drain the water)
Icing Sugar for dusting(optional) (refer note2)

* Reserve some blueberries(unsoaked) for later.

Ingredients for Blueberry topping/Sauce:

Blueberries(dried) 1 cup (soaked for 30 mins in warm water and drain water)
Sugar1/4 cup
Cornflour 1 tbsp
Lemon Juice 1 tbsp
Butter 1 tbsp
Blueberry preserve 3/4 of a 240 gm bottle(around 180 gm) 

Directions for Sauce:
Place the Blueberries and remaining ingredients(except the preserve) in a saucepan and cook over medium flame. Bring them to a simmer and cook until few of the blueberries burst, around 3 minutes. Keep stirring. Now add the preserve ad stir again. The sauce will come together and become jammy. Remove from flame and cool completely.

Directions for Base:
1.Grease or spray a round baking tray/mould with oil and line with parchment paper/butter paper. Place the biscuits in a blender and powder them. Add the butter and sugar to the powdered biscuits and blitz again. It should look like wet sand.

2. Put this mixture into the baking mould and using something flat press it down into the base and also rise in the sides, as this is going to hold the filling and topping, it needs some height. See pictures for reference.


Directions for filling:

1. Firstly preheat the oven to 160 C or 320F. Now start making the filling. Beat Creamcheese(just a spatula will do, stand mixer or electric beater not required, remember I said it a one-bowl recipe😉) until smooth, it need not become fluffy. Now add the flour and beat again until just combined.
 

2. Add sour cream/curd, sugar, vanilla and the lemon zest and beat until combined. Add the eggs one by one beating in between, until just combined. Do not overbeat.
 

3. Now ensure you have drained all water from the soaked blueberries and add the berries to the cream cheese batter and fold gently. Now pour this batter into the prepared base and top with the reserved unsoaked blueberries.


4. Bake for 40 minutes at 180 C or until the cheesecake is set, but the middle of the cake should wobble when you shake it and when you stick in a toothpick it should come out clean. There can be little cracks on the cake, so don't worry.
Baked Cake


5. Cool the cake completely and spread the Blueberry sauce over it( the sauce might have thickened, just microwave it for 20 seconds and it will be spreadable again). Refrigerate for 2 hours and its ready. Enjoy the Berrilicious flavour. Bon Appetit.


NOTES:
1. If using Fresh Blueberries use 1/2 cup sugar for the filling and the entire bottle of the preserve.
2. Topping the cake with Blueberry sauce is optional. If not topping it dust icing sugar over the cake before storing.
3. Try using a spatula for beating as we don't want the batter to air up and rise. If the batter becomes fluffy, the cake will rise while baking and then go limp on removing it from the oven.
4. If topping the cake with sauce, don't forget to refrigerate it, only then the topping will set, otherwise when you cut the cake it will drop everywhere.

If you tried this recipe and liked it please comment below. I would love to hear from you. If you have a query about the recipe email us and ill respond as soon as I can.
If you would like to receive our recipes on your mail please leave your mail id at the homepage. Every time Rajjo's Kitchen has a new post we will mail the recipe to you.


TOFU AND STIR FRIED VEGETABLES IN HOT SCHEZWAN SAUCE

  Any Tofu lovers? I agree its an acquired taste,but going by the health benefits it has to offer, I try including it in my diet now and the...