Vegetarian cooking blog

Wednesday, 20 January 2021

GARLIC NAAN

 Usually when we think of Naan we think of eating it at a restaurant. That's also the reason why I have never attempted to make this at home until now. But the Pandemic has made us all crave restaurant style food at home and so the search for the perfect Naan recipe, which can be made at home easily, without any sophisticated gadgets was on. 

Its also common knowledge that an Iron Kadai is used to cook the Naan. But I wanted to get the dough right. One which will yield perfect Naans without much effort and also I did not want to make the instant one with baking soda, because when baking soda is used  the dough must go on the girdle immediately without resting it. I always prefer resting the dough, be it Roti's, Paratha's or Naan. So, in this recipe I have used yeast, because that is what gives the perfect texture and fluffiness to the Naan.

As far as possible I try to use less, or no Maida, but, to get the fluffiness the Maida needs to be added, whereas taste and nutrition comes from wheat. So in this recipe I have used both. The result was fluffy and perfectly cooked Naan's.   

While you are here check out my other bread recipes like Aloo Methi Paratha, Beetroot Paratha, Missi Roti and more...

Here is the recipe of Garlic Naan for you-


    PREP TIME: 10 MINS+ 2 hrs                               COOK TIME:15 MINS

    TOTAL TIME: 2 hr 25 MINS                                  COURSE: MAIN 

    CUISINE: NORTH INDIAN                                   SERVINGS: 5

     AUTHOR: RAJNI RAM


    Ingredients for dough:

    Whole Wheat flour 2 cups

    Maida 2 cups

    Water(lukewarm) 1 cup ( refer note1)

    Dry yeast 2 tsp

    Sugar 1 tbsp

    Salt to taste or 1 tsp

    Oil 3 tbsp

    Curd 2 tbsp

    Milk less than1/2 cup

    Fresh coriander leaves finely chopped

    Kalonji/ Nigella seeds  2 tsp


   For Garlic butter:

   Table butter/salted butter 50 gm

   Garlic 2 pods minced

   Coriander leaves finely chopped 1 tsp

Directions to make Garlic butter: Put all ingredients in a microwave safe bowl and microwave for 30 seconds, alternately put the ingredients in a bowl and melt the butter.

Directions: 

In a large mixing bowl take both the flours, add the salt and mix well. Now in a bowl take lukewarm water, add the sugar followed by the yeast. Let this stand for 10 mins or until the yeast blooms and becomes frothy. Now to the bowl of bloomed yeast add the oil, milk and curd and mix well. Now use this mixture to knead the dough. Add little at a time to knead the dough. In case after using the whole mixture the dough is still dry, add water to make the dough. The dough will be sticky, but stiff. Grease a container and put the dough in it to rest 2 hours. After 2 hours, the dough would have doubled up in size. Take it out, punch to release the air inside and knead again. Now divide the dough into 10 equal portions. Dust a little flour and roll out in oval shape. Sprinkle the Kalonji/Nigella seeds and fresh coriander and gently press it on the rolled dough. Take an iron Kadai (non stick doesn't give the best results), and invert it over the gas flame. When it is hot, stick the rolled out Naan on it and cook. When done the Naan comes out easily, without sticking. Now remove the Naan from the Kadai and transfer over direct flame and cook on both sides like how you would a Phulka. Transfer to a plate, apply the garlic butter over it and serve hot. 


Serving Suggestions: Serve this Naan with Paneer Butter Masala, Mava Paneer Curry. Also goes well with Dal Makhni, Paneer Khurchan, Choley or Rajma.


STEPWISE RECIPE FOLLOWS:

1. In a large mixing bowl take both the flours, add the salt and mix well. Now in a bowl take lukewarm water, add the sugar followed by the yeast. Let this stand for 10 mins or until the yeast blooms and becomes frothy.


2. Now to the bowl of bloomed yeast add the oil, milk and curd and mix well. Now use this mixture to knead the dough. Add little at a time to knead the dough. In case after using the whole mixture the dough is still dry, add water to make the dough. The dough will be sticky, but stiff. Grease a container and put the dough in it to rest 2 hours. ( Please add the sugar, curd and milk, those pictures are not here and will be added as soon as possible)


3. After 2 hours, the dough would have doubled up in size. Take it out, punch to release the air inside and knead again. Now divide the dough into 10 equal portions. Dust a little flour and roll out in oval shape. Sprinkle the Kalonji/Nigella seeds and fresh coriander and gently press it on the rolled dough


4. Take an iron Kadai (non stick doesn't give the best results), and invert it over the gas flame. When it is hot, stick the rolled out Naan on it and cook. When done the Naan comes out easily, without sticking. Now remove the Naan from the Kadai and transfer over direct flame and cook on both sides like how you would a Phulka. Transfer to a plate, apply the garlic butter over it and serve hot. 


    NOTES:

1. The dry yeast must always be added to lukewarm water and not hot water. The temperature of the water is right if your finger immersed in water is able to bear the heat.

2. The Naan can be customized with whatever you prefer, if not garlic. Just apply plain butter without garlic for butter Naan or top it up with cheese for Cheese Naan. 

3. The dough should have risen well for the perfect turnout. So plan making the dough ahead.


If you tried this recipe and liked it please comment below. I would love to hear from you. If you have a query about the recipe email us and ill respond as soon as I can.

Wednesday, 13 January 2021

KOVA KAJJIKAYALU

 This Indian sweet is so close to my heart as they bring back many memories of places, people and a different time altogether. Kajjikayalu in Telugu means Karanji or Gujiya.

Kova Kajjikayalu or Kobbari Kova Kajjikayalu is a melt in the mouth sweet with a stuffing of coconut and jaggery, covered on the outside with sweetened Kova or Mava. This is a very easy to do recipe.

In this recipe I have gone completely by intuition and not referred any other recipe.  That's why it may be a little different from other ones. 

Typically Almond flour is not used in this sweet, but I have used a little for the smooth texture and so that the Kova is easy to work around with.

Like me, my daughter also likes this sweet or may be she likes it, and so I like it๐Ÿ˜€. This is one of the most popular sweets at G Pullareddy Sweets of Hyderabad. Every time my parents would visit us they would get this for my daughter as she would always ask for this as a child. After that due to some reasons the connect with Hyderabad broke(oh!only from a proximity point of view, at heart I'm always a Hyderabadi). 

Since a few years we have not tasted this sweet and never dared to make it as it would always be compared to the Pullareddy ones, but then I guess today it had to happen. In my mind it was going on for a while. To bring it to fructification, I had to visualize it in my mind first. I am so happy that it turned out so well the first time. 

Lets go to the recipe right away. While you are here check out my other Indian sweet recipes like - Akkaravadisal, Chakkara Pongal, Pineapple Rabri, Atte ka Sheera, Aval Kesari, Vella Aval, and more...

Here is the recipe of Kova Kajjikayalu-  

  PREP TIME: 20                                         COOK TIME: 20 MINS
 TOTAL TIME:40Mins                                  COURSE:  SWEET
 CUISINE:  INDIAN                                      SERVINGS: 15 PCS
 AUTHOR: Rajni Ram


    Ingredients:

    Kova/Mava(unsweetened) 300 gm

    Sugar 6 tbsp

    Dessicated Coconut 2 cups( freshly grated coconut can also be used)

    Jaggery 1 cup

    Cardamom powder 1/2 tsp

    Almond Flour 3 tbsp 


    Directions:

Take a heavy bottomed Kadai and put the Jaggery and desiccated coconut in it. Sprinkle some water(less than 1/4 cup) in it and put it on flame. Keep stirring over a low flame until the jaggery melts and mixes with the coconut, and the stuffing comes together. If you are able to form a ball with the coconut jaggery mixture, thats the right stage. This takes about 10 minutes. The poornam will leave the bottom of the Kadai when done. Add cardamom powder and, let the stuffing/Poornam cool down. Grate/shred the Kova and keep it ready. Put the shredded Kova in a non stick pan, add the sugar and start stirring. The Kova will loosen up as the sugar melts, but will start solidifying again. Keep stirring until it leaves the bottom of the pan. Transfer it immediately to a plate and let it cool for exactly 5 minutes(not more as, if it cools too much making the cover gets difficult). Now add the Almond flour and combine with a spatula. Divide the Kova into 15 equal portions. Divide the Coconut stuffing also into 15 equal portions, shaping them as ovals. Apply ghee to your fingers and palms.Now take one roundel of Kova and flatten it on your palms with your fingers. Place the coconut stuffing in the centre and seal the edges as shown in the picture. Repeat for all the Kova and stuffing. Cover them with a clean cloth and allow to set for 2 hrs. The outer Kova covering will toughen up a bit as it cools, but will melt in your mouth and the coconut Poornam just takes this simple sweet to a different level. Overall a healthy sweet recipe. Ideal for gifting friends, make it for Diwali or Janmashtami when milk based sweets are made. Make them just of no reason an relish them, just as I made them today.


    STEPWISE RECIPE FOLLOWS:

1.  Take a heavy bottomed Kadai and put the Jaggery and desiccated coconut in it. Sprinkle some water(less than 1/4 cup) in it and put it on flame. Keep stirring over a low flame until the jaggery melts and mixes with the coconut, and the stuffing comes together. If you are able to form a ball with the coconut jaggery mixture, thats the right stage. This takes about 10 minutes. The poornam will leave the bottom of the Kadai when done. Add cardamom powder and, let the stuffing/Poornam cool down.


2. Grate/shred the Kova and keep it ready. Put the shredded Kova in a non stick pan, add the sugar and start stirring. The Kova will loosen up as the sugar melts, but will start solidifying again. Keep stirring until it leaves the bottom of the pan. Transfer it immediately to a plate and let it cool for exactly 5 minutes(not more as, if it cools too much making the cover gets difficult).


3. Now add the 3 tbsp Almond flour and combine with a spatula. Divide the Kova into 15 equal portions. Divide the Coconut stuffing also into 15 equal portions, shaping them as ovals. Apply ghee to your fingers and palms.Now take one roundel of Kova and flatten it on your palms with your fingers. Place the coconut stuffing in the centre and seal the edges as shown in the picture. Repeat for all the Kova and stuffing. Leave to set for 2 hrs. 


    NOTES:

1. I have used Desiccated coconut, but fresh coconut can also be used. Quantity same as above.

2. As I have used only Almond flour I cannot suggest any other flour at the moment. Once i try it out with other lours shall update the recipe. 

3. Almond flour is easily available in shops or almonds can be blanched in hot water dried for 1/2 an hour and then powdered in a mixie. The powder should be fine, without lumps.

4. This sweet can be stored outside for 3 days and in the fridge up to 15 days. Putting it in the fridge makes the Kova cover to become a little hard. Keep it out for a few minutes before consumption if storing in the fridge.

5. Store bought Kova is a light yellow in colour. If making at home it turns out white.


If you tried this recipe and liked it please comment below. I would love to hear from you. If you have a query about the recipe email us and ill respond as soon as I can.

If you would like to receive our recipes in your mail please leave your mail id at the homepage. Every time Rajjo's Kitchen has a new post we will mail the recipe to you.

Friday, 8 January 2021

BHINDI ALOO (EVERY DAY SUBJIS)

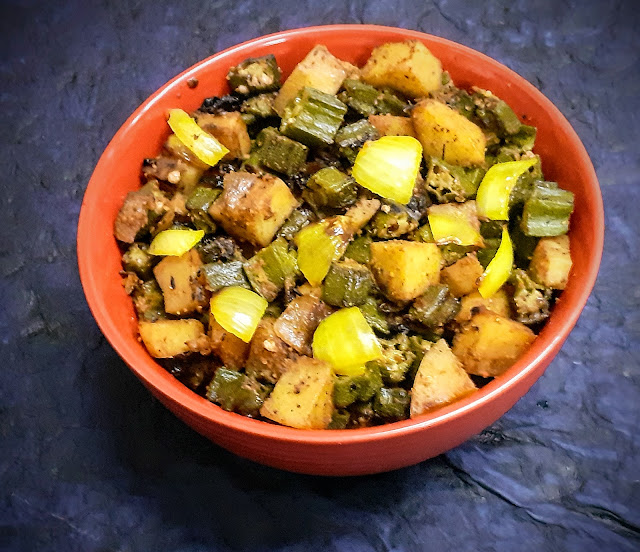
This Subji is a simple stir fry with a mix of Ladyfinger and Potatoes as the name suggests. This is perfect for those rush hours in the morning or after work evenings when you want something simple that can be made with the least effort. This dish of Bhindi Aloo goes well with Rice and Roti or other flatbread varieties. It is healthy and becomes a good lunch box item for kids. 

Without much detailing getting in to the recipe directly. While you are here check out my other Subji and curry recipes like Paneer Khurchan, South Indian Kurma, Methi wale Baingan, Roasted Eggplant 2 ways, Paneer Mava Curry and more...


PREP TIME: 15 MINS                               COOK TIME:15 MINS

TOTAL TIME: 30 MINS                              COURSE:MAIN 

CUISINE:INDIAN                                        SERVINGS: 4

AUTHOR: RAJNI RAM


    Ingredients:

    Onion 1 large cut into petals

    Bhindi/Okra/Ladysfinger 200 gm cut to 1 inch length

    Potato 1 large or 2 medium diced

    Cumin Seeds 1 tsp

    Turmeric powder 1/2 tsp

    Red chilli powder 1 tsp

    Coriander powder 1 tsp

    Fennel powder 1 tsp

    Amchur powder 1/4 tsp

    Garam Masala 1/2 tsp

    Salt as required

    Oil for sauteing


Directions: 

In a Kadai or Pan heat oil. When its hot add the Cumin seeds and let them crackle. Add the turmeric powder followed by the chopped onions and saute until the onions start turning brown. Now add the diced potatoes and continue to saute. When the Potatoes are half done add the Bhindi and continue to saute. Keep stirring in between so that the vegetables don't burn. When the Ladysfinger are half done add salt, stir nicely, and cover the Kadai for precise 2 minutes. After 2 minutes open the lid and add Red chilli powder, Coriander powder, fennel powder and Amchur(dry mango) powder and mix nicely. Check for doneness of the Aloo and Bhindi by mashing between your fingers. When done add the Garam Masala powder and turn off the stove. The simple and healthy Bhindi Aloo is ready to serve wit our choice of rice or roti.   


     STEPWISE RECIPE FOLLOWS:

1. In a Kadai or Pan heat oil. When its hot add the Cumin seeds and let them crackle. Add the turmeric powder followed by the chopped onions and saute until the onions start turning brown.


2. Now add the diced potatoes and continue to saute. When the Potatoes are half done add the Bhindi and continue to saute. Keep stirring in between so that the vegetables don't burn. 


3. When the Ladysfinger are half done, add salt, stir nicely, and cover the Kadai for precise 2 minutes. After 2 minutes open the lid and add Red chilli powder, Coriander powder, fennel powder and Amchur(dry mango) powder and mix nicely. 


4.  Check for doneness of the Aloo and Bhindi by mashing between your fingers. When done add the Garam Masala powder and turn off the stove. The simple and healthy Bhindi Aloo is ready to serve wit our choice of rice or roti.   


    NOTES:

1. The Bhindi/Ladysfinger can sometimes turn slimy. To avoid this Pre cut the Bhindi and keep in the fridge or put it on a paper to absorb the moisture. 

2. Alternately you can squeeze 1/4 of a lemon if you find that it is turning slimy.

3. Adding quarter spoon of sugar helps to retain the green colour of the Bhindi.

4. If after adding all Masala powders if you subji still looks a little moist and not crisp and dry, add 1 tbsp bread crumbs.


If you tried this recipe and liked it please comment below. I would love to hear from you. If you have a query about the recipe email us and ill respond as soon as I can.

If you would like to receive our recipes in your mail please leave your mail id at the homepage. Every time Rajjo's Kitchen has a new post we will mail the recipe to you.

Wednesday, 30 December 2020

PANEER KHURCHAN

Paneer Khurchan is a simple dish made with the most minimum ingredients. It is a simple subji to go with Rotis, Phulkas, Parathas and also Dal chawal. The beauty of this dish is that, it is mildly spiced and flavoured and is the best option for those days when the craving is for a simple meal.

This dish gets its name from the Hindi word "Khurachna" which means to scrape. In this recipe the Paneer can be added as either scrapings or as strips. Capsicum and tomatoes and some simple masalas are combined to bring out the flavours of the dish.

A simple dish doesn't need a big introduction, just its simplicity will do. So here's taking you to the recipe directly. While you are here please check out my other subji recipe like- Mushroom Do Pyaaza, Mixed Vegetable Curry, Palak Paneer, Creamy Palak in Coconut Milk, Mirch Ka Salan and more...


Here is the recipe for Paneer Khurchan-

PREP TIME: 10 MINS                               COOK TIME:15 MINS

TOTAL TIME: 25 MINS                              COURSE: MAIN 

CUISINE: NORTH INDIAN                        SERVINGS: 4

AUTHOR: RAJNI RAM


    Ingredients:

    Paneer 200 gm cut into strips

    Capsicum 1 large cut into thin strips

    Spring Onions/ Onions (one bunch/ 1 large)

    Tomatoes 2 large chopped fine 

    Cumin 1 tsp

    Turmeric powder 1/2 tsp

    Ginger-garlic paste 1 tsp

    Salt as required

    Red chilli powder(regular) 1tsp

    Kashmiri red chilli powder(optional) 1/2 tsp

   Coriander powder 1 tsp

    Green chilli 1 slit lengthwise

    Garam masala powder 1/2 tsp

    Oil for sautรฉing


    Directions:

In a Pan or Kadai pour 1/2 tbsp oil and heat. When the oil is hot add the cumin seeds, followed by turmeric powder and the Spring onion(if in season or  use regular onion). Sautรฉ until the onions start turning brown and add the spring onion greens to it(if using). Sautรฉ 30 seconds and add the ginger-garlic paste. Continue to sautรฉ for another 30 seconds. Now add the chopped Capsicum strips and sautรฉ on high heat, so that the capsicum don't release much moisture. Sautรฉ until the Capsicum are half cooked. They should retain the crunch and not turn limp. Now add the chopped tomatoes, followed by salt, red chilli powder, Coriander powder and Kashmiri red chilli powder and sautรฉ until the tomatoes break and turn mushy. Now add the Paneer strips and the slit green chilli and toss well such that the masalas evenly coat the paneer. Cover and cook on low heat for 2 minutes. Remove cover, stir and add the Garam  Masala and serve the hot Paneer Khurchan with rice or flat brad of your choice. Enjoy. Bon Appetit.


    STEPWISE RECIPE FOLLOWS:

1. In a Pan or Kadai pour 1/2 tbsp oil and heat. When the oil is hot add the cumin seeds, followed by turmeric powder and the Spring onion or regular onion.


2.  Sautรฉ until the onions start turning brown and add the spring onion greens to it(if using). Sautรฉ 30 seconds and add the ginger-garlic paste. Continue to sautรฉ for another 30 seconds. Now add the chopped Capsicum strips and sautรฉ on high heat, so that the capsicum don't release much moisture.


3. Sautรฉ until the Capsicum are half cooked. They should retain the crunch and not turn limp. Now add the chopped tomatoes, followed by salt, red chilli powder, Coriander powder and Kashmiri red chilli powder and sautรฉ until the tomatoes break and turn mushy. 


4. Now add the Paneer strips and the slit green chilli and toss well such that the masalas evenly coat the paneer. Cover and cook on low heat for 2 minutes. Remove cover, stir and add the Garam  Masala and serve hot.


    NOTES:

1. The dish actually uses regular onions. At the time i made these recipes Spring onions were in season, hence I used them. The Spring onion greens also impart a nice flavour to the dish.

2. No whole spices are used in this recipe.

3. While sautรฉing the Capsicum on high heat, keep stirring continuously so that they don't get charred.


If you tried this recipe and liked it please comment below. I would love to hear from you. If you have a query about the recipe email us and ill respond as soon as I can.

If you would like to receive our recipes in your mail please leave your mail id at the homepage. Every time Rajjo's Kitchen has a new post we will mail the recipe to you.

Thursday, 24 December 2020

PACHAI MOCHAI KUZHAMBU (FIELD BEANS GRAVY)


Though I may try fancy recipes from time to time, eat local and seasonal has always been my slogan. When it is carrot season I make my Gajar Halwa and during the Grape season my Grape conserve. Homemade  is always a better option and the pandemic has taught us just that. 

In south India December to February and specially the time around the harvest festival Pongal, is the season for Field Beans or Mocha Kottai as it is called in Tamil Nadu. These beans are used in the Pongal Kuzhambu that is made on the day of the Pongal festival, where in a Kuzhambu or Sambar is made with all the freshly harvested vegetables, which includes tubers, green vegetables and legumes likes the Field Beans.

I usually make this recipe in the Chettinad style where a the beans are cooked in a tangy gravy with garlic and coconut paste. This time however, I have tried it out in a different style which tasted very good and was an instant hit in my house. I added some Potatoes too and it turned out like a two in one curry, one that can go with rice as well as with Paratha, chapati etc. The vessel just went empty. In my house when the vessel goes empty and nothing remains for dinner, it means the dish was super good๐Ÿ˜€, and here comes this dish called the Pachai(fresh) Mochai Kuzhambu with a different gravy.

While you are here checkout my other recipes like Pachai Sundakkai Kuzhambu, Bonda Morkuzhambu, Vatha Kuzhambu, Parupu Urundai Kuzhambu and more...


Here is the recipe for Pachai Mochai Kuzhambu for you-


PREP TIME: 20 MINS                                 COOK TIME:15 MINS

TOTAL TIME: 35 MINS                                COURSE: MAIN 

CUISINE:INDIAN                                         SERVINGS: 4

AUTHOR: RAJNI RAM


    Ingredients:

    Pachai Mochai Kottai (fresh Field Beans) 200 gm (pressured cooked for 5 whistles)

    Onion 1 roughly chopped

    Tomatoes 2 roughly chopped

    Potato 1 large diced

    Sambar Powder 1 tbsp. (refer notes)

    Red chilli powder 1 tsp

    Tamarind gooseberry sized ball pulp extracted 

    Jaggery a small bit 


    To be roasted and ground:

    Peanuts 2 tbsp.

    Dry red chillies 3 large ones

    Fennel 1 tsp

    Poppy seeds/Khus khus 1 tsp

    Coconut 2 tbsp

    To temper:

    Oil 1 tbsp

    Mustard seeds 1 tsp

    Mustard seeds a pinch

    Chana dal 2 tsp

    Asafoetida 1/2 tsp

    Dry red chilli 1 broken

    Curry leaves a few


   Directions:

In a big Kadai/pan put the oil and heat. Add all ingredients mentioned under "to temper". When the mustard seeds begin to pop add the onion and sautรฉ. When the onions start turning a light brown, add the potatoes and continue to sautรฉ for a minute or two. Now add the chopped tomatoes, followed by salt, Sambar powder, red chilli powder, and the cooked Mocha Kottai(field beans). Mix nicely and let it cook for 2 minutes. Now pour the tamarind extract and let the potatoes cook. Keep the flame low. In the meanwhile take a small kadai and add 1 tsp oil and roast all ingredients mentioned under "to be roast and ground". Start by adding the groundnuts first, followed by coconut, dry red chilli, fennel seeds and poppy seeds, Roast until the coconut starts turning a light brown in colour. Cool and grind to a smooth paste adding a little water. The potatoes must have cooked by now. Check for doneness of potatoes and add the ground paste and mix well. Dilute adding 2 cups water and continue to cook. The gravy will come together and the consistency will thicken. Add a small bit of jaggery and stir and put off the flame. The delicious Pachai Mochai Kuzhambu is ready to serve. Enjoy. Bon Appetit.  


    STEPWISE RECIPE FOLLOWS:

1. In a big Kadai/pan put the oil and heat. Add all ingredients mentioned under "to temper". When the mustard seeds begin to pop add the onion and sautรฉ


2. When the onions start turning a light brown add the potatoes and continue to sautรฉ for a minute or two. Now add the chopped tomatoes, followed by salt, Sambar powder, red chilli powder, and the cooked Mocha Kottai(field beans).  Mix nicely and let it cook for 2 minutes.  


3. Now pour the tamarind extract and let the potatoes cook. In the meanwhile take a small kadai and add 1 tsp oil and roast all ingredients mentioned under "to be roast and ground". Start by adding the groundnuts first, followed by coconut, dry red chilli, fennel seeds and poppy seeds, Roast until the coconut starts turning a light brown in colour. Cool and grind to a smooth paste adding a little water. 


4. The potatoes must have cooked by now. Add the ground paste and mix well. Dilute adding 2 cups water and continue to cook. The gravy will come together and the consistency will thicken. Add a small bit of jaggery and stir and put off the flame. The delicious Pachai Mochai Kuzhambu is ready to serve.


NOTES:

1. I used homemade sambar powder as that really enhances the taste of the dish. However, store bought one also can be used. Foe the recipe of homemade sambar powder click here.

2. The use of jaggery is to cut down the gassiness of the peanuts, as some people cannot digest it. I recommend adding it though adding jaggery is not compulsory.

3. Take care not to overcook the Beans, at the same time they must be cooked well.

4. If you have roasted peanuts that too can be added, then only the coconut, chillies, fennel and poppy seeds need to be roasted.

5. This recipe can be followed for any fresh beans(seeds) variety. When the fresh Mochai are not available, the dry ones are sold. They can be soaked, cooked and the same recipe can be followed.


If you tried this recipe and liked it please comment below. I would love to hear from you. If you have a query about the recipe email us and ill respond as soon as I can.

If you would like to receive our recipes in your mail please leave your mail id at the homepage. Every time Rajjo's Kitchen has a new post we will mail the recipe to you.

Sunday, 20 December 2020

GAJAR HALWA/ CARROT HALWA

 Gajar Halwa/ Carrot Halwa is a very popular Indian dessert. Mostly a winter dessert. Though it is made frequently with the regular carrots ( English Carrots), using the Delhi Carrots or Red Carrots as they are called gives the best results.

This is one dessert I love and consider it very sacred, so if you are looking for an easy, one pot or microwave recipe, you are going to be disappointed. As far as Gajar Halwa is concerned I am old school. I cook it in milk( and a whole lot of milk) so that the raw taste of the Carrots is gone and the milk crumbles to a Rabri like texture. The taste of such a Halwa is divine. This is one recipe I have never made with regular carrot except in my dessert recipe- Gajar halwa Barfi where I was shaping  it like fudge( Barfi) and using Khoya to speed up the process. Whereas this recipe of Gajar Halwa is a slow cook process. The slower it cooks the better it tastes. Am I disappointing you? Well, make it like this and you will be hooked to it for life. Remember the best things in life come with a lot of patience.

My belief is that when I wait a whole year for the Red Carrots to appear in the Market and then make the Halwa, then it should be made the authentic way. Which does not involve adding condensed milk or Koya or milk powder but in cooking the carrots in milk( whole cream), to perfection.

I use only whole cream milk to make this dessert. So the taste of the Halwa depends entirely on the quality of milk. A full/whole cream milk Halwa will give you better taste and I can say this because I have tried it will all milk varieties available in the market and what works best is whole/full cream milk.

So after the whole mega write up, taking you to the recipe. While you are here do check out my other carrot based desserts like Carrot Kheer( another speciality from Rajjo's Kitchenn) and Gajar Halwa Barfi.


    PREP TIME:30                                   COOK TIME: 1hr
   TOTAL TIME:1hr.30Mins                     COURSE:  DESSERT
   CUISINE:  INDIAN                               SERVINGS: 6
   AUTHOR: Rajni Ram


    Ingredients:


    Carrots ( Preferably Red ones) 1.5 kilo grated

    Milk whole cream/ full cream 2 litres

    Sugar 300 gm

    Cardamom/ Elaichi powder

    Ghee 4 tbsp

    Cashews a new broken


    Directions:

Wash, peel and grate the carrots and keep aside. In a huge thick bottomed vessel/ kadai/ or urli boil the milk. When it comes to a boil, reduce the flame and put in the grated carrots. Start stirring the mixture. The flame can be increased now but constant stirring is required . This process has to continue until almost all the milk dries up. The texture will look like Rabri stickng to carrot. Once all milk dries up, reduce the flame and add the sugar. Continue to stir again. Once the sugar is added the mixture will liquify, continue to stir until all the moisture is absorbed. The halwa will come together but it will not be gooey. Now add the cardamom powder. Fry the nuts in ghee and pour it over the halwa along with the nuts. The healthy and delicious Gajar Halwa is ready.  Serve warm. Bon Appetite. 


    STEPWISE RECIPE FOLLOWS:

1. Wash, peel and grate the carrots and keep aside. In a huge thick bottomed vessel/ kadai/ or Urli boil the milk.


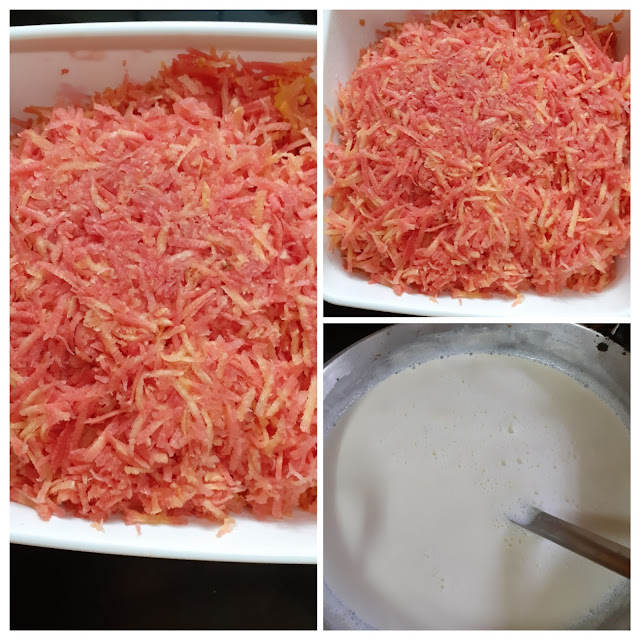
2. When it comes to a boil, reduce the flame and put in the grated carrots. Start stirring the mixture. The flame can be increased now but constant stirring is required . This process has to continue until almost all the milk dries up. Showing you the stages of reduction in pictures below that are self explanatory. 


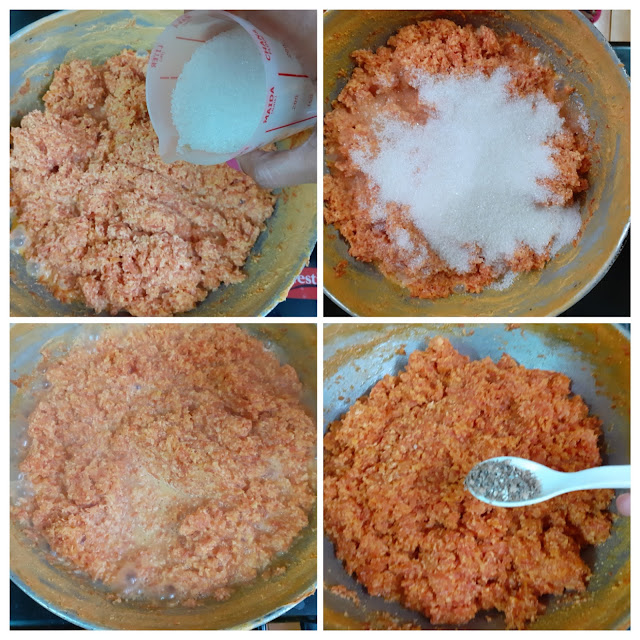
3. Once all milk dries up, reduce the flame and add the sugar. Continue to stir again. Once the sugar is added the mixture will liquefy, continue to stir until all the moisture is absorbed. The Halwa will come together but it will not be gooey. (forgot to click a picture finally to show the final consistency, so have included the one showing the cardamom powder. Please follow that texture for final consistency of Halwa).


4. Now add the cardamom powder. Fry the nuts in ghee and pour it over the Halwa along with the nuts. The healthy and delicious Gajar Halwa is ready.  Serve warm.


    NOTES:

1. While cooking at high heat keep stirring constantly to avoid burning the contents at the bottom of the pan.

2. Actually after sometime of cooking the milk and carrot mixture , it does not overflow from the vessel. That time the stirring can be relaxed a bit, but stir every couple of minutes. If you are following this reduce flame when not stirring.

3. Good quality full cream milk yields the best result, the Halwa can be made with milk of any consistency though. The results may not be what I have described .

4. Feel free to try this with regular Carrots too. Method being the same.

5. Sometimes people try to over power the subtle carrot flavour by adding huge amounts of ghee. This is not required. Pouring ghee at the right time is very important, such that the flavour is enhanced and a lot of ghee is not poured unnecessarily. Check out my Cakkara Pongal post for the directions on how to pour the ghee.


If you tried this recipe and liked it please comment below. I would love to hear from you. If you have a query about the recipe email us and ill respond as soon as I can.

If you would like to receive our recipes in your mail please leave your mail id at the homepage. Every time Rajjo's Kitchen has a new post we will mail the recipe to you.

Friday, 18 December 2020

PATRA/ PATRODE WITH BOK CHOY LEAVES ( ALU WADI)

 Patra or Patrode is a simple and healthy snack from western India. It is also called Alu Wadi in some regions. This dish is popular in karnataka too. Different regions, different names same dish. 

In this healthy snack usually the Arbi or Colacassia leaves are used. Spinach leaves can also be used, but they have to be big and thick. Since that variety is not available all the time I decided to give the dish a twist by using a different leaf altogether.  Bok Choy, or Pok choy  is a type of chinese cabbage.  The leaves are thick and nice so I decided to give the Patra a try with these leaves. It was a huge hit in my house and everyone came back for more. 

Since I was making this the first time, I made only a small quantity and with my folks asking for more have promised to make some again very soon. So, what I'm driving at is that if you are one of those people who loves this dish and wait for the Arbi leaves to arrive in the market, well don't wait. Grab some Pok Choy and try it out. The Pok Choy is closer in taste to Spinach with which Patra are made, if not for Arbi/Colaccssia leaves. 

This is a steamed snack just like the Kothimbir Vadi, it can be fried too of you prefer. I have steamed and pan roasted them.

While you are here check out my other snack recipes like Mirchi Bajji, Semolina Cheese balls, Samosa Pie, Potato Cheddar Bake, Dhania wale Namak Parey and more...


Here is the recipe ot Patra with Bok Choy Leaf-


        PREP TIME: 15MINS                              COOK TIME: 30MINS

       TOTAL TIME: 45 MINS                             CUISINE: INDIAN

        COURSE :SNACK                                   SERVINGS: 5

        AUTHOR: RAJNI RAM


Bok choy/ Pok choy 2 heads ( clip leaves carefully, wash and dab dry with towel)

Besan/ Chickpea flour 2 cups

Salt as required

Red chilli powder 1 tsp

Coriander powder 1 tsp

Fennel powder 1 tsp

Turmeric powder 1/2 tsp

Sugar 1/2 tsp

Tamarind pulp 2 tsp diluted in 1/2 cup water or make pulp with Gooseberry size tamarind ball.

Green chilli 1 finely chopped

Ginger 1/2 inch piece finely chopped

Sesame seeds a few 

Kopra / desiccated coconut 2 tsp

Oil 3 tsp for tempering

Directions: 

Carefully cut the leaves from the Bok choy, wash them in water and pat dry. Keep aside. Now in a bowl take the besan and add all the masala powders and salt. Mix well with fingers and now start adding the tamarind water little by little to make a thick paste/ batter. If using tamarind paste add paste along with masalas, mix and then use water to make the paste. The batter has to be smooth and thick that it sticks to the leaves and does not slide off. Now take the leaves, bigger ones. Apply the paste to 3 leaves, and arrange 3 of them over lapping the other as shown in the picture. This is the first layer. On this another 3 paste applied leaves have to be arranged. If the leaves are in different sizes, keep bigger ones below and smaller ones on top. Like this for 3 layers. Now start rolling the leaves from left to right, and as you role more of the paste has to be applied each time you roll the leaf. After rolling completely, apply the besan paste all over the rolled leaf. Place this in a greased cooker vessel.  Repeat for remaining leaves. I made two such rolls.  Place the second roll also in the cooker vessel and keep the vessel in the cooker to steam. Steam for 20 to 25 minutes. Put off the cooker and wait 2 minutes. Now open and cool the steams rolls completely. Once cooled cut them into 1/2 inch thick circles and keep aside. Take oil in a Tava or Pan and heat. Add mustard seeds, Jeera, asafoetida, green chillies, sesame seeds and ginger. When the mustard pops arrange the cut circles on the tava and roast on one side. When it turns a golden brown, flip and roast the other side. Sprinkle some Kopra/ desiccated coconut and remove the Parta off the Tava. Enjoy with some green chutney and chai. Bon Appetit!!!


STEPWISE RECIPE FOLLOWS:


1.Carefully cut the leaves from the Bok choy, wash them in water and pat dry. Keep aside.


2. Now in a bowl take the besan and add all the masala powders and salt. Mix well with fingers and now start adding the tamarind water little by little to make a thick paste/ batter. The batter has to be thick and smooth.


3. Apply the paste to 3 leaves, and arrange 3 of them over lapping the other as shown in the picture. This is the first layer. On this another 3 paste applied leaves have to be arranged. Make 3 such layers.


4. Now start rolling the leaves from left to right, and as you role more of the paste has to be applied each time you roll the leaf. After rolling completely, apply the besan paste all over the rolled leaf. Place this in a greased cooker vessel.  Repeat the process and put both rolls in cooker vessel.


5. Keep the vessel in the cooker to steam. Steam for 20 to 25 minutes. Put off the cooker and wait 2 minutes. Now open and cool the steams rolls completely. Once cooled cut them into 1/2 inch thick circles and keep aside. 


6. Take oil in a Tava or Pan and heat. Add mustard seeds, Jeera, asafoetida, green chillies, sesame seeds and ginger. When the mustard pops arrange the cut circles on the tava and roast on one side. When it turns a golden brown, flip and roast the other side. Sprinkle some Kopra/ desiccated coconut and remove the Parta off the Tava. Enjoy.


NOTES:

1. Select leaves which are fresh and big.

2. At the base of the leaf if the stem is hard, make a V shape cut to remove the hard veins.

3. Ensure the batter is thick like a paste or else it won't stick to the leaf.  Incase the batter turns runny add more besan and adjust spice and continue with the recipe. 

4. While toasting on the Tava take care not to burn them or the taste will change.


Sunday, 13 December 2020

SOUTH INDIAN VEGETABLE KURMA

 The South Indian Vegetable Kurma is a very popular dish in most south Indian restaurants. It goes very well with most south Indian dishes like the Sevai aka string hoppers, Parotta, Kothu Parotta( for which it forms part of the kotthu gravy), Poori, Dosa, Kal Dosa Rava Dosa, and more...

Than the ones at a restaurant I like the home version as the masalas can be customized.  I find the restaurant ones very pungent with a strong masala impact which subdues the taste of the vegetables. A good kurma is one where the taste and texture of the vegetables is retained and the mild masalas enhance the taste of the dish.

So here's my version of the South Indian Vegetable Kurma--


PREP TIME: 15 MINS                                 COOK TIME:15 MINS

TOTAL TIME: 30 MINS                                COURSE: MAIN 

CUISINE:INDIAN                                         SERVINGS: 4

AUTHOR: RAJNI RAM


    Ingredients:

    Chopped Mix vegetables 200 gm ( carrot, cauliflower, potatoes, beans) etc;

    Green peas 50 gm

    Capsicum 1 chopped 

    Onion 1 medium chopped

    Tomatoes 2 large pureed

    Cashewnuts 10

    Coconut 1 tbsp

    Fennel seeds 1 tsp

    Bay leaf/ Tej patha 1 medium

    Cumin seeds 1 tsp

    Green cardamom 2

     Cloves 3 -4

    Ginger garlic paste 1 tsp

    Green chilli 1

     Biryani masala 1 tsp depending on flavour

    Red chilli powder 2 tsp

    Oil for sauteeing 

    Garam masala powder 1/2 tsp optional


Directions:

Steam all the mix vegetables  with salt and turmeric powder, except capsicum, onion and tomatoes.  Take care to not turn them mushy. Now in a pan or Kadai pour oil and heat. Put in the Bay leaf, cumin seeds, green cardamom and cloves and fry for 30 seconds. Now add the onions and ginger garlic paste,and saute for 30 seconds. Add the capsicum and continue to saute for another minute. Now add the tomato puree and all other spice powders like red chilli powder, biryani masala and the salt. Cook the gravy until the oil separates. Now add the steamed vegetables, mix well and cook for a minute. Grind the coconut, fennel seed, cashewnuts and green chillies to a smooth paste adding a little water.  Pour this paste into the cooking gravy. Cook for another2 minutes or until the gravy cones together and put of the stove. Garnish with curry leaves add the garam masala powder now if using,  and enjoy with your choice of tiffin.


STEPWISE RECIPE FOLLOWS:

1. Steam all the mix vegetables with some salt and turmeric powder, except capsicum, onion and tomatoes.  Take care to not turn them mushy.


2. Now in a pan or Kadai pour oil and heat. Put in the Bay leaf, cumin seeds, green cardamom and cloves and fry for 30 seconds. Now add the onions and ginger garlic paste, and saute for 30 seconds. Add the capsicum and continue to saute for another minute


3. Now add the tomato puree and all other spice powders like red chilli powder, biryani masala and the salt. Cook the gravy until the oil separates.


4. Now add the steamed vegetables, mix well and cook for a minute. Grind the coconut, fennel seed, cashewnuts and green chillies to a smooth paste adding  a little water. 


5. Pour this paste into the cooking gravy. Cook for another2 minutes or until the gravy cones together and put of the stove. Garnish with curry leaves add the garam masala powder now if using,  and enjoy with your choice of tiffin


NOTES:

1. The vegetables used can be customized to your liking. That said vegetables with a lit of water content like gourds, brinjal etc are not preferred much.

2. For a thicker gravy add more cashew and coconut. For a thinner one reduce the cashew and coconut or use the quantity given and then thin down with water 

3. I use biryani masala for the kurma as it gives a very nice flavoring to the kurma. One can use garam masala too but the authentic taste does not come in.

4. I use homemade Biryani masala. For recipe of Biryani masala click here. Feel free to use store bought one too.


If you tried this recipe and liked it, please let us know in the comment box. I would love to hear from you. If you would like to receive our future posts on your mail, please leave your mail Id so that we can post it to you.


TOFU AND STIR FRIED VEGETABLES IN HOT SCHEZWAN SAUCE

  Any Tofu lovers? I agree its an acquired taste,but going by the health benefits it has to offer, I try including it in my diet now and the...