Vegetarian cooking blog

Wednesday, 21 April 2021

PISTACHIO CAKE / PISTA CAKE WITH WHITE CHOCOLATE GLAZE

 Baking a cake with Pistachio has been on my mind for a long time now, and I recently got to try my hand at it. The result was stunning. But I must say not everyone has a liking for the intense Pista flavour. I must add that I have not used any food colour for the cake and what is see is the natural Pista green, which is a dull green, unlike the bright green store bought ones.

Well, this cake was totally inspired by some wonderful chocolate bars ( both dark and white), that we bought recently from Fabelle by @itcltd . Just imagining the taste of Pista and white chocolate together was making me crave it and so this cake came about. Now when I cook/ bake a new recipe a lot of research goes in. Before I zero in on how I want to go about it.

As I always claim about my baking recipes, this one too is a single bowl recipe. No mess and no extra clean up. Let’s get to the recipe right away.

While you are here check out my other bakes like Apple Crumble, Blueberry Cheese cake, Upside down orange vanilla cake, Oatmeal cookies, Easy two way muffins, Apple Tea Cake, Eggless Pineapple cake and more...


     PREP TIME: 10 Mins                                         COOK TIME: 35 Mins
     TOTAL TIME: 45 Mins                                        COURSE:  DESSERT
     CUISINE:  WORLD FOOD                                 SERVINGS: 6
     AUTHOR: Rajni Ram


    Ingredients:

    Pista/ Pistachios unsalted 100 GM

    Flour/ Maida 1/2 cup or 70 GM approx.

    Unsalted butter 100 GM

    Refined oil 1/4 cup

    Icing sugar/ castor sugar/ sugar powder 100 GM

    Lemon zest of 1 whole Lemon

    Eggs 2

    Vanilla essence 2 drops

    Baking powder 1 tsp

    Salt 1/2 tsp

    Ghee for greasing the baking mold 2 tsp

    Ingredients for White Chocolate glaze:

    White chocolate ( invest in a good quality one) 40 GM

    Whipping cream 1 cup + 2 tbsp chilled

    Castor sugar/ icing sugar 1 tbsp less than 1/2 cup


    Directions for cake:

In a pan roast the Pistachios very lightly. They just need to get warm, and not change colour. Cool them and pulse them to a fine powder in a blender. Preheat oven to 200 C for 10 mins. In a bowl cream the butter, oil  and sugar with a beater. Now add half the amount of Pistachio powder and half the amount of flour and beat. Add the remaining Pista powder, baking powder, and flour and beat again until combined. The mixture will appear a little dry. Now add one egg at a time and beat to combine. Finally, add the lemon zest and vanilla essence and give a finally spin with the beater. Now using a spatula, scrape the sides and stir just once. The cake batter is ready. Grease a circular cake mold or Loaf pan, and pour the cake batter into it. Tap once gently to remove any air gaps and put it in the oven for 15 to 20 minutes. Since each oven has a different setting, keep checking for fineness from 15 minutes onward. The cake is done when a toothpick inserted in the center comes out clean.

    Directions for making glaze.

Bring the White chocolate to room temperature. Take the chocolate in a bowl, add 2 tbsp cream and put it in the microwave for 30 seconds. Bring it out and stir vigorously so that the melted white chocolate combines with the cream evenly. Cool it for 10 minutes. In the meanwhile, take the chilled cream in a bowl, add the castor sugar and start beating until it turns airy and forms soft peaks. Once soft peaks form, don’t whip it any more. Add the white chocolate mixture and gently fold it in with a spatula. Put it in the fridge until further use.

    How to assemble ( no pictures)

Let the cake cool naturally. Now bring out the white chocolate glaze and using a spatula gently spread it on the cake. I have left the sides uncovered. Spread generously to form a 1 cm coating. Sprinkle some Pistachio powder over the glaze and some split pistachios too. Add a few edible rose petals for contrast. Keep in fridge until it’s ready to serve.


    STEPWISE RECIPE FOLLOWS:

1. To make the cake-- In a pan roast the Pistachios very lightly. They just need to get warm, and not change colour. Cool them and pulse them to a fine powder in a blender. Preheat oven to 200 C for 10 mins.


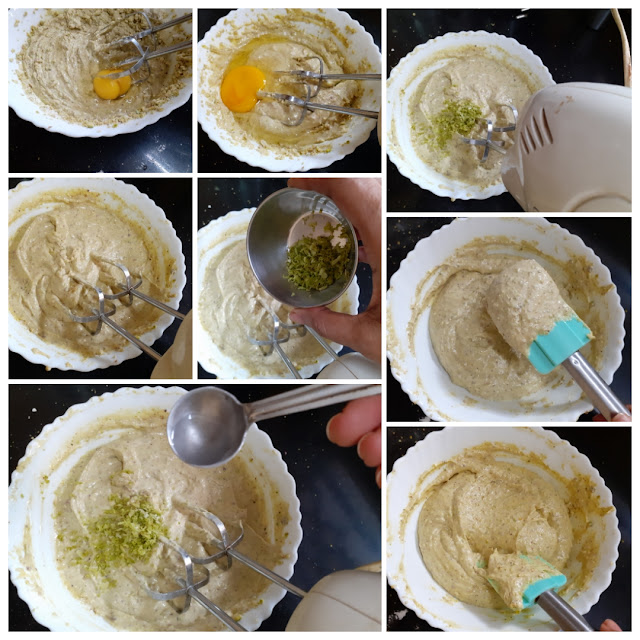
2. In a bowl cream the butter, oil  and sugar with a beater. Now add half the amount of Pistachio powder and half the amount of flour and beat. Add the remaining Pista powder, baking powder, and flour and beat again until combined. The mixture will appear a little dry.


3. Now add one egg at a time and beat to combine. Finally, add the lemon zest and vanilla essence and give a finally spin with the beater. Now using a spatula, scrape the sides and stir just once. The cake batter is ready.


4. Grease a circular cake mold or Loaf pan, and pour the cake batter into it. Tap once gently to remove any air gaps and put it in the oven for 15 to 20 minutes. Since each oven has a different setting, keep checking for fineness from 15 minutes onward. The cake is done when a toothpick inserted in the center comes out clean.


5. To Make the glaze-- Bring the White chocolate to room temperature. Take the chocolate in a bowl, add 2 tbsp cream and put it in the microwave for 30 seconds. Bring it out and stir vigorously so that the melted white chocolate combines with the cream evenly. Cool it for 10 minutes.


6. In the meanwhile, take the chilled cream in a bowl, add the castor sugar and start beating until it turns airy and forms soft peaks. Once soft peaks form, don’t whip it any more. Add the white chocolate mixture and gently fold it in with a spatula. Put it in the fridge until further use.


7. To assemble the cake-- Let the cake cool naturally. Now bring out the white chocolate glaze and using a spatula gently spread it on the cake. I have left the sides uncovered. Spread generously to form a 1 cm coating. Sprinkle some Pistachio powder over the glaze and some split pistachios too. Add a few edible rose petals for contrast. Keep in fridge until it’s ready to serve.  (no pictures)


NOTES:

1. Ensure that all ingredients are at room temperature before baking.

2. Use good quality eating chocolate instead of the cooking chocolate bars available at stores. They are mostly flavoured and not real chocolate.

3. Always use pulse mode in the blender to powder the Pistachio, so that it does not turn oily.


Monday, 19 April 2021

CORN PALAK SUBJI

 Palak is a very versatile green. It is mineral rich, healthy and fibrous. Any add-in that goes into it, gets its flavour enhanced. In my house I have been called the female Popeye for a reason. I love Palak/Spinach in all forms. Be it the simple Keerai Masiyal, Keerai Molagootal or the delicious Palak Paneer, Palak Paneer Paratha, or the simple Spinach curry in coconut milk. 

One of my favourite Palak/Spinach recipes is also this delicious Subji Palak Corn. This is a simple everyday subji that one can make even on a busy day if their greens are washed and blanched. Highly nutritious and high on Iron and the corn not only gives the green a contrast with its yellow, but also balances the tanginess from the tomatoes and palak combination. This combination of Spinach and corn is classic and in all cuisines including World cuisine you will find a few recipes dedicated to this.


I have used Sweet Corn in this recipe as only this was available at the time I was cooking this dish. My preferred corn is Makai aka Maize, but sadly since we forget to promote what is local and regional, doing a dis service to our farmers, our indigenous varieties suffer. Let us get back our own Maize/Cholam/Makai, which are very rarely seen even during rainy season when they are most likely to be found. Do give this a thought.

Getting to the recipe right away-


     PREP TIME: 15 Mins                                            COOK TIME: 25 Mins
     TOTAL TIME: 40Mins                                           COURSE:  MAIN
     CUISINE:  NORTH INDIAN                                  SERVINGS: 4
     AUTHOR: Rajni Ram


    Ingredients:

    Ingredients
    Palak 1 bunch
    Corn Kernels 100 gm
    Onion 1 large or 2 small
    Green chillies 2
    Tomato 2 large to medium size
    Ginger- garlic paste 1 tsp
    Cloves 2
    Bay leaf 1 small 
    Cardamom 2 
    Cumin seeds 1 tsp
    Turmeric powder 1/2 tsp
    Salt as required
    Garam masala powder 1/2 tsp
    Coriander powder 2 tsp
    Fennel Powder 1 tsp
    Red chilli powder 1 tsp
    Cream 2 tbsp
    Oil for sauteeing

Directions:
Chop the Palak roughly and blanch them, I usually put them in the microwave for 2 mins. Alternately just put them in boiling water for 5 minutes. Drain the water and pour cold water over the Palak, this helps in keeping the green colour intact. Puree the Palak and keep ready. Cook the Corn kernels, and keep aside. 
Now in a karahi pour some oil and heat. Add 2 cloves followed by Cumin seeds and drop in the chopped onions. Saute for a minute, add the green chillies and continue to saute for 30 seconds, finally add the tomatoes and cook until the tomatoes turn mushy. Cool them. Now blend the onion-tomato mixture to a puree. In the same karahi take another 2 tsp of oil and heat.  Add the cumin seeds followed by turmeric powder and pour the onion-tomato mixture. Fry it nicely in the oil. Now add salt, followed by coriander powder, red chilli powder, fennel powder and continue to cook. Now add the Palak Puree. Stir well to combine the tomato and palak puree. Be careful as the palak splutters a lot while cooking, you can keep the karahi partially covered.  After about 3-4 minutes of cooking the Palak and tomato mixture will come together, at that stage add the cooked corn, cook for two more minutes, add the cream and garam masala powder and turn of the flame immediately. The delicious Corn palak is ready to serve.

Serving suggestions: with Rotis, Parathas, Kulcha, with rice varieties like Jeera rice, Mayar Pulav, 
Flavoured rice, vegetable pilaf etc;


STEPWISE RECIPE FOLLOWS:

1. Chop the Palak roughly and blanch them, I usually put them in the microwave for 2 mins. Alternately just put them in boiling water for 5 minutes. Drain the water and pour cold water over the Palak, this helps in keeping the green colour intact. Puree the Palak and keep ready. Cook the Corn kernels, and keep aside. 


2. Puree the Palak and set aside. In a karahi take oil and heat. Put in the cloves and cumin seeds, and as the cumin splutters add turmeric powder followed by onions and sauté for a minute. Add the green chillies and sauté for 30 seconds and now add the tomatoes and sauté until mushy. Cool and grind to a purée, along with 1 tsp ginger garlic paste.


3. In the same karahi take 2 tsp oil and heat. Now add the cumin seeds, Bay leaf, cloves and cardamom and  pour in the tomato and onion paste and fry nicely in the oil. 


 Now add salt, followed by coriander powder, red chilli powder, fennel powder and continue to cook. 


Now add the Palak Puree. Stir well to combine the tomato and palak puree. Be careful as the palak splutters a lot while cooking, you can keep the karahi partially covered. Add little water to dilute if required.  After about 3-4 minutes of cooking the Palak and tomato mixture will come together, at that stage add the cooked corn, cook for two more minutes.


Now add the cream and garam masala powder and turn of the flame immediately. The delicious Corn palak is ready to serve.


NOTES:
1. Blanching ( putting the Palak in hot water) is a critical step followed by dipping it in cold water.
2. Don’t overcook the Palak, it loses its colour and taste.


If you tried this recipe and liked it please comment below. I would love to hear from you. If you have a query about the recipe email us and i'll respond as soon as I can.


Thursday, 15 April 2021

CHAKKI KI SHAK/ CHAKKI KI SUBJI

 The cuisine of  Madhya Pradesh ( central India) has been unexplored by me so far. Recently while looking up the internet I saw this interesting recipe called Chakki Ki Shak from the MP cuisine. I found the recipe simple and interesting and as I don’t have this cuisine on the blog I gave it a try and the dish turned out so delicious that I had to blog it. 

While looking up this recipe in detail I also came to know of many more interesting vegetarian  recipes from the region and I will surely bring them all here over a period of time. If you are following the blog you know by now that when I try a new recipe it has to turn out well thrice, and that takes time.

Before we delve into the recipe, I must tell you that MP being the center of India is surrounded by various states and hence there is a similarity of cuisine between them. I found some dishes bearing similarities with Rajasthani and Maharashtrian cuisine. Wheat, Jowar, and Maize form the staple food, do you see that’s how “Bhutte Ka Kees” is a specialty from MP, Bafla which is made of whole wheat flour is also a famous dish from the region. The current dish Chakki ki Shak is a curry  made of whole wheat flour and some aromatic spices. The flour dumplings are simmered in a tangy sauce.

While you are here check out my other curry recipes like Miloni Baby corn and Bell Peppers curry, kadai Paneer( gravy), Kathrikai Masala Kuzhambu, Pachai Mochai Kuzhambu, Keerai Molagootal, Mirch Ka Salan, Dum Aloo Ajwaini, Pachai Sundakkai Kuzhambu and more...

Here is the recipe for Chakki ki shak-


 PREP TIME: 15                                          COOK TIME: 15 Mins
 TOTAL TIME: 30 Mins                                COURSE:  MAIN
 CUISINE: INDIAN/MP                                SERVINGS: 6
 AUTHOR: Rajni Ram


    Ingredients to make Chakki:

    Whole wheat flour 1.5 cups

    Oil 1 tsp

    Carrom seeds/ Ajwain 1 tsp

    Salt as required

    Red chilli powder 1 tsp

    Turmeric powder 1/2 tsp

    Water as required to make a dough


    Ingredients for making the curry:

    Cumin Seeds 1 tsp

    Cardamom 2 pods

    Cloves 2-3

    Onions 2 small finely chopped

    Tomatoes 3 large

    Curd 1/2 cup 

    Cashewnuts 8 to 10

    Red chilli powder( regular) 1 tsp

    Red chilli powder( Kashmiri) 1 tsp

    Coriander powder 2 tsp

    Fennel powder 1 tsp

    Turmeric powder 1/2 tsp

    Garam masala powder 1/2 tsp

    Fresh coriander 1 tsp finely chopped


    Directions for making Chakki ( wheat dumplings)

In a bowl take the flour add the oil, salt and all spices and using water form a soft dough. It should be like roti dough. Immerse this dough in water for 15 minutes. After 15 minutes, scrub the flour lightly with your fingers, the water will become hazy. Throw this water. Pour some more water on the dough and scrub again and discard the water. The dough is now ready to be made to Chakki. Get the steamer ready, as the water in the steamer is getting boiled, smear your steamer plate with oil and spread this dough evenly on the plate using your fingers. Now place this in the steamer for 10 to 15 mins. Remove and cool the chakki. On cooling, cut into diamonds or squares. In a pan take some oil for shallow frying, and fry the Chakki to a golden brown. Drain on absorbent paper and keep aside.


   Directions for gravy preparation: 

In a blender add the chopped Tomatoes, and cashewnuts and blend to a smooth paste. In a Pan or Kadai take 1 tbsp oil and heat. Add the cumin seeds, cardamom and cloves and fry until aromatic. Now add the finely chopped onions ,turmeric powder,  and saute until light brown. Now add the ground paste followed by all the spice powders- red chilli powder(both regular and Kashmiri), coriander powder, fennel powder and mix well. Cook for two minutes until the raw smell goes away. Now add half a cup of curd and stir continuously for 2 minutes. Add 2 cups water and gently drop in the cooled and cut Chakki(wheat flour dumplings). Cover and cook the dumplings in this gravy until they turn soft and the gravy thickens up. Depending on what you are serving the Chakki Ki Shak with you can thin down or thicken the gravy. Finally add Garam masala powder and fresh coriander leaves and switch off the flame. 

Serving Suggestion: With Roti, Paratha, Naan or Plain or Jeera rice.


    STEPWISE RECIPE FOLLOWS:

1. In a bowl take the flour add the oil, salt and all spices and using water form a soft dough. It should be like roti dough. Immerse this dough in water for 15 minutes. After 15 minutes, scrub the flour lightly with your fingers, the water will become hazy. Throw this water. Pour some more water on the dough and scrub again and discard the water.


2. Get the steamer ready, as the water in the steamer is getting boiled, smear your steamer plate with oil and spread this dough evenly on the plate using your fingers. Now place this in the steamer for 10 to 15 mins. Remove and cool the chakki. On cooling, cut into diamonds or squares. In a pan take some oil for shallow frying, and fry the Chakki to a golden brown. Drain on absorbent paper and keep aside.


3. In a blender add the chopped Tomatoes, and cashewnuts and blend to a smooth paste. In a Pan or Kadai take 1 tbsp oil and heat. Add the cumin seeds, cardamom and cloves and fry until aromatic. Now add the finely chopped onions ,turmeric powder,  and saute until light brown. Now add the ground paste followed by all the spice powders- red chilli powder(both regular and Kashmiri), coriander powder, fennel powder and mix well. Cook for two minutes.


4.  Now add half a cup of curd and stir continuously for 2 minutes. Add 2 cups water and gently drop in the cooled and cut Chakki(wheat flour dumplings). Cover and cook the dumplings in this gravy until they turn soft and the gravy thickens up.


6. Finally add Garam masala powder and fresh coriander leaves and switch off the flame. 


    NOTES:

1. Since most recipes suggested soaking and washing the dough, i have followed it. One can also try steaming the dough, cutting to pieces and frying also.

2. The gravy can be allowed to thicken further if serving with Rotis.

3. Whichever the method, resting the dough for 15 mins is essential. 


If you tried this recipe and liked it please comment below. I would love to hear from you. If you have a query about the recipe email us and i'll respond as soon as I can.

If you would like to receive our recipes on your mail please leave your mail id at the homepage. Every time Rajjo's Kitchenn has a new post we will mail the recipe to you.


  This is my meal with Chakki Ki Sakh. I served it with Jeera Pulav, Bombay Potatoes and Beet root Raita.


Tuesday, 13 April 2021

DOSAKAYA CHUTNEY

 Dosakaya is a type of Cucumber that is yellow in colour and round. There are longer versions of the yellow cucumber too, but I have used the round ones. 

There are 3 varieties in cucumbers, one is the slicing one, which is used in salads. Then there is the pickling variety and the other burpless ones which the melons belong to. This vegetable Dosakaya,  is the pickling kind. 

This Cucumber is more popular in South India as compared to other places and especially in Andhra Paradesh they make many dishes of it. This chutney is my favorite of all those recipes and hence I am bring it here to share with all if you. Cucumber have a lot of water, minerals in them and their seeds are edible too. In summers one must include them as much as possible in ones  diet.

For people who are first timers at using this vegetable,  the skin needs to be peeled and seeds discarded and the flesh is used to cook. This chutney is an ideal accompaniment to Dosa, Chapati, Idli, Puri, Parathas and even hot rice.

This is a simple recipe so does not involve any stepwise instructions. I have included a video instead and the directions to the recipe.

While you are here also check out other recipes like  Homemade Schezwan sauce, Thengai Molagapodi (Coconut Gun powder), Roasted red Bell Peppers Chutney, Homemade Pesto, Curry leaves Podi (Karivepilai Podi), and more.


Here is the recipe for Dosakaya Chutney-


PREP TIME: 20 Mins                     COOK TIME: 10 Mins
TOTAL TIME: 30 Mins                  COURSE: ACCOMPANIMENT  
CUISINE: SOUTH INDIAN           QUANTITY: 2 CUP
AUTHOR: Rajni Ram


Ingredients:

Dosakaya/ Yellow Cucumber 1 medium sized, skin peeled, seeds removed and flesh chopped to pieces.

Tomatoes 2 large or 15-15 Cherry Tomatoes ( I used Cherry tomatoes)

Mustarrd seeds 1 tbsp

Methi seeds/Fenugreek seeds 1/2 tbsp

Chana Dal/ Gram dal 1 tbsp

Urad Dal 1/2 tbsp

Dry Red chillies 4

Green chillies 2-3 depending on spice

Asafoetida a pinch

Fresh Coriander leaves a handful

Oil for sauteing


Directions:

In a pan heat oil and add mustard seeds, Methi seeds, Chana dal and Urad dal. Fry for 30 second. Now add the Dry red chillies, green chillies and asafoetida and fry until the dals turn light brown. Remove them onto a plate and cool them. In the same pan, add  ore oil if required and drop in the cut Dosakaya cubes. Saute them until half done. Now add salt followed by the tomatoes and continue to saute until the tomatoes turn tender. Cool the vegetables. Now powder the fried dals to a coarse mixture in a blender. Making a fine powder does not give the right texture to the chutney. Now add the sauteed vegetables and coriander leaves and blend again to a coarse paste. Watch video for the right texture. No tempering is required for this Chutney, and can be served directly with Idli, Dosa, Rice or Parathas.  Enjoy. Bon Appetit !!


Watch Video here 👇


Friday, 9 April 2021

EASY CORN FRITTERS

 Corn Fritters are very simple to make, healthy and delicious and they get done in no time with no planning ahead needed. Isn't this the very reason, one should make this often? This recipe has been on my mind for a very long time and it is a contest on social media that finally got me making this. 

Other than the Corn, all other vegetables used here are customizable to one's preference. I have used every day vegetables like carrots and capsicum. Grated Potatoes(after removing starch), Purple cabbage, Zucchini are other add ins that I usually use.

While you are here check out other snack recipes here like- Semolina Cheese Balls, Medu Vada, Potato Cheddar bake, Pepper vadai, Patra, Dhaniya wale Namak Pare, Oatmeal Cookies, Samosa Pie, and more...

Here is the recipe for Corn Fritters--

PREP TIME: 10 Mins                                      COOK TIME: 15 Mins
 TOTAL TIME:30 Mins                                    COURSE:  SNACK
 CUISINE:WORLD                                         SERVINGS: 12 NOS   
 AUTHOR: RAJNI RAM                                      


      Ingredients:

      Sweet corn Kernels 20 gm (divided into 100 each) cooked and kept aside

      Carrot 1 small chopped finely

      Capsicum 1 small chopped finely

      Refined Flour( Maida) 1/2 cup

      Egg 1 

      Salt as per taste

      Pepper powder 1 tsp

      Red Chilli powder   1 tsp

     Oil for shallow frying the fritters


      STEPWISE RECIPE FOLLOWS:

1. Boil Corn and divided it into 2 halves. Crush 1 half in a mixie/blender to a coarse paste and keep the other half as whole kernels. To the mashed or crushed corn, add all the other vegetables like carrot, capsicum etc, add the flour and egg, followed by salt, pepper powder and red chilli powder. Add chopped coriander if you like(optional).  


2. Mix well to make a thick mixture, and now add in the whole corn kernels, and mix lightly. Heat oil in a pan (2 tbsp will be enough, more can be added if required). Now drop small scoops of this corn mixture and flatten lightly with a spatula. Coo on one side and flip and cook on the other. Remove and enjoy with some sauce. I drizzled Cheese sauce over them. Alternately bake them in a pre heated oven, by spreading the mixture on a baking sheet, and bake at 200 C for 20 to 25 minutes. Since all oven work at different temperature ranges keep checking from 20 mins onward for doneness.  


NOTES:

1. A very simple and fool proof recipe hence no notes are needed.

2. For more quantity just double up the ingredients.

3. As for alternate to egg, Flax egg can be used, but I have not tried the version yet.


If you tried this recipe and liked it please comment below. I would love to hear from you. If you have a query about the recipe email us and ill respond as soon as I can.

If you would like to receive our recipes in your mail please leave your mail id at the homepage. Every time Rajjo's Kitchen has a new post we will mail the recipe to you.


Thursday, 8 April 2021

MEDU VADA / URAD VADA

 Urad Vada or Medu Vada, as it is called, is probably one of the most simplest and yet difficult to make recipes. This is because the texture of the ground batter is very important for a perfect turn out and the quality of the Urad dal is important too. With time and practice one gets a hang of it. In this recipe I have tried to give detailed pictures of various steps of grinding so that the recipe becomes a no fail one, and I am depending on your feedback on this once you try it. The Medu Vada is different from its North Indian counter part, because of the hole in the center, and making that hole is what makes grinding the batter perfectly important.

Urad Vada can be a snack, an accompaniment to the mains or even a starter when made bite sized. In South India it is a part of Prasad / Bhog ( holy offering) to God and so is made many times during the year. In my house after eating a few plain with chutney or Sambar the rest are converted to Dahi Vada in the evening. If one doesn’t want to get into making Dahi Vadas, just  dunking them is tomato sauce is also a good option.

I prefer using the whole Urad dal without skin for these Vadas, as compared to the split urad dal as they almost are no fail. There are many add ins to into the batter like finely chopped onions, grated carrot, mix of finely grated veggies, the only rule- once the add in’s go in, pat and fry Vadas immediately. Another variation of this Vada is the dry Pepper Vada or Milagu Vadai. 

While you are here, check out my other snack recipes like Semolina Cheese Balls, Patra/ Pathrode, Ratlami Sev, Mirchi Bajji/Mirapakaya Bhajji, Potato Cheddar Bake, and more...


Here is the recipe for fluffy Medu Vadai for you--


PREP TIME: 5 Mins ( 1hr Soak time)         COOK TIME: 30 Mins
TOTAL TIME: 1 hr. mins                             COURSE:  BREAKFAST/TIFFIN/ SNACK
CUISINE:  INDIAN                                     SERVINGS: 15 pcs
AUTHOR: Rajni Ram


    Ingredients:

    Whole or Split Urad dal (without skin) 1 cup 

    Green chillies 2

    Ginger 1/2 inch piece

    Peppercorns 5 to 6 crushed

    Curry leaves a few

    Salt as required 

    Rice flour 1 tbsp (optional)

    Directions:  

Soak the Urad dal in water for 1 hour. Grind the green chillies, ginger, and curry leaves to a coarse dry paste ( check picture). Now in a blender add the dal after draining all the water and grind to a smooth paste. Add water a little at a time, by sprinkling and not by pouring it. So, sprinkle water, grind, sprinkle, grind, until the batter is smooth and thick. Take care to see that the batter does not become runny or else Vadas cannot be formed. The right consistency of the batter is when it doesn't fall off your hand easily. Remove the batter from the blender into a bowl, add salt and the green chili and ginger paste, add few more curry leaves if required and rice flour in case using ( I have not used in this recipe), and mix well with your fingers. Next, take a banana leaf or a plastic cover( I have used a flexible plastic lid) for patting the Vada. Now, wipe the leaf/ plastic with some water, take a small lemon sized portion of the batter and place it in the centre of the leaf/plastic, do not flatten, just wet your index finger in water, and make a hole in the centre . Now carefully pick the Vada out of the leaf/ plastic and gently drop it on hot oil and fry until golden brown. Remove on to absorbent paper . Repeat the process for the entire batter. Enjoy hot with Sambar and Chutney.


    STEPWISE RECIPE FOLLOWS:

1. Soak the Urad dal in water for 1 hour.


2. Grind the green chillies, ginger, and curry leaves to a coarse dry paste ( check picture). 


3. Now in a blender add the dal after draining all the water and grind to a smooth paste. Add water a little at a time, by sprinkling and not by pouring it. So, sprinkle water, grind, sprinkle, grind, until the batter is smooth and thick. Take care to see that the batter does not become runny or else Vadas cannot be formed. The right consistency of the batter is when it doesn't fall off your hand easily. ( see pics for stages of grinding)


4. Remove the batter from the blender into a bowl, add salt and the green chili and ginger paste, ground pepper powder, add few more curry leaves if required and rice flour in case using ( I have not used in this recipe), and mix well with your fingers.


5. Next, take a banana leaf or a plastic cover( I have used a flexible plastic lid) for patting the Vada. Now, wipe the leaf/ plastic with some water, take a small lemon sized portion of the batter and place it in the centre of the leaf/plastic, do not flatten, just wet your index finger in water, and make a hole in the center . Now carefully pick the Vada out of the leaf/ plastic and gently drop it on hot oil and fry until golden brown. Remove on to absorbent paper .


    NOTES:

1. Sprinkling water a little at a time and not pouring it into the dal while grinding is critical.

2. The batter should be smooth, yet not lose or runny.

3. I usually add rice flour only if I find that the batter is not turning fluffy as we grind, and kind of flat. Anyway adding 1 tbsp does no harm, and gives crisp Vadas.

4. I prefer to grind in the wet grinder, as then, even with minimum water we are able to grind well. But those who don't have one can certainly use the blender and be patient while grinding.


To make these yummy Dahi Vadas - To a blender add 1/2 a bunch of coriander leaves, 1/2 inch piece ginger and two green chillies. Blend to a paste. Add little curd to it and now blend to a smooth paste. Add this mixture to 500 ml of curd, and add salt as required. Soak the Vadas in hot water for 2 minutes, squeeze lightly and put them into this spiced curd mixture. Let it soak in for 30 mins in the fridge, before serving. 


If you tried this recipe and liked it please comment below. I would love to hear from you. If you have a query about the recipe email us and ill respond as soon as I can.

If you would like to receive our recipes on your mail please leave your mail id at the homepage. Every time Rajjo's Kitchenn has a new post we will mail the recipe to you.


Thursday, 1 April 2021

SWEET POTATO PURAN POLI

Every year during Vaikunta Ekadashi and Shiv Rathri the elders in my family like to have Sweet Potato, as is the custom. Shiva Rathri and Vaikunta Ekadashi both are celebrated in winter and the carbs from the Sweet potato give the much needed warmth. This could have been the reason this custom was formed. 

So instead of just giving them the plain boiled one, I prefer giving it to them as these Puran Polis. This is quite a simple recipe and needs no pre planing. Sweet potatoes are also high on fiber and minerals, therefore they are perfect for people on a fast. Sweet Potatoes promote gut health, they support healthy vision and also support the immune system. Isn't this reason enough for us to include this healthy  tuber.

While you choose the sweet Potatoes at the market, choose the fat ones, chop off the tips before boiling, as that's where you may find some rough fibres. 

There is a lot more one can do with Sweet Potatoes than just making a subji and I for sure am going to explore every one of them and bring it here for you all.

Let's get to the recipe of this yummy Sweet potato stuffed flat bread which can be had as dessert, can be a holi offering(prasad), or even a snack.

While you are here check out my other dessert recipes like Gajar ka Halwa, Carrot kheer, Eggless Pineapple cake, Strawberry and Lemon loaf, Dry fruit ladoo, Shrikand, Aval Kesari, Mal Pua, Akkaravadisal and more...

Here is the recipe of Sweet Potato Puran Poli--

PREP TIME: 30 Mins                                      COOK TIME:30 Mins
TOTAL TIME: 20Mins                                     COURSE: DESSERT/SWEET
CUISINE:   INDIAN                                         SERVINGS: 4
AUTHOR: Rajni Ram


Ingredients for dough:

Wheat flour 2 cups
salt a pinch
oil 1 tsp
water to knead

Ingredients for stuffing:

Sweet potatoes 2 large or 3 medium ( pressure cook for 3 whistles, peel skin and mash)
jaggery 1/2 cup
cardamom powder 1 tsp
Ghee/ clarified butter 1 tbsp
Ghee for cooking Polis

Directions:
 For dough- combine flour adding the salt and oil and little water at a time and combine to form a soft yet stiff dough, like that of Paratha dough.

For stuffing: Pressure cook, peel and mash the sweet potatoes. Now ina kadai put in the mashed sweet potatoes followed by the jaggery and keep stirring. The jaggery will begin to melt. Keep stirring so that the jaggery combines well with the sweet potato and thickens a little. Now add cardamom powder and ghee and mix well. Allow the stuffing to cool.
Now divide the dough into 10 equal parts and divide the stuffing also. Take one ball of the dough at a time, dust it with flour and roll into a small puri, put the stuffing in the centre, and seal the edges. dust with little flour again and roll out into a thick Chapathi. Heat a girdle/Tava and put the Poli ( stuffed roti) on it. Cook on one side and apply some ghee, flip over and cook on the other side and apply more ghee. Repeat for all the dough and stuffing. Enjoy hot. This can be stored in the fridge for uptio 4 das and warmed up as required.


STEPWISE RECIPE FOLLOWS: 

1. For dough- combine flour adding the salt and oil and little water at a time and combine to form a soft yet stiff dough, like that of Paratha dough.


2. For stuffing: Pressure cook, peel and mash the sweet potatoes. Now ina kadai put in the mashed sweet potatoes followed by the jaggery and keep stirring. The jaggery will begin to melt. Keep stirring so that the jaggery combines well with the sweet potato and thickens a little.


3. Now add cardamom powder and ghee and mix well. Allow the stuffing to cool.


4. Now divide the dough into 10 equal parts and divide the stuffing also. Take one ball of the dough at a time, dust it with flour and roll into a small puri, put the stuffing in the centre, and seal the edges. dust with little flour again and roll out into a thick Chapathi. 


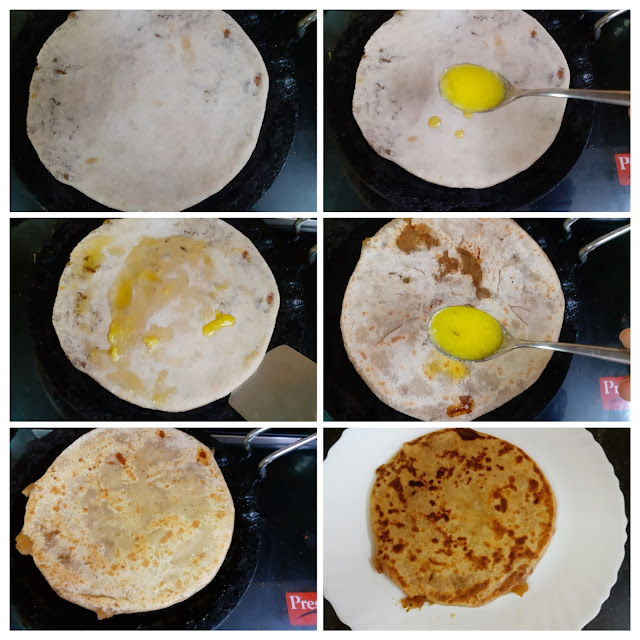
5. Heat a girdle/Tava and put the Poli ( stuffed roti) on it. Cook on one side and apply some ghee, flip over and cook on the other side and apply more ghee. Repeat for all the dough and stuffing. Enjoy hot.


NOTES:

1. Let the  jaggery melt in the heat from the sweet potato, do not add any water. If the mixture is lose, the stuffing will tend to come out of the Roti.
2. Ghee can be smeared even after both sides are cooked.
3. Brown or unrefined sugar can be added in place  of jaggery.

If you tried this recipe and liked it please comment below. I would love to hear from you. If you have a query about the recipe email us and ill respond as soon as I can.

If you would like to receive our recipes on your mail please leave your mail id at the homepage. Every time Rajjo's Kitchen has a new post we will mail the recipe to you.


TOFU AND STIR FRIED VEGETABLES IN HOT SCHEZWAN SAUCE

  Any Tofu lovers? I agree its an acquired taste,but going by the health benefits it has to offer, I try including it in my diet now and the...