Vegetarian cooking blog

Saturday, 22 May 2021

BEETROOT HALWA

 I have a long standing relationship with Beetroot. I have liked it as a child and continue to do so. What I meant by long standing relationship is that, when I was anemic for a certain period, I was advised to eat Beetroot and Pomegranate regularly. And yes Dates too. These three are always part of my diet even now. I cook Beetroot in many forms. Stir fry, Falafel, Paratha, Salad and more. But my most favourite version is of this dessert, Beetroot Halwa. In fact I prefer Beetroot halwa to Carrot Halwa. 

If you have followed my Carrot halwa recipe you will see that I have followed the same method. These root vegetables have an earthy taste and smell. So to make a dessert with them, it is necessary to get rid of the earthy taste. That's done by boiling them in milk( a good amount of it). This not only removes that raw taste, but add that nice milkiness that we require for a Halwa or any fudge kind of recipe.

If not boiling them in milk, you need something like unsweetened Mava or Khoya, which is dehydrated milk to get rid of the taste. This version I have done in my Gajar Halwa Barfi recipe. It is a very quick version of the Carrot Halwa itself. Finally, this halwa is such a guilt free dish because a lot of sugar is not needed owing to the natural sweetness of the beets, and ghee has been used only for frying the nuts.

Coming to the vegetable itself and why one must include it in their diet is because they are packed with essential vitamins, minerals, some of  which have medicinal properties. Another popular reason is that they have any nutrients, and fewer calories, so it is good for weight watchers. It helps keep blood pressure in check. They also have a decent amount of Fiber, folate and Vitamin C. Isn't this reason enough for it to be a part of our meal plan?

I am cooking this Halwa on a day I have excess milk, so you will see me using my regular milk vessel, instead of my Kadai or Pan which I usually prefer. This is also Pandemic time, so no house help around. The more vessels I use, the more clean up I end up doing... getting the drift😉?

While you are here check out other dessert recipes of mine like- Carrot Kheer, Gajar/Carrot Halwa, Moong Dal Halwa, Dry fruit ladoo, Red Poha Ladoo, Sweet Potato Puranpoli, and more...

Here is the recipe for Beet root Halwa.  


     PREP TIME: 10 Mins                                      COOK TIME: 40 Mins
     TOTAL TIME: 50 Mins                                      COURSE:  DESSERT
     CUISINE:  INDIAN                                            SERVINGS: 6
     AUTHOR: Rajni Ram


    Ingredients:

    Beetroot 2 medium around 250 gm grated

    Milk 500 ml

    Sugar 3/4 cup

    Cardamom powder 2 pinches

    Cashewnuts few broken to bits

    Pistachio a few (optional)

    Ghee for frying nuts

    Directions: Boil Milk in a Pan/Kadai or heavy bottomed vessel.  Once boiled, add the grated beetroot and cook. Keep stirring continuously, so that the milk doesn't get burnt. This is an important step. If the milk sticks to the bottom of the vessel and burns, the dessert will not taste good any more. The stirring and cooking process has to continue until the mixture becomes almost dry. This takes about 40 to 45 minutes, if done on medium flame, while stirring constantly. I have indicated the steps of evaporation of milk in the mixture, in my pictures. When the mixture is almost dry, it is time to add the sugar. Keep stirring again. The mixture will liquefy. Not to worry. Keep stirring, and it will start solidifying again. Keep stirring until the mixture no more sticks to the bottom of the pan. This is the right consistency. Switch off the flame and, add cardamom powder. Now in a small tadka Kadai heat some ghee, drop in the broken cashew pieces and fry until golden brown. Pour this over the Halwa and enjoy warm. Garnish with Pistachios if you prefer.


STEPWISE RECIPE FOLLOWS:

1.  Boil Milk in a Pan/Kadai or heavy bottomed vessel.  Once boiled, add the grated beetroot and cook. Keep stirring continuously, so that the milk doesn't get burnt. This is an important step. If the milk sticks to the bottom of the vessel and burns, the dessert will not taste good any more.


2. The stirring and cooking process has to continue until the mixture becomes almost dry. This takes about 40 to 45 minutes, if done on medium flame, while stirring constantly. I have indicated the steps of evaporation of milk in the mixture, in my pictures.


3. When the mixture is almost dry, it is time to add the sugar. Keep stirring again. The mixture will liquefy. Not to worry. Keep stirring, and it will start solidifying again. Keep stirring until the mixture no more sticks to the bottom of the pan. This is the right consistency.


4. Switch off the flame and, add cardamom powder. Now in a small tadka Kadai heat some ghee, drop in the broken cashew pieces and fry until golden brown. Pour this over the Halwa and enjoy warm. Garnish with Pistachios if you prefer.


    NOTES:

1. Once can easily double up measures for more quantity.

2. If you are a beginner, you may want to know that, as you cook the beets in milk, their colour pales, but once the sugar is added, it becomes all bright again. So you are doing good. Do not worry.

3. Sometimes if the beets are too juicy, inspite of trying to dry the mixture, a small amount of moisture remains. If you don't prefer that, just add 1 tbsp of milk powder and you get the perfect texture.


If you tried this recipe and liked it please comment below. I would love to hear from you. If you have a query about the recipe email us and ill respond as soon as I can.

If you would like to receive our recipes on your mail please leave your mail id at the homepage. Every time Rajjo's Kitchenn has a new post we will mail the recipe to you.


Tuesday, 18 May 2021

ONE POT LAUKI WADIYAN CURRY

 Lauki or Bottle gourd is a healthy summer vegetable, available perennially. It has many health benefits, but many don't prefer it because of its bland taste. How many times would an elder at home or our mother have tried to feed it to us on the sly 😀? All for a good cause though. Lauki belongs to the cucumber family, and is very light on the tummy. That's one of the reasons it is summers most preferred vegetable.  

This vegetable is also called by several other names all over India like Doodhi, Ghiya, Sorakkai, to name a few. This vegetable packs a lot of Vitamins like-  Vitamin A, Vitamin B, Vitamin C, Vitanin E, Vitamin K and minerals like - Potassium, Iron and Manganese. Lauki has many electrolytes which makes it the ideal summer vegetable, that replenishes the water lost in sweating. All these advantages make Lauki a wholesome vegetable that fights off infections and helps in detoxification.

Coming to the next element in the recipe which is Urad dal Wadi, which are basically sun dried lentil dumplings. They can be broken to bits and fried, then added to subjis to pack in that extra flavour and crunch. They are also a nice way to add proteins to diet, when you want a break from the usual dal. 

In this recipe, I have combined the goodness these both have to offer and what I have is a super delicious curry. I have cooked this in the one pot method, which makes it very easy, and also a work day lunch or dinner option. It can be paired with rice or Rotis and you have amazing lunch/dinner ready in a jiffy. The Wadiyan or the lentil dumplings are just an add on, which can be done away with altogether if you prefer having just Lauki Ki Subji, or can be swapped with Soya chunks. For the fussy Lauki eaters, adding Wadiyan or Soya chunks is a good idea.

Last but not the least, requesting readers to not judge the pictures taken this time. As I finished all prep for the curry, the tube light in my kitchen got fused. Our kitchen doesn't get enough natural light, so I depend on two tube lights for lighting while I click pictures for the blog. With one gone, the light from one was not adequate. Since we are in the midst of the Pandemic, we were unable to step out to buy one immediately, and my husband has created a kind of bio bubble at home😅

While you are here check out other curry and subji recipes like- Corn Palak Subji, Chakki ki Shak, Miloni Babycorn and Bell Peppers curry, Bhindi Aloo, Paneer Khurchan, and more...

Let's get to the recipe right away.


     PREP TIME: 15 Mins                                            COOK TIME: 15 Mins
     TOTAL TIME: 30 Mins                                           COURSE:  MAIN
     CUISINE:  NORTH INDIAN                                  SERVINGS: 4
     AUTHOR: Rajni Ram 


     Ingredients:

     Lauki/Bottle gourd/Sorakai 250 gms skin peeled and, diced finely
    Tomatoes 2 large blanched and skin peel and chopped finely
    Onion 1 finely chopped
    Wadiyan/ sundried lentil dumplings about 5 
    Cumin Seeds 1 tsp
    Turmeric powder 1/2 tsp
    Ginger garlic paste 1/2 tsp
    Salt as required
    Red chilli powder 1 tsp
    Coriander powder 1 to 2 tsp
    Fennel powder 1 tsp
    Water 1 cup
    Fresh coriander leaves 2 tbsp finely chopped
    Garam Masala powder 1/2 tsp
    Oil for sauteeing


    Directions: Blanch the tomatoes for 10 mins in hot water, cool them, peel the skin and     chop finely. Break the Wadiyan to small pieces and keep aside. In a cooker take 1 tbsp oil and heat. Drop the broken Wadiyan into the oil and fry until brown. take care not to burn them. Remove and drain on absorbant paper. Now to the same oil add the cumin seeds, turmeric powder, chopped onions, and ginger garlic paste and saute, until onions turn light brown. Now add the blanched and chopped tomatoes and saute for 30 seconds. Add the diced Bottle gourd/lauki, salt, red chilli powder, coriander powder, fennel powder, and stir everything together. Now add 1 cup water, stir again, close cooker and cook until 4 to 5 whistles. Allow the pressure to settle. Now open cooker, add the fried Wadiyan, chopped coriander leaves and garam masala powder. The subji is ready to serve. Enjoy with hot rice or Rotis. Bon Appetit.

STEPWISE RECIPE FOLLOWS:

1. Blanch the tomatoes for 10 mins in hot water, cool them, peel the skin and chop finely. Break the Wadiyan to small pieces and keep aside. In a cooker take 1 tbsp oil and heat. Drop the broken Wadiyan into the oil and fry until brown. take care not to burn them. Remove and drain on absorbent paper.


2. Now to the same oil add the cumin seeds, turmeric powder, chopped onions, and ginger garlic paste and saute, until onions turn light brown. 


3. Now add the blanched and chopped tomatoes and saute for 30 seconds. Add the diced Bottle gourd/lauki, salt, red chilli powder, coriander powder, fennel powder, and stir everything together. Now add 1 cup water, stir again, close cooker and cook until 4 to 5 whistles. Allow the pressure to settle.


4. Now open cooker, add the fried Wadiyan, chopped coriander leaves and garam masala powder. The subji is ready to serve. Enjoy with hot rice or Rotis. Bon Appetit.


NOTES:

1. The Wadiyan or the lentil dumplings are just an add on, which can be done away with altogether if you prefer having just Lauki Ki Subji, or can be swapped with Soya chunks. For the fussy Lauki eaters, adding Wadiyan or Soya chunks is a good idea.

2. To use Soya chunks instead of Wadiyan, cook the soya chunks as per pack instructions. cool them and rinse a couple of times. Now they can be substuted instead of the Wadiyan at the end(need not be fried). They can be added as whole or mince. Still better is to add the tiny Soya granules.


Friday, 14 May 2021

BOMBAY CHUTNEY/BESAN CHUTNEY/KADALAMAAVU CHUTNEY

  Bombay chutney/ kadalama chutney/ Besan chutney. This dish holds a lot of significance for me. 

Will you believe me if I said I have never cooked this in 22 years? It's TRUE. In my mind I have known how to make it, but had never practically done it. I have had a mental block about this dish/ chutney because I have tasted this always during  family functions when a Samayal Mami (  cook ) is called to help. And they usually make it so unpalatable, watery and tasteless that I never ate it.  And they always make this with Roti or Dosa because it gets done in few minutes. So until a few days back I had this view. Now let me tell you, most South Indians have a dislike for Besan( oh except when they make Mysorepak). Meaning we use it in our sweets and savories and Bajjis but not in regular cooking. If a main course  item like Gatte is Subji is made our folks will say "Kadalamava?"( meaning "oh Besan). But since I was brought up in a Cosmopolitan environment I never had the aversion towards Besan. In fact I know its rich in proteins and fiber. 

Funny fact, inspiration to break the jinx of not making this dish until now is a movie scene that my hubby and I were watching and the hero makes this chutney in such mouthwatering way that I ended up letting go of my mental block.

My daughter, thanks to my mental block, had never tasted this dish ever. She loved it😍, and said it tastes like south Indian potato masala that we make for Puris and rightly so because we do add little diluted Besan flour there. People who make this regular will know I have made it as a thicker version of the chutney with lots of ginger, green chillies, curry leaves, onions, and peas. That's my #breakfree story. 

Coming to why Besan chutney is called Bombay chutney in the south, well I could not find a satisfactory answer to this. But may be because Maharashtra has its own version of this chutney called "Pitla", though the consistency of Pitla is more on the runny side and the spices used a little different, so I think from Maharashtra this dish trickled down south and got a makeover with different spices and Bombay chutney came to being. Gujarat also has its version of this chutney, which is a slightly sweet version called "Kadi Chutney", and so does the Andhra region, cal "Senaga Pindi Pachadi".

Let's make this simple chutney, and while you are here check out other recipes like - Chakki Ki Shak, Vegetable Oats Kichdi, Methi Wale Baingan, Roasted Bell Peppers chutney, Ragi and Besan Chila , and many more...


     PREP TIME: 10 Mins                                       COOK TIME: 35 Mins
     TOTAL TIME: 45 Mins                                      COURSE:  ACCOMPANIMENT
     CUISINE:  INDIAN                                            SERVINGS: 6
     AUTHOR: Rajni Ram


    Ingredients:

    Besan 1 cup

    Water 3 cups approx  added in parts

     Salt as required

    Turmeric powder 1 tsp divided

    Red chilli powder 1 tsp

    Mustard seeds 1 tsp

    Chana dal 1 tsp

     Urad dal 1tsp

    Onion 1 large finely chopped 

    Ginger 1 inch piece finely chopped 

    Green chillies 2 finely chopped 

    Curry leaves a few

     Asafoetida 1/2 tsp

    Green peas ( optional) if using per cook.

    Oil for tempering 


Directions: In a bowl take besan, add 1 cup water to it and form a lump free paste. To this add, salt, red chilli powder, turmeric powder and set aside. Now take oil in a kadai or pan and heat. First add the mustard seeds, Chana dal and urad dal. When the mustard seeds splutter add 1/2 tsp turmeric powder, followed by chopped onions, green chilli, ginger and curry leaves. Fry these nicely until the onions start browning a bit. Add the green peas if using now.  Now give the Besan paste in the bowl a mix and slowly pour it into the kadai with tempering. This should be done while stirring continuously. Pour one more cup water and stir constantly so that no lumps are formed. Stir over low fire, this will ensure the besan cooks well and does not have a raw taste. Now check for salt and spices and adjust if required. If the besan still has a raw taste, pour another half cup water and stir until the raw taste is gone. You can customise the consistency as per your requirement. Squeeze a lemon if you like( this is totally optional). Enjoy the chutney while hot with Idli, Dosa, Rotis, Puri and more.


STEPWISE RECIPE FOLLOWS:

1. In a bowl take besan, add 1 cup water to it and form a lump free paste. To this add, salt, red chilli powder, turmeric powder and set aside.


2. Now take oil in a kadai or pan and heat. First add the mustard seeds, Chana dal and urad dal. When the mustard seeds splutter add 1/2 tsp turmeric powder, followed by chopped onions, green chilli, ginger and curry leaves. Fry these nicely until the onions start browning a bit. Add the green peas if using now.


3. Now give the Besan paste in the bowl a mix and slowly pour it into the kadai with tempering. This should be done while stirring continuously. Pour one more cup water and stir constantly so that no lumps are formed. Stir over low fire, this will ensure the besan cooks well and does not have a raw taste.


4. Now check for salt and spices and adjust if required. If the besan still has a raw taste, pour another half cup water and stir until the raw taste is gone. You can customise the consistency as per your requirement. Squeeze a lemon if you like( this is totally optional). Enjoy the chutney while hot with Idli, Dosa, Rotis, Puri and more.


NOTES:

1. This tastes best when the Besan is fully cooked. When nicely cooked the besan becomes duller in appearance.

2. Veggies like capsicum and carrot can also be added to the recipe along with peas.

3.  I have kept the consistency thick, it was be diluted by adding 1/4 cup warm water if you prefer.

4. Cooking the besan paste on low flame ensures perfection of taste and flavour.


If you tried this recipe and liked it please comment below. I would love to hear from you. If you have a query about the recipe email us and ill respond as soon as I can.

If you would like to receive our recipes on your mail please leave your mail id at the homepage. Every time Rajjo's Kitchen has a new post we will mail the recipe to you.


Monday, 10 May 2021

WHOLE WHEAT BLUEBERRY MUFFINS

If you haven't realised until now, I am a huge berry fan. Whatever the berry, I will think of a dessert to make. The berry recipes in this blog are proof for it. Berries not only provide our body with antioxidants, but also with micro nutrients, which are essential for a healthy body. so whenever you find berries include them in smoothies, pan cakes, lassi, compote, Jams and more...

This time they had to be muffins as they can be picked off a box and popped in when hungry😀. They stay good in the refrigerator for upto a month. They are easy to pack up on a picnic, road trip and even for hostelers. These are the moistest cup cakes you will find and using good quality berries really enhances the flavour of the cake. I have used dried Blue berries, fresh ones can be used too. 

As I say in all my cake recipes, this too is a single bowl recipe, where you mix dry and wet ingredients in one bowl, line up your muffin tins and bake away.

While you are here check out my other very berry desserts like Blueberry Cheesecake, Berry Smoothie Ice cream, Strawberry and Lemon loaf, Easy 2 way muffins, and more...


Here is the recipe for Whole Wheat Blueberry muffins for you-


     PREP TIME: 10 Mins                                         COOK TIME: 35 Mins
     TOTAL TIME: 45 Mins                                        COURSE:  DESSERT
     CUISINE:  WORLD FOOD                                 SERVINGS: 6
     AUTHOR: Rajni Ram


    Ingredients:

    Whole wheat flour/ Multigrain flour 2.25 cups

    Sugar 1 cup 

    Baking powder 3 tsp

    Baking soda 1 tsp

    Salt 2 pinches

    Eggs 2

    Butter 60 gms

    Oil 4 tbsp

    Buttermilk 1 cup

    Vanilla essence 2 to 3 drops

    Blueberries 100 gms


Directions: Firstly put the oven to preheat at 200 C. Now in a bowl mix all the dry ingredients- wheat flour, sugar, baking powder, baking soda and salt. In a larger bowl mix all wet ingredients- butter, eggs, oil, and vanilla essence. Do not mix in the buttermilk and blueberries now. Now slowly add the dry ingredients into the wet ingredients and stir. Stir in circular motion. The wet ingredients will absorb the flour and turn dry. Now add the buttermilk, a little at a time and stir gently. Take care not to over stir. Finally add the Blueberries and give a gentle stir. Now the batter is ready to fill into the muffin tin/cup cake moulds. Bake at 190 C for 15 minutes. Check for doneness by inserting a toothpick in the centre. If a little wet, then bake another 2 minutes. Enjoy the healthy goodness. Serve when warm.


STEPWISE RECIPE FOLLOWS:

1.  Firstly put the oven to preheat at 200 C. Now in a bowl mix all the dry ingredients- wheat flour, sugar, baking powder, baking soda and salt. 


2. In a larger bowl mix all wet ingredients- butter, eggs, oil, and vanilla essence. Do not mix in the buttermilk and blueberries now.


3. Now slowly add the dry ingredients into the wet ingredients and stir. Stir in circular motion. The wet ingredients will absorb the flour and turn dry. Now add the buttermilk, a little at a time and stir gently. Take care not to over stir.


4. Finally add the Blueberries and give a gentle stir. Now the batter is ready to fill into the muffin tin/cup cake mould. Bake at 190 C for 15 minutes. Check for doneness by inserting a toothpick in the centre. If a little wet, then bake another 2 minutes. Enjoy the healthy goodness. Serve when warm.


NOTES:

1. These cup cakes can be made with any berry.

2. If fresh ones are not available use the dry ones like I have here. If using frozen, then use them directly from the freezer without thawing.

3. You must have noticed that in this recipe I have used both butter and oil. This is to get the super moist texture. If you do not wish to use butter, then use 1/2 cup oil.

4. Since oven settings are different for different oven, start checking for doneness from 13 minutes onward.

5. Whole wheat flour can be substituted with multigrain flour or refined flour if you prefer.


Friday, 7 May 2021

BROCCOLI AND ZUCCHINI FRITTERS WITH HUNG CURD DIP

 A combination of Zucchini and Broccoli is a match made in heaven. These two have been used in many dishes from Pastas, Pizzas, Salads and fritters.

The current recipe is of fritters, which are very melt in the mouth and bursting with flavours. Usually fritters have egg added to the batter, but these are eggless fritters. They need not be deep fried at all, but just grilled on the Tava, which makes them healthy too. I had some leftover rice and added it to the batter to make them chunky and give a slightly crisp exterior, whereas the insides are soft.

The hung curd dip goes extremely well with these fritters and is so simple to put together. The fritters and dip are a combination that can be served as snack or starters.

While you are here check out other snack recipes on the blog like- Easy Corn Fritters, Medu Vada, Milagu Vadai/Pepper Vadai, Patra, Easy 2 way Muffins, Mirchi Bajji, and more...


Here is the recipe of Broccoli and Zucchini fritters with Hung Curd Dip-

PREP TIME: 10 Mins                                      COOK TIME: 15 Mins
 TOTAL TIME:30 Mins                                    COURSE:  SNACK
 CUISINE:WORLD                                         SERVINGS: 12 NOS   
 AUTHOR: RAJNI RAM                                      


    Ingredients for Fritters:

    Broccoli 1 small head or half of big one
    Zucchini 1 medium size (grated)
    Leftover rice 1/2 cup
    Parmesan cheese grated 2 tbsp  (optional)
    Chick pea flour/besan 1/2 cup
    Green chillies 2 chopped finely
    Red chilli powder 1 tsp
    Salt as required 
    Coriander powder 1 tsp
    Fennel powder 1 tsp
    cumin powder 1 tsp
    Turmeric powder 1/2 tsp

    Ingredients for Hung Curd Dip:

    Curd 2 cups
    Cucumber 1/2 of small finely chopped
    Onion 1/2 of small one
    Red bell pepper a small piece chopped finely
    Fresh coriander leaves chopped finely
    Salt as required
    Pepper powder 2 pinches

    Directions for Hung Curd Dip:
Take a clean cotton cloth/ Muslin cloth and tie up the curd in it with a vessel at the bottom to collect the water. Leave it undisturbed for an hour or so.  Alternately, put the curd in a double sieve and leave it for an hour, for the excess water to drain away. After an hour, put the thick curd into a bowl and add all the ingredients mentioned under "ingredients for curd dip", and give it a gentle mix. Put it in the fridge until ready to serve.

    Directions for the Fritters:

Put the chopped Broccoli in a bowl, pour hot water over it and keep it covered for 15 minutes. After 15 minutes, drain water and cool the broccoli. Now put the Broccoli in the blender jar and give it a single pulse, such that it becomes a mince. See picture. Now take the left over rice in a bowl and mash it well. To the rice, add the minced broccoli, grated Zucchini, chopped green chilli, salt, red chilli powder, coriander powder, fennel powder, cumin powder, and mix well. Now add Parmesan cheese(optional) and the Besan/chickpea flour and mix well. For the best result, leave this mixture in the fridge for 30 minutes. After 30 minutes, start shaping the mixture into tikkis/pattice and grill them on a girdle/tawa. The healthy fritters are ready to serve.


    STEPWISE RECIPE FOLLOWS:

1. Put the chopped Broccoli in a bowl, pour hot water over it and keep it covered for 15 minutes. After 15 minutes, drain water and cool the broccoli. Now put the Broccoli in the blender jar and give it a single pulse, such that it becomes a mince. See picture.


2. Now take the left over rice in a bowl and mash it well. To the rice, add the minced broccoli, grated Zucchini, chopped green chilli, salt, red chilli powder, coriander powder, fennel powder, cumin powder, and mix well.


3. Now add Parmesan cheese(optional) and the Besan/chickpea flour and mix well. For the best result, leave this mixture in the fridge for 30 minutes. After 30 minutes, start shaping the mixture into tikkis/pattice and grill them on a girdle/tawa. The healthy fritters are ready to serve.


    NOTES:
1. Usually fritters make use of egg. In this recipe I have swapped the egg with chickpea flour/Besan. Therefore, I recommend putting the batter into the fridge for 30 minutes, so that the fritters can be shaped easily.
2. Using Parmesan Cheese(or any cheese) is optional, but I recommend it for that extra punch.
3. The same mixture can be done with egg also. In that case, do not use the chickpea flour and use just 1 egg instead.
4. I have not tried this recipe with flax egg, so I cannot recommend it right now.
5. There is no stepwise recipe for the hung curd dip, as it is pretty simple.


If you tried this recipe and liked it please comment below. I would love to hear from you. If you have a query about the recipe email us and ill respond as soon as I can.

If you would like to receive our recipes on your mail please leave your mail id at the homepage. Every time Rajjo's Kitchen has a new post we will mail the recipe to you.


Sunday, 2 May 2021

MOONG DAL HALWA

Moong dal Halwa is an Indian dessert made from yellow lentils. It is basically a fudge and is very rich because of the amount ghee/ clarified butter added to it. Though I make many sweet varieties and desserts, I’m not generally the one who will stay until dessert. I’m immensely intuitive while I create sweet dishes, but I don’t crave sweets much. But this halwa is very close to my heart because it probably is the first sweet dish I ever liked. Thanks to our stint in Delhi, I have got to taste the best ones.

Infact, I liked this sweet dish so much that I have attempted to make it in the past, failed miserably and had given up on ever trying it again. But last year during the pandemic lockdown I was craving it badly, and as you know “ when you want something very badly, the universe conspires to make it happen” 😄. So I had a viola moment during Diwali,  while I was documenting the sweets and savoury prepared by me, when a simple method to make this halwa struck m

If you have attempted making this halwa any time or have searched the net for the recipe, all of them will tell you it takes 3 to 4 hours to get this sweet dish done. The actual recipe asks to soak and grind the lentils and them cook it in milk/ water and then add the sweetening agent. As I have claimed here on the blog before, I will take a short cut as long as it does not alter the taste, flavour and texture of the dish. And I took a short cut to this recipe and I don’t regret it because the outcome was just like the original. 

If you follow the procedure as given here by me without altering I’m sure it’s a no fail recipe. And why stand by the stove for hours when you can get the same taste and flavour in an hour's time? Having failed at this recipe many times, and knowing what went wrong each time, this time the recipe was made with so much conviction of technique that it turned out wonderfully. 

While you are here do check out other dessert recipes like Carrot kheer, Strawberry and Lemon loaf, Red Poha Ladoo, Shrikhand, Malpua with Gulab Jamun mix, Akkaravadisal, Sweet Poha, and more...

Here is the recipe of Moong Dal Halwa-


      PREP TIME: 10 Mins                                      COOK TIME: 50 Mins
     TOTAL TIME: 60 Mins                                      COURSE:  DESSERT
     CUISINE:  INDIAN                                            SERVINGS: 6
     AUTHOR: Rajni Ram


    Ingredients:

    Moong dal split ( yellow lentils) 1 cup

    Milk 1 cup

    Water 2 cups

    Sugar 1 cup

    Saffron strands a few (optional)

    Yellow food colour/turmeric powder for colour 2 pinches

    Ghee 100 GM approx

    Cardamom/ Elaichi powder 1/4 tsp

    Almonds and Pistachio chopped a few


    Directions:

The foremost and important step is dry roasting the dal to a light brown colour. This has to be done patiently on low heat. On this depends the entire recipe. First put a pan/ kadai on flame and warm it. Now put the dal and start the roasting procedure by stirring constantly. This step can be done ahead. Cool the roasted dal and grind it in a blender. For a smooth texture of halwa grind it finely, for a grainy texture grind it coarse. Whole dal should not be visible. Now put this ground dal powder in a pan, add one cup milk, followed by 2 cups water, and stir to make it lump free. Now put the pan on the flame, add the food colour/turmeric powder, and start cooking the mixture on medium flame. Slowly the mixture will start thickening. If adding saffron strands, add now. Keep stirring gently, scraping the sides of the pan from time to time. Once the mixture thickens, check if there is any rawness in the smell. That is, if the dal smell/ taste is still coming. If yes, add another ladle of milk and continue to stir again. If your mixture has thickened and there is no raw smell or taste, add the sugar gently and start stirring again. As the sugar melts the dal mixture will liquefy. Don’t worry and continue to stir. The mixture will start thickening again. Now is the time to start pouring the ghee. Pour one ladle at a time and stir until the ghee is absorbed. Continue this process until no more ghee gets absorbed, but remains on the halwa. You will also notice that at this stage your mixture/ halwa no longer sticks to the pan/ kadai bottom, but comes out clean while stirring. Another way to tell the Halwa is done, is when you take a little of it in your fingers and try to form a ball, you should be able to do it. Add the cardamom powder and nuts and transfer the halwa to a container.  The delicious Moong dal halwa is ready to relish .


    STEPWISE RECIPE FOLLOWS:

1. First out a pan/ kadai on flame and warm it. Now put the dal and start the roasting procedure by stirring constantly. This step can be done ahead. Cool the roasted dal and grind it in a blender. For a smooth texture of halwa grind it finely, for a grainy texture grind it coarse. 


2. Now put this ground dal powder in a pan, add one cup milk, followed by 2 cups water, and stir to make it lump free. Now put the pan on the flame, add the food colour/turmeric powder, and start cooking the mixture on medium flame.


3. Slowly the mixture will start thickening. Keep stirring gently, scraping the sides of the pan from time to time. If adding saffron strands, add now. Once the mixture thickens, check if there is any rawness in the smell. That is, if the dal smell/ taste is still coming. If yes, add another ladle of milk and continue to stir again. If your mixture has thickened and there is no raw smell or taste, add the sugar gently and start stirring again.


4. As the sugar melts the dal mixture will liquefy. Don’t worry and continue to stir. The mixture will start thickening again. Now is the time to start pouring the ghee. Pour one ladle at a time and stir until the ghee is absorbed. Continue this process until no more ghee gets absorbed, but remains on the halwa. 


5. You will also notice that at this stage your mixture/ halwa no longer sticks to the pan/ kadai bottom, but comes out clean while stirring. Another way to tell the Halwa is done, is when you take a little of it in your fingers and try to form a ball, you should be able to do it. Add the cardamom powder and nuts and transfer the halwa to a container. The delicious Moong dal halwa is ready to relish .


    NOTES:

1. The foremost and important step is dry roasting the dal to a light brown colour. This has to be done patiently on low heat. On this depends the entire recipe.
2. Ensure the Kadai is warm before you put in the dal for roasting. This way the Dal will get roasted evenly and quickly.
3. I like a grainy texture, so while grinding, I stopped just before super fine.
4. Adding more ghee than required will subdue the taste of the dal. When the dal mixture no longer takes in the ghee, as soon as poured and stirred, stop adding any more ghee.
5. I used a non stick pan for making the Halwa and recommend the same for now. I will soon be trying in a regular kadai and shall update the recipe then.
6. I have kept my Halwa colour yellow, by frying it to a light brown and then adding turmeric powder(which is a natural colour). If you prefer a browner version, roast the dal to a deeper brown and proceed with the recipe. 
7. I have used turmeric powder instead of food colour, as it is natural and two pinches of it do not make a difference to the taste of the halwa.


If you tried this recipe and liked it please comment below. I would love to hear from you. If you have a query about the recipe email us and ill respond as soon as I can.

If you would like to receive our recipes on your mail please leave your mail id at the homepage. Every time Rajjo's Kitchen has a new post we will mail the recipe to you.


Friday, 30 April 2021

WATERMELON RIND KOOTU / WATERMELON RIND LENTIL CURRY

 In south India, especially the Tamilnadu region, Kootu refers to any lentil based curry. There are many versions of Kootu cooked with a variety of lentils. Some are tamarind based(puli kootu), some milk based(pal kootu), some with spices and coconut gratings(poricha kootu).

This Watermelon rind kootu came about when I saw an contest alert in one of my social media pages, asking to contribute recipes towards sustainable living. Traditionally, India is a country where we have had the practice of using things without wasting them. This tradition lost its value with globalization , and the  "use and throw" phase. Now in the millennium as the world faces so many issues, "sustainable living" has become the mantra. 

In my house, I have seen my grand mother and mother use the peel of many vegetables like Ridge gourd, Bitter gourd etc to make chutneys. And we prepare Kootu using vegetables from the Cucumber familiy like, Ash Gourd, Pumpkin, Country Cucumber etc. As Watermelon also belongs to this family, I thought, why not give it a try, and believe me this kootu turned out so delicious.

So, I no more waste the rind of the Watermelon. I use it to make this Kootu, grind the rind and add it to Dosa batter, and also grind the rind into a chutney. 

While you are here check out other recipes here like, Menthiya Keerai Kootu, Vatha Kuzhambu, Bonda Morkuzhambu, Dosakaya Chutney, Pachai Mochai Kuzhambu and more...

Here is the recipe for Watermelon rind Kootu --


  PREP TIME: 15                                       COOK TIME: 15 Mins
 TOTAL TIME:30 Mins                                COURSE:  MAIN
 CUISINE: SOUTH INDIAN                        SERVINGS: 6
 AUTHOR: Rajni Ram


    Ingredients:

    Watermelon rind of half a watermelon, cut into cubes

    Moong dal (yellow split dal) 1/2 cup cooked soft in pressure cooker

    Green Chilli 1 split

    Turmeric powder 1/2 tsp

    Coconut gratings 1 tbsp

    Dry red chillies 2

    Peppercorns 4-5

    Cumin seeds 1 tsp

    Salt as required

    For tempering:

    Oil 2 tsp (coconut/ refined oil)

    Mustard seeds 1/2 tsp

    Urad dal 1 tsp

    Chana dal 1 tsp

    Curry leaves a few

    Dry red chilli broken 1

    Asafoetida 1/4 tsp


    Directions:

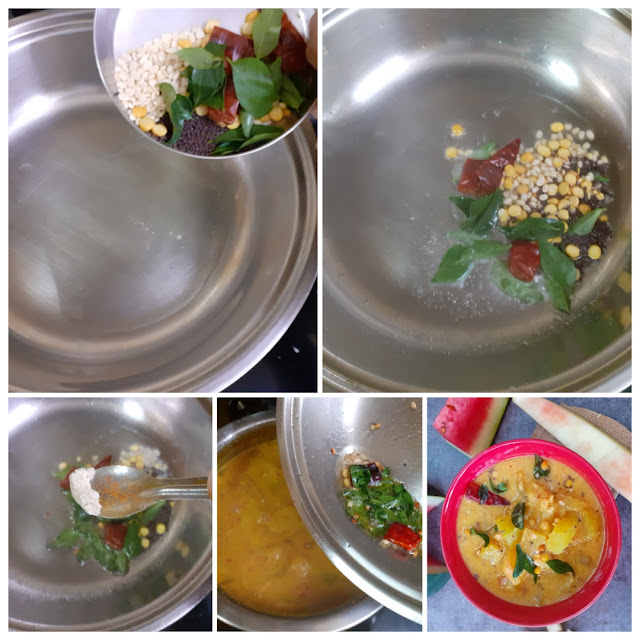
Pressure cook the Moong dal for 4 whistles, and keep aside. After using up the pulp of watermelon, remove/peel the dark green skin and discard. Cube the lighter portion as shown in the picture. Put the cubed rind pieces in a vessel, add the split green chilli, salt, and turmeric powder, pour water(about 1.5 cups), and cook the water melon rind until soft, but not mushy. Now in a blender add the coconut gratings, peppercorns, dry red chilli, and cumin seeds and grind to a smooth paste adding little water. Pour this paste into the cook watermelon rind and bring to a boil. Now, nicely mash the cooked dal with the back of a ladle and pour it into the vessel having watermelon rind and coconut paste. Stir nicely to mix the spices evenly. Cook for 2 minutes on low flames and put off the flame. Now in a tadka/tempering kadai take oil and heat. Add mustard seeds and remaining ingredients mentioned under tempering and fry for 30 seconds. Pour this tempering into the cook rind and dal mixture. The healthy and delicious Watermelon rind kootu is ready. This can be served with rice or Rotis. 


    STEPWISE RECIPE FOLLOWS:

1. Pressure cook the Moong dal for 4 whistles, and keep aside. After using up the pulp of watermelon, remove/peel the dark green skin and discard. Cube the lighter portion as shown in the picture. Put the cubed rind pieces in a vessel, add the split green chilli, salt, and turmeric powder, pour water(about 1.5 cups), and cook the water melon rind until soft, but not mushy.


2. Now in a blender add the coconut gratings, peppercorns, dry red chilli, and cumin seeds and grind to a smooth paste adding little water. Pour this paste into the cook watermelon rind and bring to a boil. 


3. Now, nicely mash the cooked dal with the back of a ladle and pour it into the vessel having watermelon rind and coconut paste. Stir nicely to mix the spices evenly. Cook for 2 minutes on low flames and put off the flame.


4. Now in a tadka/tempering kadai take oil and heat. Add mustard seeds and remaining ingredients mentioned under tempering and fry for 30 seconds. Pour this tempering into the cook rind and dal mixture. The healthy and delicious Watermelon rind kootu is ready.


    NOTES:

1. This Kootu can be made with most vegetables like Snake gourd, Ash gourd, Cabbage, Bottle gourd and more. 

2. If one prefers the taste of pepper, more can be added while grinding.

3. Tempering in coconut oil works best, but vegetable oil can also be used.


TOFU AND STIR FRIED VEGETABLES IN HOT SCHEZWAN SAUCE

  Any Tofu lovers? I agree its an acquired taste,but going by the health benefits it has to offer, I try including it in my diet now and the...