Vegetarian cooking blog

Thursday, 23 July 2020

NUTELLA FUDGE BROWNIES

 Well, this is one of those recipes where the intent was to make the Brownies a   certain way, ended up forgetting an ingredient and remembered it only after tossing the batter in the oven, and waited out the bake time to find out the result of my blunder, and guess what, forgetting the ingredient was well worth it as I   stumbled on to something so so yummy😊. I found it blog-worthy and hence the post.

 There are many Brownie recipes and various proportions out there if you browse,   but what one actually wants is an easy one, which is non-messy and not much washing up to do later. Agree? This is one of those recipes where I combine everything in a single bowl, stir or whisk with a hand whisk(no electric mixer mind you), pour it into the baking tray and pop it in the oven. Wait 27 to 30   minutes and there you get a platter of such gooey goodness. 
 All that fudge came from bits of chocolate I threw into the batter, before popping it into the oven. The chocolate bits melt and make it fudgy. I prefer a fudgy moist   Brownie to a cakey one, and a warm Brownie is always welcome. This recipe takes about 12 minutes to prep and around 27 to 30 minutes in the oven and its done.
  Another recommendation is to use dark eating chocolate and not baking ones.
  I leave you all to guess what ingredient did I miss out?😀 
  While you are here please check out my other dessert recipes like 

Here is the recipe of Nutella Fudge Brownie for you--


      PREP TIME: 15 Mins                                          COOK TIME: 30 Mins
     TOTAL TIME: 45Mins                                           COURSE:  DESSERT
     CUISINE:  WORLD FOOD                                    SERVINGS: 5
     AUTHOR: Rajni Ram

Ingredients:

Dark choco chips 50 gm
Nutella 150 gm
Unsalted butter 200 gm chopped
Refined flour/Maida 3/4 cup
Eggs 3
Brown sugar 1 cup loosely packed
Vanilla essence 1/2 tsp
Dark chocolate 50 gm chopped

Directions:
In a deep heat resistant dish put in the choco chips, the Nutella and the butter and microwave in short spurts of 30 seconds each removing the dish and stirring each time until the butter and chocolate melt completely and you have a smooth mixture. It takes around 3 rounds of 30 seconds for the chocolate and butter to melt. Preheat the oven to 160 degrees. Now while the mixture is still warm put in the sugar and stir. Now add in the eggs one by one and stir nicely until they are well combined. Next comes the flour, put it in, and combine nicely without any lumps. Add the vanilla essence, followed by the chopped dark chocolate. Stir very lightly, grease a baking tray/Brownie tin, and pour the batter into it. Give 2 taps lightly to the tray and put it in the oven. Bake at 180 degrees for 27 minutes. Stick a toothpick in the center of the brownie and check for doneness. If it comes out with a little smear of the chocolate, it is fudgy enough. If there is too much smear on the toothpick then bake for another  3 to 5 minutes and don't go beyond that.
Let it cool completely, cut into bars or squares, and devour them. Yummy Nutella fudge Brownies are ready. Enjoy them warm. Bon Appetit.  

STEPWISE RECIPE FOLLOWS:
1. Assemble all ingredients.

2. In a deep heat resistant dish put in the dark chocolate chips, Nutella and the butter. Place it in the microwave for 30 seconds, remove stir and place it again for 30 seconds and repeat the process once more. In all 3 times to get a smooth mixture. Every time you remove it from the microwave be sure to stir. Once this is done, start preheating the oven. Preheat to 160 degrees.

3. Now while the mixture is still warm add the sugar and stir nicely until it dissolves.


4. Add the eggs and combine well with a whisk or spatula. Now slowly add in the flour and combine well to form a smooth batter.


5. Now add the vanilla essence followed by the chopped chocolate(use any dark eating chocolate and not the baking one). Grease a baking tray or Brownie tin and pour the batter in. Tap it lightly twice and place it in the oven and bake at 180 degrees for 27 minutes. 
when you stick n a toothpick it should come out with a slight smear. That's the consistency we want. If there is a lot of smear bake for another 3 minutes or so.


NOTES:
1. Dark chocolate works best for this recipe. Buy good quality ones for best results.
2. In case you go beyond 27 minutes, don't worry, it may a little less fudgy that's all.
3. As soon as microwaving the chocolate and butter mixture is done, remember to preheat the oven.
4. If not using a microwave melting of butter and chocolate has to be done in a double boiler.
5. Adding the sugar when the butter-chocolate mixture is still warm is what gives the brownie its paper-thin crust and glaze. This is a crucial step.

if you tried this recipe and liked it please comment below. I would love to hear from you.


MOONG DAL KACHORI(KHASTA KACHORI)

Kachori is a savory snack with stuffing that has lip-smacking flavours. It is a very popular dish in North India.  It can be served as it is with green chutney or can be made into a chaat and served topped with curd, green and sweet chutney and some crisps.
The Kachori has many variants of stuffing the outer cover remaining the same. Khasta Kachori, Aloo Kachori, Pyaaz Kachori, Matar Kachori, and Mawa Kachori are some of its variants. 
I have made Khasta Kachori with Moong dal stuffing. It can be made with an Urad dal stuffing too and some use a combination of both Urad and Moong dals to make this kachori.
 I have used only Moong dal as I  like the texture of this stuffing and find this tastier.  A perfect Kachori is one which is crisp and flaky on the outside and well puffed and hollow on the inside and with the stuffing stuck to the crust.
In some regions, the Kachori is served with an Aloo subji, like I did today. Kachoris keep well up to 4 to 5 days if kept in an airtight container. I have wanted to make these Kachoris for a long time now and as dal Kachoris are my favorite,  decided to start with them.  
Whenever we visit Jaipur there is a particular sweet shop we visit and no one makes Kachoris as good as them. Tried recreating the magic, as creating the perfect crust and flakiness is a truly technical job, and believe me, it improves with practice because then you start understanding how each element behaves.
While you are here please check out my other snack recipes like------
Here is the recipe of Moong dal Kachori for you--


     PREP TIME: 20 Mins(1 hr soaking)                    COOK TIME: 40 Mins
     TOTAL TIME: 40Mins                                         COURSE:  SNACK
     CUISINE:  NORTH INDIAN                               SERVINGS: 6(12 Pcs)
     AUTHOR: Rajni Ram

     Ingredients for Dough:
     Maida/ refined flour 1.5 cups
     Butter/ghee 3 tbsp 
    Salt 1/4 tsp
    Baking powder 1/2 tsp
    Lemon juice 1 tsp 
    Coldwater(refrigerated) as required
    Oil for frying

    Ingredients for Stuffing:
    Moong dal 1 cup soaked for 1 hr
    Salt as per taste
    Coriander powder/dhania powder 2 tsp
    Red chilli powder 1.5 tsp
    Fennel Powder/Saunf powder 1 tsp
    Tamarind paste 1 tbsp
    Jaggery 1/2 tsp
    Asafoetida 1 tsp
    Jeera powder 1/2 tsp
    Mustard seeds 1 tsp
    Cumin seeds 1 tsp
    Ginger 1 inch finely chopped
    Oil 1 tbsp
    Coriander leaves finely chopped 1 tbsp
    Oil for frying

   Directions for dough:
 Take the Maida/ refined flour in a dish and add the salt, pour the butter/ghee and mix well. When you take the flour and close it in your fist, it should hold shape without breaking. Now start adding the water little by little and combining to form the dough. Form a Roti kind of dough, not very stiff. Cover and let it rest for a minimum of 15 minutes.

   Directions for stuffing:
 Drain all water from the soaked moon dal and put it ina blender. Give it 2 small spins in the mixer so that it forms a coarse mixture. Take oil in a Karahi and put in the mustard seeds and the cumin seeds, as they crackle add the ginger and fry.   Now add all the spice powder to the oil and fry for 30 seconds. keep stirring, they should not burn. Ensure there is sufficient oil for frying the masalas. Now add the coarse moong dal mixture to the oil and mix well. Add the tamarind paste and   Jaggery. Keep mixing until the masalas have evenly mixed with the dal stuffing.   Remove from flame and cool.

   Directions for Kachori:
 Pinch the dough into small balls. This quantity will yield around 12 balls. Now take one ball at a time, dust with some flour and roll it into a small Puri. Put in a   little of the stuffing in the center of the ball, you can also make small balls of the stuffing and keep ready if that's convenient. Now bring together the edges of the rolled puri and seal nicely. remove excess flour and seal well. After sealing the roll out the stuffed ball into a small puri and deep fry in oil that is heated to a  medium-high. Fry until nicely browned and remove from oil. Kachoris should be fried in medium heated oil for best results, only then will they turn crisp and flaky.  The Khasta Kachori is ready to serve.

   Serving suggestions:
 Serve with sweet and green chutney, or with Aloo Rassedar subzi, or as chaat with sweetened curd and combination of chutney and Sev. Kachoris can be relished just by themselves too and can be stored in an airtight container for 4 to 5   days. Enjoy. Bon Appetit.

   STEPWISE RECIPE FOLLOWS:
  1. Assemble all ingredients. Soak Moong dal for 1 hour.

   2. For the dough--take the Maida, salt, baking powder and ghee in a dish and combine well. When you clump the mixture in your fist, it shouldn't break. Now add cold water little by little and knead to form a dough. Leave to rest for 15     minutes.

  3. For the stuffing -- drain all water from the Moong dal and put it in a blender along with some salt and grind coarse such that some dals are whole.  

  4. Take oil in a pan and add the mustard and cumin seeds, add the chopped ginger followed by all dry masalas. Fry the masalas in oil for 30 seconds. Now add the ground Dal and mix nicely such that the masala coats the dal mixture, now add the tamarind pulp, jaggery and cook for 2 minutes. Any moisture in the mixture should evaporate. leave the mixture to cool.

 5. To form the Kachoris knead the dough again and pinch small portions and make small balls of them. Take one ball at a time and dust with some flour and roll it into a small puri. Put the filling in the center and bring the edges together and seal well. Roll out the puris a little thick with put much pressure or the covering may break in oil spreading the stuffing in the oil. Repeat for all balls likewise and keep aside.


  6. Now heat oil for frying the kachoris. The oil should be medium hot. Take one flattened puri at a time and drop it in the oil gently. fry in low- medium heat until the Kachoris puff up, turn crisp and brown. Remove from oil and drain on absorbent paper. The hot Kachoris are ready to serve. 


   NOTE:
  1. Use cold water to knead the dough, it results in a nice flaky crust.
  2. The ghee for the dough can also be heated and poured into the flour before kneading as it gives a crunchy crust. Be sure to allow the oil to become warm before you knead or you might burn your hand.
  3. The temperature of the oil is very important as very hot oil will result in soft crust. Low to medium oil gives a crunchy crust. To test the oil, drop a small bead sized ball of flour in the oil. It should sizzle but not rise on top immediately. This is the right temperature for the oil.
  4. If you wish you can shape the stuffing into small balls too for filling, so that it is not messy or if you are comfortable;le using a spoon to fill that is fine too. 

  If you tried this recipe and liked it please comment below. I would love to hear from you.


Wednesday, 22 July 2020

RASAM POWDER

Rasam South India’s most popular food often served with rice, had as a soup or beverage, or also served as a welcome drink in some restaurants, is one most the simple preparations. Comes to the rescue when one has a Cold as the pepper in the Rasam powder gives relief from the symptoms.
Talking about rasam powder, it is, in fact, the one that gives the Rasam its flavour. In South India, every household has its own recipe of the Rasam powder which is passed on sometimes from generation to generation. Just 5 everyday ingredients make this powder so rich in flavour and it is the proportion of these ingredients that matters the most. 
I am sharing with you my version of the Rasam powder and can assure you that it makes a really good pot of Rasam. While you are here please check out my recipes of Pineapple Rasam and Vetrilai/Betel Leaf Rasam. I will shortly add different variations of the Rasam too for which this powder is the same. 
Here is the recipe  of Rasam Powder--


PREP TIME: 5Mins                                      COOK TIME: 25Mins
TOTAL TIME: 30 Mins                                COURSE:  MAIN 
CUISINE: SOUTH INDIAN                        QUANTITY: 250 GM APPROX
AUTHOR: Rajni Ram


Ingredients:
Dhania seeds/Coriander seeds 1 cup ( approx 150-200gm)
Jeera/Cumin seeds 1 tbsp 
Peppercorns 1 -1.5 tbsp
Tuvar dal 1 tbsp
Dry Red chillies 10
Asafoetida 2 tsp
Curry leaves 3 sprigs( leaves separated)


Directions:
Dry roast the Dhania, Tuvar dal and Jeera separately in a karahi until light brown.
Dry roast the peppercorns until a few start popping. Dry roast the dry red chillies until they become crisp, take care not to burn them. Cool all roasted ingredients and transfer to a blender. Add the asafoetida to this and grind them to a fine powder. The curry leaves must be washed and dried and should have no moisture. After roasting all other ingredients put off the flame and put washed and dried curry leaves into the Kadai and roast it for a few minutes. Add this to the ground powder. Cool the powder and bottle it in an airtight container. This quantity yields about 200 to 250 gms of powder.


NOTES:
I am not giving step by step photos for this recipe as the steps are quite easy to follow.
1. Wash and dry the curry leaves quiet in advance as they should not retain any moisture.
2. Dry roasting to be done on low flame only and keep stirring constantly so that there is even roasting.

VETRILAI RASAM/BETLE LEAF RASAM


Rasam is a popular South Indian dish prepared with tamarind, tomatoes, and Rasam powder. There are many variations of this dish, and each South Indian household has its own recipe for the proportions of the ingredients of the rasam powder. Therefore though Rasam is almost a regular feature in all South Indian households its taste is unique to each. No two Rasam recipes taste the same. Rasam is also a sought after comfort food in South Indian households when one has a Cold(Common Cold) or is a little under the weather because it is made of simple ingredients that are easily digestible and pepper that helps in combating the cold. 

Earlier the Rasam was an everyday feature in most South Indian households along with Sambar or Vatha Kozhambu or Moru Kozhambu and a part of the Main course. Some households follow it to this day, but as the eating patterns of people has changed and is now more global the humble Rasam has taken a back seat or is made on a festival day where there is a feast(Elai Sapadu) or sometimes is also being served as a soup in elite gatherings.

There are different types of Rasam Like the Pepper Rasam, Tomato Rasam, Lemon Rasam, Garlic Rasam, Neem Flower (Vepampoo) Rasam, Drumstick Rasam, Pineapple Rasam and the Vetrilai(Betel leaf) Rasam. I have already posted the recipe of pineapple Rasam and slowly over a period of time plan to cover all the Rasam varieties mentioned here. 

The Vetrilai also called Vethalai Rasam is has Betel leaves, Tomatoes, and the Rasam Powder as the main ingredients. This Rasam is a very mildly flavoured rasam. For more intense flavour add more Betel leaves. I am posting the recipe of the Rasam powder as the powder used makes a great impact on the flavour of the Rasam. This is also the reason why I said that the Rasam of no two households tastes the same as each has its own proportion. That said Rasam in any form is Comfort food😊.

While you are here please check out the recipe of Pineapple Rasam.
Here is the recipe of Vetrilai Rasam for you--


PREP TIME: 10 Mins                                          COOK TIME: 20 Mins
TOTAL TIME: 30 Mins                                      COURSE:  MAIN / APPETISER
CUISINE: SOUTH INDIAN                               SERVINGS: 4
                                                                              AUTHOR: Rajni Ram

Ingredients:

Betel leaves/Vetrilai 10-12 leaves(refer note 1)
Tomatoes 5 (note 3)
Tuvar dal/ Yellow lentils 1/4 cup cooked in a pressure cooker
Rasam powder 3 tsp
Green chilli 1
Lemon 1
Coriander leaves finely chopped
Garlic(optional) (refer note 2)
Asafoetida 1 tsp (split 1/2 while boiling and 1/2 for tempering)
Turmeric powder 1 tsp
Salt as per taste
Roasted Pepper & Cumin powder 1 tsp( dry roast in the ratio 2:1 and grind coarse)

Directions:
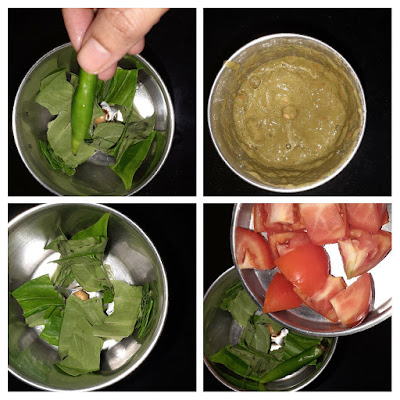
Put the dal in a vessel and cook it in the pressure cooker. I used pot in pot method, you can use whichever is convenient. The dal should have cooked well. Remove the stalks from Betel leaves, reserve one leaf for garnish and put the remaining in a blender, put 2 chopped tomatoes and the green chilli into the blender too, and grind them to a smooth puree. Chop the remaining 3 tomatoes into big cubes and put them in a 1-litre vessel. Add the Betel leaf-tomato puree also to this vessel and pour 3 cups water(1 cup =150 ml). Put the vessel on a medium flame and add the Rasam Powder, followed by turmeric powder, asafoetida and salt. Boil the mixture until the raw smell of the Betel leaves and tomatoes is gone(around 7 minutes from boiling on medium flame). Now separate the water from the cooked dal and reserve. Mash the dal nicely with the back of a ladle. Pour the dal into the boiling mixture followed by the reserved water and add 2 to 3 cups of more plain water. Now continue to boil the mixture on a low flame until the Rasam froths up and boils and starts rising in the vessel( around 10 minutes on low flame). Don't let it to overflow. When it rises up squeeze the juice of 1 lemon and put off the flame immediately. Now take 2 tsp ghee in a small tempering Kadai and heat. Add mustard seeds, as they crackle add the Asafoetida powder, roasted pepper-cumin powder and put off the stove. Now add the curry leaves to the ghee, and pour the tempering into the Rasam. Garnish with finely cut Betel leaves(only 1 leaf will do) and coriander leaves. The yummy Vetrilai Rasam is ready to slurp. Enjoy and Bon Appetit.

Serving suggestions: Just as a soup, with hot rice and ghee, with Oats porridge(try this it tastes yummy). 
Sometimes I also pour it on my chapatis while hot.😉

STEPWISE RECIPE FOLLOWS:
1. Assemble all ingredients. Cook the dal and keep ready. Remove the stalks from the Betel leaves, cut them to big bits, chop the tomatoes and keep aside.


2. In a blender put in the cut Betel leaves(reserve 1 for garnish), 2 chopped tomatoes, and green chilli and puree them smooth.

3. In a 1 litre vessel put the remaining 3 chopped tomatoes and the Betel-tomato puree and pour 3 cups of water. Put the vessel on the flame. Now add Rasam powder, Salt, turmeric powder, asafoetida and bring to a boil on medium flame. Keep boiling until the raw smell of the rasam powder and the Betel leaves goes away. This takes approximately 7 minutes on medium flame.


4. Now mash the dal nicely, if the dal has retained water, reserve it. Pour the dal into the boiling Rasam mixture, follow it up with the reserved dal water and add 2-3 more cups of plain water, and start boiling again on low flame.


5. Around about 10 minutes of boiling on a low flame the Rasam should start frothing up and rising in the vessel. When it starts coming towards the brim, add lemon juice and put off the stove immediately.


6. In a tempering Kadai heat 2 tsp of ghee. when it heats up put the mustard seeds into it, as they crackle add the asafoetida and the roasted cumin-pepper powder. Put off the flame and then add the curry leaves. Drop this tempering into the Rasam and serve hot with hot rice and ghee or follow any of the serving suggestions given above. 


NOTES:
1. Betel leaves come in many varieties, but 2 of them are popular and in common use. One is light green and thin(the one I have used and you see in my pictures) another is a little deeper shade of green and the leaves are thick. So if using the light green ones use 10 to 12 leaves. If using the darker ones then reduce the quantity by half, use about 6-8 leaves as their flavour is more intense. 

2. If using garlic grind it along with the Betel tomato puree. Around 2 pods should be enough or it will overpower the Betel taste.

3. I have used the sweeter hybrid variety of tomatoes(Bangalore ones) which I usually don't, hence I used 5 of them. If using the country variety(Naatu thakkali) then 3 should be enough. Two to grind and two to put chopped. 

4. If you serve Rasam with something unusual do let us, know..we love learning and trying new combinations.

If you tried this recipe and liked it please comment below. I would love to hear from you.


Tuesday, 21 July 2020

SCHEZWAN FRIED RICE(SOYA CHUNKS)

Schezwan fried rice is an Indo Chinese recipe and is similar to Chinese Fried Rice. Schezwan Sauce imparts a lovely flavour to this dish. 
Well, I had this dish a couple of years ago at a Chinese Restaurant near our house, where they served amazing Indo Chinese food. It was our monthly haunt and their flavours were so rustic.  I loved their Phad Thai Noodles and can still remember the flavour when I think of it. But for some reason, this jaunt shutdown and we( my daughter and I) were so disappointed. This is what prompted me to learn this recipe.
Well for years I made it using store-bought Schezwan sauce and one day I  thought why not give the Sauce a try. Well, it turned out so amazing and it's the simplest thing to make. Once you taste this you'll never go back to the store ones again.
What's more, this Schezwan Sauce(for recipe click here) can be used for stir fry vegetables too. I have used Chinese five-spice powder, which I made at home too. So this dish is an out and out "from the scratch" dish.
I have used regular rice and not Basmathi. I feel that Chinese flavours and Basmathi do not go well. Instead of regular rice Jasmine rice can be used too. In this recipe I have used Soya chunks majorly and little vegetables. Soya bean is high in fibre and protein. In all, it makes this dish a"meal in a bowl" sort where you don't need to make anything else to go with. If the Schezwan Sauce is ready this dish can get done in 15 minutes excluding the rice cooking time.
On a lazy day, this is a good option as once the rice is cooked(which you can put in a cooker for 3 whistles if using pot in pot method or separately too), just stir fry the veggies, is the sauce and add the rice and it's done. The Schezwan sauce once made stays good for 10 to 12 days in a refrigerator, so can be made ahead.
This dish can also be given to kids in the lunch box, and please be sure to send more and all other kids at school are going to demand some😋. 
While you are here please check out my rice other recipes like Masala Rice, Flavoured Rice, Coconut Rice, Coriander rice, Lemon Rice etc;

Here is the recipe of Schezwan Soya chunks fried rice:

PREP TIME: 15Mins                                      COOK TIME: 15 Mins
TOTAL TIME: 30Mins                                     COURSE:  MAIN
CUISINE:  FUSION                                         SERVINGS: 5
AUTHOR: Rajni Ram


Ingredients:   

Rice 1 cup
Soya chunks 100 gm or around 15 pcs
carrot 1/2 of 1 whole finely chopped
Spring onions 1/2 of 1 bunch(onions included) finely chopped
Beans 5 finely chopped
Capsicum 1/2 of 1 whole finely chopped.
Ginger Garlic paste 1 tsp ( or crush fresh ones)
Schezwan sauce 1.5 tbsp
Oil for Sauteeing. Sesame oil/refined oil

Directions:
Pre-cook the rice. The rice should be nicely done but grainy. So as I say in all my rice recipes, cook and spread out the rice, drizzle some oil over it.
Take water in a saucepan and bring it to a boil. Once the water starts boiling put off the flame and drop the Soya chunks in it and cover for 3 mins. The water should cover all the chunks. After 3 minutes drain the water and cool the soya chunks. Once they cool rinse them in cold water and squeeze out the water. Repeat this process 3 times to remove all processed impurities from the chunks, and set aside.
Now take oil in wok/karahi and heat. Increase the flame to high and drop in the spring onion and saute, after 30 seconds add the ginger garlic paste and fry for 30 seconds. Now add the capsicum and saute for a minute. Sauteing should be on high flame throughout. Now add the soya chunks into the Kadai after squeezing out any remaining water and saute well for 2 minutes. Add salt and put in the chopped carrots and beans and saute for a minute. Now put 1.5 tablespoons of the prepared Schezwan sauce into sauteed vegetable and mix well. Stir fry for 30 seconds. If you find the mixture to be very dry, add 1 tbsp of water and stir. Now add the pre-cooked rice little by little and mix well. Taste and adjust salt and spice. If sensitive to spice use only 1 tbsp of the sauce. Yummy Schezwan fried rice is ready. If using store-bought Sauce add 2 tablespoons. Enjoy the flavours...Bon Appetit.

Serving Suggestions: I served it with stir-fried vegetables in Schezwan sauce. You could do the same or serve it Vegetable Manchurian(gravy), Gobi Manchurian(gravy) or it is so good to have by itself too. It is convenient to pack ina lunch box too. 

STEPWISE RECIPE FOLLOWS:
1. Assemble all ingredients. Pre-cook the rice and cool. Make the Schezwan sauce(if making at home).

2. Take the Soya chunks in a vessel and pour hot water over them and keep covered for  3 minutes. After 3 minutes drain the water and pour cold water over the chunks and let stand until completely cooled. Once cooled squeeze out all water and pour fresh water again and nicely squeeze the water again. Repeat this process  2 to 3 times.

3.  Take oil in a wok/Karahi( I used Sesame oil as it gives a good flavouring) and heat. Add the Spring Onions and saute on high flame for 30 seconds. Add the ginger-garlic paste and saute for another 30 seconds. Now add the Capsicum and saute for 1 minute. The flame should be on high throughout. Add the Soya chunks followed by salt and saute for a minute.

4. Add the chopped Carrot and Beans and saute for 2 minutes. Now add the Schezwan sauce and stir well. If the mixture is too dry add a tablespoon of water. Now put in the rice little by little and mix it well with the Sauce, such that the sauce evenly coats all the rice. Check for salt and spice and adjust. The delicious Soya Chunk Fried Rice is ready. 

NOTES:
1. While stir-frying vegetables the flame should always be high and one has to keep stirring constantly to enable even cooking. If cooked on a low flame the vegetable will release water and turn limp.  
2. If using the store-bought Sauce use 2 tbsp. If sensitive to spice use only 1 tbsp of the homemade Schezwan Sauce as the flavour is intense.
3. Follow the procedure for cooking and cleaning the Soya chunks as they irritate the stomach if not properly rinsed.
4. If using Schezwan Masala powder sprinkle it after sauteing all vegetables.
5. For the Schezwan sauce recipe click here.

Tried this recipe? Comment below, send a picture or send your version of it. I would love to hear from you.


SCHEZWAN SAUCE(HOMEMADE)


Schezwan Sauce the high on flavour sauce which gives many dishes like Schezwan Rice, Schezwan Noodles, Schezwan Stir-fried vegetables etc; their distinct flavour. I was happy making Schezwa rice with the store-bought sauce until I chanced upon this recipe while surfing browsing the internet. It seemed so easy and I wondered at its simplicity and high flavour. I learnt to make it so that I could make the Schezwan rice and other such recipes mentioned above with it. The outcome was so so good that I'm not buying store-bought sauce again.  It is so simple and most of them are simple home ingredients.  Chinese Five spice was mentioned and I wondered what it would be. I checked out that too and so I made the 5 spice powder at home too. It is made with everyday masalas we use at home. So here first I will take you through the process of the  Chinese Five-spice powder followed by the Schezwan sauce.
While you are here please check out my other spice powders like Sambar Powder.
I am posting the step by step process directly without the initial directions that I usually give. I have adapted the recipe from "feasting at home"https://www.feastingathome.com/szechuan-sauce/ as per the Indian Palate and substituted with locally available items.


PREP TIME: 5 MINS (30Mins SOAK)      COOK TIME: 5 Mins
TOTAL TIME: 40 Mins                                COURSE:  SAUCE
CUISINE: WORLD FOOD                        QUANTITY: 100 GM APPROX
AUTHOR: Rajni Ram


STEP1 Chinese Five Spice Powder- Assemble 6 Star Anise pods, 1 stick Cinnamon(3-inch piece), 2 tbsp Fennel seeds, 1.5 tsp cloves(whole), 3 tsp regular Peppercorns. Put them in a mixed at and grind to a fine powder. Store in an airtight jar. (can be used in all Indian Subjis, so make more😉).


STEP2: SCHEZWAN SAUCE INGREDIENTS:
Black pepper powder 1/2 tsp
Soy sauce 1/4 cup
Honey 3 tbsp (or) substitute with brown sugar
Sesame oil 1 tbsp
White Vinegar 1 tbsp
Garlic cloves 8 to 10 Indian (or) 3 Chinese pods
Ginger paste 2 tsp
Chilli Paste 1 tbsp
Chinese 5 spice 1/2 tsp

Directions for chilli paste:
Soak Indian Red chillies in warm water for 30 minutes and grind to a paste without adding water at first and adding up to 2 tsp water later.

Directions for the Sauce:
 In a bowl add all ingredients and nicely mix for a minute using a whisk until all ingredients are well combined. The sauce is ready. Bottle it up and store in the refrigerator. Use when required.


NOTE:
This quantity makes about 1 cup of Schezwan Sauce.
Do not forget to Store in the refrigerator.

If you tried this recipe and liked it please comment below, would love to hear from you. Also, like and share the link.

Monday, 20 July 2020

MISSI ROTI

Missi Roti is a simple Indian flatbread made from Besan(gram flour) and Atta(wheat flour), Spices and onions give this an amazing flavour. It is a popular dish in North India. Served with a dollop of butter and some pickle, it is a meal by itself. It can be served with curry varieties like Mixed Vegetable CurryDrumstick Curry, Matar Paneer, Palak Paneer Koftas, and Lauki Kaddu Ke Kofthey.

I had this Roti for the first time about 18 years ago in a remote township in Andhra, where the cook at the official guest house was from Bihar and had prepared this for a get-together. I liked this Roti so much that I asked him to teach it to me(as there was no internet those days and we learnt cooking from cookery books or a cookery show on television). The cook(Maharaj as they are called)obliged and I learnt this lovely flatbread recipe. I made it a couple of times after that and until recently it was forgotten I my recipe book(in which I enter recipes after they have been tried and tested a couple of times). I chanced upon it while searching for another recipe in my book and the memories came flooding. So here is the recipe as it is really blog-worthy.  
I have seen many versions of this recipe, but I am sticking to the way I was taught. 


Serving Suggestion: Missi Roti with pickle and butter, Missi Roti with Paneer Butter Masala, Missi Roti with Kadai vegetable or Missi Roti with Dal Makhni/Choley etc;
My favourite combination is with pickle and butter.  

Here's the recipe of Missi Roti...

PREP TIME: 20 Mins                                      COOK TIME: 20 Mins
TOTAL TIME: 40Mins                                     COURSE:  BREADS
CUISINE:  INDIAN                                         SERVINGS: 4(8 Pcs)
AUTHOR: Rajni Ram


Ingredients:

Besan/gram flour 1.5 cups
Atta/wheat flour 3/4 cup
Onion 1 finely chopped
Coriander leaves 1 tbsp finely chopped
Green chillies 3 finely chopped
Ginger 1/2 inch finely chopped
Salt as per taste
Oil 1 tsp for dough
Red chilli powder 1.5 tsp
Amchur powder/dry mango powder 1 tsp
Black pepper powder 1/2 tsp
Ajwain 1 tsp
Turmeric powder 1/2 tsp
Oil for roasting the Rotis

Directions:
In a dish take the Besan and Atta and add all ingredients one by one into it.  Mix nicely until the onion's moisture is absorbed by the flour. Now pour water little by little and combine to form a pliable dough, not very stiff. Keep covered for 15 minutes. Now pinch small portions of the dough to form roundels. You will get about 8 from this quantity. Now roll them out into Rotis gently. Since I have used more of Besan, it cannot be spread much unlike Roti. This bread is usually rolled small only.
Now heat a Tava/girdle and smear some oil on it. Put the roti on the tava and cook, drizzle some oil and flip over and cook the other side too. small brownish dots should appear on the Roti. Remove from heat and repeat the same for all roundels. 
The aromatic Missi Roti is ready...some pickle and butter and  it is ready to tuck in...Enjoy. Bon Appetit.

STEPWISE RECIPE FOLLOWS:
1. Assemble all ingredients.

2. Take the Atta and Besan in a dish.

3. Add all ingredients one by one and mix nicely with hand so that the moisture of the onion is absorbed by the flour.

4. Now pour water little by little and combine to form a pliable dough. It should not be too stiff. Cover and let it rest for 15 minutes.

5. Now pinch the dough into 8 portions to form roundels. Dust each with flour and roll them out into Rotis.

6. Put on hot Tava/girdle and cook one side, drizzle oil, flip and cook on the other side. Keep flipping until light brown spots are formed on the Rotis. Repeat for all roundels. Missi Roti is ready...Enjoy with any curry of your choice or pickle and butter.


NOTES:
1. I have stuck to the proportion of more Besan that Atta because in Missi Roti the Besan Taste should dominate. More atta is used to make it pliable but the flavour gets compensated.
2. Usually, people are little reluctant to use Besan because of its gassy nature. That is why we have used Ajwain(carrom seeds) here. Little asafoetida can be added to the water that we are going to mix the dough with. This also aids in better digestion. 
3. These Rotis can be made ahead and keep and they just need to be warmed before serving. The besan keeps the rotis soft.

If you tried this recipe and liked it please comment below. I would love to hear from you.

Sunday, 19 July 2020

CHAKKARA PONGAL/SWEET PONGAL

The month of Aadi(as per Tamil calender) or Aashad is a very auspicious one in South India as it marks the beginning of festivals which begin with Ganesh Chaturthi and Janmashtami and goes up to Pongal in January which is the month of Thai(Tamil) or Paush. The Chakkara Pongal is considered to be the prime offering to the Mother Goddess. This sweet Pongal is also the offering to the Sun God on the Makara Shankranti day/Pongal festival.
This being the Aadi month I made Chakkara Pongal too and it came out well as always. But there is a lot to tell about the proportions and how I arrived at the current one after a lot of hit and trial methods. Is it that tough you may ask? Certainly not. In fact, it is the most simple one provided the right proportions of Rice, Dal, and jaggery is used. 
Chakkara Pongal was my favourite sweet dish as a child(the only one I liked as I was not fond of sweets, now I like most of them) and I would get my mom to make it frequently. As I grew older I learnt to make it from my mother and eventually my mother in law. I believed our's was the best Chakkara Pongal as compared to most South Indian households(as it is very common to make it here often) until I had it as prasad(offering) in a temple around 10 years ago and that Chakkara Pongal wowed me. I so fell in love with that taste and it was unlike any other Sweet Pongal I had tasted before. From then on started my quest for the right proportions to make this recipe. I asked a lot many people of the proportions they used, I browsed many websites to check out the best recipe, and also tried all these whenever I made the Sweet Pongal but "that" one recipe always eluded me. It is not even that this recipe has many ingredients, whatever it is we have to play around the proportions of Rice, dal(moong dal/ Chana dal) and Jaggery. So I tried many permutations and combinations until I arrived at the current one. I have used the one-pot method, but the same recipe works well for pot in pot method too. Hope you all will find it easy to prepare and also delicious. Looking forward to your comments.
While you are here please do look up other traditional sweet dish/deserts by Rajjo's kitchen like Pineapple RabriAtte Ka Sheera, Carrot Kheer, and Akkaravadisal

Here is the recipe of Chakkara Pongal for you. 

PREP TIME: 10 MINS                                   COOK TIME: 30 Mins
TOTAL TIME: 40 Mins                                  COURSE:  DESSERT 
CUISINE: SOUTH INDIAN                           SERVINGS: 6
AUTHOR: Rajni Ram


Ingredients:
Rice 1 cup
Moong Dal 1/2 cup
Milk 1/4 cup
Jaggery 1 cup
Sugar 1 tbsp
Cashewnut around 7-8
Raisins around 7-8
Cardamom powder 1/2 tsp
Edible camphor/Pacha karpooram 1 pinch
Nutmeg powder less than a pinch(optional)
Ghee 1/2 cup

Directions:
Dry roast the Moong dal until light brown on a low flame. In a vessel take the rice and add the roasted moong dal to it. Wash the rice and dal together and put them in the cooker. Pour 4 cups water and cook for 5 to 6 whistles. Once the pressure releases mash the rice and dal nicely with the back of a ladle or masher. Set aside. Take the jaggery in a vessel or pan and add 1/4 cup water. Switch on the flame to low and dissolve the jaggery until it froths up. switch off and cool for 5 minutes(the jaggery mixture can be prepared when the rice is cooking, it will save time later). Now strain the liquid jaggery directly into the mashed rice-dal mixture in the cooker. Switch on the flame, add 1/4 cup milk and 1/4 cup water. Stir the mixture nicely and cook on low fire for 5 minutes or until the Pongal comes together and the jaggery is not runny anymore. Switch off the flame. In a tempering Kadai take 1 tbsp ghee and heat. Add the Cashewnuts and fry, followed by raisins. Pour this mixture on the cooked Pongal and also add the cardamom powder, raw camphor and the nutmeg powder(optional). Pour the remaining ghee over the Pongal. The delicious Pongal is ready. Enjoy. Bon Appetit.

STEPWISE RECIPE FOLLOWS:
1. Assemble all ingredients.

2. Dry roast moong dal over a low flame until light brown.

3. Take the rice and roasted dal in a vessel and wash nicely and put them in the cooker.
Add caption

4. Add 4 cups water and cook for 5 to 6 whistles. While the rice is cooking take the jaggery in another pan/vessel and add 1/4 cup water and put it on the flame. On low flame dissolve the jaggery and allow to boil until it froths around 2 minutes from dissolving. Switch off the flame.


5. Once the pressure in the cooker releases, strain the liquid jaggery over the rice - dal mixture in the cooker. Pour 1/4 cup milk and 1/4 cup water(warm) and stir nicely such that the jaggery is well mixed with the contents in the cooker, add 1 tbsp sugar. Let it cook for 5 minutes on low flame. The Pongal will come together as a nice gooey mixture. Switch off the flame.

6. In a tempering Kadai or pan add 1 tbsp of ghee and heat. Add in the halved cashew nuts and fry, followed by raisins until they fluff up. Add the cardamom powder, and a pinch of raw camphor(a mini pinch of nutmeg powder too if using). Drop the ghee with nuts and raisins into the Pongal. Top up with remaining ghee. The delicious Chakkara Pongal is ready to serve.

NOTES:
1. I have used 1 cup jaggery, but depending on the sweetness of the jaggery the amount may vary by 1/4 cup.
2. Adding a spoon of sugar to any jaggery based sweet dish they say helps in the jaggery getting integrated into the dish and raises the taste they say. So I have always followed this.
3. Edible Camphor and Nutmeg powder should be used sparingly and only the mentioned amounts. Using more makes the dish bitter.
4. A trick I learnt from my mother in law is to always pour the ghee in the end on top of the sweet dish while it is hot and to not stir it in completely. So when you scoop out the sweet dish the ghee on top will automatically flow down, so you actually won't have to flood the dish with a lot of ghee.
5. Adding the ghee while it is still hot helps in even spread of the ghee on the dish. Don't mix the ghee after pouring on the Sweet dish, it makes it heavy and also the dish will keep absorbing how much ever you pour.

If you tried my method of the Chakkara Pongal and liked it please comment below. I would love to hear from you.

TOFU AND STIR FRIED VEGETABLES IN HOT SCHEZWAN SAUCE

  Any Tofu lovers? I agree its an acquired taste,but going by the health benefits it has to offer, I try including it in my diet now and the...