Vegetarian cooking blog

Tuesday 30 June 2020

Lemon Rice

Lemon Rice is one such recipe which is easy to make with minimum ingredients. It doesn't need any specific accompaniment. It can be had just like that or with Papad. It's the perfect lunchbox item. The zing and freshness of lemon is enough to bring everyone to your table for their share. 
My Grandmom was an expert at making it( not that its rocket science), but her lemon rice always had that freshness of the lemon intact. So over the years I have tried and perfected it, her way and by hit and trial have found her secret of that fresh lemon flavour. I'm stressing on the flavour here because I have seen many a time the lemon flavour fails to standout the sourness is there, but the flavour is missing. This is because of cooking the lemon juice with the tempering. As the recipe proceeds, you'll understand what I mean.
I usually don't write so much of an introduction, but this recipe is just so close to my heart that I had to.
Let's get to the recipe right away.


PREP TIME: 10Mins                                COOK TIME: 40Mins
TOTAL TIME: 50 Mins                               COURSE:  MAIN 
CUISINE: SOUTH INDIAN                       SERVINGS: 4


Ingredients:
Rice 1 cup ( regular rice not Basmati)
Lemon 2 medium size
Green chillies 2
Red chillies 2
Ginger 1 inch piece
Curry leaves a few
Turmeric powder 1 tsp
Asafoetida powder 1/2 tsp
Salt as per taste
Urad dal 1 tsp
Chana dal soaked in water( for 1/2 an hour) 1 Tbsp.
Mustard 1 tsp
Peanuts 1 Tbsp
Oil 3 Tbsp( refined or sesame)  for tempering and 3 tsp for drizzling on cooked rice.

Directions:
Cook the rice in a pressure cooker. You can use 2.5 to 3 cups water for 1 cup of rice.  As soon as pressure releases transfer the rice to a large plate/ tray and spread it. Drizzle little refined oil or sesame oil on it, so that the rice doesn't stick together. Allow it to cool.
In the meanwhile take 3 Tbsp oil in a Karahi/ pan and heat it. Drop the peanuts gently into the oil and fry until you see a nice golden colour. Add the mustard, as it crackles add the green and red chillies, ginger, asafoetida, urad dal, soaked chana Dal after straining the water, curry leaves and fry them till the dals are a nice golden colour. Add the turmeric powder and salt and put off the stove.  Now add the juice of 1 lemon to it and mix well. Now add the rice little by little to this tempering. Mix well so that the tempering is evenly distributed. Now squeeze the juice of another lemon on the rice and mix gently( my secret to the freshness). There the yellow beauty is ready to serve...Bon Appetit.

STEPWISE RECIPE FOLLOWS:

1. Assemble all ingredients.


2. Cook the rice in a pressure cooker. After pressure settles, transfer the rice to a large plate and spread it. Drizzle some oil on it. Allow it to cool.


3. In a Karahi take oil for tempering and heat it. Put in the peanuts and fry until golden brown.
Add all tempering ingredients- mustard, soaked chana dal( water strained), urad dal, green chillies, red chillies, ginger, Asafoetida,  curry leaves. Fry until they get a nice brown. 


4. Add the turmeric powder and salt and put off the stove. Squeeze juice of one lemon. Mix well.


5. Mix the cooked rice little by little to the tempering. Finally, squeeze the juice of another lemon on the rice and mix gently but thoroughly. Lemon rice is ready. Enjoy with some Papads.


NOTES:1. Usually, Lemon rice recipes state adding the lemon juice to the tempering, which gives the taste but not the flavour. some other recipes recommend squeezing the lemon directly over the rice. This ensures the flavour, but not the taste as the juice will not get evenly mixed. 
2. In this recipe I have divided the juice into 2 halves and added one half to tempering and another half to the rice, this gave me the perfect balance of flavour and taste.
3. Potato fry(south Indian style) goes very well with the lemon rice too, just in case you aren't the papad person.
4. You could serve the Rice with Raita too.

If you tried this recipe and liked it please comment below. Would love to hear from you. 
Chinese Paratha

This recipe is one that has been sitting in my recipe book for the past 20 years. I made this as a young mother, with no success at making Veg Hakka noodles, as I did not understand what aldente meant. 
Over the years as my journey as a budding home cook begun, I mastered the Veg Hakka part, but yet hadn't tried the fusion recipe, until I started this blog and as I   was going through all my recipe collections( a manuscript from the days when digitalization was unknown) with my daughter, she said: "why not try this now"? and I gave in to the idea and don't regret it at all. That said, this fusion recipe is a Paratha(Indian bread) with stuffed Veg Hakka noodles. Let's get to the recipe right away.
   

PREP TIME: 15Mins                                COOK TIME: 40Mins+30mins(cooling)
TOTAL TIME: 1 hr 25 Mins                    COURSE:  MAIN 
CUISINE: FUSION                                  SERVINGS: 4
                                                                  AUTHOR: Rajni Ram     

Ingredients for paratha dough.

Wheat flour--3 cups
oil-- 1 tsp
salt--1 tsp
water for combining the dough.

Ingredients for the Veg Hakka Noodles:

Veg Hakka Noodles -- 1 packet
Onion- 1 medium-sized( can use spring onions too, finely chopped)  
Carrot --1 small grated coarsely
Capsicum- 1 finely chopped
Garlic- 5 cloves finely chopped
Green Chillies- 2 finely chopped
Tomato- 1 large finely chopped
Schezwan sauce 3 tsp
Tomato sauce 2 tsp
salt as per taste
Red chilli powder 1 tsp

Directions for Parathas:
Take the wheat flour in a deep dish or a large plate. Add salt and the oil. Mix well and add water little by little as you knead to form a stiff dough. The dough must be stiffer than the Chapati dough. If the dough is loose, add a little more flour and knead again. Form a ball of the dough. Apply a little oil to your palms and spread it on the dough. Cover and rest it for half an hour.

Directions for the Veg Hakka noodles:

Boil around 1.5 litres of water in a wide-mouthed vessel. As the water comes to a boil add the uncooked Hakka noodles( broken to small bits around a fingers length) and a tsp of salt and cook. The noodles must be cooked aldente meaning a little undone( this comes with some practise). Keep stirring so that you know when to switch off the heat. Remove a few strands of noodles from the pot and do the cook test, that is, use a spatula to cut the noodles. If it cuts through easily, put off the heat, drain water from the noodles immediately and rinse the noodles in plain water(room temperature) 2 to 3 times, and drain the water. apply a little oil to the noodles and let it cool a bit.
As the noodles cool off let's get the vegetables ready. In a wok or Karahi, take the oil and heat. Add the finely chopped garlic and green chillies and fry till you get a good garlicky aroma. Add the finely chopped onions, followed by the capsicum and saute well. Next, add in the grated carrots and cook for a minute. Now add the tomatoes followed by salt and red chilli powder and cook for a few minutes. Once the tomatoes turn mushy add both the sauces( you can mix them ahead in the said ratio) and cook until semi-dry. Add in the cooked Hakka noodles and mix well. Veg Hakka is ready. allow it to cool. This can be made ahead and kept.

Method to stuff the parathas:
Take the resting dough and divide it into 10 equal parts. If you want bigger parathas to divide into 8 portions. Take one ball, dust it with flour and roll out into a small circle. Fill it with the noodles stuffing and seal the ends nicely. Dust it with flour again place it on the counter and flatten it with your palm, so that the stuffing spreads evenly. Now roll it out with a light hand without applying pressure into a little thick circle. Put a girdle on the stove and heat it. Place the paratha on the girdle and cook it, apply a tsp of oil and flip it, apply another tsp oil, and cook both sides well, until you see small brown dots. Repeat for all the 10 balls. The Chinese Parathas are ready, Bon Appetit.  

STEPWISE RECIPE FOLLOWS:

1. Assemble all ingredients.


2. For Parathas, Take the flour in a deep dish or big plate. Add the salt and oil. Pour water little by little and start combining the flour. Don't use too much water as we want a tough but pliable dough. As you combine the flour knead it well. It has to be smooth. Smear a little oil on the dough, cover it and let it rest for half an hour.

2. For the Hakka noodles, boil water in a widemouthed vessel. Break the noodles into finger length pieces and keep ready. When water begins to boil, drop the noodles gently into the water add a little salt and let it cook.

3. Keep stirring as we don't want the noodles sticking together. Also, we have to cook it aldente( not cook it all the way through). Once done, drain the water and rinse the noodles in plain water(room temperature), smear little oil and let it cool.

4. Prepare the vegetable mixture by heating oil in a wok/ Karahi. Add finely cut garlic to the oil and the green chillies too. Fry nicely.

5. Add the finely chopped onions to this and saute. Add in the capsicum, cook for a minute and, add in the grated carrot. Cook for 2mins on low heat.


6. Add the tomatoes, salt, red chilli powder, and both sauces( i have combined them both in the said ratio) and cook until the mixture is semi-dry. 

7. Add the cooked noodles little at a time and combine well. Put off the stove and cool the filling.

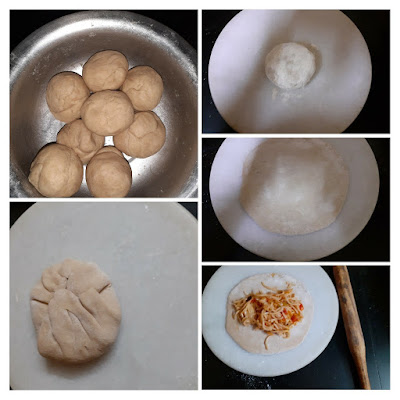
8. To make the parathas, divide the dough into 10 equal parts. Take one ball from that and dust it with dry flour. Roll this into a small circle a little smaller than your palm. fill in the filling with a spoon, about 2 tbsp into each circle. bring the edges together and seal them.

9. Dust with flour again and roll it out into a bigger and thick circle. Put a girdle to heat and place the rolled out paratha on the girdle. smear oil on the side facing up and flip it. smear oil again after flipping and cook both sides until brown spots appear.

10. The Chinese Paratha is ready to serve with some raita.

NOTES:
1. I have used only a few vegetables here, you can add spring onion too, but it's better to not go over the top with vegetables here as rolling the Paratha may become tough.
2. The filling has to be quiet dry or else it will start oozing out of the bread while rolling.
3. Cooking the noodles as mentioned is better, as overcooked noodles will clam together, and rolling the Paratha will be difficult.
4. I have served the paratha with Raita and tomato ketchup and not pickle as most parathas, as this  Chinese Paratha being a fusion may not go with pickle. But if you prefer it that way, do go ahead as what the palate demands is what it should get.    

If you tried this recipe and liked it please comment below. Would love to hear from you. 


Rava Dosa

Dosas come in many varieties and these Rava Dosas are full of flavour and are crisp too. This is a foolproof recipe. In my family, we have made it this way for years and what's more, just add any healthy millet flour to this and it will still come out well. In restaurants, this Dosa is made with Maida instead of the wheat flour. You can do that too. I'm partial to what flour so have replaced Maida/ refined flour with it.
Let's get to the recipe right away.


PREP TIME: 10Mins                                           COOK TIME: 40Mins
TOTAL TIME: 50 Mins                                       COURSE:  MAIN 
CUISINE: SOUTH INDIAN                                SERVINGS: 4
                                                                              AUTHOR: Rajni Ram

Ingredients: 

Rava/ Sooji 1 cup( roasting Rava is optional, but I would  recommend it)                Rice flour 1 cup
Wheat flour 1 cup
Curd 1 cup
Water -around 1 litre or a little more 
Roasted cumin and pepper powder
Green chillies 2
Ginger 1 inch piece
Curry leaves- few leaves cut fine
Coriander leaves finely chopped.
Salt  as per taste( I used 1.5 tsp)

Directions: 
Take a 1-litre vessel. Put in all the three flours.
Add the curd to it. Add in the salt and the roasted cumin pepper powder. Add a little of the water from 1 litre and mix well forming a paste without lumps. Once that's done mix in the remaining water little by little and stirring every now and then so lumps don't form. Don't pour all the water at a time. Depending on the quality of the Sooji, you might use, less too. The batter should neither be too thick nor too watery. It should be a little loose than the normal Dosa batter. Take 3 tsp oil in a small tadka karahi and heat.  Add the mustard and Cumin and once they crackle put in the finely cut green chillies, ginger and curry leaves. Also, add 1/2 tsp of Hing/ Asafoetida and turn off the stove. Add this tempering to the batter. Let the batter stand for 10 mins and you are ready to pour the Dosa on the girdle. There your crispy Rava Dosa is ready. Enjoy. Bon Appetit!

STEPWISE RECIPE FOLLOWS:

1. Assemble all ingredients. 


2. Take a 1-litre vessel and add in Rava/ Sooji, wheat flour and Rice flour. Add in the curd.


3. Add the salt and the roasted cumin- pepper powder( to make powder take 2 tsp Jeera and 1 tsp pepper and roast on low fire to get the aroma of the spices. Cool and grind coarse).

4. Add water( up to 1 litre) little at a time and stirring constantly so that no lumps are formed. Pour the remaining water until you achieve the consistency shown in the picture( a little thinner than the regular Dosa).

5. Take oil in a small tadka karahi. Add the mustard and cumin seeds. When they crackle add the cut green chillies, ginger and curry leaves. Add Asafoetida too and crush a little. Pour this tempering into the batter. Add the chopped coriander and let the batter stand for 10 mins atleast. There your batter is ready.

6. To make crispy Dosas, put a girdle on the Tava( I used a non-stick one). The girdle has to be really hot or else your dosa will be lumpy. 


7. Now pour the batter on the girdle forming a circle. You cannot spread the batter like the regular dosa, you'll have to pour it as shown in the picture. Drizzle oil over the Dosa and cook.


8. Cook until it becomes crisp and is a golden brown, then flip over and cook again. If you want it crisper be generous with the oil. 
Your crisp Rava Dosa is ready. Enjoy with chutney( check out the recipe in chutney section)  and idli podi ( check out the recipe in powders section).


NOTES:
1. As said earlier it's a  foolproof batter and won't let you down. Just stick to the measurements.
2. Rava Dosa is usually made with Maida in restaurants as it gives that extra crispy edge, feel free to use that too. Since I am partial to wheat flour have replaced Maida with it.
3. Instead of wheat flour or Maida, you can use Ragi flour, Jowar flour or any other millet flour and the Dosa will still come out well.
4. If you are sceptical of replacing the wheat flour with any millet flour, just add a cup of millet flour along with the other flours. That works too.
5. Be generous with the oil for crisp Dosas and be patient. Unlike the regular Dosas, they take a little longer to cook and get crisp, and the patience will be worth it.
6. It's important to get the girdle quite hot. Do the little test of sprinkling water on your girdle when it's hot. If the water evaporates very quickly, that's the right heat. You can start pouring the batter on the girdle.

If you tried this recipe and liked it please comment below. Would love to hear from you. 


Dal Makhni

Dal Makhni or Dal Makhani is one of the all-time favourite dishes of my family, whenever we are at a North Indian joint. So I have tasted many versions of it and used to make this recipe at one point in time with cream, as most recipes suggest. I found the dal to be heavy when made this way and then I chanced upon the recipe for Dal Makhni that I'm blogging now on a spice packet, I tried it and it tasted almost like the restaurant ones, so have been following this recipe for a long time now. 

Dal Makhni is a dish from Punjab and the main ingredients are black lentils( Black Urad dal whole) Rajma, butter and other spices and condiments. It gets the creamy texture and taste from butter and slow cooking. The longer you cook it on low fire, the tastier. That said, this dal can be made without butter/ cream too. And it tastes all the same. 
While you are here please checkout my other recipes like Choley, Pakode wali Dal, 
Hari Moong Dal, Rajma and more...


Here is the recipe of Dal Makhni for you--


PREP TIME: 10Mins+soak time(8hrs)         COOK TIME: 1 hour
TOTAL TIME: 1 hr 10 Mins                         COURSE:  MAIN 
CUISINE: NORTH INDIAN                         SERVINGS: 4
                                                                        AUTHOR: Rajni Ram

Ingredients:
Black Whole Urad 200 gm ( black lentils) Soaked overnight
Rajma 1 handful (soaked overnight)
Chana dal 1 tbsp.
Garlic 8 pods (finely chopped)
ginger 1-inch piece chopped
Butter 2 tbsp
Tomato 3 medium pureed
Salt as per taste
Red chilli powder 1 tsp( more if you like it spicy)
Dal makhani masala 1.5 tbsp
Kasoori Methi 1 tsp crushed

Directions: Soak the Black Urad, Rajma and Chana dal overnight. Once soaked put them in a pressure cooker with 2 pods of garlic and the ginger and cook for 6 to 8 whistles. Heat 1 tbsp butter in a pan and heat. Put in the Cinnamon stick and garlic and fry don't brown them. Add in the Kasoori Methi and fry for half a minute. Now add the tomato puree and cook for 3 minutes. Add in the Dal Makhni masala, Red chilli powder, salt and cook until the butter floats. Lightly mash the cooked dals and add them to the tomato mixture. Stir nicely and add 2 cups water and reduce the heat and cook on low fire for about 25 to 30 minutes. Switch off the stove and add another tablespoon of butter and garnish with finely chopped coriander. Creamy Dal Makhni is ready to serve. This Dal goes really well with Parathas, Roti, Jeera rice and other Indian bread. Enjoy and Bon Appetit.

STEPWISE RECIPE FOLLOWS:
1. Assemble all ingredients. Soak the dals overnight.


2. Cook the soaked dal in a pressure cooker along with some garlic and the ginger and a piece of cinnamon stick for 8 to 10 whistles.


3. Take some butter in a pan and heat. Put in the Cinnamon stick and garlic and fry for 1/2 a minute. The garlic must not turn brown. Add in the crushed Kasoori Methi and fry for a minute.


4. Now add in the pureed tomatoes followed by salt, red chilli powder and Dal Makhani masala and cook. Cook until the butter floats/ forms a layer on top.


5. Now add the cooked dal, stir nicely and add 2 cups of water and cook on low fire for 25 to 30 minutes.


6. After 30 mins put off the stove and add a tablespoon( or more)of butter to the dal and garnish with chopped coriander.


NOTES:
1. The Chana dal gives the creaminess to this dish, so don't do away with it, at the same time don't put too much of it or the taste may vary.
2. If you don't have Dal Makhni Masala, use a small quantity of garam masala. For the measures that are given above 2 tsp garam masala should be sufficient.
3. Adding Kashmiri red chilli powder will give the dish a good colour. I have added a mix of both regular red chilli powder and Kashmiri red chilli powder, so that spice and colour are balanced. 

If you tried this recipe and liked it please comment below. I would love to hear from you.


Masala Rice

Masala Rice is flavourful rice with vegetables and a ground paste. The aroma that fills your home while making it will bring in everyone to the kitchen. It is a very simple Rice and wholesome too. Just serve it with Raita and papad and all hungry souls will be content.
Let's get to the recipe right away.


PREP TIME: 15 Mins                             COOK TIME: 25Mins
TOTAL TIME: 40 Mins                            COURSE:  MAIN 
CUISINE: SOUTH INDIAN                      SERVINGS: 4 
 
 Ingredients:                                                AUTHOR: RAJNI RAM
 
Uncooked Rice 1 cup (Regular/ Basmathi, both are fine)
Water( to cook rice, 2.5 cups for regular rice and 2 cups for Basmati)
Carrot 1 small
Potato 1 medium
Beans 4 long
Brinjal/Eggplant(any variety other than globe)
Red chilli powder 1 tsp
Garam masala powder 1/2 tsp
Coriander/ Dhaniya powder 1 tsp
cloves 3
Cardamom/ Elaichi 3
Cinnamon 1 inch stick
Saunf/ fennel seeds 1/2 tsp
Star anise 1
Peppercorns a few
Fresh Coriander leaves finely chopped
Oil for tempering
Cashewnuts 5 to 6
Raisins  5 to 6

Paste ingredients:
Coconut 3 Tbsp
Green chillies 2
Garlic 5 to 6 cloves
Ginger 1 inch piece

Directions:
Wash rice and soak for 15 minutes. Cut vegetables into cubes and keep ready. 
In a deep Karahi take about 2 Tbsp oil . Once it's hot, add all whole masalas like Cardamom, Star anise, Cinnamon, Fennel, Peppercorns, and Cloves. Fry until they turn aromatic. To this, add the cut vegetables and saute for a few minutes. Now add in the soaked rice after draining the water. Saute all of them for a few minutes. Add all the masala powders like coriander powder, red chilli powder, garam masala powder and mix well. Add water and put the stove on low. Now put the coconut, ginger, garlic and green chillies into the blender and give it a nice turn. Add some water and grind it to a smooth paste. Add the paste to the Karahi, stir all the contents well and close the Karahi with a lid. The rice takes up to 15 mins to cook. Keep stirring the rice every now and then so that it doesn't stick to the bottom of the Karahi. The Masala Rice is ready. Enjoy with Bhindi Raira( recipe in Raitas section). Bon Appetit.

STEPWISE RECIPE FOLLOWS: 

1. Assemble all ingredients.


2. Wash the rice and soak it for 15 minutes.


3. Take a deep Karahi, you can use a cooker too. Pour in 2 Tbsp oil and heat. Add the Cashewnuts and Raisins, fry and set aside. To the same oil as all whole masalas and fry until aromatic.


4. Add in the Vegetables and saute for 2 mins. Add the soaked rice after draining the water and saute all of them together.


5. Add all masala powders to this and mix well. Add the water now, give it a nice stir and lower the heat of the stove. 


6. Grind a smooth paste with all the paste ingredients and add the paste to the rice. Now increase the heat and cover the Karahi/ cooker and cook the rice. Takes up to 15 mins. If using cooker put off the stove after 3 whistles.


7. Masala rice is ready, garnish with some coriander leaves and the Cashewnuts and Raisins kept aside. 


Notes:
1. You can cook the Masala rice in either a Karahi or Cooker. If using cooker put off in exactly 3 whistles, otherwise, rice may get soft.
2. You can use regular rice or Basmati. I have used the regular one.
3. Don't hesitate to add vegetables of your choice.
4. Serve Masala rice with Bhindi Raita( recipe in Raita section) and papad.
5. You can roast the nuts and Raisins in ghee too.

If you tried this recipe and liked it, comment below. Would love to hear from you.


Coconut Tomato Chutney

This chutney is very easy to make. I have added Tomato for the freshness and tang and so you don't have to add either tamarind or lemon as in the regular coconut chutney. Goes really well with Idli, Dosa, Pongal, Paniyaram etc.
Let's get to the recipe right away.


PREP TIME: 10 Mins                             COOK TIME: 5 Mins
TOTAL TIME: 15 Mins                            COURSE:  MAIN 
CUISINE: SOUTH INDIAN                     SERVINGS: 4


Ingredients:

Coconut 1 cup 
Fried chana dal/ chutney chana/Pottu kadalai 1 tbsp
Green chillie 2
Red chilli 2 
Tomato 1 large
Oil for tempering
Mustard sees 1/2 tsp
Curry leaves a few
Asafoetida 1/4 tsp

Directions: 
In a blender put in the fresh coconut, fried chana dal, green chillies and dry grind to a coarse paste. Add some salt as per taste and add in the chopped tomatoes and now grind to a fine paste. Add in some water to adjust consistency and give it a nice spin in the blender. The Coconut tomato chutney is ready to be served with Idli, Dosas, Pongal, etc. Enjoy. Bon Appetit.

STEPWISE RECIPE FOLLOWS:
1. Assemble all ingredients.


2. In a blender put in the coconut and grind coarse. Add the fried chana, green chillies and red chillies and grind without water.


3. Add the chopped tomato and salt and to grind smooth. Add little water to adjust consistency, add salt and give a single spin in the blender.

4. Take 2 tsp oil in small tempering Kadai and add in the mustard seeds, after they splutter add the asafoetida, and curry leaves. Pour the tempering into the chutney. 


NOTES:
1. Since we have added tomato there is no need to add any other form of sour ingredients like tamarind or lemon.
2. First, dry grind all ingredients and then only add in the chopped tomato, otherwise, they won't get ground evenly.

We would love to hear what you think of this recipe. Let us know in the comments. 
 

TOFU AND STIR FRIED VEGETABLES IN HOT SCHEZWAN SAUCE

  Any Tofu lovers? I agree its an acquired taste,but going by the health benefits it has to offer, I try including it in my diet now and the...