Vegetarian cooking blog

Friday 10 July 2020

MIXED VEGETABLE CURRY(NO ONION, NO GARLIC RECIPE)

This recipe is absolute comfort food. On those, no masala days or on days when you are off onion and garlic, or even otherwise this Subji is a great option for Rotis and Rice. It's a colourful subji that will encourage children to eat vegetables and is also not very spicy. Since I have not used onions or garlic, milk cream forms the base of the subji. A wide variety of vegetables can be used, excluding the high water content ones. I have used vegetables that are easily available and popularly come under the mixed vegetable category. please do visit my other subjis and dals while you are here.
Here's the recipe for Mixed Vegetable Curry.

PREP TIME: 15Mins                                                     COOK TIME: 15 Mins
TOTAL TIME: 30Mins                                                   COURSE:  MAIN 
CUISINE: NORTH INDIAN                                          SERVINGS: 4
                                                                                   AUTHOR: Rajni Ram


Ingredients:
Cauliflower  10-15 florets
Carrot 1 diced
Potato 1 large or 2 small
Capsicum 1 medium diced and seeds removed
Beans 10 approx cut into 1/2 inch pieces
Tomatoes 4 ( 2 chopped & 2 pureed)
Peas shelled( fresh/frozen) 50 gm
Fresh cream 1.5 cups
Salt as per taste
Cumin seeds 1tsp
Red chilli powder 1 tsp
Turmeric powder 1tsp
Fennel/saunf powder
Coriander powder 1 tsp
Garam Masala powder 1/2 tsp
Oil for sauteeing 

Directions:
Dice all vegetables and keep ready. Put all the vegetables except Capsicum and tomatoes, in a vessel, pour enough water, salt and turmeric powder and cook. The vegetables should get tender but not turn limp. Switch off flame at this stage and cool the vegetables completely. If any water is remaining drain and keep it aside, it can be used if required later on. Now in a pan heat 1 tbsp oil, add cumin seeds, turmeric powder and put in the diced capsicum and saute on high flame for few minutes. Reduce flame to low and add in the tomatoes. Saute on low flame for a minute. The tomatoes should just get a little tender and not break and release the juice. Now add in the tomato puree and all the dry spice powders and cook for 3 minutes on medium flame. Put in the boiled vegetables now(after draining the water)  and cook for another 3 minutes. Ensure that not much water is remaining in the pan, if there is, then drain out some or else the subji will turn too watery. Now pour the fresh cream into the pan and immediately turn off the flame. Once the cream is added the flame should not be on,  or the gravy will thin out completely. Stir nicely, add the garam masala powder and garnish with chopped coriander leaves and the Mixed Veg subji is ready to be served with Rotis or rice. Enjoy. Bon Appetit.

STEPWISE RECIPE FOLLOWS:
1. Assemble all ingredients. Chop and boil all vegetables and puree 2 tomatoes.

2. In a pan take 1 tbsp oil and heat it. Add the cumin seeds and once they splutter, add the turmeric powder and capsicum and saute on high flame for few minutes.

3. Lower the flame and add in the chopped tomatoes and saute on low to medium flame for a minute. The tomatoes should not break and become limp.

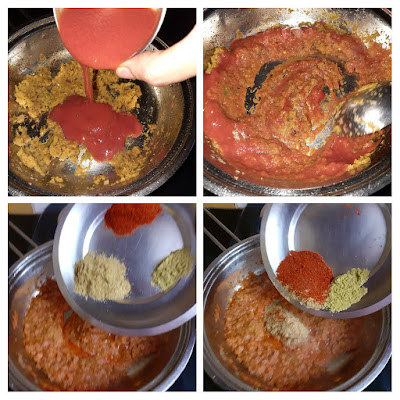
4. Now add the tomato puree followed by salt and all the dry spice powders except the garam masala powder, stir nicely and cook for 3 minutes or until the raw smell goes away.

5. Now add the boiled vegetables and cook for another 3 minutes. If there is too much water, drain it. A little water is ok and required.

6. Finally, add the cream and switch off the flame immediately. Add the garam masala powder now and mix. Garnish with coriander leaves. The mixed vegetable curry is ready to serve.


NOTES:
1. Any store-bought fresh cream is good enough for the subji. It need not necessarily be full or medium fat. Low fat cream is fine too.  
2. Once the cream is added put off flame right away, or the gravy will thin down and the moisture from the cream will separate, making the subji too runny.
3. Saute the capsicum on high flame so that it doesn't release too much moisture and cooks crisp.

If you tried this recipe and liked it comment below. I would love to hear from you.


Thursday 9 July 2020

ATTE KA SHEERA(INSANT WHEAT HALWA)

Halwa is a popular dish in the Indian subcontinent and there are many varieties of Halwa like Rava/Suji Halwa, Moong dal halwa, Chana dal halwa, Lauki halwa, Carrot halwa, and many more. This recipe Atte Ka Sheera is very popular in North India during both the Navrathras, as it is offered to little girls on the Ashtami day( day 8 of Navrathri) as Prasad(holy offering).
 This Halwa gets done in no time and is healthy and tasty at the same time. My girl loves it and whenever any of us craves sweet at home I make it instantly, like today. 
The smooth texture of the Halwa lies in roasting the Wheat flour correctly, as an under roasted flour can make the halwa lumpy. There are many variations to making this Halwa and I chanced upon this one in an old recipe book and have always made it that way ever since. Do check out my other sweet and dessert recipes.

PREP TIME: 10 Mins                                            COOK TIME: 20Mins
TOTAL TIME: 30Mins                                          COURSE:  DESSERT
CUISINE: NORTH INDIAN                                 SERVINGS: 4
                                                                                AUTHOR: Rajni Ram

Ingredients:
Wheat flour 1 cup( any size is fine, but use the same cup for all measures in this recipe).
Sugar 1 cup
water 2 cups
Ghee 1/2 cup
Cardamom powder 1/4 tsp

Directions:
Take a heavy-bottomed pan /Karahi/Urli and heat it. Add 1 tbsp ghee and add in the wheat flour and start roasting it, stirring continuously. after 5 minutes add another tablespoon of ghee and continue to roast. Don't forget to keep stirring, as the flour can get burnt. as the roasting continues the atta/wheat flour will give a nice aroma, keep roasting until the flour turns golden brown. Once it is nicely browned turn off the flame. In another saucepan heat water, and drop the sugar into it, dissolve it and allow it to boil. Once the sugar is dissolved switch off the flame. Now slowly pour the sugar water into the roasted wheat flour and keep stirring continuously(remember to keep the flame off while pouring the sugar water). Once you have poured all the water, switch on the flame and continue to stir, until the halwa starts leaving the bottom of the pan/karahi. turn off the flame add the nuts and remaining ghee. Atte Ka Sheera is ready. Enjoy this wholesome goodness. Bon Appetit.

STEPWISE RECIPE FOLLOWS:
1. Assemble all ingredients.

2. In a heavy-bottomed pan/karahi pour 1 tablespoon ghee, add the wheat flour and start roasting. Keep stirring continuously.

3. After 5 minutes of roasting add another tablespoon of ghee and continue to roast. The flour starts turning brown and also starts giving out a nice aroma. Continue to roast until the flour turns golden brown. (Remember to keep flame at low or medium). Once browned switch off the flame.

4. Now in a saucepan pour the water and drop in the sugar and boil, add a few pods of cardamom to this(later it can be fished out). Once the water starts boiling and the sugar has completely dissolved put off the flame. 

5. Now slowly pour the sugar water into the roasted wheat flour, while stirring simultaneously. Remember to keep the flame of while pouring the water into the Atta. If the flame is not switched off the water can splutter on the hand, and the halwa can get lumpy too.

6. Once you have poured in all the water, switch on the flame and continue stirring, until the halwa starts leaving the pan bottom and swirls along with the ladle. At this stage add the remaining ghee and garnish with some dry nuts. 
Atte Ka Sheera is ready to serve.

NOTES:
1. Roasting the flour is the most critical step to get a smooth and creamy Halwa.
2. Roasting must be done in low to medium flame and not high as this could burn the flour.
3. After roasting the flour and while preparing the sugar water, keep the flame of the flour off. 
4. While pouring the sugar water into the Ata also the flame must be off. Switch on after pouring all the water.
5. I have used only 1/2 a cup of ghee, more can be added if required.

If you tried this recipe and liked it please comment below. I would love to hear from you.

RAJMA(Kidney Beans)MASALA

This is a simple dish from North India in which Kidney Beans/Rajma are cooked and simmered in a flavourful tomato sauce. This dish is a hit with everyone whenever I serve it at home and also when I make it for friends. I learnt this recipe from a Kashmiri friend around 18 years back and have cooked it the same way since then. 
I usually use finely chopped tomatoes, but in this recipe, I have used tomato puree. This recipe goes very well with Rice varieties like Jeera Rice, Matar Pulao, Flavoured rice, Ghee rice, Masala Rice and with Rotis, Chapatis and Naan too.
Let's get to the recipe right away.


PREP TIME: 10Mins+(soak time 6-8 hrs)          COOK TIME: 30 Mins
TOTAL TIME: 40Mins                                      COURSE:  MAIN 
CUISINE: NORTH INDIAN                              SERVINGS: 4
                                                                             AUTHOR: Rajni Ram


Ingredients:
Rajma(kidney beans) 200 gm approx soaked overnight
Onion 1 large or 2 small chopped
Tomatoes 2 large pureed ( if store-bought 1 cup)
Cinnamon 1 inch stick
Cumin seeds 2 tsp
Green chilli 1
Ginger - Garlic paste 1 tsp
Coriander powder 2 tsp
Fennel powder 1 tsp
Red chilli 2 tsp 
Turmeric powder 1/2 tsp
Garam Masala 1 tsp
Coriander leaves 2 tsp finely chopped 
Oil  1 tbsp

Directions:
Soak the Rajma overnight. Put it in a pressure cooker along with a stick of Cinnamon and cook for 8 whistles on medium flame. Now put the onions, green chilli and cumin seeds in a blender and blend smooth. In a pan or karahi heat the oil. Add 1 tsp cumin seeds and as it splutters, add in the onion paste and fry, add the turmeric powder and ginger-garlic paste and continue stirring. Keep frying until it turns light brown. Keep stirring continuously as it can stick to the pan base. Once you get the brown colour pour in the tomato puree and give it a stir. Cook for a minute and add all the dry spices-coriander powder, fennel powder, red chilli powder, stir and cook for 2 minutes. Now lightly mash the cooked Rajma and pour it into the pan along with the water(in which it cooked). Stir well and bring the dal to a boil. Cook for another 7 minutes the gravy will come together. The consistency should neither be too thick nor too watery. Add the Garam Masala powder now and switch off the flame. Garnish with some finely chopped fresh coriander leaves. The yummy Rajma Masala is ready to serve. I served it with Jeera rice. Indian breads go very well with this dish too.

STEPWISE RECIPE FOLLOWS:
1. Assemble all ingredients. Soak Rajma overnight and pressure cook for 8 whistles and keep ready.


2. Put the chopped onions, green chillies and 1 tsp cumin in a blender and grind to a fine paste.


3. Pour some oil in a pan/karahi and heat. Add 1 tsp cumin seeds and as they splutter add in the onion paste, Fry for 2 mins and add the turmeric powder and ginger-garlic paste. Fry until the mixture turns light brown.


4. Now add the tomato puree, stir and cook for a minute. Add all the dry spice powders except Garam masala powder and cook the mixture on a medium flame for 2 minutes.


5. Squish the cooked Rajma very lightly(with the back of a ladle just once)and add the Rajma along with the water(in which it cooked) to the onion tomato paste.


6. Stir nicely add 1 to 1.5 cups water and salt and allow it to boil on a medium flame for 5-7 minutes. The gravy will come together. Don't dry it up too much. The gravy should neither be too watery nor too dry. Add the garam masala at this stage and put off the stove. The Rajma masala is ready to serve. Garnish with finely chopped coriander leaves or mint leaves and serve with any of the rice varieties or with Roti, Chapati, Naan etc.


NOTES:
1. If the Rajma is well soaked the cooking time in the pressure cooker will be shorter. 
2. The Rajma splitting in the pressure cooker is a good sign, it means it has cooked through completely and there are no undercooked ones.
3. After pressure cooking always crush one Rajma between your index and thumb finger and check. It should crush easily. If you are having to put pressure, then put it back in the cooker again and cook for a few more whistles.
4. There are many varieties of Rajma, this recipe can be followed with all.
5. If using chopped tomatoes, then chop them really fine and add them in step 4 as mentioned, but cook them longer. You may also have to add little water to cook the tomatoes, as they should turn mushy for a nice gravy. 
6. Alternately while cooking the tomatoes keep mashing them with a masher simultaneously. 

If you tried this recipe and liked it please do comment below. I would love to hear from you.


Wednesday 8 July 2020

KUTHIRAIVALI(BARNYARD MILLET) PONGAL

Pongal is a savory dish of rice and lentils in South India similar to the Khichdi in the North. I have supplemented the rice with Barnyard Millet, called Kuthiraivali in Tamilnadu. These millets are high in fibre and are gluten-free. So for all the health freaks,  here's the recipe for you. This is a simple one-pot recipe. It makes a great breakfast option as compared to the rice Pongal, as it is lighter.  


PREP TIME: 20 Mins                                           COOK TIME: 15 Mins
TOTAL TIME: 35 Mins                                        COURSE:  MAIN 
CUISINE: NORTH INDIAN                                 SERVINGS: 4
                                                                               AUTHOR: Rajni Ram


Ingredients:

Kuthiraivali(Barnyard Millet) 1.5 cups
Moong dal/ split green gram 1/2 cup lightly roasted
Pepper-Cumin powder 2 tsp (dry roast in the ratio 2:1 cool and grind coarse)
Salt as per taste
Cashewnuts 6-7 
Ghee 1 tbsp
Curry leaves a few
Ginger 1 tsp finely chopped
Asafoetida 1 tsp
Turmeric powder

Directions :
Roast the moong dal to a light brown. Put the Millet in a vessel add the roasted dal to it and wash them nicely. Now put them into a pressure cooker and add 4 cups water, the salt, and turmeric powder and cook for 5 whistles. Let the pressure release. Now open the lid and give a light mash to the millet- dal mixture. It would have absorbed all the water while cooking, so pour another 1 to 1.5 cups of water and stir nicely. Now in a small tadka kadai put in 1 tbsp of Ghee and heat. Put the Cashewnuts in and fry them to a light brown. Remove them from the ghee and set aside. Now to the same ghee add Cumin seeds, let them splutter add-in the ginger, pepper- cumin powder, asafoetida, and curry leaves and fry them well in the ghee. Transfer this into the cooker. The Kuthiraivali Pongal is ready. Serve with some coconut-coriander chutney. 

STEPWISE RECIPE FOLLOWS:
1. Assemble all ingredients. Roast the moong dal and keep it ready.


2. Wash the Kuthiraivali/Barnyard millet and moong dal and transfer them to a small pressure cooker. If using big cooker follow pot in pot method( that is putting the contents into a vessel and putting that vessel into the cooker). Pour 4 cups water and pressure for 5 whistles. Once the pressure releases check if the mixture is well cooked. They should be quiet soft, If not put back in the cooker for another 2 whistles.

3. The mixture will be a little solid, add around 1 to  1.5 cups of water, and loosen up the mixture.

4. In a tadka, Kadai, or small tempering pan add the ghee and let it heat. Add the cashews and fry to a light brown. Remove from ghee. To the same ghee add the cumin. Once they splutter add in the ginger, pepper-cumin powder, curry leaves, and asafoetida. fry nicely for a minute and pour it into the dal-millet mixture. The Kuthiraivali Pongal is ready  


Notes:
1. If using pot in pot method then after pressure cooking, you can make the tempering in a bigger pan and add the rice dal mixture to the pan.
2. While adding water to the Pongal after pressure cooking to loosen it, you can add hot water instead of room temperature one.
3.Pepper -cumin powder  direction pictures below--


 If you tried this recipe and liked it please do comment below. I would love to hear from you.


PINEAPPLE RABRI

Rabri is a sweet-dish made by boiling and reducing milk until it gets a thready texture and becomes dense. It is flavoured with cardamom and nuts and served chilled. In this recipe, I have added fruit to the Rabri instead of dry nuts. Usually, Rabri is served as an accompaniment for Jalebi or Malpua, but this recipe of Pineapple Rabri can be relished just by itself. Let's get to the recipe right away.


PREP TIME: 20 Mins                                       COOK TIME:1 hr 30 Mins
TOTAL TIME: 1 hr 50 Mins                             COURSE:  DESSERT
 CUISINE: NORTH INDIAN                           SERVINGS: 4
                                                                           AUTHOR: Rajni Ram 


Ingredients:
Pineapple 4 slices chopped fine
Milk 1.5 litres
Brown sugar or unrefined sugar 1/4 cup
white sugar 1/2 cup
Cardamom powder of 3 pods
Milk Powder 1/2 cup(optional)
Saffron strands a few(optional)

Directions to make Rabri:
Cut the pineapple into fine cubes, put them in a pan add 1.5 to 2 cups water and cook them on slow fire. The pineapple should be just cooked and not mushy. The water should have dried up, it takes about 15 minutes. After the water dries up add 1/2 cup brown sugar/unrefined sugar and saute. Keep stirring once you add sugar as there are chances of the sugar burning. Let the mixture become dry. Put off the flame and cool it. Now in a thick bottomed vessel pour the 1.5 litres of milk and boil. Keep stirring continuously, otherwise the milk we stick to the bottom of the vessel and burn. Add the Saffron strands now. Keep stirring until the milk reduces to half the quantity. It will start getting denser. The texture also changes. Add 1/2 cup milk powder(if using, at this stage) continue to stir, add the white sugar and continue stirring until the milk becomes semi-dry, that is, it should not be of flowing consistency but a little denser. At this stage put off the flame. Cool the Rabri and put it in the refrigerator. To serve add the candied pineapple pieces to the Rabri, mix, put some pieces on top and the desert is ready.

STEPWISE RECIPE FOLLOWS:
1. Assemble all ingredients. Please note that the pineapple can be cooked a day ahead and put in the refrigerator.

2. To cook the pineapples, cut them into small cubes, put them in a pan add around 2 cups water and cook. They should become soft, but not mushy. Add the brown sugar and continue to cook. Once the mixture dries up, put off the flame and let it cool.

3. Pour the milk into a wide-mouthed, thick-bottomed vessel and begin to boil. Keep stirring constantly as the milk should not stick to the bottom of the pan. Add the saffron strands now.

4. Continue stirring until the milk reduces to half, it will become denser and the texture will start getting thread. Add in the milk powder(this is optional) and continue to reduce the milk.

5. Add the sugar when the threadiness increases and continue to stir. Put in the cardamom powder.  Put off the flame when the mixture is no longer in pouring consistency, it has to be scooped out. Cool the mixture and put it in the refrigerator.  

6. To serve add the candied Pineapple into the Rabri and mix. Reserve some for putting on top. Decorate with cherries or berries and the refreshing Pineapple Rabri is ready to serve.


NOTES:
1. It takes about 1.5 hrs to make this dish. But don't be disappointed, it will be worth the effort. 
2. The time taken will depend on the fat content in the milk used. I have used toned milk, so it took me more than an hour to reduce the milk. If full cream milk is used the time will be lesser.
3. If making this for a get-together or party, you can make this the previous day and put it in the refrigerator in an airtight container. If doing this keep the fruit separate and add before serving.
4. I have used white sugar for Rabri, unlike the pineapple, as adding brown sugar to the Rabri will change its colour. 

If you tried this recipe and liked it pls do comment below. I would love to hear from you.


Tuesday 7 July 2020

SEMOLINA(SUJI)CHEESE BALLS

This is a desi version of American Corn Cheese balls sans the corn. It’s a no Maida recipe. I made this recipe the first time today and they turned out very well, and hence decided to blog them. They are the perfect tea time snack. I have stuffed the Sooji balls with a seasoned cheese mixture. The cheese mixture is enclosed in a Suji and potato jacket. The use of Suji has made the balls very light and crisp at the same time. Here’s the recipe...

   PREP TIME: 25 Mins                                      COOK TIME: 15 Mins
  TOTAL TIME: 35 Mins                                     COURSE:  STARTERS/ SNACKS
  CUISINE: NORTH INDIAN                              SERVINGS: 4
   AUTHOR: RAJNI RAM


    Ingredients:
    Semolina( Suji) 1 cup
    Potatoes 3 medium size boiled and grated
    Cheddar cheese 1 cup grated
    Coriander leaves 1tbsp finely chopped
    Green chillies 3 finely chopped
    Salt as per taste
    Coriander powder 2 tsp
    Fennel powder 1 tsp
    Red chilli 1 tsp
    Garam masala powder 1/2 tsp
    Pepper powder 1/4 tsp
    Red chilli flakes 1/2 tsp

Directions for filling: Grate the Cheddar cheese, add chilli flakes and pepper and mix well. Make tiny balls of them for stuffing and keep aside.
Directions for Suji balls:
In a pan take 1.5 cups water and put it to boil. As it starts boiling slowly start pouring the roasted Suji into
the water( like making Upma) and keep stirring simultaneously. Stir until all water is absorbed and it becomes dry. Boil the potatoes mash them. In a big bowl put in the cooked Suji, the grated potatoes, green chillies, coriander leaves and all dry masalas- red chilli powder, coriander powder, fennel powder, salt and garam masala and combine all together such that all masalas are well mixed well. Form into a big ball. Divide this into 12 medium-sized balls and keep aside. Take one ball at a time and make a cavity into it with your thumb and widen it, put it the cheese mixture and nicely seal the ball well. Repeat with all balls. Now heat oil for deep frying in a karahi. It should not be too hot. When it is medium hot drop the balls gently into the oil a few at a time and fry them on medium heat until they are nicely brown and crisp. Drain the oil on absorbent paper and serve hot with a bowl of tomato ketchup. The yummy Suji Cheese Balls are ready. A cup of tea to go with it makes for a monsoon time snack. Children too will like this snack. 

    STEPWISE RECIPE FOLLOWS:

1. Assemble all ingredients. Boil and grate potatoes and grate the cheese.


2. Make the filling by adding Red chilli flakes and pepper powder to the cheese and diving the cheese mixture into 12 tiny balls which will fit into the Suji balls.


3. In a small pan or vessel boil 1.5 cups of water with 1/4 tsp of salt.  Once it starts bubbling slowly pour the Suji little by little and stir simultaneously ( like cooking Upma). Once the water absorbs all the Suji and dries up( it should be cooked- colour changes and it becomes pale) put off the stove and cool. This step can be done ahead and kept.


4. In a big bowl put it the cooked Suji, grated potato followed by green chillies, chopped coriander, and all dry masalas and salt and combine all of them well to form a big ball. Divide the ball into 12 smaller portions.


5. Now take one Suji ball at a time and make a cavity( hole) in the centre with your thumb and widen it. Put in the tiny cheese ball into this cavity and seal well. Likewise, repeat for all the 12 portions. ( please check point 5 in notes, as I have updated it recently).


6. Heat oil for frying in a karahi and get it medium hot. Now drop the cheese-filled Suji balls gently into the oil and fry. You can fry a few of them at a time. Get them to a nice brown colour and remove from oil and drain on absorbent towels. Repeat for all 12 portions. Serve. hot with some tomato ketchup. ( please refer to note 6 here).

6


    NOTES:
1. The Suji can be cooked well in advance. The potatoes too can be boiled and grated much ahead.
2. Do season the cheese with chilli flakes and pepper or it may taste bland.
3. Don’t overheat the oil or the insides will remain raw. At the same time, the oil should not be under heated, or the Suji will absorb more oil. To test drop a tiny bit of the mixture, if it rises up gradually it is the right temperature.
4. These Suji balls can be made into bite-sized balls and served as starters for a party or get together.
5. When I made these the next time, I quartered a cheese cube and dusted it with pepper powder, and stuffed it into the Suji balls . If you don’t want to grate cheese, this is an alternate. And the cheese was more melty this way. 
6. Instead of deep frying I tried using a Appe pan ( Appa chatty/ Paniyaram mould) and the outcome was very good. For a less oil option, one can do that too.

If you made this recipe and liked it please comment below. I would love to hear from you.


VATHA KOZHAMBU(Shallots in a spicy tamarind gravy)

This is a traditional South Indian recipe. There are many variations to this recipe and a large variety of vegetables or dehydrated berries(Turkey berry, cluster beans, etc;) are simmered in a spicy tamarind sauce. Usually served with hot rice and ghee, but goes well with Dosas and Idlis too. I have used Sambar powder here, though Vatha Kozhambu powder is also used, there is not much difference in the taste and Sambar powder works well. For the recipe of Sambar Powder click here. Let's get to the recipe without much ado.


PREP TIME: 20 Mins                                           COOK TIME: 15 Mins
 TOTAL TIME: 35 Mins                                       COURSE:  MAIN 
 CUISINE: SOUTH INDIAN                               SERVINGS: 4
                                                                               AUTHOR: Rajni Ram


Ingredients:
Shallots 200 gm skinned
Tomato 1 large
Tamarind lemon sized ball( soaked in water and pulped)
Salt as per taste 
Sambar powder 1 tbsp
Red chilli powder 1 tsp
Turmeric powder 1 tsp
Asafoetida 1 tsp
Mustard seeds 1 tsp
Fenugreek seeds 1/2 tsp
Dry red chillies 2 broken
Curry leaves a few
Sesame oil/ Til oil 1 tbsp( can use more if you prefer)

Directions:
Peel the skin off the Shallots and keep ready. Chop the tomatoes. Soak a lemon sized ball of tamarind in a little warm water, let it cool and extract the pulp. Now in a pan or karahi take a tablespoon of Sesame/Til oil and heat. Add the mustard seeds, fenugreek seeds, asafoetida, dry red chillies, and curry leaves and saute for a minute. Add the Shallots and saute until they start turning translucent. Now add the tomatoes and continue to saute for a minute. Add the dry spices- Sambar powder, turmeric powder, and red chilli powder and continue to stir fry. If the mixture is too dry add another 2 teaspoons of oil, otherwise the masala may burn. Saute for another minute and pour the tamarind pulp and add the salt. Stir well and allow it to simmer on low flame until it thickens and reduces a bit. The oil will form a layer on top and the mixture will reduce, at this stage put off the stove. The Shallot Vatha Kozhambu is ready to serve with hot rice, Dosas, Idlis etc. 

Direction to make Sambar powder is given under the label powders.

STEPWISE RECIPE FOLLOWS:
1. Assemble all ingredients. Shallots skinned and tomatoes chopped. Soak tamarind(lemon sized ball) and get the pulp.

2. In a pan/karahi heat some Til oil(preferable, if not continue with refined oil). Add mustard seeds, fenugreek seeds, dry red chillies, asafoetida, curry leaves, and fry.

3. Add the shallots and stir well so that the oil coats all the shallots. Fry until they turn translucent. Add the tomatoes and continue to stir fry for another minute.


4. Now add in all the dry spices- Sambar powder, red chilli powder, turmeric powder, and continue to fry. If the mixture is too dry after adding the powders, then add 2 tsp of oil and fry, until the raw taste of the masalas is gone. 

5. Pour the tamarind pulp and in the salt and stir well and allow the mixture to boil. Let it simmer until the mixture thickens and reduces in quantity. The oil will form a layer on top. At this stage put off the stove. The Shallot Vatha Kozhambu is ready to serve with hot rice and ghee.


NOTES:
1. I have used Shallots here, other vegetables that can be used are Drumsticks, Ladies finger, Onions, dehydrated berries like Turkey berry(Sundakai), and even dehydrated vegetables like Cluster beans, Bitter gourd, etc. 
2. Sesame oil enhances the flavour of the dish, so I highly recommend it.
3. Frying the dry masalas in the oil well(step4), gives the dish the perfect flavour.
4. The fenugreek seeds also impart the aroma a lovely flavour to this dish, but they should be used in the quantity mentioned and not more, as they can turn the dish bitter. 

If you tried this recipe and liked it please comment below. I would love to hear from you.


TOFU AND STIR FRIED VEGETABLES IN HOT SCHEZWAN SAUCE

  Any Tofu lovers? I agree its an acquired taste,but going by the health benefits it has to offer, I try including it in my diet now and the...