Vegetarian cooking blog

Saturday 18 July 2020

SAMBAR POWDER

Sambar,  South India’s most popular food often served with rice and also as an accompaniment for Dosa, Idli, Paniyaram, Pongal and many such recipes. What gives the Sambar its flavour and taste? But of course the Sambar Powder. Every South Indian household has its own proportions of the ingredients for the Sambar Powder. The main ingredients being the same, there may be some differences based on the region. 
This recipe of Sambar powder can also be used to make Vatha Kozhambu a traditional South Indian preparation. You can check out the recipe of Vatha Kozhambu here
Sambar powder is used to make Rasam too in some households, but I strongly recommend not to use Sambar powder for Rasam, as though most ingredients are same the addition of pepper gives the Rasam powder a different taste and flavour altogether. I will post the Rasam powder recipe soon. 
This recipe yields about 250 gm of powder, which can be stored in an airtight container as used when required.
Here is the recipe for Sambar Powder which makes delicious and flavourful Sambar.

PREP TIME: 5Mins                                      COOK TIME: 25Mins
TOTAL TIME: 30 Mins                                COURSE:  MAIN 
CUISINE: SOUTH INDIAN                        QUANTITY: 250 GM APPROX
AUTHOR: Rajni Ram


Ingredients:
Coriander seeds/ Dhania seeds 2 cups
Urad dal 3/4 cup
Chana dal 1/2 cup
Tuvar dal 1/4 cup
Fenugreek seeds/ Methi seeds 1 tbsp
Dry red chillies 150 GM
Turmeric powder 1 tbsp
Red chilli powder 1 cup

Directions: 
Each ingredient except turmeric powder and red chilli powder should be fried in a karahi separately to golden brown colour. Dry roast, no need of oil. The red chillies should turn crisp. Cool all of them after frying and grind them to a fine powder. Now add the turmeric powder and red chilli powder to the ground powder and mix well. Store in an airtight container. 
2 tbsp of this powder will make Sambar to serve 5 people. The powder will last 6 months or more when stored in a cool dry place. 

During peak summer you can also keep all ingredients except turmeric and red chilli powder directly in the hot sun for 2 hours and grind when still crisp.

NOTE:
I am not giving step by step photos for this recipe as it is quite easy to follow. Each ingredient to be slow-roasted in a Kadai separately, or to be kept in the sun, each in a separate flat plate so that they are even heated.


If you tried making Sambar with this proportion of Sambar powder please comment below. I would love to hear from you. 

DAHI POHE/MORU AVAL

This recipe of the humble Poha(beaten rice flakes)/Aval soaked in curd is one of my favourites.  I make it whenever I have a lot of sour curd. Healthy and filling at the same time. It makes for a good breakfast or mid-evening snack(Tiffin) option. I make it for dinner too when lunch is heavy.  There are many variations of the Pohe like Kanda Poha(onion Poha), Masala Poha(tomatoes and onions), Lemon Poha, Puli Aval(tamarind Poha), Vella Aval(Sweet Poha) and  Dahi Pohe/Moru Aval. The Poha can be either thick or thin. For this recipe, I have used the thin one, but the same can be done with the thick one too, just that the soak time will vary. Thick Poha is used for recipes where the Poha is going to cook in a sauce so that it doesn't become soggy. The Dahi Pohe makes for a good and healthy lunchbox recipe for kids. While you are here please have a look at other recipes by Rajjo's Kitchen like Semolina Cheese BallsRava DosaSavoury Muffins and more...
Here is the recipe for Dahi Pohe/Moru Aval.

PREP TIME: 10Mins                                      COOK TIME: 15 Mins
TOTAL TIME: 25Mins                                    COURSE:  BREAKFAST/TIFFIN
CUISINE:  INDIAN                                         SERVINGS: 4
AUTHOR: Rajni Ram


Ingredients:
Poha (thin) 250 gms
Sour curd 1 to 1.5 cups
Salt as per taste
Grated Coconut 2 tbsp
Peanuts 1 tbsp
Green chillies 2 finely chopped
Ginger 1 inch piece finely chopped
Dry red chillies 2 broken
Mustard seeds 1 tsp
Chana dal(gram dal) 2 tsp
Urad dal(black gram)2 tsp
Curry leaves a few
Asafoetida 1/2 tsp
Oil for tempering

Directions:
Pass the Poha through a sieve that has medium-sized perforations, such that the Poha remains in the sieve and the dust and small flakes fall away. Now wash the Poha just once(may become soggy if done more than once)and drain all the water. Put it into a flat bowl and add the sour curd and salt to it. Mix gently but evenly so that all the Poha are coated with the curd. Set aside for 10 to 15 minutes.
Now using your hands separate the soaked Poha gently and set aside. Take a Pan or Karahi and pour the oil. Once it heats up add the peanuts and fry them. Once they are golden in colour remove and set aside. Now to the oil add the mustard seeds, as they crackle add the chana dal, urad dal, dry red chillies, ginger, green chillies, curry leaves and asafoetida and fry them until golden in colour. Now add the Poha to the tempering and mix nicely. Check and adjust the salt. Keep stirring the Poha on a low to medium flame for 3 minutes. Now add the grated coconut and stir for another 2 minutes on low flame. Add in the fried peanuts and put off the flame. Enjoy the simple, healthy, tasty Dahi Pohe. Bon Appetit. 

STEPWISE RECIPE FOLLOWS:
1. Assemble all ingredients. 


2. Sieve, wash and soak the Poha in Curd. Add salt to poha before pouring the curd. Dilute the curd with little water(1/4 cup) if required. Rest the soaked Poha for 10 to 15 minutes. After the poha have soaked, separate them gently with your hands.
 

3. In a pan/karahi pour oil for tempering, around 2 tbsp and heat. Drop in the peanuts and fry until golden in colour. Now add the mustard seeds, as they crackle add the chana dal, urad dal, dry red chillies, ginger, green chillies and asafoetida and fry until golden in colour. 


4.. Now add the Poha little by little and mix nicely so that the tempering is mixed evenly. Stir on a medium flame for  3minutes. Check salt and adjust if required. Add the grated coconut and stir for another 3 minutes over a medium to low flame.


5.. The Dahi Pohe are ready to pack in the lunch box or to serve.


NOTES:
1. If using thick Poha there is no need to sieve the Poha, just wash it around 3 times and then soak it in curd.
2. Fresh curd can also be used, but the recipe tastes best with slightly sour curd.
3. More grated coconut can be added if you like the flavour.


If you tried this recipe and liked it, please comment below. I would love to hear from you.


Friday 17 July 2020

rajnirams.blogspot.com

Kheer/Payasam is a popular part of Indian cuisine as a sweet dish. It is sometimes served at the beginning of a meal or as a finish off to the meal. Whenever there are festivities there is always kheer. There are many variations to the payasam, the popular ones being Rice Kheer, Semiya Payasam, Chana dal payasam, and many more.

Carrot Kheer is a dessert I have made time and again for friends and family on popular demand. I will also let you into my little secret that turns this recipe a stunner. 

A simple dessert that tastes good both chilled and warm. This is a great recipe to make all the fussy about carrots and milk kids to get to eat both, as it a delicious way to have them. Any variety of carrot can be used for this kheer either Delhi Carrots or the English Carrots.

This kheer or payasam is not a very popular one as generally carrots are not on the favourite list of many, but that's exactly why it should be popularised. Only when you have this kheer you will understand what I mean. It has a beautiful texture, can be had chilled right out of a glass-like juice or can be had warm on those cosy winter nights. It is also a great after school healthy drink. I can keep singing more praises of its goodness and delicious, but then one has to drink this kheer to experience it.    
While you are here check out my other dessert recipes like Pineapple tartAtte ka SheeraApple CrumblePineapple RabriBerry Smoothie Ice cream, and Akkaravadisal.

Here goes the recipe of Carrot Kheer for you.

PREP TIME: 10 MINS            COOK TIME:30 MINS 
TOTAL TIME: 60 Mins              COURSE:  DESSERT
CUISINE: SOUTH INDIAN      SERVINGS: 5
AUTHOR: Rajni Ram


Ingredients:
Carrot  2 cups chopped to small cubes
Milk 5 cups
Sugar 1/2 cup 
Cardamom 4 pods powdered
Cashewnuts around 7 broken to bits

Directions:
Chop the carrots to small cubes and put them in a heavy-bottomed vessel. Pour 1.5 cups of milk and cook. This should be done in a low to medium flame and the carrots should cook in the milk until the milk is almost evaporated and the milk sticks to the carrot pieces. Put off the flame and cool completely. Now put them in a blender and grind to a smooth paste. Add around 1/2 cup milk if required while grinding. Now pour the pureed Carrot into the same heavy bottomed vessel and switch on the flame. Dilute the puree with 1 cup milk and start boiling again. As it froths up and starts rising in the vessel add the sugar and reduce the flame. Continue to cook for 2 minutes. Now add another cup of milk and continue to boil on a low flame. Now when the mixture starts rising in the vessel switch off the flame and add the cardamom powder. Take a small tempering Kadai and add 2 teaspoons of ghee to it. when the ghee is warm add the broken Cashewnuts and fry to a light brown colour. The delicious Carrot Kheer is ready to serve. Enjoy the healthy goodness. Bon Appetit.


STEPWISE RECIPE FOLLOWS:
1. Assemble all ingredients. Chop Carrots, cut the Cashewnuts to pieces, make a powder of the Cardamom pods.

2. Put the chopped carrots in a thick bottomed vessel, pour 11/2 cups milk and cook.

3. The milk should evaporate completely while cooking the carrots and should stick to the carrots. The mixture should resemble like Rabdi sticking to carrots. Put off the flame at this stage and cool the mixture.


4. Now put the mixture in a blender and grind it to a smooth puree, add 1/2 cup milk if required while pureeing.


5. Pour the puree into the same heavy bottomed vessel and switch on the flame. Add 1 cup of milk and bring to a boil on a low flame. Ad the puree froths and rises up in the vessel put in the sugar and stir nicely to dissolve.


6. Cook for 2 minutes and pour another cup of milk and continue to cook over a low flame for another 5 minutes. When the mixture starts rising again in the vessel, put off the flame and sprinkle the Cardamom powder over the kheer and mix gently. 


7. Fry the Cashewnuts to a golden colour and add them to the kheer. The delicious Carrot Kheer/payasam is ready.


NOTES:
1. Cooking the carrots in the milk until the milk is fully evaporated is critical to recreating this taste( that's the secret). I find cooking carrots in milk only until the carrots are tender and then putting them in the blender as most recipes recommend, to leave a raw taste of the carrot in the dish. Which finally mars the flavour of the dish.

2. The milk and carrot have to cook over a low to medium flame. Don't be tempted to raise the flame as the milk can get burnt and leave an after taste.

3. The beauty of this dish is that it needs no artificial colouring as its natural colour is bt itself very inviting.

4. Not much sugar is required for this recipe as carrots are naturally sweet.

5. Condensed milk can also be added instead of sugar, but in a lesser quantity, maybe 1/4 cup first and more if required. I have not tested this method of using condensed milk.

If you tried this recipe and liked it please comment below. I would love to hear from you.


Carrot Kheer/Payasam

Kheer/Payasam is a popular part of Indian cuisine as a sweet dish. It is sometimes served at the beginning of a meal or as a finish off to the meal. Whenever there are festivities there is always kheer. There are many variations to the payasam, the popular ones being Rice Kheer, Semiya Payasam, Chana dal payasam, and many more.

Carrot Kheer is a dessert I have made time and again for friends and family on popular demand. I will also let you into my little secret that turns this recipe a stunner. 

A simple dessert that tastes good both chilled and warm. This is a great recipe to make all the fussy about carrots and milk kids to get to eat both, as it a delicious way to have them. Any variety of carrot can be used for this kheer either Delhi Carrots or the English Carrots.

This kheer or payasam is not a very popular one as generally carrots are not on the favourite list of many, but that's exactly why it should be popularised. Only when you have this kheer you will understand what I mean. It has a beautiful texture, can be had chilled right out of a glass-like juice or can be had warm on those cosy winter nights. It is also a great after school healthy drink. I can keep singing more praises of its goodness and delicious, but then one has to drink this kheer to experience it.    
While you are here check out my other dessert recipes like Pineapple tart, Atte ka Sheera, Apple Crumble, Pineapple Rabri, Berry Smoothie Ice cream, and Akkaravadisal.

Here goes the recipe of Carrot Kheer for you.

PREP TIME: 10 MINS            COOK TIME:30 MINS 
TOTAL TIME: 60 Mins              COURSE:  DESSERT
CUISINE: SOUTH INDIAN      SERVINGS: 5
AUTHOR: Rajni Ram


Ingredients:
Carrot  2 cups chopped to small cubes
Milk 5 cups
Sugar 1/2 cup 
Cardamom 4 pods powdered
Cashewnuts around 7 broken to bits

Directions:
Chop the carrots to small cubes and put them in a heavy-bottomed vessel. Pour 1.5 cups of milk and cook. This should be done in a low to medium flame and the carrots should cook in the milk until the milk is almost evaporated and the milk sticks to the carrot pieces. Put off the flame and cool completely. Now put them in a blender and grind to a smooth paste. Add around 1/2 cup milk if required while grinding. Now pour the pureed Carrot into the same heavy bottomed vessel and switch on the flame. Dilute the puree with 1 cup milk and start boiling again. As it froths up and starts rising in the vessel add the sugar and reduce the flame. Continue to cook for 2 minutes. Now add another cup of milk and continue to boil on a low flame. Now when the mixture starts rising in the vessel switch off the flame and add the cardamom powder. Take a small tempering Kadai and add 2 teaspoons of ghee to it. when the ghee is warm add the broken Cashewnuts and fry to a light brown colour. The delicious Carrot Kheer is ready to serve. Enjoy the healthy goodness. Bon Appetit.


STEPWISE RECIPE FOLLOWS:
1. Assemble all ingredients. Chop Carrots, cut the Cashewnuts to pieces, make a powder of the Cardamom pods.

2. Put the chopped carrots in a thick bottomed vessel, pour 11/2 cups milk and cook.

3. The milk should evaporate completely while cooking the carrots and should stick to the carrots. The mixture should resemble like Rabdi sticking to carrots. Put off the flame at this stage and cool the mixture.


4. Now put the mixture in a blender and grind it to a smooth puree, add 1/2 cup milk if required while pureeing.


5. Pour the puree into the same heavy bottomed vessel and switch on the flame. Add 1 cup of milk and bring to a boil on a low flame. Ad the puree froths and rises up in the vessel put in the sugar and stir nicely to dissolve.


6. Cook for 2 minutes and pour another cup of milk and continue to cook over a low flame for another 5 minutes. When the mixture starts rising again in the vessel, put off the flame and sprinkle the Cardamom powder over the kheer and mix gently. 


7. Fry the Cashewnuts to a golden colour and add them to the kheer. The delicious Carrot Kheer/payasam is ready.


NOTES:
1. Cooking the carrots in the milk until the milk is fully evaporated is critical to recreating this taste( that's the secret). I find cooking carrots in milk only until the carrots are tender and then putting them in the blender as most recipes recommend, to leave a raw taste of the carrot in the dish. Which finally mars the flavour of the dish.

2. The milk and carrot have to cook over a low to medium flame. Don't be tempted to raise the flame as the milk can get burnt and leave an after taste.

3. The beauty of this dish is that it needs no artificial colouring as its natural colour is bt itself very inviting.

4. Not much sugar is required for this recipe as carrots are naturally sweet.

5. Condensed milk can also be added instead of sugar, but in a lesser quantity, maybe 1/4 cup first and more if required. I have not tested this method of using condensed milk.

If you tried this recipe and liked it please comment below. I would love to hear from you.


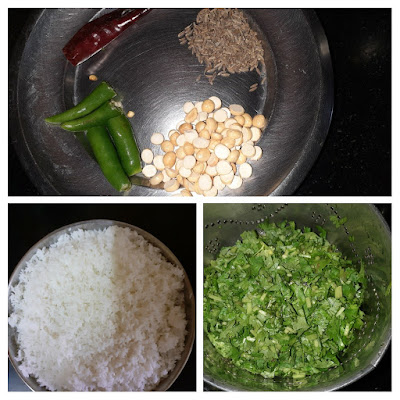
CORIANDER RICE/CHUTNEY RICE

My love for this herb is perennial. I love adding it to Subjis not just as a garnish but a few springs just as one of the ingredients. There are many condiments made of this humble herb like Chutneys, Dips, Raitas, Pickle, etc; Coriander rice is a simple and healthy rice variety and a great lunch box option for kids. It is healthy too as Coriander is rich in fiber and essential nutrients. It aids in digestion too. So why leave out such a beneficial herb from main course cooking and limit it to just being a condiment. Therefore I thought of adding this Coriander rice recipe to my blog post.
Try adding a few sprigs of it to any subji, not in the end but while cooking and see how the dish gets elevated in taste and flavour. 
The colour, flavour, and aroma of this rice are just so refreshing. While you are here check out my other rice varieties like Coconut Rice, Masala Rice, Falvoured rice and, Lemon Rice.
I'm calling this chutney rice as these are almost the same ingredients we use for green chutney, barring the chutney Chana. Well, tamarind/raw mango is added in green chutney though, I will try that version shortly and post. Here is the recipe for Coriander Rice...


PREP TIME: 10Mins                                     COOK TIME: 30 Mins
TOTAL TIME: 40 Mins                                  COURSE:  MAIN 
CUISINE: SOUTH INDIAN                           SERVINGS: 4
AUTHOR: Rajni Ram


Ingredients:

Coriander leaves 1 bunch finely chopped
Rice(regular) 1 cup precooked
Peanuts 1 tbsp
Cashewnuts a few
Green chillies 2
Cumin seeds 1 tsp
Fried gram dal(chutney chana)/Pottukadalai 1 tbsp
Turmeric powder 1 tsp
Mustard  seeds1 tsp
Chana Dal(Bengal gram) 1 tsp
Urad dal(black gram) 1 tsp
Dry red chillies 1-2 broken
Oil for tempering 1 tbsp

Directions:

Cook 1 cup rice in a pressure cooker( I used pot in pot method, you can cook directly too) adding 3 cups water for 3-4 whistles. Once pressure releases spread out the rice on a plate to cool and also drizzle 2 tsp oil over the rice so that the grains do not stick together. Put the chopped coriander, cumin seeds, green chillies and the fried chana/ Pottukadalai and grind at first without water, then after a spin or two add little water and grind to a smooth paste. In a karahi or pan pour some oil and heat. Add the mustard seeds, chana dal, urad dal, dry red chilli and fry until golden brown. Now add the turmeric powder, followed by the ground Coriander puree and nicely fry the paste in oil on low heat. The paste will get a little dense. Add salt and fry for another 2 minutes. Now start mixing in the cooled rice little by little into the cooked paste, and mix nicely so that the rice is nicely coated with the paste. Put off flame and garnish with peanuts and cashewnuts. The flavourful Coriander Rice is ready to serve. Enjoy the lovely green of the rice. Bon Appetit.

Serving suggestions: Raita, Potato fry, or Cauliflower roast or Colaccasia(Arbi/Sepankezhangu) roast and papad.

STEPWISE RECIPE FOLLOWS:

1. Assemble all ingredients. Chop coriander leaves finely, Cook the rice for 3 to 4 whistles, cool on a plate and set aside.

2. Put the chopped coriander into the blender along with the green chillies, cumin seeds and fried chana/pottukadalai. Without adding water pulse them once or twice. Now add some water and grind to a smooth paste. Set aside.

3. In a karahi or pan pour some oil for tempering. Fry the peanuts to a golden colour and the cashew too and keep aside. In the same oil put in the mustard seeds. Let them crackle then add Chana dal, urad dal followed by dry red chillies. Fry until golden brown and add the turmeric powder.


4. Now pour the coriander paste into the oil and fry the paste nicely for 2 minutes. Add salt and continue to fry for another 2 minutes. The moisture should evaporate and the paste should become a little dense. 

5. Add the cooked and cooled rice little by little to the paste. Mix well and switch off the flame. The flavourful Coriander rice is ready to serve.


NOTES:
1. While frying the paste in oil be careful not to evaporate it completely. The consistency should resemble sauce consistency. 
2. Spread out the rice on a plate and drizzle oil or the rice will turn soft and lumpy once added to the paste.

If you tried this recipe and liked it then please comment below. I would love to hear from you.


Wednesday 15 July 2020

DRUMSTICK CURRY

Moringa is the latest buzz word everywhere. What with Moringa leaves powder trending the healthy list. Well, the Moringa tree and dishes cooked from its fruit, flowers and leaves have been in India for ages. We have used its fruit, the drumstick in Subjis, Sambar, dal, etc; the leaves too are very aromatic and used as an add-in in Dosas, chilas, and more. The flowers too when added while making ghee, give the ghee a nice flavour and make it aromatic. My grandmother always added a few flowers just before putting off the flame while making ghee and would remove the flowers later, while bottling the ghee. My mother makes a pickle of it too, which is just as wonderful.
Here I bring to you a simple curry made from Drumsticks in curd and cashew-based gravy which absorbs all the flavours of the drumstick. A very quick recipe that gets done in 30 minutes. While you are here please have a look at my other Subjis like Mixed vegetable curry, Brinjal Pepper Masala, Kadai Paneer dry and many more 
Here is the recipe of Drumstick curry--

PREP TIME: 15 Mins                                     COOK TIME: 15 Mins
TOTAL TIME: 30 Mins                                    COURSE:  MAIN 
CUISINE: NORTH INDIAN                             SERVINGS: 4
AUTHOR: Rajni Ram


Ingredients:
Drumsticks 5 long ones cut into pieces
Cashewnuts 15(soaked in warm water)
Poppy seeds 2 tsp(soaked in warm water)
Tomatoes 2 large or 3 medium
Curd 1 cup
Red chilli powder 1.5 tsp
Turmeric powder 1 tsp
cloves 3
Cinnamon 1 small stick
Garam masala powder 1/2 tsp

Directions:

Soak the Cashewnuts and poppy seeds in a little warm after for 10 minutes. Cut the drumsticks to 3 inch long pieces and set aside. Chop the tomatoes. After 10 minutes drain the water off the Cashewnuts and poppy seeds and put them in a blender, add the Cloves and Cinnamon stick and grind without water to a coarse paste. 2 spins in the blender will do. Add the chopped tomatoes to this and blend to a fine paste now. Keep aside. Heat 1 tbsp oil in a karahi, the oil should not be smoking hot. Lower the flame and add 1 tsp turmeric powder the chilli powder and stir immediately, or the masala powders will get burnt. To this add the ground paste and fry it in the oil for a minute nicely, until the rawness of the tomatoes goes away. Now add the curd and stir continuously for 30 seconds, add the salt and 1.5 cups water and put in all the drum stick pieces, cover and cook until the drumsticks are well cooked and the gravy becomes thicker. Test the drumsticks for doneness. If they are cooked, the flame can be turned oof and sprinkle little garam masala powder on top. The Drumstick curry is ready to serve. Enjoy the flavours. I'm sure you will cook this dish whenever you have Drumsticks at home. Bon Appetit.   

STEPWISE RECIPE FOLLOWS:
1. Assemble all ingredients. Cut the drumsticks to pieces, soak the cashewnuts and poppy seeds for 10 minutes in warm water, chop the tomatoes.


2. After 10 minutes put the whole spices(cloves and cinnamon) in the blender, drain water from the cashewnuts and poppy seeds and put them in the blender at too and grind them coarse, without adding any water.


3. Now add the tomatoes to the blender and grind all together to a smooth paste.


4. Heat oil in a Karahi(medium hot) and add the turmeric powder, followed by red chilli powder. Oil in the karahi should be sufficient or the spice powders will burn.
Now add the ground paste immediately and fry the paste in oil for a minute, until the rawness of tomatoes is gone.
  

5. Now add the curd and start stirring continuously for 30 seconds. Now add the salt, and put in the cut drumsticks. Add 1.5 cups water and cover and cook for 10 minutes on medium heat. The drumsticks should have cooked well and the gravy should thicken up, at this stage add 1/2 tsp garam masala and put off the flame.
The drumstick curry is ready. Serve with Rotis, Parathas or even Rice.


NOTES:
1. If the curd is a little sour it adds taste to the curry.
2. Stirring constantly after pouring the curd is crucial or the curd will leave out the moisture and the gravy will be too thin.
3. Check the doneness of the drumsticks before switching off the flame.
4. In case the drumsticks are still raw but the gravy has thickened, add 1/2 cup water, cover and cook until done.
5. Pick tender and fleshy Drumsticks while buying, they will cook faster.

If you tried this recipe and liked it please comment below. I would love to hear from you.


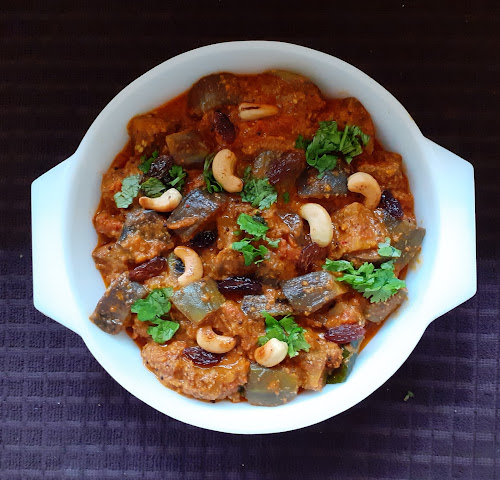
BRINJAL PEPPER MASALA(NO ONION-NO GARLIC RECIPE)

An everyday subji made from Brinjals and very simple gravy. Brinjals combined in a tomato and coconut gravy with some black peppers for spice. A very mildly flavoured dish, it has some Cashewnuts and Raisins too which enhance its taste. As I mentioned in one of my earlier posts Brinjals are very versatile vegetables and a large variety of recipes can be made with them from different cuisines. There are many types of Brinjal too and some recipes are specific to the Brinjal.
In this recipe, you can use any variety except the Bhara Baigan( the large fleshy one), as we want the Brinjal pieces to be firm and not mushy.

I learnt this subji from one of the guest house cooks where we stayed during our transfers from city to city. The gravy is of the South Indian style but believe me, it goes perfectly well with any of the rice varieties like Pulav or vegetable rice or even plain rice. It can also be served with Rotis. The Cashews and especially the raisins are like surprise packages in this dish which keep popping every 1 or 2 scoops. If you don't like nuts or Raisins in your subjis(like I did until I tasted this) then you can always omit their use.

While you are here take a look at Gutti Vankaya Kura, which is also a Brinjal dish with Andhra flavours. Also check out, Methi Wale Baingan,  Please look up other subjis too under the label Subjis while you are here.

PREP TIME: 20 Mins                                    COOK TIME: 20 Mins
TOTAL TIME: 40 Mins                                   COURSE:  MAIN 
CUISINE: SOUTH INDIAN                            SERVINGS: 4
AUTHOR: Rajni Ram


Here is the recipe of Brinjal Pepper Masala-

Ingredients:
Brinjal (any variety except Bharta Baigan) 250 gm diced medium
Tomatoes 3 large finely chopped
Curry leaves a few
Oil for sauteeing
Turmeric powder
Red chilli powder

Ingredients for paste:
Pepper 1 tsp(add more for more spice)
Cumin 1 tsp
Dry red chillies 3
Grated coconut 2-3 tbsp

Directions for making paste:
Heat a karahi with 1 tsp oil and put in all ingredients mentioned under paste, in the same order and roast them until light brown. Cool it and grind it in a blender to a smooth paste.

Directions:
Dice the brinjals to medium size and put them in some water. Chop tomatoes very fine and set aside. In a Karahi pour some oil-around a tablespoon, let it heat up and put in the Cashewnuts, fry them until they are golden brown, remove them and put in the Raisins. Fry them too until they puff up and remove from oil. Now add the diced Brinjals to the same karahi and add 1/2 tsp turmeric powder, 1/2 tsp salt, stir well and cover it and cook for 3 minutes. Stir again and cover for another 2 minutes. The brinjal should have turned a little tender but still retain shape. Transfer the brinjals to another vessel and set aside. Now in the same karahi take 2 tsp oil and heat. Add the mustard seeds, let them crackle. Add the cumin seeds followed by turmeric powder and curry leaves. Give it a stir and add the chopped tomatoes. Now add some salt followed by red chilli powder and fry nicely in the oil. Let the tomatoes break, keep mashing them with the back of the spatula. When it turns pulpy, add the ground paste, sauteed Brinjals followed by 1 cup of water, cover and cook for 7 minutes. When you open the lid, the brinjals should have cooked fully, but retain shape and the curry should have come together. Now switch off the flame and add in the fried nuts and Raisins. Brinjal Pepper masala is ready to serve. I served it with some Pulav, any rice or Indian bread varieties will go well with it. Enjoy. Bon Appetit.

STEPWISE  RECIPE FOLLOWS:
1. Assemble all ingredients. Dice the Brinjals, chop the tomatoes, grate the coconut and keep ready.


2. In a karahi take around 1 tbsp oil, add the nuts and the raisins one after the other and fry. The cashew nuts should turn golden brown and the raisins should fluff up. Remove them into a separate plate.

3. Now to the same karahi add the diced Brinjals followed by salt 1/2 tsp and turmeric powder 1/2 tsp. Stir them and cover the karahi for 3 minutes. Open the lid, stir again and cover and cook for 2 minutes. Open and check the brinjals, they should have turned a little tender but should have retained the shape. Remove them to another vessel. If still undone, then cover and cook for another 2 minutes.


4. Now pour a little oil into the karahi, about 1 tsp and heat. Roast all the masalas , mentioned under paste in the same order. Pepper being first, followed by cumin seeds, dry red chillies and finally add the coconut and fry until they get a nice brown colour. Cool, transfer to a blender and grind to a fine paste.


5. In the same karahi pour 2 tsp oil and heat. Add the mustard seeds followed by cumin seeds, turmeric powder and curry leaves. Fry and put in the tomatoes followed by salt and red chilli powder. Stir and cook the tomatoes. Keep mashing them with the back of the spatula so that they turn mushy. 


6. Now add the ground paste, followed by 1 cup water and put in the sauteed brinjals and cover the karahi and cook the brinjals in the paste for 7 minutes approximately, stirring once in between. 


7. The Brinjals should be completely cooked by now, but not limp. the gravy too should have come together and should not be runny. Switch off the flame and drop in the fried nuts and raisins. Brinjal pepper masala is now ready. Serve hot with plain rice, Pulavs or with hot Chapatis.


NOTES:
1. Any variety of brinjal can be used except for the big fleshy one(Bharta Baingan).
2. Coriander seeds have been excluded from the paste, to get the same taste as mentioned in the recipe do not add them as they change the flavour of the dish completely. 
3. More pepper can be added depending upon your spice levels. Be sure to reduce the red chillies or red chilli powder if increasing the pepper quantity. 

4. The Cashewnuts and enhance the taste of the dish but if you don't like the nuts coming in the way, they can be excluded altogether.
5. Kashmiri red chilli powder can be used instead of the regular one for colour.

If you tried this recipe and liked it please comment below. I would love to hear from you.


Tuesday 14 July 2020

PRUPPU URUNDAI KOZHAMBU(Dal Dumplings In Tamarind Sauce)

I love cooking this dish though it involves some amount of preparation and detail. Paruppu Urundai Kozhambu is a delicious traditional South Indian recipe. I learnt this from my mother in law and she was an expert at it. In this preparation, dumplings of Dal/ lentils are cooked in a tangy tamarind sauce. This dish is served with rice but goes well as a side dish for Dosas, Idli, Pongal etc. As in all recipes, there are different methods of making the dumplings. Some steam the dumplings before adding it to the sauce, while some cook it directly in the tamarind sauce. I prefer and follow the second method. The dumplings are able to absorb the flavours this way. I also love using fresh coriander in the dumplings as it realove cooking this dish though it involves some amount of preparation and detail. Paruppu Urundai Kozhambu is a delicious traditionaand add them to the sauce, whereas other recipes suggest cooking it lly elevates the dish to a different level. So when there are no coriander leaves at home I don’t make the dish. Whether coriander is added or not, this dish is just amazingly tasty. So don’t wait for the coriander, just cook on. While you are here check out the recipe of Vatha Kozhambu   A similar recipe with Shallots cooked in a tangy tamarind sauce. 
Here is the recipe of Paruppu Urundai Kozhambu.


PREP TIME: 20 Mins+ soak time                  COOK TIME: 30 Mins
TOTAL TIME: 60 Mins                                  COURSE:  MAIN 
CUISINE: SOUTH INDIAN                           SERVINGS: 5
AUTHOR: Rajni Ram


Ingredients:
Tuvar dal/ Pigeon peas 2 cups soaked for 1 hour
Tamarind 2 lemon sized balls( pulp extracted)
Grated Coconut  3 tbsp
Sambar powder 2 tbsp
Dry red chillies 5
Mustard seeds 2 tsp
Asafoetida 2 tsp
Methi seeds/ fenugreek seeds
Curry leaves few
Coriander leaves(optional)
Salt as required

Directions to make Urundai( dumplings)
Drain out the water from the soaked dal and put it in the blender. Add 1 tsp asafoetida, dry red chillies 3, salt ( as per preference) and grind to a coarse mixture. Now in a karahi or pan add 1 tbsp oil to temper and sauté the mixture. As the oil heats up add 1 tsp mustard seeds, as they crackle add a few Methi seeds, broken dry red chillies, asafoetida1 tsp, curry leaves and fry them. Once they are golden brown add the coarsely ground dal mixture and salt and sauté nicely over a medium flame for 5 minutes. Add the grated coconut and keep stirring constantly as the mixture may stick to the pan/karahi bottom. This step is just to take away the moisture, the dal need not be crumbled, just stirred. After sautéing transfer the sautéed dal to another vessel and cool. Once cooled shape them into dumplings. I could make around 13 dumplings from this mixture. The dumplings should be a little bigger than a Lemon. Set the dumplings aside.

Directions for the Kozhambu( gravy/ sauce)

Extract the pulp from the tamarind and dilute it. You should have about 700 ml of tamarind juice if it’s too sour dilute with another 100 ml. Pour this diluted extract into a deep thick bottomed dish and switch on the flame. Add salt, turmeric powder, Sambar powder, asafoetida and boil. As it starts boiling and the raw smell of the masalas is gone( around 7 minutes into the process on medium flame), add one Urundai( dumpling) and test. If it doesn't break while cooking on medium heat in the next 1 minutes, reserve 1 dumpling and all the other dumplings can be put into the tamarind water one by one after reducing the heat to low. If the first Urundai disintegrates in the water, put off the flame, undo all the dumplings and add 1 tablespoon rice flour and shape them to dumplings again and continue the process mentioned above. Cook the Urundais(dumplings) in low to medium flame while stirring gently every now and then until they start rising to the top. Once cooked the dumplings will float above. Now add about 1 cup water to the reserved dumpling and break it up. Pour this paste into the kozhambu( gravy) after the dumplings have risen and cook for 2 minutes or until the gravy has thickened to a Sambar like consistency. Switch off the flame and temper the Kozhambu with a little oil in a Kadai and put mustard seeds, followed by Asafoetida and curry leaves. The delicious Paruppu Urundai Kozhambu is ready.

Serving Suggestions: with hot rice and ghee, Dosas, Idlis, Ven Pongal, Kuthiravali Pongal( millet Pongal) etc. 

STEPWISE RECIPE FOLLOWS:
1. Assemble all ingredients. Soak the Tuvar dal for 1 hour, soak the tamarind in warm water and extract the pulp, dilute pulp, grate the coconut, and keep ready.

2. Drain water from the soaked dal and put it into the blender, followed by red chillies, turmeric powder,  salt and asafoetida. Grind them to a coarse paste, without adding water.

3. Now in a karahi pour oil for tempering and heat. Put in mustard seeds. As they crackle add the methi seeds, turmeric powder, broken dry red chillies, asafoetida 1 tsp and curry leaves and fry. Now add in the dal mixture to this and start sauteeing, so that the moisture from the dal gets evaporated. Add the grated coconut, saute for another minute and switch off the flame. Finally, add some finely chopped coriander to the dal mixture.  Leave the mixture to cool.

4. In a deep vessel, preferably flat one pour the tamarind extract. It should be a dilute extract of 700 ml. Add turmeric powder 1tsp, asafoetida 1 tsp, Sambar powder 3 tbsp, salt and boil the extract on medium flame. 

5. After the extract is put to boil, shape the dumplings of the Dal mixture and keep aside.


6.  When the mixture bubbles up and froths( about 5 mins from boiling) and all the raw smell of the powders is gone drop one dumpling gently into the boiling mixture. Flame on medium, wait for 2 minutes. If the dumpling does not disintegrate in this time, retain 1 dumpling and put in all the other dumplings one by one. Reduce flame to low and continue to boil.


7. As the dumplings cook in the tamarind extract they will slowly start rising to the top(I have added a short video). When all have risen, break the single reserved dumpling and add 1 cup water to it. Give it a stir so that it becomes a paste. Add this paste into the boiling tamarind gravy to thicken the gravy. Cook for 2 minutes and switch off the flame.


8. Take a small tempering Kadai and add little oil. heat and add mustard seeds, asafoetida 1/2 tsp and curry leaves. Pour the tempering into the Kozhambu.
The tasty Paruppu Urundai Kozhambu is ready to serve.


NOTES:
1. Definitely soak the dal, helps in binding.
2. Sometimes depending on the dal quality the dumplings can break/disintegrate in the extract while boiling. That is why I have recommended putting only a single one to test. 
3. If the tester dumpling disintegrates, break up all the other dumplings and add 1 tbsp rice flour to it. Mix well and shape into dumplings again. Before you do this do not forget to switch off the flame in which the extract is cooking as we dont want it to evaporate now.
4. Some recipes recommend adding rice flour to the dal mixture while shaping them itself. I prefer not doing this as it makes the dumplings tougher or hard. So I prefer adding rice flour only if required.


If you tried this recipe and liked it please comment below. I would love to hear from you.


TOFU AND STIR FRIED VEGETABLES IN HOT SCHEZWAN SAUCE

  Any Tofu lovers? I agree its an acquired taste,but going by the health benefits it has to offer, I try including it in my diet now and the...