Vegetarian cooking blog

Tuesday 4 August 2020

BEETROOT PARATHA

Parathas are flatbreads stuffed with grated or mashed vegetables. Sometimes the vegetables are not stuffed but mixed in with the dough. This Paratha is one such recipe.

I resisted making these parathas for a whole month. I like Beetroot Poriyal( dry subji) a lot and I love Beetroot Halwa, but the thought of Beetroot in paratha sounded a little off track. My girl kept trying to convince me that I should give it a try and I kept dodging, saying I couldn't imagine a sweetish paratha. The internet has a quite many beetroot paratha recipes, but I refused to look at them. Then one day when I ran out of options to cook dinner, I thought why not give it a try. But the challenge was to balance the sweetness with some spice and at the same time the beetroot is a mild vegetable and also spices do not go very well with it, so I decided to keep it simple.

I am more than willing to say I don’t regret making the Beetroot Paratha at all. It tasted so good and the lovely aroma while cooking the parathas was difficult to resist. So much so RK who isn’t a beetroot liker at all gave the parathas a thumbs up. Beetroot paratha is definitely becoming a regular at my house.

While you are here please check out other recipes on Rajjo’s Kitchen like

Here is the recipe of Beetroot Paratha for you—

PREP TIME: 15Mins                                COOK TIME: 25 MINS
TOTAL TIME: 40 MINS                            COURSE:  BREADS 
CUISINE: INDIAN                                    SERVINGS: 6
                                                                  AUTHOR: Rajni Ram     


Ingredients:
Beetroot 1 Medium  grated
Whole wheat flour 3 cups
Ginger 1 inch piece chopped
Green chillies 3 
Salt as per taste
Red chilli powder 1 tsp
Coriander powder 1 tsp
Water as required for making dough
Ol for cooking Parathas

Directions:
Grate the Beetroot and keep ready. In a mixer grind the green chillies and ginger to a fine paste without adding water. Now in a bowl/dish take 3 cups of wheat flour, salt as required, red chilli powder, coriander powder and the green chilli- ginger paste. Now add in the grated beetroot and start combining with your hand. Do not add any water at this stage. The beetroot also will release some moisture. So once you have combined the flour, spices and the wheat flour nicely, then start adding water little by little. The consistency should be like that of Chapati dough. Rest the dough for 15 minutes and then pinch small portions of the dough and form balls. This quantity yields 12 Parathas. Now dust each ball with flour and roll out to form a medium-sized Paratha. The dough must be rolled out a little thick. The colourful and delicious Beetroot Paratha is ready. Enjoy this colourful and flavourful Paratha. Bon Appetit.
 
Serving Suggestions: Usually parathas are served with pickle, butter and raita or curd. For this particular paratha, I suggest excluding the pickle as they will be very diverse in taste.

STEPWISE RECIPE FOLLOWS:

1. Assemble all ingredients. Grate the Beetroot, make a paste of the green chillies and ginger and keep ready.


2. In a bowl or dish take 3 cups of whole wheat flour. Add the red chilli powder coriander powder, salt plus the chilli- ginger paste to this.


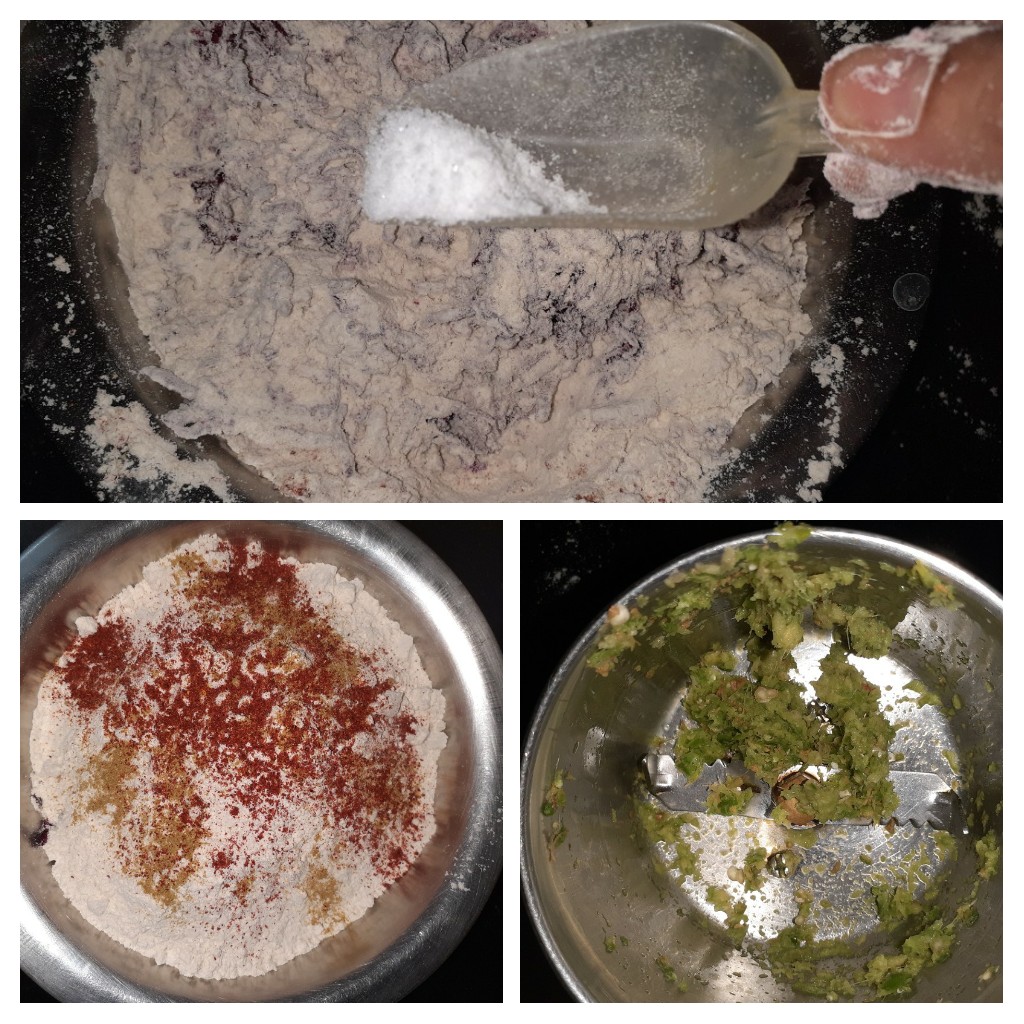
3. Now add the grated beetroot and mix well. Don't add any water at this stage keep mixing it with your hands until all the moisture of the beetroot is absorbed by the wheat flour.


4. Now add water a little at a time and start combining to form a dough. The dough should neither be stiff not too loose. It should resemble the Chapati dough in consistency.


5. Now pinch small portions of the dough and shape them to balls. This quantity gives around 12 of them. Now dust each ball with flour and roll it out into a thick Paratha. Cook both sides on a hot girdle drizzling some oil, until tiny light brown dots appear. The yummy beetroot paratha is ready to tuck in.


NOTES:
1. The flavour of this Paratha is very subtle, so the spice powders should be used minimally.
2. This is a no onion- no garlic paratha, it is best kept that way as the pungency of garlic may not go with the taste.
3. Coriander leaves could be added if you prefer, but I have not used them in this recipe.

If you tried this recipe and liked it please comment below. I would love to hear from you.

If you want the recipes emailed to you leave your id in the homepage near the📧
icon. Whenever we have a new post the recipe will be mailed to you. Thank you for showing interest in Rajjo's Kitchen.


Sunday 2 August 2020

PAV BHAJI

Pav Bhaji the popular food from Maharashtra is everyone's favourite. It is also the most popular street food. Everyone has their favourite outlet for this yummy street food variety. Mine is Elco Arcade in Mumbai and Gangotree in Chennai. If you visit these places please try them out.

The bread also called the Pav has to be fresh and the Bhaji the Maharashtrian word for Subji, tangy and spicy. Pav is a term that fills me with warmth because I have many childhood memories associated with it. When in Mumbai my aunt would decide to make us her yummy Pav Bhaji, we kids would be sent to these narrow bylanes in Bandra where the Pav was made fresh. here was this whole colony of Pav(bread) bakers and the whole area would smell so good. Just for this fact we kids would never refuse to go. This place was very close to my aunt's house and we would take a morning walk to this place and would be handed over a fresh and hot batch of Pav for our evening Pav Bhaji. I just cannot forget the aroma of fresh bread just out of the oven. 

In this dish, mashed potatoes are the main ingredient along with a tomato base. Onions and spices are also added which gives it the iconic taste. Topped with a dollop of butter a squeeze of some lime, this is could the best food ever.

I like to add more vegetables apart from the Potatoes and so I add a tiny carrot, few finely chopped pieces of cauliflower, peas, and capsicum. I also like to add a puree of tomato instead of chopped tomato. 
So when the demand at home is to make something special yet simple I mostly opt for Pav Bhaji.

While you are here please do check out my other recipes like Pakode wali Dal, Semolina Cheese balls, Dahi Pohe, Pineapple rasam, Chinese paratha, and more...

Here is the recipe of Pav Bhaji for you-

PREP TIME: 20 Mins                                               COOK TIME: 20 Mins
TOTAL TIME: 40 Mins                                             COURSE:  SNACK
CUISINE: MAHARASHTRIAN                                SERVINGS: 4
                                                                                AUTHOR: Rajni Ram


Ingredients:
Pav- Store-bought 
Potatoes 4 medium boiled and mashed
Tomatoes 2 large(pureed) used the local variety(desi) if available
Onion 1 large finely chopped
Green chillies 3 finely chopped
Cauliflower 3 florets finely chopped
Carrot 1 medium finely chopped
Capsicum 1 medium finely chopped
Green peas 1/2 cup ( I have not used here as could not find fresh ones)
Ginger -garlic paste 1/2  tsp
Cumin seeds 1 tsp
Turmeric powder 1/2 tsp
Red chilli powder 1 tsp(or more if you prefer)
Coriander powder 1 tsp
Fennel powder 1 tsp
Amchur powder 1 tsp
Salt as required
Garam masala powder 1/2 tsp
Oil for sauteeing
Butter for toasting the pav and a dollop for the bhaji

Directions:
Boil the potatoes and mash them. Puree the tomatoes in a blender. In a karahi/pan take 1 tbsp oil and heat. Add the cumin seeds and as they crackle add the green chillies and saute for 30 seconds. Now add the onions and saute for a minute. Add the turmeric powder and continue to saute for 30 seconds, now add the ginger-garlic paste and saute until the onions start turning light brown. Now add in the capsicum and saute for a 1 minute. Remember that all sauteeing to be done on high flame. Now add the cauliflower and carrot and saute for 2 minutes. Now add the tomato puree, followed by red chilli powder, coriander powder, fennel powder, and salt and stir nicely. Cook for a minute. Now add the mashed potato and using a masher keep mashing and mixing all the veggies in the pan. Repeat the process until all are well combined. Now add 1 cup(can add up to 1.5 cups) of water and cook for 2 minutes on low flame. Now add Garam masala powder and turn off the flame. Garnish with finely chopped coriander leaves, finely chopped onions and a dollop of butter. Toast the fresh Pav with a liberal amount of butter and serve hot with the Bhaji. Enjoy. Bon Appetit.

STEPWISE RECIPE FOLLOWS:
1. Assemble all ingredients. Boil and mash Potatoes, puree the tomatoes. Chop onions and green chillies.

2. In a pan take 1 tbsp oil and heat. Add in the cumin seeds and as they crackle add the green chillies and saute for 30 seconds.

3. Now add the onions and saute on high flame for 30 seconds followed by turmeric powder, ginger-garlic paste and saute for 1 minute. Now add in the capsicum and saute for a minute. Add in the cauliflower and carrots and green peas(if using), add salt and continue to saute for 2 minutes.


4. Now pour the tomato puree, followed by red chilli powder, coriander powder, fennel powder, amchur powder and stir nicely. Cook for 1 minute and add in the mashed potatoes and mix well. Using a masher mash the potato-veggie mixture in the pan until all are well combined. Now add about 1 cup water and continue to cook for 2 minutes. Check for salt and spice and if less add at this stage.


5. Finally, add the garam masala powder and turn off the flame. The bhaji should not be lumpy nor should it be runny. The spicy and tangy Pav Bhaji is ready to feast on. Toast some fresh Pav with a liberal amount of butter and serve the bhaji topped with finely chopped onion, coriander and a dollop of butter.

NOTES:
1. I recommend you use some green peas. As I could not find any on that said day I have made my Bhaji without it. If using boil them ahead. 
2. Be liberal with the butter it really enhances the taste.
3. one can also sprinkle some grated cheese over the Bhaji, to make Cheese pav bhaji.
4. If you don't want to add other vegetables it is fine and the dish will still taste the same.

If you tried this recipe and liked it please comment below. I would love to hear from you.

If you want the recipes emailed to you leave your id in the homepage near the📧
icon. Whenever we have a new post the recipe will be mailed to you. Thank you for showing interest in Rajjo's Kitchen.


Thursday 30 July 2020

BLUEBERRY CHEESECAKE(BAKED)

This is an epic post because I love Blueberries(any berry for that matter) and I  have perfected this Blueberry cheesecake finally. And for a recipe to feature on my blog, I should have perfected it before I put it out before you, and that is when I have tried it out 3 times without any mishaps. 
Over the years I have tried this recipe quite many times and it would taste fine but,  consistency wise there would be some glitch or the other. Also in India, we don't get fresh Blueberries very often, and even if we do they are expensive. So in this recipe, I have used dried Blueberries that are available in all departmental stores. I wanted to give you a recipe in which things are accessible. The Cream Cheese I have used here is also available at all outlets with a Chiller isle. The recommended one is Philadelphia Cream cheese but I have not used that, just to try if other brands work fine, and yes they do. 
This Cheesecake turning out so well is a dream come true for me, as its always been my wish to make one. Since I love berries I have loaded my Cheesecake with a lot of them, one can reduce the quantity too if they desire. 
This recipe is a no-mess, one-bowl recipe so not much of clean up is required. It is light and creamy with a blueberry topping. The thing about them being baked is that they hold well at room temperature, but since I am using a blueberry topping I had to refrigerate for 2 hours. The topping is just an option and is not at all mandatory.
I have simplified the recipe quite a bit. In this recipe, I'm giving stepwise instructions directly.

while you are here please try my other recipes like Apple Crumble, 
Pineapple Jam tarts, Nutella fudge brownies, Berry Smoothie Icecream, and more...

Here is the recipe of Blueberry Cheesecake for you-


     PREP TIME: 20 Mins                                          COOK TIME: 40 Mins
     TOTAL TIME:60Mins                                           COURSE:  DESSERT
     CUISINE:  WORLD FOOD                                  SERVINGS: 6
     AUTHOR: Rajni Ram

Ingredients for Base:

 Marie Biscuit 1 sheet(20 nos)
Unsalted butter 100 gm
Sugar 2 tbsp(powdered or fine sugar)

Ingredients for Filling:

Creamcheese 320 gm softened(keep out of the refrigerator for 1 hour)
Plain flour/Maida 1 tbsp
Sourcream/Curd 1/3 cup
White Sugar 1/2 cup 
Vanilla extract 1.5 tsp
Zest of Lemon- Grate the rind of one whole lemon
Eggs 2
Blueberries(dried) 250 gm (soak in warm water for 30 mins and drain the water)
Icing Sugar for dusting(optional) (refer note2)

* Reserve some blueberries(unsoaked) for later.

Ingredients for Blueberry topping/Sauce:

Blueberries(dried) 1 cup (soaked for 30 mins in warm water and drain water)
Sugar1/4 cup
Cornflour 1 tbsp
Lemon Juice 1 tbsp
Butter 1 tbsp
Blueberry preserve 3/4 of a 240 gm bottle(around 180 gm) 

Directions for Sauce:
Place the Blueberries and remaining ingredients(except the preserve) in a saucepan and cook over medium flame. Bring them to a simmer and cook until few of the blueberries burst, around 3 minutes. Keep stirring. Now add the preserve ad stir again. The sauce will come together and become jammy. Remove from flame and cool completely.

Directions for Base:
1.Grease or spray a round baking tray/mould with oil and line with parchment paper/butter paper. Place the biscuits in a blender and powder them. Add the butter and sugar to the powdered biscuits and blitz again. It should look like wet sand.

2. Put this mixture into the baking mould and using something flat press it down into the base and also rise in the sides, as this is going to hold the filling and topping, it needs some height. See pictures for reference.


Directions for filling:

1. Firstly preheat the oven to 160 C or 320F. Now start making the filling. Beat Creamcheese(just a spatula will do, stand mixer or electric beater not required, remember I said it a one-bowl recipe😉) until smooth, it need not become fluffy. Now add the flour and beat again until just combined.
 

2. Add sour cream/curd, sugar, vanilla and the lemon zest and beat until combined. Add the eggs one by one beating in between, until just combined. Do not overbeat.
 

3. Now ensure you have drained all water from the soaked blueberries and add the berries to the cream cheese batter and fold gently. Now pour this batter into the prepared base and top with the reserved unsoaked blueberries.


4. Bake for 40 minutes at 180 C or until the cheesecake is set, but the middle of the cake should wobble when you shake it and when you stick in a toothpick it should come out clean. There can be little cracks on the cake, so don't worry.
Baked Cake


5. Cool the cake completely and spread the Blueberry sauce over it( the sauce might have thickened, just microwave it for 20 seconds and it will be spreadable again). Refrigerate for 2 hours and its ready. Enjoy the Berrilicious flavour. Bon Appetit.


NOTES:
1. If using Fresh Blueberries use 1/2 cup sugar for the filling and the entire bottle of the preserve.
2. Topping the cake with Blueberry sauce is optional. If not topping it dust icing sugar over the cake before storing.
3. Try using a spatula for beating as we don't want the batter to air up and rise. If the batter becomes fluffy, the cake will rise while baking and then go limp on removing it from the oven.
4. If topping the cake with sauce, don't forget to refrigerate it, only then the topping will set, otherwise when you cut the cake it will drop everywhere.

If you tried this recipe and liked it please comment below. I would love to hear from you. If you have a query about the recipe email us and ill respond as soon as I can.
If you would like to receive our recipes on your mail please leave your mail id at the homepage. Every time Rajjo's Kitchen has a new post we will mail the recipe to you.


Wednesday 29 July 2020

STUFFED KARELA/BITTER GOURD

I have realized that people either like Karela/Pavakkai/Bittergourd or don't like it at all. There is no in-between here. Those who like it, love it. So here I bring to you an everyday subzi that is made in most houses, does that sound boring? Then read ahead and you will realize that I'm not going to stuff it with the regular Amchur powder, coriander, and red chilli powders. Ok, I'm using Coriander seeds and I shall make the stuffing from scratch, which makes it aromatic, and yes my favourite word flavourful.

Actually, before deciding to blog this recipe I was in two minds as to whether you all will be interested in a bitter gourd recipe and then thought even if half my Karela eating followers try the dish, it would be worth it. In this recipe, I slow-roast coriander seeds and lentils and spices along with tamarind to form a powder and fill the karelas with it. After stuffing them saute over a low fire until done and they get a beautiful glaze on them.

I am using the small Bitter gourds as then the filling is intact. But believe me, if you like this dish you are going to make it with the big ones too, and  I will tell you how to by the end of the recipe.

While you are here please take a look at my other recipes like Drumstick Curry, Brinjal Pepper fry, Mushroom Do Pyaza, Palak Paneer, Gutti Vankaya Kura and more.

Here is the recipe of stuffed karela/Bitter gourd for you--

9


      PREP TIME: 15 Mins                                            COOK TIME: 20 Mins
     TOTAL TIME: 35Mins                                           COURSE:  MAIN
     CUISINE:  NORTH INDIAN                                 SERVINGS: 4
     AUTHOR: Rajni Ram


Ingredients:

Small Bitter gourd 20 pcs
Coriander seeds 2 tbsp
Urad dal 1 tbsp
Chana dal 1/2 tbsp
Tamarind gooseberry size ball
Dry red chillies( whole) 5
Jaggery 1 tsp(optional)
Asafoetida 1/2 tsp
Turmeric powder 1/2 tsp
Salt as per taste
Oil for sauteeing

Directions:
Slit the Bitter gourd midway to form a +. Now put the slit Bitter gourds in hot water, add some salt and keep covered for 5 minutes. After 5 mins drain the water and cool the bitter gourds. Now in a pan add 1 tsp oil and heat. First, add the coriander seeds and fry for half a minute. Now add both the dals and fry until golden brown. Add the dry red chillies and fry until crisp, add tamarind and fry for 30 seconds and put off the flame( roasting of all these ingredients should be done only on low flame and take care not to burn them). Cool the roasted spices and grind to an almost fine powder. Add the turmeric powder, salt and jaggery(if using) and give another spin in the blender. Now fill this mixture in all the Karelas and set aside( if the filling is left, reserve it to add in the end for that lovely glaze, or better make a little extra of this powder). Heat oil in a Karahi/ pan, pour 1 tbsp oil and heat. Now slowly add the stuffed Karelas to the Karahi one by one and start sauteeing over a low flame. Cover for 2 minutes and stir again. Cover the karahi, let it cook for 2 minutes, then again open and stir. Repeat this until Karela are cooked well but not limp. They should retain shape. Finally, add the reserved stuffing to the Cooked Karelas and cover and cook for a minute on low flame. Put off the stove and its ready to serve.

Serving Suggestions: Serve hot with Rotis, Plain Parathas, Dal Chawal, Kadi Chawal and more...

STEPWISE RECIPE FOLLOWS:
1. Assemble all ingredients. Slit the Karela/Bitterourd as shown in the picture, put in salted hot water and keep covered for 5 minutes. Drain the water and cool the bitter gourds.

2. In a pan add 1 tsp oil and on slow flame roast coriander seeds until you get a nice aroma or until it turns light brown. Now add the Urad dal and chana dal and roast until they turn light brown. Follow up with dry red chillies and roast until crisp. Finally, add the tamarind and fry for 30 seconds. Cool. Grind to almost fine powder, add turmeric powder, salt and jaggery if using) and give it a final spin in the blender.


3. Fill this stuffing(masala) into the bitter gourds. Reserve some stuffing. 


4. Now in a Karahi take 1 tbsp oil and heat. Now drop the bitter gourds one by one into the oil and fry on a low flame. Keep covered to 2 minutes, open, give a stir and cover and cook again. Repeat this process until all the Karelas are cooked, but not limp and mushy. 


5. Finally, add the reserved stuffing powder to the Karelas, stir and cook covered for a minute or two on low flame, to get that nice brown glaze.


NOTES:
1. To make the same recipe with the big ones, cut them in halves and then slit then midway and fill. In this procedure, some stuffing will fall into the oil, but it is fine as long as you keep stirring it every now and then and don't allow it to burn.
2. The dish will taste good even without adding jaggery, so you can skip it entirely.
3. Once you grind the spices you can always check the taste and balance it, by adding red chilli powder or salt.


 If you tried this recipe and liked it please comment below. I would love to hear from you.
In case you wish to receive recipes as an email, please leave your id on the homepage near the mail icon. Whenever Rajjo's Kitchen has a new post the recipe will be mailed to you. 


Tuesday 28 July 2020

MUSHROOM DO PYAZA

Mushroom Do Pyaza is a simple recipe made predominantly of Mushrooms and onions. At our home, I make it frequently to go with Rotis or pulav. Well, this dish is usually semi-dry but I prefer it with a little gravy, so you will find that my recipe is a little different from the other Mushroom Do Pyaz recipes. That said, it still is a very simple one. I have just included 2 ingredients that make it a little creamy.
Mushrooms by nature are a little bland so making this dish with a little gravy gives some texture and flavour to the dish. Even though the Mushrooms are bland they blend really well in Indian gravies and spices. Especially in this recipe of Mushroom Do Pyaza, you will see how surprisingly yummy they can be.
This recipe gets its name "Do Pyaza" from a cooking technique that requires adding Onion in two different stages. 
While you are here please check out my other recipes like Mixed Vegetable Curry


         PREP TIME: 15                                              COOK TIME: 15 Mins
      TOTAL TIME: 30 Mins                                     COURSE:  MAIN
     CUISINE: NORTH INDIAN                                SERVINGS: 6
     AUTHOR: Rajni Ram


Ingredients:

Mushrooms 200 gm chopped in 4 lengthwise
Capsicum 1 medium chopped
Onion 2 medium chopped into petals
Besan/gram flour 2 tbsp
Tomato puree 1/2 cup
Cream 2 tsp
Curd 1/2 cup
Cumin seeds 1 tsp
Coriander powder 2 tsp
fennel powder 1 tsp
Red chilli powder 1 tsp (1/2 tsp if sensitive to spice)
salt as required
turmeric powder 1/2 tsp

Directions:
Dry roast the gram flour until light brown and a nice aroma emanates. Cool the roasted flour. Now in the blender put in half the amount of chopped onions and the roasted gram flour and blend to a smooth paste. Now add the tomato puree to this onion- gram flour paste and blend again. Add the curd to the paste and blend it again. So now you will have a smooth puree of onion, roasted gram flour, tomato puree, and curd. Keep this aside and heat oil in a Karahi. When the oil is hot drop in the onion petals and saute them until light brown. Now add the Capsicum cubes and continue to saute for 1 to 2 minutes until a light brown tint appears. Remove them on to a plate. Now to the same kadai add the mushrooms and saute on high flame, until all the moisture escapes and it becomes dry. (refer picture).  Remember to saute all these vegetables over a high flame or else they will start releasing moisture. Transfer the sauteed vegetables to a separate plate/vessel. Now in the same Kadai pour some more oil and heat it. Put in the cumin seeds and as they splutter add in the puree from the blender jar and stir continuously for a minute so that it doesn't stick to the pan/karahi. Now add the coriander powder, followed by red chilli powder and turmeric powder and salt, and stir nicely. Let it cook for 2 minutes on medium flame. Now add the sauteed vegetables to the sauce and cook for 2 minutes. Add the cream and stir constantly for 30 seconds so that it doesn't split. Now put off the flame and add Garam Masala powder if you prefer. Garnish with chopped coriander leaves and its ready to relish. Happy cooking, Enjoy, and Bon Appetit.

STEPWISE RECIPE FOLLOWS:

1. Assemble all the ingredients. Chop the mushrooms in 4, Chop the opinion into petals, and the capsicum to cubes. Dry roast the gram flour, puree the tomatoes.


In addition to the above vegetables, Red Bell peppers/ capsicum and green peas can also be added. However, these are optional and hence have not been mentioned in ingredients.


2. In a blender put in half the amount of chopped onions and the roasted gram flour and blend to a paste. Add the tomato puree and blend again. Now add the cuts and blend once again. You should have a smooth puree of all the above ingredients now. Set it aside.


3. In a pan/Karahi heat, some oil and saute the onion for 1 minute or until it gets a light brown colour, on high flame. Add the Capsicum and continue to saute until they get a light brown tint on them. Remove them on to a plate. Now to the same kadai add the mushrooms and saute on high flame, until all the moisture escapes and it becomes dry. (refer picture).


 Sauteed vegetables


4. In the same Pan/karahi Take some more oil and heat. Add the cumin seeds and when they splutter pour the prepared paste into it and stir continuously for a minute. 


5. Add the salt, coriander powder, fennel powder, red chilli powder, and turmeric powder, stir and cook for 2 minutes on medium flame. Add little water if the sauce is too thick. Now add the sauteed vegetables and cook for another 2 minutes. If adding green peas, cook them and add at this stage.


6. Finally, add the cream and stir nicely and put off the flame. Add garam masala powder. Garnish with coriander leaves and the Mushroom Do Pyaza is ready to serve.


NOTES:
1. Always saute vegetables such as onions, capsicum, mushroom, etc on high flame or they release a lot of moisture. Mushrooms should be added at the end as they don't withstand too much heat and become limp quickly.
2. You can add more cream if you prefer.
3. You can add or skip Garam masala powder if you prefer. 


This is my meal with Mushroom Do Pyaza. I served it with Warqi Parathas and Mango Chundo. 


  If you tried this recipe and liked it please comment below. I would love to hear from you.
In case you wish to receive recipes as an email, please leave your id on the homepage near the mail icon. Whenever Rajjo's Kitchen has a new post the recipe will be mailed to you. 


Monday 27 July 2020

SUGIYAN

Sugiyan or Sukhiyan as it is called is a traditional snack in Kerala and Tamilnadu. It is also made in Andhra Pradesh and is called Boorelu. This snack is like a sweet version of the Aloo Bonda where the Aloo is replaced with a sweet Chana dal or Moong dal and Jaggery filling and instead of Besan Urad dal and rice flour are used as a batter to cover the filling(Poornam). Coconut is also added to the filling that enhances the taste. This is also a snack that people make for festivals. As the festival time is nearing blogging this recipe may be helpful. I usually make it around Navarathri and Diwali to serve it to guests who visit home.
As I  had mentioned that the poornam (filling) is made with Moong dal too, but I personally feel the chana dal filling is tastier. Some also use whole moong(payaru) to make the filling.
 I use this filling of Sugiyan to make Puran Poli(Boli/Bobbatlu/Hoolige) also. So what I usually do is make them both simultaneously. I use wheat flour majorly with a hint of maida to make Puran Poli, the Sugiyan is had the same day as it doesn't taste fresh or hold good the next day, it is like an instant snack, whereas Puran Poli can be consumed with 2-3 days if stored properly.
One needs to grind the batter carefully and the rest of the recipe is quite easy. In this recipe, I will also show you an easy way to make the filling.

While you are here check out my other dessert recipes like Pineapple Rabdi,
 Carrot Kheer, Chakkara Pongal, Atte Ka Sheera, Akkara vadisal, and more. 


Here is the recipe of Sugiyan for you--
 PREP TIME: 20 Mins(1 hr soak)                         COOK TIME: 40 Mins
TOTAL TIME: 60 Mins                                          COURSE:  SNACK
CUISINE: SOUTH INDIAN                                   SERVINGS: 6
                                                                              AUTHOR: Rajni Ram


Ingredients:
Urad dal 1 cup soaked for 1-hour 
Chana dal 1 cup roasted to light brown
Turmeric powder 1/2 tsp
Rice flour 2 tbsp
Jaggery 1 cup powdered
Coconut grated 1/2 cup
Cardamom powder 1 tsp
Oil for frying

Directions: for the filling:
 Dry roast the Chana dal to a light brown, you will get a nice aroma of the dal. Switch off the flame, remove and cook in a pressure cooker with 1/2 tsp turmeric powder and adequate water for 2-3 whistles(not more), as we want the dal to be rightly cooked, not mushy. Once the dal is cooked and the pressure in the cooker has subsided, remove the dal and put it in a strainer for all the water to drain off for about 5 minutes. Now put the dal into the dry grinding unit of the processor and blitz. Open stir the contents well and blitz again to a fine powder. After grinding it will resemble wet sand. Now in a Karahi put in the jaggery and the ground dal, followed by grated coconut( add no water) and keep stirring, in low flame. The jaggery will start melting and within 5 minutes of stirring the filling will become well combined. Even if it seems a little dry, don't be tempted to add water. The jaggery will be enough to bind it. Add the Cardamom powder and keep stirring and when it forms a lump, put off the flame and let it cool. Once the filling has cooled, make small balls of them and keep aside.   

Directions for the outer crust:

Soak the Urad dal for 1 hour and grind. Don't allow it to soak for a long time, as then it soaks up a lot of oil while frying. The dal has to be ground to a smooth and thick batter, with water as required. The batter should stick to the filling and not roll off it, that should be the consistency. A runny or flowy batter will not stick to the filling. After grinding transfer to a dish, add 2 tablespoons of rice flour and 1/2 tsp salt. Now add little water if required as the rice flour would have absorbed all moisture from the urad dal paste. 

Directions to make Sugiyan:
Heat oil for frying to medium-high. Now take one ball at a time, roll it in the batter, or smear the batter all over the filling, it should be a thick coating or it will split in the oil and, drop them gently into the oil. Fry 4-5 of them at a time. Remove when golden brown in colour. Drain them on an absorbent paper. Repeat for the entire lot of filling. The delicious Sugiyan is ready. Serve with tea or make it as Prasad(offering) for Puja and enjoy it. Bon Appetit.

STEPWISE RECIPE FOLLOWS:

1. Assemble all ingredients. Soak the dal for an hour. Dry roast the Chana dal and pressure cook for 2 -3 whistles and no more.

2. For the Outer crust(cover)- Grind the soaked Urad dal by adding little water to a smooth but thick paste(idli batter consistency or a little thicker also is fine). Stir in 1.5 to 2 tablespoons of rice flour. If the batter gets too thick, add a little amount of water to get it back to the right consistency, given above. ( I forgot to take a picture of adding Rice flour, so please keep in mind and ad it).


3. For filling- Dry roast the Chana dal until light brown in colour, you will get a nice sweet aroma when you are getting to that stage. Pour required water and add turmeric powder and pressure cook it for 2-3 whistles, and not more. Once the pressure reduces, take the dal and drain it completely of all the water and allow it to cool for 5 minutes.


4. Now put the warm Dal into the dry grinding jar and blend to a powdery texture, without any water. Give it a mix and spin again, the mixture should be fine and should resemble wet sand.


5. Put this ground Dal mixture in a Kadai and add the jaggery and grated coconut to it. Switch on the flame on low and start stirring this mixture. Do not add any water, the jaggery will start melting in the heat and help in combining. Add the cardamom and keep stirring until the mixture comes together and forms a lump. Put off the flame and cool the mixture.


6. To make the Sugiyan-  Heat oil in a karahi for frying. Heat should be medium-high. Now make lemon sized(or a little bigger too is ok) balls of the filling and keep it aside. Check if the oil is hot by dropping little of the batter into it. If it sizzles and rises immediately, it is ready for frying.


7. Now take the Urad dal - Rice flour batter and dunk each ball into it gently, use your hands to smear the batter on the filling if required ad cover the ball. Gently drop it into the oil and fry to a golden brown colour. 4-5 Sugiyans can be fried at a time. Drain them on absorbent paper. Repeat for the entire filling and enjoy them hot.


NOTE:
1. I recommend not soaking the Urad dal for more than an hour as it soaks in lot of oil while frying.
2. The jaggery can be reduced to 3/4 cup depending on how sweet it is.
3. I forgot to take a picture of adding the rice flour, so don't forget to add it if following only the pictures.

If you tried this recipe and liked it please comment/ tag Rajjo's kitchen on Facebook and Instagram and please follow us on my blog https://rajnirams.blogspot.com/

If you wish to receive the recipes as an email please leave your id on the homepage near the mail icon. Whenever Rajjo's Kitchen has a new post it will be mailed to you.


Sunday 26 July 2020

PALAK PANEER

  Palak Paneer is a dish I have relished since childhood, as I love Palak and Paneer both. This dish is popular in North India and is one of the most popular Paneer dishes. It is usually served with Roti, Parathas, and other Indian Bread. It goes really well with Plain Rice, Jeera rice and Pulav too. In this dish, the Palak is pureed and made into a thick gravy with spices and the Paneer pieces are cooked in it. This dish is a great way to add Palak to your diet.
Spinach/Palak is loaded with Iron and fibre and the Paneer is rich in proteins and so this makes it a healthy recipe.
Well, there are loads of Palak Paneer recipes that recommend using cashewnuts or cream for a thicker or creamier gravy, I feel that this makes the dish heavy. Palak by itself when pureed after blanching has volume, plus the onions and tomatoes sauteed and ground also adds body to the dish, so adding cashew paste or cream is not absolutely necessary, though if one likes the taste of it, then no harm in adding them too. That said it does not make much of a difference to the dish. I usually use the cream only as a garnish, that too around 1 tsp.  
There are many other Palak recipes from different cuisines and I will try and bring them to you over a period of time. While you are here please go through my recipes of other Subjis like  Drumstick curry, Brinjal pepper masala, Kadai Paneer, Mixed vegetable curryGutti vankaya Kura, Matar PaneerPaneer palak steamed Koftas, Arbi masala and Lauki Kaddu ke Kofthey.  
Please do try out my Dal recipes like Rajma masala, Dal Makhni, Choley, Pakodewali Dal and Hari Moong ki dal.

Here is the recipe of Palak paneer for you---


     PREP TIME: 15 Mins                                            COOK TIME: 25 Mins
     TOTAL TIME: 40Mins                                           COURSE:  MAIN
     CUISINE:  NORTH INDIAN                                  SERVINGS: 4
     AUTHOR: Rajni Ram

Ingredients
Palak 1 bunch
Paneer 200 gm
Onion 1 large or 2 small
Green chillies 2
Tomato 2 large to medium size
Ginger- garlic paste 1 tsp
Cloves 2
Cumin seeds 1 tsp
Turmeric powder 1/2 tsp
Salt as required
Garam masala powder 1/2 tsp
Coriander powder 2 tsp
Fennel Powder 1 tsp
red chilli powder 1 ts
Oil for sauteeing

Directions:
Chop the Palak roughly and blanch them, I usually put them in the microwave for 2 mins. Alternately just put them in boiling water for 5 minutes. Drain the water and pour cold water over the Palak, this helps in keeping the green colour intact. Puree the Palak and keep ready.
Now in a karahi pour some oil and heat. Add 2 cloves followed by Cumin seeds and drop in the chopped onions. Saute for a minute, add the green chillies and continue to saute for 30 seconds, finally add the tomatoes and cook until the tomatoes turn mushy. Cool them. Now blend the onion-tomato mixture to a puree. In the same karahi take another 2 tsp of oil and heat.  Add the cumin seeds followed by turmeric powder and pour the onion-tomato mixture. Fry it nicely in the oil,  now add the Palak puree and stir. Cook for about 3 minutes on medium flame and add salt, followed by coriander powder, red chilli powder, fennel powder and continue to cook. Be careful as the palak splutters a lot while cooking, you can keep the karahi partially covered.  After about 3-4 minutes of cooking the Palak and tomato mixture will come together, at that stage add the cubed paneer and cook for another 2 minutes on medium flame so that the Paneer absorbs the masala. The delicious Palak Paneer is ready to serve.

Serving suggestions: with Rotis, Parathas, Kulcha, with rice varieties like Jeera rice, Mayar Pulav, 
Flavoured rice, vegetable pilaf etc;


STEPWISE RECIPE FOLLOWS:
1. Assemble all ingredients. Blanch the Palak, cube the Paneer, chop onion and tomatoes.


2. Puree the Palak and set aside. In a karahi take oil and heat. Put in the cloves and cumin seeds, and as the cumin splutters add turmeric powder followed by onions and sauté for a minute. Add the green chillies and sauté for 30 seconds and now add the tomatoes and sauté until mushy. Cool and grind to a purée, along with 1 tsp ginger garlic paste.


3. In the same karahi take 2 tsp oil and heat. Now add the cumin seeds and pour in the tomato and onion paste and fry nicely in the oil. 


4. Now pour the Palak purée and stir nicely. Add the salt, red chilli powder, coriander powder, fennel powder and stir. Cook on medium flame until combined, approximately 4 minutes.


5. Now add the cubed Paneer pieces to the gravy and cook covered for 2 minutes. Finally, add garam masala powder and turn off the flame. The delicious Palak Paneer is ready.


NOTES:
1. Blanching ( putting the Palak in hot water) is a critical step followed by dipping it in cold water.
2. I don’t usually fry the paneer before adding it to a subji or gravy unless the recipe demands it. While you are readying the gravy just put the cubed paneer in fresh water until it’s time to put it in the gravy. It will absorb the flavours better.
3. Don’t overcook the Palak, it loses its colour and taste.

If you tried this recipe and liked it please comment below. I would love to hear from you.
In case you wish to receive recipes as email, please leave your id in the homepage near the mail icon. Whenever Rajjo's Kitchen has a new post the recipe will be mailed to you. Your privacy is important to us and we will not share your id with anyone.


TOFU AND STIR FRIED VEGETABLES IN HOT SCHEZWAN SAUCE

  Any Tofu lovers? I agree its an acquired taste,but going by the health benefits it has to offer, I try including it in my diet now and the...