Vegetarian cooking blog

Tuesday 18 August 2020

UNNI APPAM/NEI APPAM/SWEET APPAM

 This Appam recipe is the Kerala style Appam, made with soaked raw Rice, Jaggery, Banana and Cardamom. It is one of the most simple recipes and is also one of the main offerings in festivals like Janmashtami, and Ganesh Chaturthi. In our house, it is also an instant snack that my mother would make in a jiffy apart from the soak time. Usually, an Appam mould/ Appa karai is required for this, but some also make it by directly pouring a ladle of batter into the oil and deep-frying. If fried without a mould the shape is flat like that of a Pancake, whereas the one made in a mould is round. It is best made with ghee, though oil too can be substituted for ghee.

Grinding the batter to the right consistency is a critical step, as too dilute a batter will affect the moulding of the appam and the batter may just scatter away in the oil. Therefore I have mentioned the right way to grind the batter in the recipe. Once the batter is ground we are just five minutes away from yummy tasting Nei Appams.

While you are here look at my other Sweet dish recipes like Sugiyan, Vella Aval, Akkaravadisal, Chakkara Pongal, Maa Ladoo, Carrot Kheer, Pineapple Rabri and more.

Here is the recipe of Sweet Appam/ Unni Appam for you-- 

PREP TIME: 10Mins+ 1 hr(soak)                        COOK TIME: 30Mins
TOTAL TIME: 40Mins                                          COURSE: DESSERT/SWEET
CUISINE: SOUTH  INDIAN                                 SERVINGS:15 pcs
AUTHOR: Rajni Ram


Ingredients:

Raw Rice 1 cup  soaked for 1-hour minimum ( 1 cup equals 200 gm) ( refer note1)

Jaggery 1 cup powdered/shredded

Banana 1/2 to 3/4 th of 1 large 

Cardamom powder 1/2 tsp

Coconut grated or cut to small pieces 2 Tbsp

Directions:

Soak the Rice for a minimum of 1 hour and up to a maximum of 1.5 hours. After soaking, drain all water and out the rice into a blender. Grind it first to a Rava/Sooji like texture without adding water, now add little water and grind to a smooth paste. Take care not to add too much water, as adding jaggery will liquify it further. So try to use only 1/4 cup water to get a smooth texture. Now add the Jaggery and grind again. Add coconut grating and blitz. Mash the bananas with your fingers and add them to the batter and bring again to a smooth batter. Transfer to a vessel and add the cardamom powder. The Appam batter is now ready.

Now put the Appam mould/Appam Chetty or Appa Karal on flame and heat it well.  Spoon in the ghee into the moulds liberally. Let the ghee heat up, now spoon the batter into the moulds and fry on one side until golden brown, using a kambi/skewer or a fork, to loosen the edges of the Appam and flip it to the other side and fry until golden brown. To check for doneness, pierce the appam with the skewer/toothpick or fork in the center, if it comes out clean, remove appams from the mould. The delicious Unni appam/ Sweet Paniyarams/ Nei Appams are ready. Enjoy. Bon Appetit.

STEPWISE RECIPE FOLLOWS:

1. Soak rice for 1 hour. It can be soaked up to a maximum of 1.5 hours.


2. After an hour drain all the water and put the rice ina blender and grind it without any water at first to a Rava/Sooji like texture.


3. Now add water little by little and grind it to a smooth paste. Water should be used minimally. I used around 1/4 cup water to grind. Check cup measurement given above.


4. Now add the jaggery again and grind to a smooth paste, add the coconut gratings and blitz again.


5. Now mash 3/4 of a Banana with your fingers and add it to the paste, grind once again to a smooth batter. The consistency should be that of dosa batter. Transfer it to a vessel and add the cardamom powder. The appam batter is ready. Have added a mini video to show the consistency of the batter.


6. Put an Appam Chetty on the flame. Spoon in the ghee and heat it. Now spoon in the batter into the moulds and fry on now side until a golden brown. Using a skewer or fork loosen the edges of the appam and gently flip it to the other side and fry again to a golden colour. Repeat for all batter. The Sweet Appams are now ready. 


NOTES:

1. Any raw rice variety can be used other than Basmathi as the Basmathi rice does not have a lot of starch content that is required for binding. The appams turn out rubbery with it.

2. While grinding if you end up with a runny batter accidentally, then add rice flour a tablespoon at a time until you achieve the right consistency.

3. If the batter splits or breaks apart in the ghee either your batter is runny or too much jaggery has been added. So modify accordingly and fry.

4. It is ideal to fry these appams in ghee/clarified butter as it tastes best. But oil also can be used.

5. Banana varieties that are sweet can be used. Avoid the slight sour ones like Poovan. 

6. Always start with frying a single Appam first so that if something needs to be adjusted it can be done and then the rest can be fried.

If you tried this recipe and liked it please comment below. I would love to hear from you. If you have a query about the recipe email us and ill respond as soon as I can.
If you would like to receive our recipes on your mail please leave your mail id at the homepage. Every time Rajjo's Kitchen has a new post we will mail the recipe to you.


Sunday 16 August 2020

GOBI /CAULIFLOWER FRIED RICE

This is a fusion recipe and I usually make it by stir-frying the Cauliflower, but this time I tweaked my own version of the recipe a little and first made a dry Manchurian of the cauliflower and then incorporated it into the fried rice. This is a complete meal and you won’t have to make any accompaniments to go with, as the cauliflower is curried. Usually, a wet Manchurian is served with Fried rice, but here the Manchurian is incorporated into the rice, so just by itself it is a meal.

Apart from the cauliflower Manchurian, I have added the usual Fried rice vegetables as well like Carrots, French Beans, Capsicum etc, had to skip the Spring onions as I couldn’t get hold of it when I planned to make this dish. Never the less, the rice tastes just as good. 

I have used regular rice and not Basmathi as I find that Basmathi and Chinese flavours do not go very well. Jasmine rice can be used in place of regular rice if you prefer. Fried rice varieties like this one and Schezwan Fried rice with Soya chunks are my go-to food during weekends as just one dish makes everyone happy, and I get time to do some baking.

While you are here I request you to check out my other recipes such as Schezwan Fried Rice, Schezwan Sauce,  Creamy Tomato Pasta, Nutella fudge Brownies, Apple Crumble and more...

Here is the recipe of Gobi Fried Rice for you—

PREP TIME: 20 Mins                                         COOK TIME: 40 Mins
 TOTAL TIME:60Mins                                          COURSE:  MAIN
 CUISINE:  FUSION                                             SERVINGS: 5
 AUTHOR: Rajni Ram


Ingredients for Manchurian:

Cauliflower 1 medium-sized, cut into florets

Rice flour ½ cup

Corn flour ¼  cup

Salt as required

Red chilli powder 1 tap

Pepper powder 1 tsp

Water 1 tbsp approx.

Onion 1 large

Tomato 1 medium 

Tomato sauce 1 tbsp

Red chilli sauce ½ Tbsp

Garlic 5 cloves finely chopped

Green chillies 3 finely chopped(divided)

Oil for frying

Ingredients for Fried Rice:

Rice precooked and cooled (spread and cool on a plate, drizzle little oil)

Carrot 1 chopped finely

French Beans a few chopped finely

Capsicum 1 small chopped finely

Salt as required

Sugar 1 tsp

Soya sauce 1 tbsp 

Pepper powder ½ tsp 


Directions for Manchurian:

Boil 1litre water. Take the cauliflower florets in a large vessel, add 1 tsp st and ½ tsp turmeric powder and pour the boiling water over it. Cover the vessel and let it stand for 10minutes. Now drain all water and cool the florets. On cooling add the Rice flour, followed by Corn flour, add salt, red chilli powder, pepper powder and toss nicely with a spatula or using your fingers. Take approximately 1 tablespoon water and sprinkle it over the flour and cauliflower mixture. Now nicely mix them all together. Adding 1 tbsp water helps the flours to stick to the Cauliflower. Heat oil for frying in a Karahi and fry the Cauliflowers nice and crisp. Drain in absorbent paper and keep aside.

 In a wok/karahi take some oil and heat. Put in the finely chopped garlic and saute for 30 seconds. Add the green chillies and saute for another 30 seconds. Transfer the sauteed garlic and chilli to a plate. Now put the onion and 1 green chilli into a blender and grind to a smooth paste. Remove and blend the tomato into a smooth puree. Now in the same wok heat the oil and drop in the onion paste. Fry nicely until light brown. Now add the tomato puree and mix well. Cook the onion tomato paste on high flame and start drying out the moisture. When most of the moisture has evaporated add the Tomato sauce, Red chilli sauce, salt and red chilli powder and stir nicely. The sauce should be semi-dry. Now add the fried cauliflower florets to this sauce and toss nicely, such that the sauce coats the cauliflower well. The Manchurian is ready. Set it aside.

Directions for Fried Rice:

Pre-cook rice. Spread it on a plate, drizzle some oil and cool. Now in a wok heat some oil. Over a high flame saute the capsicums first for 1 minute. Now add the chopped beans and carrot and stir fry for a minute. Add a teaspoon of sugar while stir-frying. Now add the salt, pepper powder and saute for another minute. Now its time to add the cooked and cooled rice. Add it little by little and mix nicely. Add a tablespoon of Soya sauce and give everything a nice stir, so that the Soya sauce mixes in. Now add the Manchurian to rice and toss well. Finally, mix in the sauteed chillies and garlic to the Fried rice. The Gobi fried rice is ready to serve.


STEPWISE RECIPE FOLLOWS:

1. Assemble all ingredients. Chop cauliflower to florets, cook rice and cool as directed. Take the cauliflower florets in a large vessel, add 1 tsp st and ½ tsp turmeric powder and pour the boiling water over it. Cover the vessel and let it stand for 10minutes. Drain the water and cool the florets.


2. Add the rice flour and cornflour along with salt, red chilli powder, pepper powder and toss well. Add a tablespoon of water and mix nicely. It should be a dry mixture, the flours must stick to the florets. 


3. Heat oil in a wok/karahi for deep frying and fry the cauliflower florets until crisp. Drain excess oil on an absorbent paper and set aside.


4. In a wok/karahi take some oil and heat. Put in the finely chopped garlic and saute for 30 seconds. Add the green chillies and saute for another 30 seconds. Transfer the sauteed garlic and chilli to a plate.


5. Put the onion and 1 green chilli into a blender and grind to a smooth paste. Remove the paste, and blend the tomato into a smooth puree. Now in the same wok heat the oil and drop in the onion paste. Fry nicely until light brown. Now add the tomato puree and mix well. Cook the onion tomato paste on high flame and start drying out the moisture.


6. When the mixture is almost dry, add the Tomato sauce, Red chilli sauce, salt and red chilli powder and stir nicely. The sauce should be semi-dry. Now add the fried cauliflower florets to this sauce and toss nicely, such that the sauce coats the cauliflower well. Set the Manchurian aside.


7. In a wok, heat oil and add the chopped beans and carrot and stir fry for a minute. Add a teaspoon of sugar while stir-frying. Now add the salt, pepper powder and saute for another minute. 


8. Now add the rice little by little and mix well. To this add the soya sauce and mix again, such that all the contents are well integrated. Now add the Manchurian to the rice and toss nicely. Follow this up by adding the sauteed green chilli and garlic. Toss again. The Gobi Fried rice is ready to devour.


NOTES.

1. The same recipe of Manchurian works well if you want to make dry Gobi Manchurian. If using the recipe only for Manchurian then add the sauteed chillies and garlic after to have mixed the florets with the sauce.

2. In case you add more water while mixing the flours with the florets and the flour is not sticking to the florets add in extra flour.

3. While making the fried rice I have not added any chilli powder. Only pepper powder has been added, as all other spices are there in the Manchurian. If you prefer more spice, feel free to add more.

4. Sugar is added while sauteeing vegetables so that they retain the colour and cook well.

 If you tried this recipe and liked it please comment below. I would love to hear from you. If you have a query about the recipe email us and ill respond as soon as I can.

If you would like to receive our recipes on your mail please leave your mail id at the homepage. Every time Rajjo's Kitchen has a new post we will mail the recipe to you.


Special Note:
To make this Fried rice with Baby Corn, pressure cook 2 packs approximately 200 gm for 3 whistles. Once pressure releases drain water and cool completely. Once cool add 1tsp red chilli powder, 1 tsp turmeric powder, 1 tsp coriander powder, required salt and juice of half a lemon, i tsp oil and 1 tbsp cornflour and marinate for 30 minutes. Fry these in oil until crisp and add to the Fried rice instead of Cauliflower.


Friday 14 August 2020

MUSHROOM RISOTTO WITH DALIYA( WHEAT BROKENS)


Risotto is an Italian dish made of rice. It is cooked in a broth until creamy and combined with sauteed onions, other vegetables, and cheese.

This recipe of Mushroom Risotto is tasty and healthy at the same time. This recipe was spotted by my girl while browsing the internet and she had been asking me to make it for her. So decided to give it a try, and it really tastes delicious and therefore it gets to feature on my blog. I do make the regular Risotto once in a while but the use of Daliya seemed very novel and different to me. 

In this recipe, I have replaced the rice with Daliya(broken Wheat that is coarse). Lapsi or Wheat Rava also can be used. The key to a good Risotto lies in the broth and the Parmesan cheese. A large variety of vegetables can be used in making the broth.

If you are a regular at making Risotto follow the same process as with rice. Beginners may want to follow the recipe carefully. I have put in a video too for guidance.

The Risotto made with rice makes use of wine to enhance the taste. I have kept this wheat Risotto very simple with everyday ingredients. Simple ingredients make for great flavour always.

This recipe requires about 1 litre of vegetable broth. I made the broth at home, if you use broth cubes, that is fine too.

In this recipe, I have not given the stepwise instructions, but I have included a video of the whole process instead. Hope you find the video helpful.

While you are here please do check out my other recipes like Apple Crumble, Blueberry Cheesecake, Nutella Fudge Brownies, Schezwan fried rice,              Berry Smoothie Icecream, Creamy Tomato pasta and more...

Here is the recipe of Mushroom Risotto with Daliya for you-

  PREP TIME: 20 Mins                                         COOK TIME: 40 Mins
 TOTAL TIME:60Mins                                          COURSE:  MAIN
 CUISINE:  WORLD FOOD                                 SERVINGS: 3
 AUTHOR: Rajni Ram


  Ingredients for Broth:

  Carrot 1

  Cucumber 1

  Onion 1 large

  Broccoli 4 to 5 florets

  French Beans a few

  Garlic 4 to 5 cloves

  Coriander/ Cilantro few sprigs

  Salt as per taste


  Ingredients for Risotto                                                                                                                                                                                                                       

   Mushrooms 200 gm

  Daliya (broken Wheat) 1 cup washed

  Garlic 8 cloves (divided)

  Onion 1 cup  (chopped)

  Vegetable broth 4 to 5 cups approx.

  Salt as required

  Pepper powder 1 to 1.5 tsp

  Parmesan Cheese 3 tbsp (add more if you prefer)

  Directions for broth:

Chop all the vegetables mentioned under Broth, put them in a saucepan, add 1 litre + 1 cup water and salt and boil for 10 minutes. Cool completely and use as required. Other vegetables that you may like can also be added to make the broth.  

Directions for Risotto:

In a pan take 1 tablespoon butter and heat, add the garlic and saute on high for 30 seconds, now add the chopped mushrooms and saute for a minute. Flame to be on high throughout sauteeing. Add the salt and continue to saute. The mushroom will release a lot of moisture, continue to saute, and let the moisture dry. When the moisture is almost dry add the pepper powder and continue to saute until all the moisture has evaporated. Transfer the sauteed mushrooms to another vessel. 

Now in the same pan add 1 tablespoon butter and heat. Add the crushed garlic and saute for 30 seconds. Now add the finely chopped onions and continue to saute. Saute on high flame. When the onion turns translucent add the Daliya and stir nicely. Add 1 cup of broth, stir, and cover the pan and cook for 5 minutes on low flame. Open the lid after 5 minutes, pour 1 more cup of broth, stir well and cover and cook again on low flame for 5 minutes. Now when you open the pan, the Daliya would be cooked, now we only have to get it soft. Add another cup of broth, and salt, stir and cook on low flame. The pan need not be covered now. As you cook the Daliya keep mashing with the back of a ladle to get a creamy texture. Now add pepper powder and stir well. add another cup of broth, stir and continue cook on low flame. Once all the water is absorbed, add in the sauteed mushrooms and give it a stir. Add the last cup of broth now and cook on a low flame. Now when the water gets absorbed, add 3 tablespoons of Parmesan Cheese, stir nicely, so that the cheese melts and gives the Risotto its gooey and creamy texture. Put off the flame. If you like cheese you can add more than 3 tablespoons too. In all 4 to 5 cups of broth is required to get that creamy texture.

The healthy and delicious Mushroom Risotto is ready. Enjoy hot. Bon Appetit.


SHORT VIDEO OF THE METHOD HERE🠇                              


NOTES:

1. Any variety of vegetables can be added to the broth, in addition to the mentioned ones.

2. Around 4 to 5 cups of broth is required for this recipe. If in case the broth gets over, and you still have to add a cup, plain water can be added. 

3. Parmesan is the most recommended cheese for this recipe, as cheddar will become tough and stretchy once cooked, whereas Parmesan is a softer one.

4. In place of, or in addition to mushrooms, Broccoli also can be used.  


  If you tried this recipe and liked it please comment below. I would love to hear from you. If you have a query about the recipe email us and ill respond as soon as I can.

If you would like to receive our recipes on your mail please leave your mail id at the homepage. Every time Rajjo's Kitchen has a new post we will mail the recipe to you.


Wednesday 12 August 2020

BAIGAN RAITA/KATHRIKAI THAIR PACHCHADI

Raita is a yogurt-based condiment. It usually contains cooked or raw vegetables/fruits/pulses, mixed with the Yogurt/Dahi and tempered with Mustard and Jeera. The Raita is usually served with Biriyani, Pulav, Parathas, Naans, or can be served as a dip for Kebabs too.

Raitas are a regular feature at my house. Whenever I make Parathas I usually pair it with a Raita instead of plain curd, and it goes without saying that Biriyani is almost always served with raita. I use raitas such as Mint raita as a dip for Kebabs too.

This recipe of Baigan raita is a very simple one, gets done in 15 minutes, at the end of a tiring working day when one wants to eat veggies but isn't up to cooking a proper subji, is when this Raita comes in. I have used the Big Bharta Baigan(Kathrikai) in this recipe. The small ones will work fine too, but the big ones give it a special taste. 

This method of making the Raita really gives a very nice flavour and taste. 

In South India this Raita is usually made by roasting the Eggplant over a flame, mashing it, and then adding it to curd along with a tempering of green chilies and ginger. 

The big Baigans get mushy too soon, so the trick lies in cutting them appropriately(mentioned in the recipe), the rest is just whisking the curd and adding the masala and the raita is ready.

While you are here please visit other Raita recipes of mine like Bhindi Raita and       Mint Raita more Raita recipes will be uploaded soon.

Here is the recipe of Baigan Raita for you--

PREP TIME: 10 Mins                             COOK TIME: 5 Mins
TOTAL TIME: 15Mins                            COURSE:  MAIN 
CUISINE: SOUTH INDIAN/                    SERVINGS: 4
                 NORTH INDIAN 


Ingredients:

Baigan/Kathrikai(big one/Bharta Baigan) 1 medium-sized                                        Curd 500 ml                                                                                                                  Salt as per taste                                                                                                            Red chilli powder 1 tsp( for more spice can add more)                                              Roasted Cumin/Jeera powder 1 tsp                                                                              Sugar 1 tsp      

Directions:

Cutting of the Baigan: Big Eggplants/Baigan tend to get very mushy when cooked. So it is important to cut the Baigan such that every piece retains the peel(skin). The Baigan must be cubed into small pieces. Cutting in a way that every cube has the peel ensures that they don't get mushy, and cubed Baigan must be fried in 1 tablespoon oil on high flame until they get a light brown tint. Add a small amount of salt while frying them. The Baigan/ eggplant must not lose shape. It should have cooked, but remain firm. Set these fried pieces aside to cool.

Now take the curd in a bowl and lightly whisk it, just smoothening it will also do, as too much whisking will make the curd runny. Add the salt, red chilli powder and roasted cumin powder, sugar and mix well. Now add the cooled and cooked Baigan pieces to the curd and spice mix and put it in the refrigerator until you serve. The delicious Baigan Raita is ready.

Serving suggestions: Parathas, Kebabs, Biriyani, Pulav, Jeera rice, coriander rice, Masala rice, Flavoured rice, and other rice varieties.


STEPWISE RECIPE FOLLOWS:

1. Assemble all ingredients. Cut the eggplants/Baigan as stated in the directions for cutting above.


2. Now in a Kadai or pan take 1 tbsp oil and heat. Put in the Cubed Baigan and fry on high flame adding a minute amount of salt. Do not add too much salt. The Baigan should get a light brown tint, should be cooked, and yet retain its shape and not turn limp.


3. Now lightly whisk the curd. Add the salt, red chilli powder, roasted cumin powder, sugar and stir nicely.


4. Add the cooled and cooked Baigan pieces to the curd mix and refrigerate until ready to serve.


NOTES:

1.  If using the big Eggplants cutting them as recommended is a crucial step.

2. Adding sugar gives a very nice taste to the Raita, so try not skipping this step.

If you tried this recipe and liked it please comment below. I would love to hear from you.

If you want the recipes emailed to you,  leave your id in the homepage near the📧
icon. Whenever we have a new post,  the recipe will be mailed to you. Thank you for showing interest in Rajjo's Kitchen.


Monday 10 August 2020

THENGAI THERATTIPAL/ PALKOVA(COCONUT INFUSED)

 Therattipal or Palkova is a dehydrated milk sweet, made with only two ingredients-Milk and Sugar. Therattipal is a traditional recipe made for festivals like Janmashtami and Deepawali. In our house, Therattipal is the main offering to Krishna apart from Sweet Appam and for Deepawali too we start the festival with a spoon of the Therattipal immediately after Ganga Snanam.

This time I have given a twist to the Therattipal and added roasted coconut gratings to it, which enhances the taste of this sweet dish. Anyway until we add the coconut the method of the recipe is the same. Usually, no cardamom powder is added to this sweet as the milk taste is what should pervade, but if one does prefer, it can always be added.

The coconut flavour is mild and not very intense. The milk and the coconut combine really well to give a different taste which is a welcome change from the regular Therattipal.  

This recipe if made with pure organic cows milk tastes divine, as while the milk reduces you can see the natural fat bubbling out. And it tastes as though ghee has been added to it. These days since we all use milk packets or tetra pack cartons of milk we don't see this process happening naturally and so we add a teaspoon of ghee at the end. its an optional step and the sweet will still taste the same, if not added.

While you are here please check out my other Sweet dish recipes like -

 Atte ka Sheera, Sugiyan, Carrot Kheer, Vella Aval, Maa Ladoo, Pineapple Rabri, Chakkara Pongal and many more...

The same recipe can be followed for regular Therattipal/Palkova too. Only the coconut doesn't have to be added.

Here is the recipe for Thengai Therattipal/Palkova(coconut-infused)-

PREP TIME: 5Mins                                      COOK TIME: 1 hr
TOTAL TIME: 1 hr 05Mins                            COURSE: DESSERT
CUISINE: SOUTH  INDIAN                          SERVINGS: 4

AUTHOR: Rajni Ram


Ingredients:

Milk (toned milk) 1.5 litres (refer to note1)                                                                Sugar 140 gm approx (reduce if you prefer less)                                                        Coconut (grated) 1 cup

Directions:

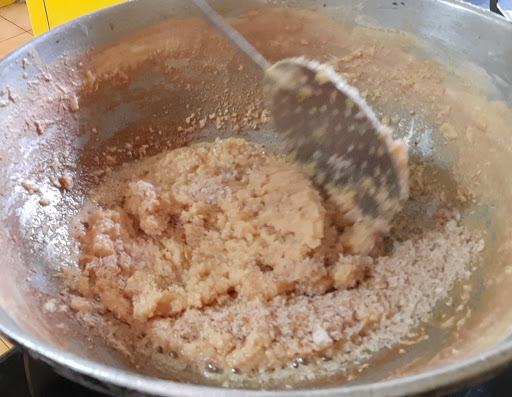
Pour the milk into a heavy-bottomed vessel or Kadai and begin to boil. It has to be reduced by almost 3/4 of the quantity by stirring constantly. For the first 10-15 minutes, constant stirring is required, thereafter keep flame on medium heat and keep stirring from time to time. As the moisture from the milk evaporates the consistency of the milk becomes denser and the texture also starts becoming granular/thready. Keep stirring until the milk has lost almost all moisture(check picture for reference) and now add in the sugar and start stirring again. Once the sugar is added the reduced milk mixture liquifies a little, it is normal and nothing to worry about. Continue stirring until the mixture loses all the moisture al does not stick to the bottom of the pan anymore. Another way to check is to put a little   Palkova in a plate, just wet your hands with water, and try to take a small bit of the Palkova and shape it to a mini ball. If the ball forms, you can turn off the flame. Now in In another Kadai, put 1/2 tsp ghee and drop in the coconut gratings and start roasting it until it becomes dry and it is a nice brown in colour. Transfer it to a plate and cool it. Once cooled, add to the Palakova/Therattipal, switch on the flame and mix nicely until the coconut and the Therattipal are well integrated and switch off the flame. After adding the coconut the mixture turns a little drier. It is natural so nothing to worry. Offer it to Krishna or just have it as dessert. Enjoy. Bon Appetit.                                                                                                                If you want just regular Therattipal stop the procedure after adding sugar and reducing it again. Add a teaspoon of ghee for a nice sheen.   


STEPWISE RECIPE FOLLOWS:

1. Start by boiling the milk in a heavy-bottomed vessel or Kadai.


2. Keep stirring constantly for the first 10 to 15 minutes and keep scraping the sides of the vessel as the milk solids keep depositing there.


3. Now on medium heat and stirring every once in awhile reduce the milk until almost all moisture gets evaporated.


4. Now add in the sugar and start stirring again. The mixture liquified a little again but it is natural and again will solidify.


5. Keep stirring until the mixture does not stick to the bottom of the vessel any more. Another method to check for doneness is to take a little amount of the Therattipal and put it on a plate. Wet your fingers and take a small quantity and try to form a ball. If you are able to form a ball, that is the right consistency. Put off the flame.


6. In a small Kadai take little ghee and add a cup of grated coconut and start roasting until it becomes dry and turns a nice brown in colour. When the coconut is dry, it will not stick to the Kadai anymore. Transfer it to a plate and cool.


7. After it cools completely add it to the Therattipal, switch on the flame and stir nicely until the coconut is well integrated with the Therattipal. Once the coconut is absorbed, the mixture will become drier, this is natural and there is no need to worry. Add a teaspoon of ghee finally, just for some sheen. The Thengai Therattipal is now ready.


QUICK VIDEO OF METHOD HERE:


NOTES:

1. I have used Tetrapack toned milk. The more fat content in the milk the lesser the evaporation time. You can use full cream milk too.

2. It took around 1 hour to reduce 1.5 litres of milk. 

3. If you don't wish to add the coconut, the process can be stopped after adding sugar, reducing further and performing the test to see if a ball is formed.

4. If one prefers less sugar, it can be reduced a little.

5. There are many short cut methods to evaporate milk by adding milk powder etc; I use this method for making small amounts of Rabri for jalebis and other such dishes, but I don't recommend the shortcut method for Therattipal, as this whole sweet dish is about the texture and taste. 

6. Cheese too is used for quick evaporation, but again it changes the taste and texture.


Sunday 9 August 2020

MASALA WHEAT FLOUR PAPDIS(BAKED)

Masala Wheat Flour Papdis are crunchy crisps made of wheat flour. The wheat flour here can be easily replaced with maida/refined flour or multigrain flour. I usually fry these Papdis, but this time I have baked them as per the request of friends and followers as they wanted something that was not deep-fried. That said, these Papdis can be fried too and I have given both options in this recipe.

When we bake a snack that is traditionally deep- fried there is always a difference in texture. It would be wrong to say that they taste almost like fried ones. The taste is the same, the papdis are crunchy too, but there is a difference in their textures. I also believe that when we prefer a baked snack over a fried one we are willing to adjust to the minute differences that are bound to be there because the technique used is different. Therefore you will not find phrases like "baked but almost like fried" or "baked but as good as fried", on this blog. Baked is baked and fried is fried, and somewhere there is a compromise in either, shape, colour, texture, taste of the dish. I am not saying this only about the current recipe but in general. When a deep-fried dish is baked there are differences.

This is why I try to keep the fried ones fried, but sometimes I do give in to a little experimenting. I won't do something because it is a trend, but if I do experiment and the result is blog-worthy I will certainly share it with you all.

Now, these Papdis can be served with tea, they last for a long time when stored in an airtight container. I also make Papdi Chat(street food delicacy) with these, and since they are firm than the Maida papdis, they hold up the sweet curd and chutneys of the Chaat well.

While you are here please do look at other snack recipes by Rajjo's kitchen like Semolina Cheese Balls, Kothimbir vadi, Stuffed kuzhi Paniyarams, Kachori, Savory Muffins and more...

Here is the recipe of Wheat flour Papdis for you--

PREP TIME: 15Mins                                       COOK TIME: 45 Mins
TOTAL TIME: 60Mins                                     COURSE: SNACK
CUISINE: NORTH INDIAN                            SERVINGS: 40 pcs
AUTHOR: Rajni Ram


Ingredients:

Wheat flour 2 cups       (1 cup =150 ml)                                                                      Suji(semolina) 1/2 cup                                                                                                Salt as per taste                                                                                                            Red chilli powder 1 tsp                                                                                                Ajwain(Omam/Carrom seeds) 1 tsp                                                                            Oil 3 tbsp for flour  (refer note1)                                                                                  Fresh Coriander or Methi(fenugreek)leaves  1/2 cup finely chopped                          White sesame 1 tsp (optional)                                                                                      Water as required      

Directions:

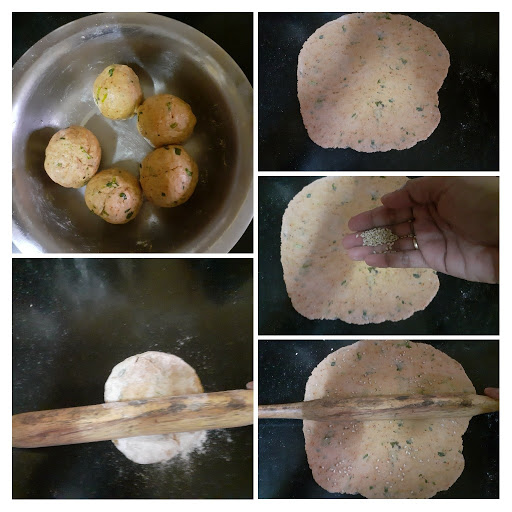
In a dish take the wheat flour and add the suji/semolina to it. Now add the salt, red chilli powder, ajwain followed by the 3 tbsp oil. Start mixing the flour with your fingers, such that the spice powders and oil are well mixed with the flour. Now take some flour in your palm and clamp it together with your fingers. If the flour holds shape, water can be added little by little now. But before that add the chopped coriander/methi leaves, mix it with the flour well and now start adding water little by little. We want a stiff dough here. The consistency should be like the dough for Poorie. Now apply very little oil on the dough and rest it or 15 minutes.  Now divide the dough into 4 or 5 balls. Roll out each ball into a thin circle, flour for dusting if required. Sprinkle some sesame seeds on the rolled and flattened dough and roll again so that the sesame seeds stick to the dough. Now with a cookie cutter or lid of a bottle cut into a circle. Remove excess dough from sides. prick holes with a fork on the little papdis.                                                                     

To bake them: Preheat oven to 180 C for 10 minutes. Place the little circles into a baking tray after pricking holes,  brush with a little oil(this step is optional), and bake at 180 C for 8 minutes on one side, flip them after 8 minutes and bake again for 8 minutes. Remove from oven, let them cool and store in an airtight container. Repeat this process for the whole amount of dough.

To fry them: Take oil in a Kadai and heat. The oil should be medium hot. The dough when put should sizzle and rise up immediately. This is the right temperature. Prick the papdis with a fork and gently drop them into the oil and fry until all bubbles have subsided and the papdis are light brown in colour. Cool and store in an airtight container. 

The crunchy and spicy Masala Wheat Flour Papdis are ready to serve with tea or to be made to a Chaat item. Enjoy. Bon Appetit.


STEPWISE RECIPE FOLLOWS:

1. Assemble all ingredients. Take the Wheat flour in a dish and add the Semolina/Suji to it.


2. Now add the salt, red chilli powder, ajwain, and oil to the flour.


3. Start mixing the flour with your fingers(without adding any water at this stage). The spice powders and salt must mix evenly with the flour. Take some flour in your palm and try to clamp it within your fist. When you open your fist the flour should hold shape and not break away.


4. Now add the finely chopped fresh coriander or Methi leaves, and adding water little by little form a stiff dough. The consistency should be like Poori dough. Rest the dough for 15 minutes.


5. Now divide the dough into 4 or 5 equal parts. Take one ball at a time, dust it with flour and roll it out like a chapati, sprinkle some sesame seeds and roll again lightly, so that the seeds stick to the dough.


6. Now with a cookie cutter or lid of a bottle make small circles. Take away the excess dough. Prick the circles all over with a fork.


7. To bake- preheat oven to 180 c for 10 minutes. Brush some oil over the Papdis, place them on a baking tray and bake at 180C for 8 minutes on one side. Remove the tray, flip over the papdis and bake again for 8 minutes. Remove from oven and cool. Store in an airtight container.  


8. To fry them- heat oil in a Kadai. Oil should be medium hot. Check the temperature by gently dropping a small bit of dough into the oil. If it sizzles and rises immediately, this is the right temperature. Now fry the papdis in oil at medium heat until all the bubbles subside and the papdis are light brown in colour.


NOTES:                                                                                                                        1. Adding adequate oil to the flour is a crucial step, the oil is the one that imparts the crunch to the Papdis. After step 3 if the flour is still not holding shape, then add another teaspoon or two of oil to the flour, rub it into the flour and check if it holds shape now by claiming it in your fist. If it does, start mixing water.

2. It is important to prick the Papdis with a fork before baking or frying as otherwise, they will rise/puff up thereby losing the crunch. So pricking holes is a crucial step.

3. The temperature of the oil is important, the method to check the temperature is given in step 8, which should be followed. 

4. The timing in each oven may vary to bake, so 2 to 3 minutes less or extra time may be required.     


TOFU AND STIR FRIED VEGETABLES IN HOT SCHEZWAN SAUCE

  Any Tofu lovers? I agree its an acquired taste,but going by the health benefits it has to offer, I try including it in my diet now and the...