Vegetarian cooking blog

Monday 12 October 2020

MIRCHI BAJJI/MIRAPAKAYA BAJJI/CHILLI FRITTERS

 Mirchi Bajji or Mirapakaya bajji as it is called in Andhra Pradesh, is popular street food in most South Indian states. The way of making them differs though. This snack is popular in Jaipur/Rajasthan too and the style of making it is different. This snack is made from a particular type of Chilli, called Banana Peppers or Bajji Milagai. They are a light shade of green and huge.

In this recipe, I have followed the Hyderabadi style, wherein the chilli is first processed by slitting it in the centre, de-seeding it, and stuffing it with a paste. The then chillies are coated with chickpea flour batter and deep-fried.

In the Rajasthani style, the Mirchi/chilli is de-seeded and is topped with a spicy mashed potato coating(not stuffed), then dipped in chickpea batter and then fried.

In some other states in South India, the chillies are just deseeded and then dipped in batter and deep-fried. This version is not the best way to make this bajjis though. The stuffing is what makes all the difference.

I am getting to the recipe without much ado. I request you to have a look at my other snack recipes like Semolina Cheese Balls, Kothimbir Vadi, Dahi Pohe/Moru Aval, Masala Wheat flour Papdis, and more..,

Here is the recipe for Mirchi Bajji/Mirapakaya Bajji for you-

 PREP TIME: 20                                         COOK TIME: 20Mins
 TOTAL TIME:40Mins                                  COURSE:  SNACK
 CUISINE:  INDIAN                                     SERVINGS: 6
 AUTHOR: Rajni Ram


Ingredients for stuffing:

Chickpea flour/Besan 2 cups

Tamarind paste 1 tbsp or Tamarind pulp 1 cup(refer note1)

Salt as required

Red chilli powder 1/2 to 1 tsp

Ajwain seeds/Omam 1 tsp

Water as required(if using tamarind paste)


Ingredients for batter:

Besan/ Chickpea flour 2 cups

Rice flour 1/4 cup

Salt as required

Red chilli powder 1 tsp

Ajwain 1/2 tsp

Hot oil 1 tbsp

Ingredients for Mirchi Bajji:

Bajji Chillies 12 numbers

Oil for deep frying

Processing the Bajji Chilli:

Wash then and pat them dry. With a sharp knife make a lengthwise slit in the center and remove the seeds complete with your fingers, or spoon. Be very gently or they may break. The chilli should be clean on the inside and devoid of any seeds.

Directions for making Mirchi Bajji:

 Once the processing of the Chillies is done, take all ingredients mentioned under stuffing except water and mix them well with your fingers. Now add water little by little to make a dough, which is neither too stiff nor too loose. (this procedure is if using tamarind paste)

If using tamarind pulp then take all ingredients mentioned under stuffing, in a bowl and combine them to form a dough, using the tamarind pulp. 

Now make small cylinders out of this stuffing dough and stuff it into the chillies. Note that the chillies need not be fully stuffed, making a cylinder of them ensures that the stuffing is there from stalk to tip. Repeat for all chillies.

Now take all ingredients mentioned under batter, except water and mix well with your fingers. Adding water little by little, form a batter that is not too flowy. It should be thick enough to coat the chilli. The chilli surface is very smooth and slippery. so the natter has to be a little thick(refer picture). After making the batter, put oil for deep frying in a Kadai and heat. Bring the oil to smoke point and reduce heat completely. Pour 1 tbsp of this oil into the batter, and mix the batter nicely with a spoon(be careful not to use your hands, the oil is very hot). The hot oil does the job of baking soda here, and make your bajji turn fluffy and crisp(secret out๐Ÿ˜€). Now it is time for frying. Holding the chilli by the stalk, dip it into the batter, use your fingers if required to coat the chilli well and drop them gently into the hot oil. Fry on medium-high until it turns a nice brown in colour. To serve, sprinkle some Chaat masala and enjoy. Bon Appetit.


STEPWISE RECIPE FOLLOWS:

1. Assemble all ingredients. Follow the processing of chillies step and set them aside.


2. This step is if you are using tamarind paste- take all ingredients mentioned under stuffing except water and mix them well with your fingers. Now add water little by little to make a dough, which is neither too stiff nor too loose. (if following this step ignore step 3)


3. This step is if you are using tamarind pulp: take all ingredients mentioned under stuffing, in a bowl and combine them to form a dough, using the tamarind pulp. 

( PICTURES SAME AS ABOVE, USE TAMARIND PULP INSTEAD OF WATER)

4.  Now make small cylinders out of this stuffing dough and stuff it into the chillies. Note that the chillies need not be fully stuffed, making a cylinder of them ensures that the stuffing is there from stalk to tip. Repeat for all chillies.


5. Now take all ingredients mentioned under batter, except water and mix well with your fingers. Adding water little by little, form a batter that is not too flowy. It should be thick enough to coat the chilli.


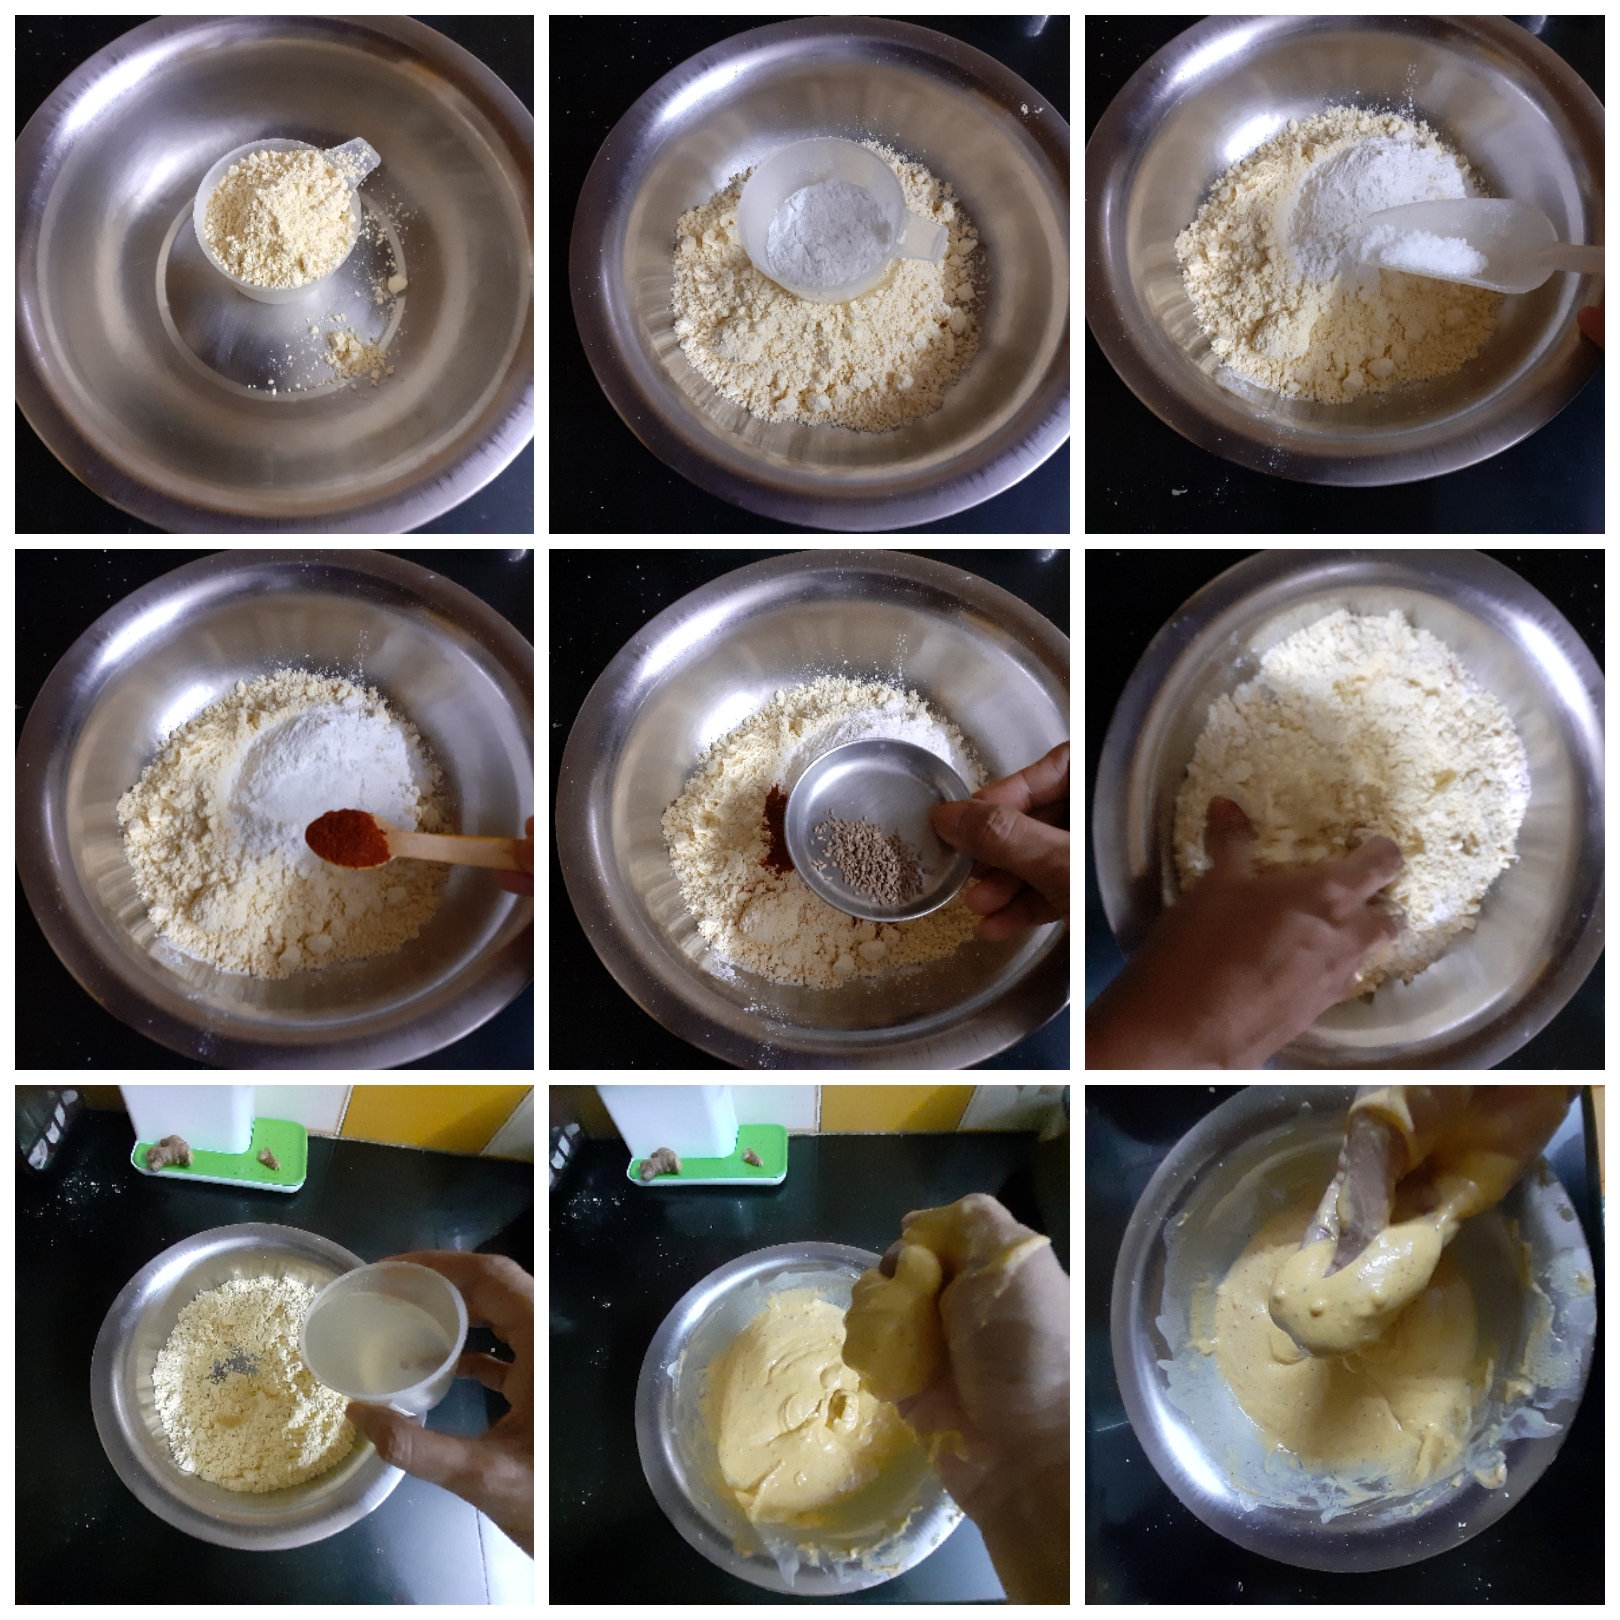
6. After making the batter, put oil for deep frying in a Kadai and heat. Bring the oil to smoke point and reduce heat completely. Pour 1 tbsp of this oil into the batter, and mix the batter nicely with a spoon(be careful not to use your hands, the oil is very hot). 


7. Holding the chilli by the stalk, dip it into the batter, use your fingers if required to coat the chilli well and drop them gently into the hot oil. Fry on medium-high until it turns a nice brown in colour. 


NOTES:

1. I usually make a paste of tamarind and keep it handy. This post is on my Facebook and Instagram handles. I will try to share that in the blog sometime soon. Store-bought paste also can be used, quantity should be 1.5 tbsp. If using store-bought paste, decrease the amount of salt in the stuffing.

2. For making Tamarind pulp take lemon size ball of tamarind, soak in warm water for 5-10 minutes and extract a pulp that comes to 1 cup. Use this to make the stuffing dough.

3. Pouring hot oil into the Bajji batter does the job of soda. It makes the Bajji fluffy and crisp and also gives it a good colour. 

4. While frying these Bajjis patience is required and fry them in high heat will give you an uncooked stuffing. 


If you tried this recipe and liked it please comment below. I would love to hear from you. If you have a query about the recipe email us and ill respond as soon as I can.

If you would like to receive our recipes in your mail please leave your mail id at the homepage. Every time Rajjo's Kitchen has a new post we will mail the recipe to you.

Friday 9 October 2020

GAJAR HALWA BARFI

 A Barfi is the Indian cousin of the western Fudge. In a Barfi either milk or flour is a base along with fruit or vegetables or dry fruits or a combination of them. This is a sweet dish I tried just for fun and I really did not have an idea of the quantities. I just went by gut feeling and it ended up in something really yummy. It is a twist to the regular Gajar Halwa and tales just 1/4 of the time to get it done. It took me precisely 20 minutes for the entire cooking process, 5 minutes for grating the Carrot. It needs a 20-minute chilling time(in the refrigerator). 

I tried this out with small quantities of everything as I was trying it for the first time. Since it turned out very well, it is blog-worthy and worth a try by everyone. I usually make Gajar Halwa only when the Delhi Carrots(the orangish-red ones) arrive in Chennai, and I make it 3 to 4 times before the season gets over. Since I was trying a Barfi I went ahead with the regular carrots. 

While you are here check out my Indian sweet recipe collection like- Pineapple Rabri, Atte Ka Sheera, Unni Appam, Aval Kesari, Thengai Therattipal, Maa Ladu, Vella Aval, Chakkara Pongal, Carrot Kheer, and more...

Here is the recipe for Gajar Halwa Barfi for you-

   PREP TIME: 5                                    COOK TIME: 20Mins
   TOTAL TIME:25Mins                          COURSE:  DESSERT
   CUISINE:  INDIAN                             SERVINGS: 6
   AUTHOR: Rajni Ram


Ingredients:

Carrots 2 big shredded

Kova/Khoya/Mava 100gm(store-bought)

Sugar 1/2 cup

Milk 1/4 cup

Ghee 6 tsp

Cardamom powder 1/4 tsp

Broken nuts for garnish


Directions:

Grease a small plate with ghee and keep ready. In a Kadai or pan take 2 tsp ghee and heat. Drop the grated carrot onto the Kadai or pan and saute on high for a minute. Now add the milk, reduce the flame, and cook the carrots for 5 minutes. The carrots should cook but not turn limp. Now add the grated Khoya/Mava and continue to cook for few minutes. Once the Mava is added the mixture becomes a little thick, now add the sugar and stir, the mixture liquefies a little as the sugar melts. Keep stirring for a few minutes and the mixture will start to thicken up. When the mixture no longer sticks to the bottom of the pan, its time to transfer it into a greased plate. Another method to check for doneness of the mixture is to wet your hands, take a small amount of the carrot mixture, and try to form a ball. If the ball retains shape its time to transfer into the greased plate. Spread the mixture evenly on the plate, sprinkle some chopped nuts on top, and press it gently with the ladle back or your palm. Put the plate into the fridge for 20 minutes. Bring it out, cut into diamonds or squares and it's ready to serve. Enjoy the dessert. Bon Appetite.


STEPWISE RECIPE FOLLOWS:

1. Assemble all ingredients. Grease a small plate with ghee and keep ready. In a Kadai or pan take 2 tsp ghee and heat. Drop the grated carrot onto the Kadai or pan and saute on high for a minute.


2. Now add the milk, reduce the flame, and cook the carrots for 5 minutes. The carrots should cook but not turn limp. Now add the grated Khoya/Mava and continue to cook for few minutes.


3. Once the Mava is added the mixture becomes a little thick, now add the sugar and stir, the mixture liquefies a little as the sugar melts. Keep stirring for a few minutes and the mixture will start to thicken up. When the mixture no longer sticks to the bottom of the pan, its time to transfer it into a greased plate. Before transferring to a greased plate add cardamom powder and 2 tsp ghee.


4. Another method to check for doneness of the mixture is to wet your hands, take a small amount of the carrot mixture, and try to form a ball. If the ball retains shape its time to transfer into the greased plate. Before transferring to a greased plate add cardamom powder and 2 tsp ghee.


5. Spread the mixture evenly on the plate, sprinkle some chopped nuts on top, and press it gently with the ladle back or your palm. Put the plate into the fridge for 20 minutes. Bring it out, cut into diamonds or squares and it's ready to serve. 


RECIPE VIDEO HERE ๐Ÿ‘‡


NOTES:

1. The process is not lengthy, but stirring from time to time is required.

2. Don't want the Barfi? no worry- just don't refrigerate, temper with dry fruits and nuts fried in ghee, and enjoy as Instant Gajar Halwa๐Ÿ˜ƒ.

3. I have not added any colour as the Carrots were so bright themselves. One can add food colour of they prefer a deeper colour.

4. Adding 2 tsp of ghee on the mixture before spreading on the plate, helps in even and smooth spreading. Alternately apply little ghee to the back of the ladle with which you will spread the mixture.


If you tried this recipe and liked it please comment below. I would love to hear from you. If you have a query about the recipe email us and ill respond as soon as I can.

If you would like to receive our recipes in your mail please leave your mail id at the homepage. Every time Rajjo's Kitchen has a new post we will mail the recipe to you.

Tuesday 6 October 2020

VEGETABLE MANCHURIAN(WITH GRAVY)

 Who doesn't like Vegetable Manchurian? This is the most Indianised Chinese dish, that has been customized to the Indian palette. The dry version of this dish aka Vegetable Manchurian dry is one of the most popular Starters offered at all weddings, get-togethers, parties, and the like. This also happens to be my most favourite starter.   I also have a recipe on this blog for Fried rice with these dry Manchurians, do check it out. The only difference is that I have used Cauliflowers instead of cabbage in the fried rice recipe. Fried rice and Manchurian with gravy are a match made in heaven, so do try out the combination from the recipes in my blog.

This is a no-fail recipe and turns out well every time that I make it, which is why I make it frequently. In this recipe, I have used 1 whole medium-sized cabbage( oh yes that's how much we like this dish), one can customize it as per their requirements though.

While you are here please do check out my other Indo Chinese recipes like Schezwan fried rice(with Soya chunks), Cauliflower fried rice and other dessert recipes like Pineapple jam tarts and Apple crumble.

Here is the recipe for Vegetable Manchurian(with gravy) for you-  


   PREP TIME: 20 Mins                      COOK TIME: 40 Mins
   TOTAL TIME:60Mins                       COURSE:  MAIN
   CUISINE:  FUSION                         SERVINGS: 5
   AUTHOR: RAJNI RAM


   Ingredients for the Manchurian dough:

   Cabbage 1 medium-sized (shredded)

   Carrot 1 (shredded)

   Spring onions 1 bunch chopped finely

   Onion 1 finely chopped

   Green chillies 2 finely chopped 

   Ginger 1/2 inch piece finely chopped

   Salt as per taste

   Pepper powder 1 tsp

   Maida 1/2 to 3/4 of a cup

   Rice flour 1/4 cup


   Ingredients for the gravy:

   Garlic 3 cloves finely chopped(reserve some for garnish)

   Ginger 1/2 inch piece

   Green chillies 2 finely chopped

   Spring onion greens 1 tbsp finely chopped

   Onion 1 small finely chopped

   Tomato puree 1/4 cup or puree of 1 large Tomato

   Green Capsicum 1/4 of a whole chopped medium-sized

   Red Bell pepper 1/4 of a whole chopped medium-sized

   Tomato sauce 2 tbsp

   Chilli sauce 2 tsp(add for more spice)

   Soy sauce 1 tbsp

   Vinegar 1 tbsp

   Cornflour 2 tbsp

   Salt as required

   Pepper powder 1tsp

   Oil for frying the Manchurian

   Directions to make the Manchurian:

In a bowl take the shredded Cabbage, add to it rest of the vegetables like shredded carrot, spring onions, onions, green chillies and ginger. Add salt and pepper powder and combine well using your fingers. Now add Maida/refined flour, followed by rice flour and combine nicely. It needn't become a dough, but you should be able to form a ball that doesn't go flat or break. Now divide the mixture into lemon sized balls( I got around 20 of them with this quality). Heat oil in a wok or Kadai and fry the balls in medium heat until a golden brown. Keep them aside.


Directions for making the gravy:

Heat oil in a pan and add the finely chopped green chillies, ginger and garlic to it. Saute for 30 seconds. Now add the spring onion greens and saute. Add the onions and continue to saute, until the sweat a bit. Remember all sauteeing to be done in high heat and with constant stirring. Now add the tomato puree and cook for a minute. Add salt and pepper powder and continue to cook for another minute. When the raw smell from the tomato puree is gone, drop in the both the Red and Green capsicum. Saute for another 30 seconds. You can add a teaspoon of sugar at this stage(optional). Now add the tomato sauce, followed by the red chilli sauce. Stir nicely. Now add the soya sauce followed by Vinegar, stir and cook for a minute. Prepare the cornflour mix by adding 1/2 cup water to 2 tbsp of cornflour. Pour this mix into the prepared sauce and stir continuously for a minute. Now dilute the sauce to the consistency you prefer by adding water. I have added 1 cup as I like a thick gravy. Simmer for 2 minutes on low heat and the gravy is ready. Now arrange the Manchurian balls in a serving dish and pour the gravy over it. Enjoy hot with any Fried rice varieties. Bon Appetit. 

 STEPWISE RECIPE FOLLOWS:

1. In a bowl take the shredded Cabbage, add to it rest of the vegetables like shredded carrot, spring onions, onions, green chillies and ginger. Add salt and pepper powder and combine well using your fingers. 


2. Now add Maida/refined flour, followed by rice flour and combine nicely. Now divide the mixture into lemon sized balls( I got around 20 of them with this quality). Heat oil in a wok or Kadai and fry the balls in medium heat until a golden brown. Keep them aside.


3. Heat oil in a pan and add the finely chopped green chillies, ginger and garlic to it. Saute for 30 seconds. Now add the spring onion greens and saute. 


4. Add the onions and continue to saute, until the sweat a bit. Remember all sauteeing to be done in high heat and with constant stirring. Now add the tomato puree and cook for a minute. Add salt and pepper powder and continue to cook for another minute.


5.  When the raw smell from the tomato puree is gone, drop in the both the Red and Green capsicum. Saute for another 30 seconds. Now add the tomato sauce, followed by the red chilli sauce. Stir nicely. Now add the soya sauce followed by Vinegar, stir and cook for a minute. 


6. Prepare the cornflour mix by adding 1/2 cup water to 2 tbsp of cornflour. Pour this mix into the prepared sauce and stir continuously for a minute. 


7. Now dilute the sauce to the consistency you prefer by adding water. Simmer for 2 minutes on low heat and the gravy is ready. Now arrange the Manchurian balls in a serving dish and pour the gravy over it. Enjoy hot with any Fried rice varieties.


Notes:

1. The gravy for any wet Manchurian is the same, so one can experiment with other vegetables like Cauliflower, Potato, Brocolli, Soya Chunks beside others. If you make Manchurian with any other interesting vegetable do let us know. We love learning.

2. I usually make a slightly thick gravy as that's how we like this dish. If you prefer a lighter one, feel free to dilute the gravy by adding little warm water.

3. If you make an excess of the Manchurian balls, don't fret, as you can mix them ina onion tomato paste, add some spices, add Schezwan sauce and get it to the consistency of a dry paste. Toss in the balls into this paste, mix nicely and stir fry and you have a dry Manchurian at hand๐Ÿ˜€ to relish.


If you tried this recipe and liked it please comment below. I would love to hear from you. If you have a query about the recipe email us and ill respond as soon as I can.

If you would like to receive our recipes in your mail please leave your mail id at the homepage. Every time Rajjo's Kitchen has a new post we will mail the recipe to you.


Thursday 1 October 2020

ROASTED EGGPLANT (2 WAYS)

 This roasted eggplant subji is the simplest to make as I roast/bake it in the oven. The actual recipe involves deep-frying this in oil, but these days most of us want food that is light on the oil. Moreover, I feel when deep-fried these Brinjals/Eggplants take in a lot of oil. So the best way to cook them is over a pan or in the oven.

Here I am giving both the methods so one can choose whichever is convenient for them. What I do is bake one batch and pan-fry the other. Both methods yield the same result. Baking takes a little longer, though with a little less oil than pan-frying. So while one batch is baking I get done two pan-fried batches. Does that sound weird๐Ÿ˜‰? Well, I do this because the roasted Eggplant subji is a family favourite and just one batch of baking is not enough๐Ÿ˜€. 

I Have used the big globe type Eggplants/Brinjals here(Bharta Baingan). The small ones can also be used but the bake time might vary. I have not tried baking with the small Eggplants/brinjals.

While you are here I request you to check out my other subji recipes like- Creamy Palak in Coconut Milk, Stuffed Karelas, Drumstick Curry, Kadai Paneer, Beans Paruppu Usili, and more...

Here is the recipe for Roasted Eggplant/Baingan for you-

 PREP TIME: 15                                          COOK TIME: 25Mins
 TOTAL TIME:40Mins                                  COURSE:  MAIN
 CUISINE: NORTH INDIAN                         SERVINGS: 6
 AUTHOR: Rajni Ram


   Ingredients:

   Eggplants(globe/big/Bharta Baingan) 2 or 3

   Oil 2 tbsp

   Red chilli powder 2 tsp(divided)

   Turmeric powder 1 tsp(divided) 

   Salt as required

   Coriander powder(optional) 2 tsp

   Mustard seeds 1 tsp

   Jeera/Cumin 1 tsp

   Curry leaves a few


Directions for Prepping the Brinjal/Eggplants:

Wash the Eggplants well and cut them to Slices that are of medium thickness. Sprinkle some salt on them and mix well, so that the salt gets coated evenly on all slices. Leave to rest for 20 minutes. Now rinse the sliced Eggplants and pat dry them on a towel. Set aside. 

Directions for Masala paste:

Take 1 tsp red chilli powder, 1/2 tsp turmeric powder and required salt in a small bowl. Add 1 tbsp oil and make a paste. I suggest you make the paste as required, depending on the number of Brinjal/Eggplant slices. The given quantity will cover 10 big slices approximately. If it gets over, make the paste again. The quantities given in ingredients is for 2 batches.

Directions for Baking the Eggplants:

Preheat oven at 180 C for 10 minutes. Take a baking tray and grease with a thin film of oil. Arrange the Eggplant/Baingan slices in the tray in 2 layers such that they are not crowded and the lower ones get some heat(refer picture). Take a brush and coat all slices with the masala paste. Repeat on the other side. Put the tray in the oven and bake at 200 C for 10 minutes. Remove, flip them around and bake again for 10- 15 minutes. Remove and transfer to a bowl. Repeat for all slices.

Directions for Pan-frying the Eggplants:

Heat a Tava/Girdle. Grease with a little oil. Brush the Eggplant slices with the Masala paste and arrange them on the girdle. Drizzle 1 tsp oil on the Tava for quick cooking. Cook on one side until crisp and flip the slices around, drizzle another teaspoon oil and cook until crisp. Remove from girdle to a separate vessel. repeat for all slices. 

Tempering:

In a small Kadai take 2 tsp oil and heat. Add mustard seeds, when they crackle add the Jeera/Cumin seeds followed by the curry leaves. Pour this tempering over the baked/pan-fried Brinjals. The Roasted Brinjal/Eggplants are ready to serve with Rotis(flatbread), Dal Chawal, Kadi Chawal and more. Enjoy. Bon Appetit. 

STEPWISE RECIPE FOLLOWS:

1. Wash the Eggplants well and cut them to Slices that are of medium thickness. Sprinkle some salt on them and mix well, so that the salt gets coated evenly on all slices. Leave to rest for 20 minutes. Now rinse the sliced Eggplants and pat dry them on a towel. Set aside. 


2.Take 1 tsp red chilli powder, 1/2 tsp turmeric powder and required salt in a small bowl. Add 1 tbsp oil and make a paste.


3. For baking- Preheat oven at 180 C for 10 minutes. Take a baking tray and grease with a thin film of oil. Arrange the Eggplant/Baingan slices in the tray in 2 layers such that they are not crowded and the lower ones get some heat(refer picture).


4. Take a brush and coat all slices with the masala paste. Repeat on the other side. Put the tray in the oven and bake at 200 C for 10 minutes. Remove, flip them around and bake again for 10- 15 minutes. Remove and transfer to a bowl. Repeat for all slices.


5. For Pan-frying: Heat a Tava/Girdle. Grease with a little oil. Brush the Eggplant slices with the Masala paste and arrange them on the girdle. Drizzle 1 tsp oil on the Tava for quick cooking. Cook on one side until crisp and flip the slices around, drizzle another teaspoon oil and cook until crisp. Remove from girdle to a separate vessel. repeat for all slices. 


6. Finally, to temper take some oil in a small Kadai and heat. Put in the mustard seeds and as they crackle add the cumin seeds and curry leaves. Pour this tempering over the roasted Eggplants. Enjoy with Rotis or Dal Chawal or whatever you feel like.     


NOTES:

1. The smaller variety of Brinjal can be used in the Pan-fry method. Since I have not used them anytime in the baked method, unable to be specific of the result. When I try it, I will definitely update here.

2. If one does not wish to apply the masala paste while pan-frying or baking, the masalas can be added along with the tempering and mixed also.

3. Prepping of the Eggplants is critical as otherwise, they will release a lot of moisture and instead of turning crisp they will turn soggy.

4. This is a simple everyday recipe, therefore I have kept the masalas to the minimum. Feel free to add your choice of masalas/spice powders.


If you tried this recipe and liked it please comment below. I would love to hear from you. If you have a query about the recipe email us and ill respond as soon as I can.

If you would like to receive our recipes in your mail please leave your mail id at the homepage. Every time Rajjo's Kitchen has a new post we will mail the recipe to you.


Wednesday 30 September 2020

GARLIC LACHCHA PARATHA(Multigrain flour)

Lachcha Paratha is a popular Paratha variety that we find at all Indian/North Indian restaurants. Earlier I would be very intrigued by the way the layers were created and had my own theory of how they must be done๐Ÿ˜€(this was before the internet took over us and all recipes became household). The recipes at that time showed a very complicated process and as a person just venturing into cooking(more than 20 years back), I found the process very intimidating. Then as time passed by and I started gaining confidence in the cooking arena I tried out this Lachcha Paratha(had to rely on pictures only) and it turned out fine. The efforts put were greater than the outcome at that time, so I stopped experimenting with it. After a few years, I suddenly developed an interest in recreating it again. But this time I was better equipped with knowledge and practice. Today I can try out this Paratha with any flour, that is Wheat, Maida, or Multigrain and the results are always great. The method I am giving here is a very simple one which even beginners will find easy to follow.  

The recipe that I am blogging now uses Multigrain flour(store-bought). I use Wheat flour and Multigrain flour mostly for all my bread/roti/paratha recipes. I am not much of a fan of Maida, though I do use it in some dishes where it is necessary and also in Parathas(just about a tablespoon for the pliability).

There will always be a difference in textures when we experiment with different flours, and one should be open to it. In this recipe, I have not used baking powder or baking soda for the fluffiness, so they may not be entirely fluffy, but will definitely be flaky.

While you are here please check out my other bread recipes like Beetroot Paratha and Missi Roti.

Serving Suggestions: Matar Paneer, Palak Paneer, Mava Paneer Curry, Mixed Vegetable Curry, Kadai Paneer, all go very well with this Garlic Lachcha Paratha.

Here is the recipe of Garlic Lachcha Paratha for you-

PREP TIME: 20 Mins                                      COOK TIME: 20 Mins
TOTAL TIME: 40Mins                                     COURSE:  BREAD
CUISINE:  INDIAN                                         SERVINGS: 5(10 Pcs)
AUTHOR: Rajni Ram


Ingredients:

Multigrain flour 3 cups

Maida 1 tbsp

Oil for kneading 1 tbsp water as required

Butter 50 gm

Garlic 3 cloves finely chopped

Fresh coriander leaves finely chopped 2 tsp

Salt 1/4 tsp


Directions:

In a big mixing bowl take the multigrain flour, add the tiny amount of maida and salt and mix well. Create a well in the center and pour the oil. Now work the oil into the flour(no water to be added at this stage) nicely. Now create a well in the center again. Now knead the dough adding a little water at a time. We want a dough that is neither too tough nor too soft. The texture should be like Chapati dough. Rest the dough for 20 minutes to half an hour.

For Garlic Butter:

Take 50 gm butter ina bowl, add the crushed garlic and coriander leaves to it, and microwave for 30 seconds. The butter to only melt and not boil. Alternately you can keep the bowl of butter in some hot water to melt and then add the garlic and coriander. 

To make Parathas: Divide the dough into 10 big balls. Now take one ball at a time and roll it in dry flour. Place it on your rolling board and roll it out into a big Chapati first. Apply the garlic butter on the chapati with a brush, liberally. Now pleat the Chapati or fold like a fan( refer video). Arrange the pleated dough into a roll, press it down with your fingers, dust it with a little flour and start rolling it out again gently. Roll it out a little thick and medium-sized. Now heat a girdle/tava and put the rolled out Paratha on it. Drizzle a little oil and cook on one side, flip on the other side, apply oil, and cook. You will see the flakes rising out. Cook until nicely brown and crisp. Serve right out of the girdle. The Lachcha paratha is ready!!!

STEPWISE RECIPE FOLLOWS:

1. In a big mixing bowl take the multigrain flour, add the tiny amount of maida and salt and mix well. Create a well in the center and pour the oil. Now work the oil into the flour(no water to be added at this stage) nicely.


2. Now create a well in the center again. Now knead the dough adding a little water at a time. We want a dough that is neither too tough nor too soft. Rest the dough for 20 minutes to half an hour.


3. Take 50 gm butter in a bowl, add the crushed garlic and coriander leaves to it, and microwave for 30 seconds. The butter to only melt and not boil. Alternately you can keep the bowl of butter in some hot water to melt and then add the garlic and coriander. 


4. Method to make Garlic Lachcha Paratha video given here๐Ÿ‘‡


My platter of flaky Garlic Paratha and Matar Paneer with Boondi Raita


Monday 28 September 2020

SAMOSA PIE

When one wants to have Samosa but "I feel guilty having fried stuff" is the mood, what to do? You bake it๐Ÿ˜ƒ and call it a pie๐Ÿ˜„.

Well, I'm a fan of Samosas and love them fried, but the Mr. is on a no fried stuff mode, so I just went ahead and baked it. I did not expect to get a nicely browned crust but made a slight adjustment and I got baked Samosas which had a golden-brown crust. Happy moment.

I have used Chiroti Rava/ Suji in this recipe. Chiroti Suji is more popular towards Karnataka, where it is used in making Dosas, and other fried snacks. I use this Choroti Rava to make most fried food like Samosa, Kachori, Karachikai(sweet fried snack). This Rava gives the much-required crunch to these snacks. This Suji, when kneaded and rested, becomes as pliable as maida or refined flour. Chiroti Rava is available in all departmental stores. If Chiroti is not available it can be easily swapped with Maida.

While you are here please check out my other snack recipes like Masala Wheat flour Papdis( 2 ways), Unni appam(sweet), Thattai/Nipattu, Kothimbir vadi, Kuzhi Paniyaram, Suji Cheese balls, and more...

Here is the recipe of Samosa Pie for you-


   PREP TIME: 20                                          COOK TIME: 25Mins
   TOTAL TIME:45Mins                                  COURSE:  MAIN
   CUISINE: NORTH INDIAN                         SERVINGS: 6
   AUTHOR: Rajni Ram


Ingredients:

Chiroti Suji 2 cups

Maida 1/4 cup

Salt to taste

Potatoes 5 big cooked and mashed

Onion 2 small or 1 big finely chopped

Green Peas a handful (optional)

Red chilli powder 1 to 1.5 tsp

Coriander 1 tsp

Baking Powder 1/4 tsp

Cumin seeds 1.5 tsp (divided)

Turmeric powder 1 tsp

Amchur/dry mango powder 2 tsp

Fresh Coriander leaves chopped 1tbsp

Garam Masala powder 1/2 tsp

Oil for brushing and kneading


Directions:

To make the dough:

Take the Chiroti Rava in a mixing bowl and add the Maida to it. Add 1/2 tsp Cumin seeds. Add Baking powder and salt and mix well. Create a well in the centre and add 1 tbsp oil and combine well. No water must be added now. Mix in the oil nicely into the flour, takes about a minute. Now form a well again in the centre and adding water little by little combine to form a stiff dough. Rest the dough for 1/2 an hour at least before use. (Refer note 5)

To make the filling:

In a Kadai heat oil. Add cumin seeds and mustard seeds, and as they crackle add the chopped onions. Fry the onions until light brown and add the mashed potatoes. Now add salt, followed by red chilli powder, coriander powder, Amchur powder, and mix them all nicely such that all masalas get well incorporated with the potatoes. Finally, add the garam masala powder(picture not taken) and chopped coriander and stir. Allow the filling to cool down a bit.

To assemble the pie:

Preheat the oven to 180C for 10 minutes. Knead the Chiroti dough again and divide it into two halves-one slightly bigger than the other. Roll each of them into a circle like a Chapati. The bigger part of dough should be rolled out thicker than the smaller portion of the dough. After rolling the dough, grease the pie dish or any oven-safe dish that is flat. Take the dough that was rolled bigger and thicker, and press it to the bottom of the pie dish forming the base. Prick holes to the dough base as shown in the picture. Now fill in the stuffing on the base, leaving a little space on top to seal it. Now with the dough that was rolled thinner, cover the filling and start sealing the edges. To seal the edges, bring the bottom and upper edge together and give it a twist as shown in the picture. Make a cross-cut with a knife after sealing the stuffing. Now place the dish inside the oven and bake 200 C for 15 minutes. Remove and turn it over gently and bake again at 200 C for 5 minutes. Remove from the oven, turn it over again and now grill for 5 minutes(that's how I got the golden colour). The crunchy and tasty Samosa is ready to dig in. Enjoy. Bon Appetit.


STEPWISE RECIPE FOLLOWS:

  1. Take the Chiroti Rava in a mixing bowl and add the Maida to it. Add half teaspoon Cumin seeds, Baking powder and salt and mix well. Create a well in the centre and add 1 tbsp oil and combine well.  


2. Mix in the oil nicely into the flour, takes about a minute. Now form a well again in the centre and adding water little by little combine to form a stiff dough. Rest the dough for 1/2 an hour at least before use.


3. In a Kadai heat oil. Add cumin seeds and mustard seeds, and as they crackle add the chopped onions. Fry the onions until light brown and add the mashed potatoes. 


4. Now add salt, followed by red chilli powder, coriander powder, Amchur powder, and mix them all nicely such that all masalas get well incorporated with the potatoes. Finally, add the garam masala powder(picture not taken) and chopped coriander and stir. Allow the filling to cool down a bit.


5. Preheat the oven to 180C for 10 minutes. Knead the Chiroti dough again and divide it into two halves-one slightly bigger than the other. Roll each of them into a circle like a Chapati.


6. The bigger part of dough should be rolled out thicker than the smaller portion of the dough. After rolling the dough, grease the pie dish or any oven-safe dish that is flat. Take the dough that was rolled bigger and thicker, and press it to the bottom of the pie dish forming the base. Prick holes to the dough base as shown in the picture.


7. Now fill in the stuffing on the base, leaving a little space on top to seal it. Now with the dough that was rolled thinner, cover the filling and start sealing the edges. To seal the edges, bring the bottom and upper edge together and give it a twist as shown in the picture. Make a cross-cut with a knife after sealing the stuffing.


8. Now place the dish inside the oven and bake 200 C for 15 minutes. Remove and turn it over gently and bake again at 200 C for 5 minutes. Remove from the oven, turn it over again and now grill for 5 minutes(that's how I got the golden colour). The crunchy and tasty Samosa is ready to dig in.


NOTES:

1. Let not the Chiroti Rava stop you from making this dish. Just use Maida and continue as per recipe. Instead of 2 cups Chiroti and 1/4 cup maida, use 21/4 cup Maida or 2 cups maida and 1/4 cup wheat flour.

2. I have not used green peas in this recipe, it can be an add- in to the stuffing. If using pre-cook it and add it along with the potatoes in the recipe.

3. Feel free to increase or decrease spice levels as per taste.

4.. If you are not particular about the browning on the top, it is fine to not grill, but I would recommend it because it is really worth the 5 minutes.  

5. I made 2 Samosa pies with the quantity of flour and potatoes used here.

6. Holes are pricked to the dough base after placing on the pie dish to avoid puffing. Ensure that you follow this step. If the pastry puffs the crunchiness will be compromised.

7. After the filling is put in and the edges are filled, make a cross-cut to ensure cooking is even through the layers.


If you tried this recipe and liked it please comment below. I would love to hear from you. If you have a query about the recipe email us and ill respond as soon as I can.

If you would like to receive our recipes in your mail please leave your mail id at the homepage. Every time Rajjo's Kitchen has a new post we will mail the recipe to you.

TOFU AND STIR FRIED VEGETABLES IN HOT SCHEZWAN SAUCE

  Any Tofu lovers? I agree its an acquired taste,but going by the health benefits it has to offer, I try including it in my diet now and the...