Vegetarian cooking blog

Thursday 12 November 2020

DHANIYA WALE NAMAK PARE( NAMAK PARE)

Namak Para's are a simple dry snack made from refined flour or whole wheat flour. They make for a good tea time snack too. Here the flour is combined with salt and spices to form a stiff dough. The dough is then rolled out and cut into diamonds and deep-fried in oil. This is an easy savory recipe to make around festivals like Diwali or Janmashtami where the tradition calls for making some flour-based snacks. One can just make it as a regular tea time snack too.

Yesterday when I entered the kitchen, the idea was to make the regular Namak Para.  As I went to the refrigerator to fetch some flour(oh yes my fridge is the storehouse of my flours), my eyes fell on a bunch of fresh coriander leaves, and the idea of adding them to my Namak Para struck me. Therefore the recipe of this Dhaniya wale Namak Pare. Which means Coriander flavoured Namak Paras.

In this recipe, I have used a mixture of Multigrain flour(storebought) and Refined flour. 

While you are here please check out my other snack recipes like Semolina Cheese balls, Thattai/Nipattu, Ratlami Sev, Masala Wheatflour Papdis, Moong Dal Kachori, and more...

Here is the recipe of Dhaniya wale Namak Pare-

 PREP TIME: 15                                          COOK TIME: 30 MINS
 TOTAL TIME:45Mins                                  COURSE:  SNACK
 CUISINE:  INDIAN                                      SERVINGS: 4 CUPS
 AUTHOR: Rajni Ram


    Ingredients:
    Refined flour/ Maida 1 cup
    Multigrain flour or Whole wheat flour 1 cup
    Semolina/Suji(fine) 4 bsp
    Carrom seeds 1 tsp
    Salt as required
    Cumin seeds/Jeera 1 tsp
    Fresh coriander leaves 1/2 bunch (washed and chopped)
    Green chili 1 chopped
    Ghee 11/4 tbsp ghee
    Oil for deep frying

    Directions:
 In the blender jar put the chopped coriander leaves, green chilli, and cumin seeds and blend to a smooth paste using as little water as possible. Now in a mixing bowl take both the flours, semolina and add salt, carrom seeds, and ghee. Now start rubbing the ghee into the flour. Once nicely mixed, using a spoon add the coriander paste to the flours little by little and start combining. Use as much paste as required for forming a stiff dough(a puri kind of dough). In case all the paste is used up and the flour is still dry then sprinkle little water and combine to form the dough. Let the dough rest for 15 minutes. Now work the dough again for a minute and divide it into 4 parts(ball it up). Now take one ball smear it with little oil and roll it out like a chapati. Keep the thickness medium and don't roll it out too thin. Using a knife cut to form diamonds or squares. Heat oil in a Kadai for deep frying. The right temperature is when to put a tiny bit of dough, it should sizzle immediately. Drop in the diamonds/squares gently into the oil, and fry on low flame until all the bubbles subside and the Namak Para turns a golden brown. It is difficult to retain the green color of the coriander as the flour has to cook through thoroughly, but the flavour and aroma of the coriander are retained and this is a flavour max recipe. The Coriander flavoured Nmak Para is ready.

STEPWISE RECIPE FOLLOWS:
1. In the blender jar put the chopped coriander leaves, green chilli, and cumin seeds and blend to a smooth paste using as little water as possible.


2. Now in a mixing bowl take both the flours, semolina and add salt, carrom seeds, and ghee. Now start rubbing the ghee into the flour.


3. Once nicely mixed, using a spoon add the coriander paste to the flours little by little and start combining. Use as much paste as required for forming a stiff dough(a puri kind of dough). Let the dough rest for 15 mins.


4. Now work the dough again for a minute and divide it into 4 parts(ball it up). Now take one ball smear it with little oil and roll it out like a chapati.


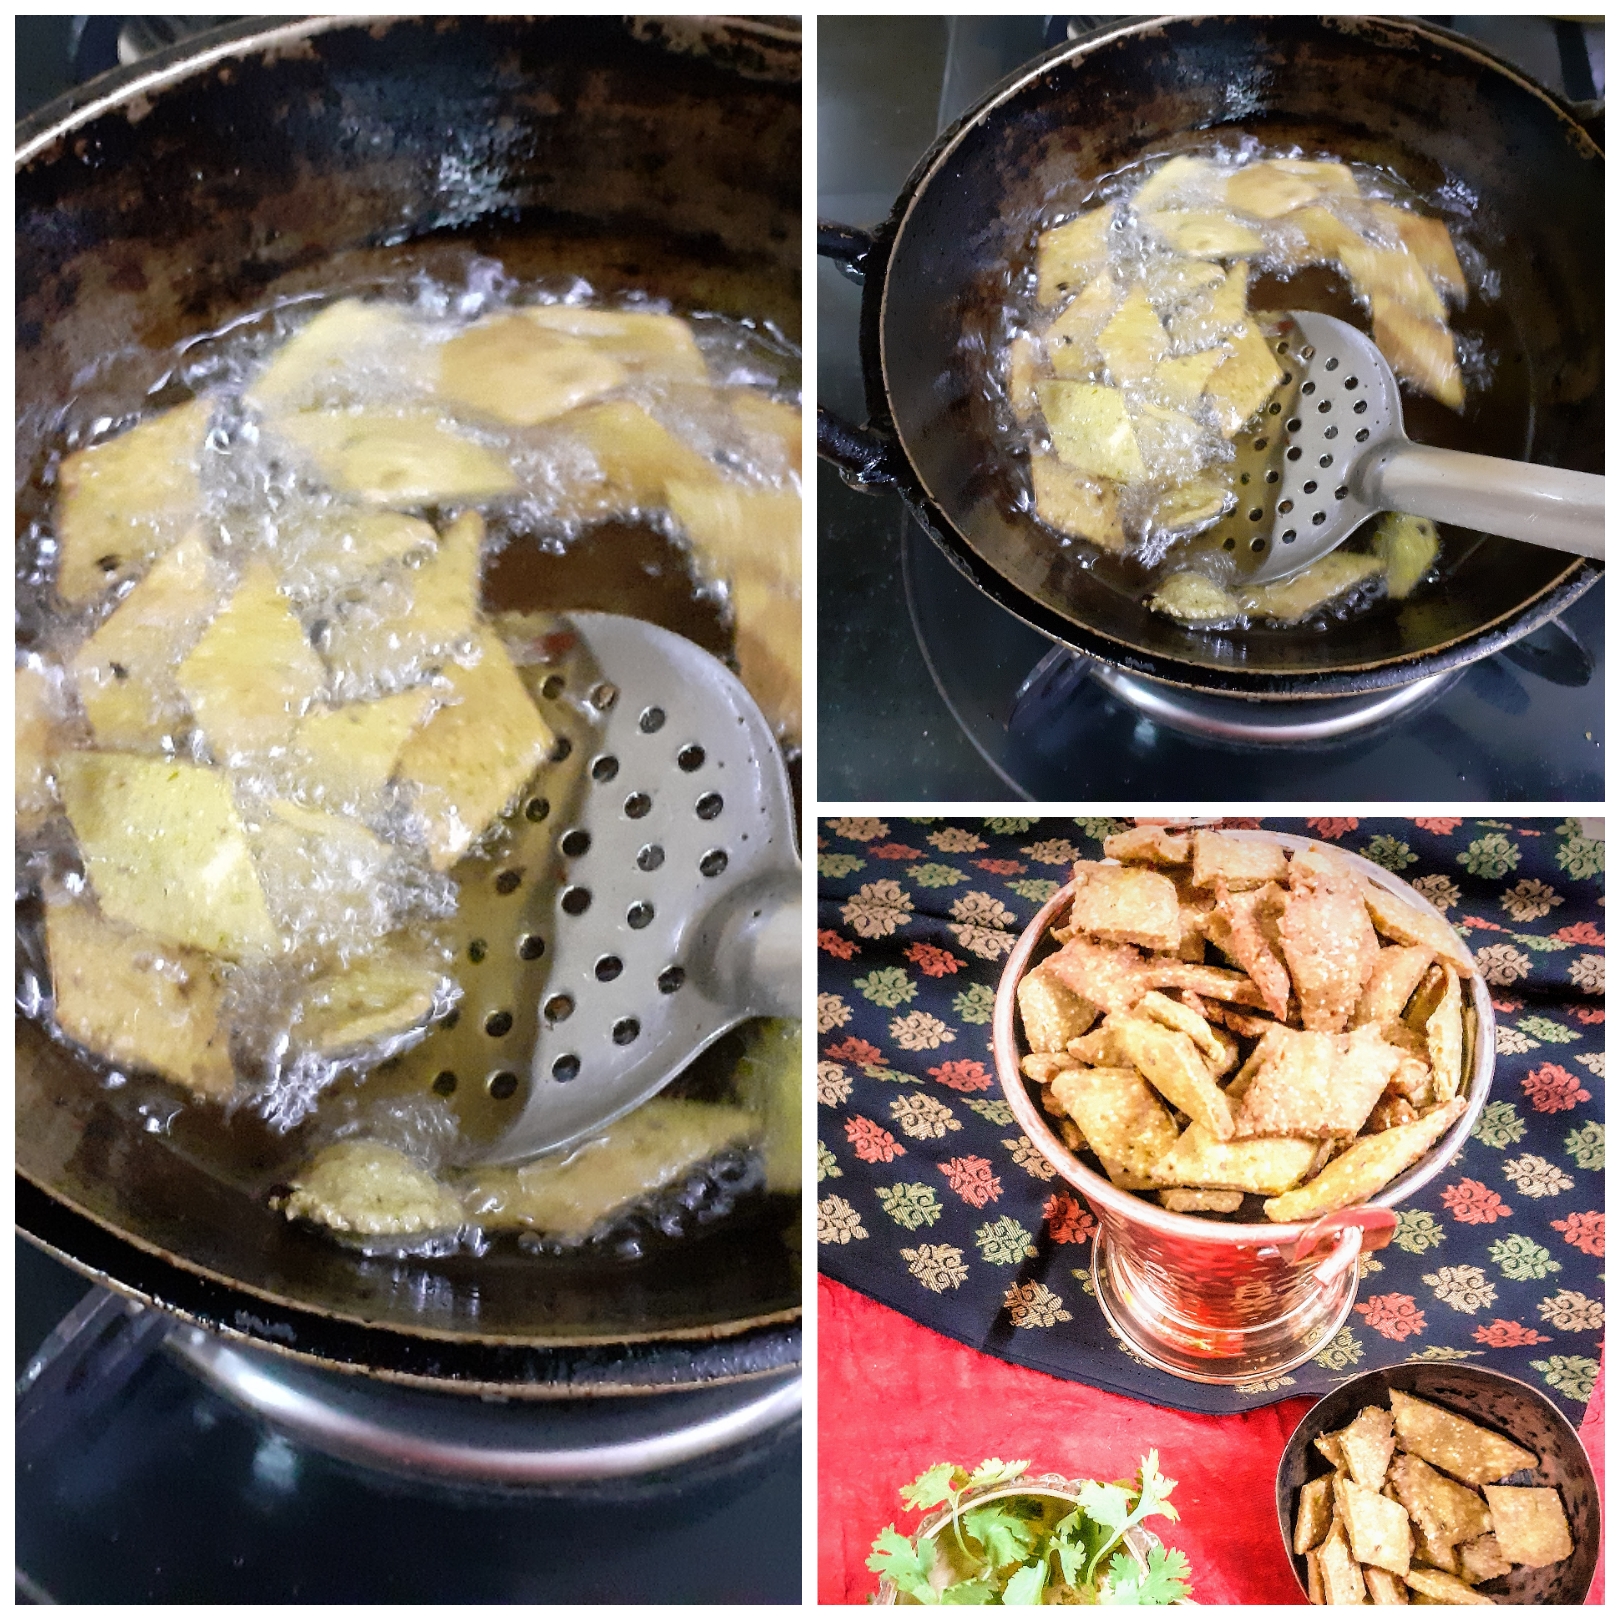
5. Keep the thickness medium and don't roll it out too thin. Using a knife cut to form diamonds or squares. Heat oil in a Kadai for deep frying. 


6. The right temperature is when to put a tiny bit of dough, it should sizzle immediately. Drop in the diamonds/squares gently into the oil, and fry on low flame until all the bubbles subside and the Namak Para turns a golden brown.


NOTES:
1. Use as much coriander paste as required for forming a stiff dough(a puri kind of dough). In case all the paste is used up and the flour is still dry then sprinkle little water and combine to form the dough.
2. In case you wish to make the regular Namak Paras then instead of making the dough using the coriander paste, just use water to make the dough, the remaining ingredients and proportions will remain the same.
3. Using Mint/Pudina for this recipe may not work as the Pudina paste changes colour on blending to a paste and may change further on frying.

If you tried this recipe and liked it please comment below. I would love to hear from you. If you have a query about the recipe email us and ill respond as soon as I can.

If you would like to receive our recipes in your mail please leave your mail id at the homepage. Every time Rajjo's Kitchen has a new post we will mail the recipe to you.

Sunday 8 November 2020

RATLAMI SEV

Usually every Diwali I make the usual Omapodi( sev) , Tenkozhal and Ribbon Pakoda. This time I have tried something different. This is called the Ratlami Sev and though we get it at the sweet shops and some brands also market it, I have never tried making it at home. The credit to this recipe goes to @indiankhana.net , where I found this while browsing for something new.

This is a simple recipe( oh yes, I mostly pick simple, as that's what we all want). Very similar to the Kara Sev of South India, but different in taste because of the masalas used and the Ratlami Sev  does not have rice flour, while the Kara Sev does.

This savory gets its name from a place in Madhya Pradesh, India, called Ratlam,  where it is famous. As I mentioned it is a quick recipe and difficult to resist  munching.

While you are here checkout my other Diwali Sweet and Savoury recipes like Maa Ladoo, Thattai, Gajar Halwa Barfi, Masala wheat flour Papdis, Baked Samosa pie, and more...

Here is the recipe of Ratlami Sev

 PREP TIME: 15                                          COOK TIME: 15 MINS
 TOTAL TIME:30Mins                                  COURSE:  SNACK
 CUISINE:  INDIAN                                      SERVINGS: 2 CUPS
 AUTHOR: Rajni Ram


    Ingredients:

    Besan/ chickpea flour 1 cup

    Cooking Soda 1 pinch

    Hot oil 3 tbsp

    Salt as required

    Red chilli powder 3/4 to 1 tsp depending on taste 

    Turmeric powder 1/2 tsp

    Clove powder 1/4 tsp

    Fennel powder 1/4 tsp

    Pepper powder 1/4 tsp

   Ginger powder 1/4tsp

   Black salt 1/4 tsp

   Cinnamon powder 1/4 tsp

   Ajwain powder 1/4 tsp

   Roasted Cumin powder 1/2 tsp

   Asafoetida 1/2 tsp

   Dry ginger powder 1/4 tsp

   Lemon juice 2 tsp

   Oil for deep frying


Directions:

In a mixing bowl take the Besan/ Chickpea flour. To it add Salt, red chilli powder, turmeric powder and all the other powders like clove, fennel, cinnamon, Ajwain/ carrot seeds, black salt and asafoetida , cooking soda,and 2 tsp of lemon juice. To this add 3 tbsp of hot oil and mix nicely with a spoon( as the oil will be hot), when it turns warm mix nicely with your fingers to form a crumbly mixture. Now adding water 1 tbsp at a time make a soft but stiff dough. Heat oil in a Karahi for deep frying. Grease the Chakli/ Muruku press with oil and put in a little dough into it and squeeze into the oil when it is hot. Oil should be medium hot. Fry on medium heat, until the bubbles subside and the Sev turns a golden brown. Repeat for the whole mixture. The spicy and flavorful Ratlami Sev is ready. 

I have combined the Cinnamon Powder, pepper powder, Roasted cumin powder, dry ginger powder, fennel powder, clove powder, Ajwain powder, and black salt, in the given measures and made it as a single powder, and am calling it the Ratlami spice mix. 

Some of these powders we might not have at home readily, for which one can roast 1 tsp of all the given ingredients under Ratlami spice mix as a whole and powder them. Use 1 to 1.5 tsp of this for the recipe. 

STEPWISE RECIPE FOLLOWS:

1. In a mixing bowl take the Besan/ Chickpea flour. To it add salt, red chilli powder, turmeric powder, and Ratlami spice mix( refer paragraph above). Also, add the asafoetida, Cooking soda, and 2 tsp lemon juice. (I forgot to add salt in the beginning and have added towards the end as you will see in one of the pictures).


2. Now heat 3 tbsp oil in a Kadai ( heat it well, but don't turn it smoky) and pour it into the Besan and spice mixture. Using a spoon combine well(do not use your hand now as the oil is hot).


3. After it turns a little warm, using your fingers nicely mix the mixture until it turns crumbly. Now adding water one tablespoon at a time start combining it to form a soft but stiff dough. We want a dough that is easy to squeeze through, but also stiff enough to retain shape. I used about 3 tbsp water to make my dough. 


4. Heat oil for deep frying on medium-high. Grease the Chakli/ Muruku press with oil and put in a little dough into it and squeeze into the oil when it is hot. Oil should be medium hot. Fry on medium heat, until the bubbles subside and the Sev turns a golden brown. Repeat for the whole mixture. The tasty and spicy Ratlami Sev is ready.


NOTES:

1. Some of these powders we might not have at home readily, for which one can roast 1 tsp of all the given ingredients under Ratlami spice mix as a whole and powder them. Use 1 to 1.5 tsp of this for the recipe. 

2. I used 3 tbsp water, one can use more as required as different qualities of Besan absorb water differently.

3. Take care not to use your fingers as soon as you pour hot oil in the mix. Let it become warm and then use your fingers to combine.

If you tried this recipe and liked it please comment below. I would love to hear from you. If you have a query about the recipe email us and ill respond as soon as I can.

If you would like to receive our recipes in your mail please leave your mail id at the homepage. Every time Rajjo's Kitchen has a new post we will mail the recipe to you.

Thursday 5 November 2020

RED POHA LADOO( RED AVAL LADOO)

 Poha is my go-to food many times during the week. Sometimes as breakfast and sometimes as dinner and, sometimes as a quick dessert or as a simple prasad. I like the fact that this humble ingredient is so versatile allowing us to create so many dishes from it. The Poha can even go into the Idli batter to make the Idlis soft and into the Dosa batter to make super crisp Dosas.

Diwali for me is about feasting consciously. There are loads of sweets that can be made with less ghee like these Poha Ladoos. They need less sugar too, which makes them an ideal recipe for Diwali times. In this recipe, I have used the Red Poha that is available at all stores these days. These Poha/rice flakes are made from Red rice. Red rice does not undergo as much processing as regular rice.  Therefore it is rich in fiber, Vitamin B, and minerals like Zinc, Iron, and Magnesium, making it a healthier choice. This Ladoo is easy to make and gets done within no time.

If you make these Ladoos don't forget to tag us.

While you are here check out my other Poha recipes like -SweetPoha, Dahi Pohe(Mor Aval), Aval Kesari...

Here is the recipe of Red Poha Ladoo for you- 

  PREP TIME: 15                                          COOK TIME: 15 MINS
 TOTAL TIME:30Mins                                  COURSE:  SWEETS
 CUISINE:  INDIAN                                      SERVINGS: 12 pcs
 AUTHOR: Rajni Ram


    Ingredients:

    Red Poha/Aval 2cups ( any measure of two cups is fine)

    Sugar 3/4 to 1 cup powdered (depending on your preference)

    Ghee 4 tbsp

    Cashewnuts 6 to 7 broken to bits

    Raisins(Kishmish) 6 to 7

    Cardamom/Elaichi  5 to 6

    Nutmeg/Jaiphal 1 tiny bit


Directions: 

In a Kadai take 1 Tbsp ghee and heat. Add the Red Poha to the ghee and start roasting it, until they become crisp. Keep stirring continuously as we don't want the Poha to turn brown, but to get crisp evenly. Once crisp, transfer to a plate and cool for a few minutes. Now in the blender jar take the sugar and add the cardamom and nutmeg to it and grind them to a fine powder. Transfer the sugar to a plate or vessel and in the same blender jar, grind the roasted Poha to a fine powder. Now transfer the Poha powder to a wide vessel, and add the powdered sugar to it. In a small Kadai take 1/2 tbsp ghee and fry the cashews and raisins until they turn a nice brown. Drop the fried nuts and raisins into the Poha and Sugar mixture. Now in the small Kadai warm(not heat) 3 tbsp ghee. The ghee should have melted and be warm( if your fingers can bear the heat, that is the right temperature for the ghee, be careful while testing, don't scald your fingers). Now mix the Poha sugar and dry nuts mixture well with your fingers, so that the sugar is mixed evenly. Create a well in the center of the Poha flour and pour the ghee into it, rub the ghee nicely into the flour, and start making Ladoo(balls) immediately. The ghee should be warm while making the Ladoo as it gives the right binding. If the ghee is not warm and is at room temperature, the ladoos will not form. Form the ladoos with the entire mixture, you can customize the size to your preference. The tasty and healthy Red Poha Ladoos are ready to gobble. Enjoy. Happy feasting!


STEPWISE RECIPE FOLLOWS:

1. Assemble all ingredients.


2. In a Kadai take 1 Tbsp ghee and heat. Add the Red Poha to the ghee and start roasting it, until they become crisp. Keep stirring continuously, taking care not to brown the Pohas or burn them. Transfer to a plate and cool for a few minutes.


3. Now in the blender jar take the sugar and add the cardamom and nutmeg to it and grind them to a fine powder. Transfer the sugar to a plate or vessel and in the same blender jar, grind the roasted Poha to a fine powder.


4. Now transfer the Poha powder to a wide vessel, and add the powdered sugar to it. In a small Kadai take 1/2 tbsp ghee and fry the cashews and raisins until they turn a nice brown. Drop the fried nuts and raisins into the Poha and Sugar mixture. 


5. Now in the small Kadai warm(not heat) 3 tbsp ghee. The ghee should have melted and be warm, now mix the Poha sugar and dry nuts mixture well with your fingers so that the sugar is mixed evenly. Create a well in the center of the Poha flour and pour the ghee into it, rub the ghee nicely into the flour, and start making Ladoo(balls) immediately. 


6. Form the ladoos with the entire mixture, you can customize the size to your preference. The tasty and healthy Red Poha Ladoos are ready to gobble. Enjoy. 


NOTES:

1. I ground my Poha to a step less than superfine, as then you get a little crunchy feel. One can customize between superfine or a stage before, but take care not grind it coarse, as them forming the ladoos will be difficult.

2. The temperature of the ghee is very important. If it is very hot, you can form the ladoos immediately, so wait for it to turn warm. However, if the ghee is not warm enough, then the ladoos will not form. Add a little warm ghee and form the balls.

3. If you have poured too much ghee, the ladoos will slump and not hold shape. Try to stick to the measure given. However, if you do end up adding too much ghee, roast more poha, grind it to powder, and add it, to form ladoos. 

4. The Poha does not hold much sugar, so stick to the measure given.


  If you tried this recipe and liked it please comment below. I would love to hear from you. If you have a query about the recipe email us and ill respond as soon as I can.

If you would like to receive our recipes in your mail please leave your mail id at the homepage. Every time Rajjo's Kitchen has a new post we will mail the recipe to you.


Wednesday 4 November 2020

DUM ALOO AJWAINI (ONE POT)

Dum Aloo Ajwaini is a recipe that is a little different from the regular Dum Aloo, because of a "magical masala paste' I add just before turning off the flame and that masala is what makes this a flavour blast dish, that goes very well with Pulav, plain rice and all types of flatbreads.

I spotted this recipe in a flights inhouse magazine many many years ago and I have always made it this way ever since, with small creative bursts from time to time. 
I have also adapted this recipe to the one-pot style. The only time-consuming factor is scraping the peels of the baby potatoes. Don't worry though, you can easily make the same with regular potatoes, by dicing them to cubes. The one-pot style also helps in better absorption of the masalas by the potatoes than pan cooking, hence for this particular recipe, I always follow the one-pot style. 

While you are here please check out other Subji/curry recipes of mine like- Mava Paneer Curry, Roasted Eggplant 2 ways, Creamy Palak in coconut milk, Stuffed Karela/Bittergourd, Mushroom Do Pyaaza, Palak Paneer, and more...

Here is the recipe of Dum Aloo Ajwaini for you-

  PREP TIME: 15                                          COOK TIME: 15 MINS
 TOTAL TIME:30Mins                                  COURSE:  MAIN
 CUISINE: NORTH INDIAN                         SERVINGS: 6
 AUTHOR: Rajni Ram


    Ingredients for the gravy:

    Baby Potatoes 250 gms jackets peeled(refer note 1)
    Onion 1 large chopped finely
    Tomato Puree 1 cup
    Ginger garlic paste 1 tsp
    Salt as required
    Red chilli powder(regular) 1 tsp 
    Red chilli powder Kashmiri 1/2 tsp
    Coriander powder 1 tsp
    Fennel Powder 1 tsp
    Garam Masala Powder 1/2 tsp
    Oil for tempering the masalas 1 tbsp

    To be ground to a paste:
    Fresh coriander leaves 1/2 a bunch
    Ajwain/Carrom seeds 1/2 tsp
    Cashew nuts 5 to 6
    Curd 1/2 a cup

Directions:
In a small pressure cooker take oil for tempering and heat. Add the Jeera and fry for 30 seconds. When they crackle add the ginger garlic paste and fry for 30 seconds. Now add the chopped onions and saute until they start turning light brown. Add the turmeric powder and saute another 30 seconds. Now add the peeled Baby potatoes and saute nicely until the oil coats all the potatoes. Now add the tomato puree followed by salt, Regular red chilli powder, Kashmiri red chilli powder, Coriander powder, fennel powder, and stir everything together nicely. Pour about 1 to 1.5 cups of water and close the cooker. Allow 3 to 4 whistles to come and put off the cooker immediately. We don't want overcooked potatoes, so take care to switch off on time(refer notes).
While the pressure releases lets grind the "magic masala"๐Ÿ˜€.
Put all ingredients mentioned under 'to be ground to a paste', except curd, into the blender jar, and give it a good spin. Now add the curd and blitz to a smooth paste. When the pressure from the cooker releases, open the cooker pour this paste in, switch on the flame on low and cook for 3 minutes, stirring in the masala paste nicely, such that it gets evenly mixed in the gravy. Add the garam masala and put off the flame. The spicy, tangy and flavourful Ajwaini Dum Aloo is ready.

Serving Suggestion: with Rotis, Paratha, Kulcha, Pulav, vegetable rice or with plain rice.

STEPWISE RECIPE FOLLOWS:

1. In a small pressure cooker take oil for tempering and heat. Add the Jeera and fry for 30 seconds. 


2.When they crackle add the ginger garlic paste and fry for 30 seconds. Now add the chopped onions and saute until they start turning light brown. Add the turmeric powder and saute another 30 seconds. 


3. Now add the peeled Baby potatoes and saute nicely until the oil coats all the potatoes. 


4.  Now add the tomato puree followed by salt, Regular red chilli powder, Kashmiri red chilli powder, Coriander powder, fennel powder, and stir everything together nicely. Pour about 1 to 1.5 cups of water and close the cooker. Allow 3 to 4 whistles to come and put off the cooker immediately. 


5. Put all ingredients mentioned under 'to be ground to a paste', except curd, into the blender jar, and give it a good spin. Now add the curd and blitz to a smooth paste. 


6. Pour this paste into the cooker once the pressure releases, switch on the flame on low, and let it simmer for just 3 minutes. Stir nicely, so that the masala gets mixed wit the gravy.


7. Finally, add the garam masala powder and put off the flame. The Dum Aloo Ajwaini si ready to serve.


NOTES:
1. If one feels peeling the baby Potatoes is cumbersome the big ones also can be used after dicing them to bigger cubes.
2. If using the big potatoes switch off the flame exactly in 3 whistles, as they cook faster.
3. Mint leaves can also be used in place of coriander leaves, but reduce the quantity as they are more pungent compared to coriander leaves.

If you tried this recipe and liked it please comment below. I would love to hear from you. If you have a query about the recipe email us and ill respond as soon as I can.

If you would like to receive our recipes in your mail please leave your mail id at the homepage. Every time Rajjo's Kitchen has a new post we will mail the recipe to you.


Tuesday 3 November 2020

SHRIKHAND ( KESAR)

 It is a double whammy when you get a probiotic as dessert. Under this category come sweet dishes like Misthti Doi, Bappa Doi, and Shrikhand. The previous two I am yet to try and blog.  But the Shrikhand is something that I love making and relish eating. 

This is one recipe that used to make in our Delhi days when curd was in excess or a little sour. Then there was a period when I entirely stopped making Shrikhand and relied on the store-bought one. Until recently when Aishu( pointed out that " amma you haven't made Shrikhand in ages"), that I decided to whip it up again. (The advantage of homemade Shrikhand is that we can customize the sugar, as per requirement. I find the store-bought ones very sweet).

But this time the Mantra was to make it in a much simpler way, in the past, this was a half-day procedure for me as it involved making hung curd, and that took anywhere between 3 to 5 hours, depending on the milk we use.

So I improvised my previous method to a smarter one, by using a mix of Greek Yogurt and homemade curd.

While you are here try out my other Indian dessert recipes like Pineapple Rabri, Thengai Therattipal, Atte ka Sheera, Gajar Halwa Barfi,  Akkaravadisal, Sweet Poha, Carrot Kheer, and more...

Here is the recipe for Shrikhand( very detailed pictures are missing because this was supposed to be a causal post for social media and turned out that many people requested the recipe). So I am blogging it with minimum pictures, but I shall compensate for that with a good set of instructions.

 PREP TIME: 5 MINS                      PROCESS TIME: 45 MINS
 TOTAL TIME: 60 MINS         COURSE: DESSERT
 CUISINE: INDIAN                  SERVINGS: 6  
 AUTHOR: RAJNI RAM


    Ingredients:

    Greek yogurt( any brand) 400 gm

    Homemade Curd 400 gm

    Sugar 1/2 cup powdered ( add more if you prefer it sweeter)

    Kesar powder a pinch 

    Kesar stands soaked in warm water a pinch

   Elaichi/ Cardamom

Directions: Take a clean Muslin or cotton cloth, which will allow water to pass out. Spread the cloth into a bowl and empty the Greek yogurt plus homemade curd into it. Collect the edges and tie it such that all the water is able to drain away. I usually tie it to the Kitchen sink tap, so that the excess water from the curd drains away into the sink. Allow 45 minutes to pass. Now untie the cloth from the dripping arrangement. Almost all the excess water from the curd must have dripped away and the hung curd is now ready. Transfer the hung curd to a bowl in which you can whip/beat it. Now with an electric beater, at low speed start beating the hung curd. Beat for a minute until the hung curd looks like cream. Now add the powdered sugar and beat again for 30 seconds. Add in the colour, the cardamom powder, and a little of the water in which the kesar strands were soaked( about 2 tsp). Use a spatula to combine well until the kesar colour is evenly spread. Garnish with Kesar strands and the yummy probiotic Shrikhand is ready. Put it in the refrigerator until ready to serve.


Serving Suggestions: Puri and Shrikhand is a match made in heaven. In my house, we like it with Parathas and Rotis too.


STEPWISE RECIPE FOLLOWS:

1. Take a clean Muslin or cotton cloth and spread it into a bowl and empty the Greek yogurt plus homemade curd into it.


2. Collect the edges and tie it such that all the water is able to drain away.  Allow 45 minutes to pass. Now untie the cloth from the dripping arrangement. Almost all the excess water from the curd must have dripped away and the hung curd is now ready.


3. Transfer the hung curd to a bowl in which you can whip/beat it. Now with an electric beater, at low speed start beating the hung curd. Beat for a minute until the hung curd looks like cream.


4. Now add the powdered sugar and beat again for 30 seconds. Add in the colour, the cardamom powder, and a little of the water in which the kesar strands were soaked( about 2 tsp). Use a spatula to combine well until the kesar colour is evenly spread.


5. Garnish with Kesar strands and the yummy probiotic Shrikhand is ready. Put it in the refrigerator until ready to serve.


NOTES:

1. Always add powdered sugar, so that the consistency of the Shrikhand does not go runny.

2. I have made a variant of Rose flavour too. I had some homemade Rose syrup, so tried it out. One can buy storebought ones and try. Use the rose syrup in place of the kesar colour and proceed.

3. This recipe can be made with homemade curd too. It takes longer for the water from the curd to drain. The rest of the recipe is the same.

 If you tried this recipe and liked it please comment below. I would love to hear from you. If you have a query about the recipe email us and ill respond as soon as I can.

If you would like to receive our recipes in your mail please leave your mail id at the homepage. Every time Rajjo's Kitchen has a new post we will mail the recipe to you.

Thursday 29 October 2020

BONDA MORU KUZHAMBU

 This is a popular south Indian dish made of curd/yogurt and is the counterpart of the North Indian Kadi. In the North Indian Kadi chickpea flour or besan is used to give body to the dish, whereas in Mor Kuzhambu, Chana dal and Tuvar dal( yellow lentils and gram) along with coconut and coriander seeds are used to give body. The masalas used in Kadi are in powdered form, whereas in the South Indian Mor Kuzhambu the whole masalas are ground to a paste.

The array of vegetables that can be used in making this dish is huge. Vegetables like Plantains, Brinjal, Colaccasia/Arbi, Ash gourd, Pumpkin, Mango(ripe), Bhindi/Vendakai can be used to make this dish. These vegetables are used in a combination or individually to make the Mor Kuzhambu. Sometimes lentil dumplings are also used

In this recipe, I am showing the method for the Bonda/Dumpling Moru Kuzhambu. This is a dish that I used to make so often in the past and then stopped making altogether for the past two years, for no specific reason ofcourse. Though the Moru Kuzhambu/Kadi is a weekly dish in my house, the Bonda Moru Kuzhambu I make only once in a while.

Usually, Urad dal/ Black lentils are soaked and ground to a fine batter and then deep-fried in oil. There is a popular south Indian snack called Mysore Bonda, so these Bondas are put in the Kadi. I make this in a much simpler fashion though. Idli/Dosa batter is a staple in all our homes, I have used that to make the Bondas with a little additional flours. That's all. 

While you are here please check out other recipes by me like Vatha Kozhambu, Moru Kuzhambu with Bhindi, Gutti Vankaya Kura, Drumstick curry, Brinjal Pepper masala, Pachai Sundakkai Kuzhambu, and many more...

   Here is the recipe for Bonda Moru Kuzhambu-


 PREP TIME: 15                                 COOK TIME: 20Mins
 TOTAL TIME:35 MINS                       COURSE:  MAIN
 CUISINE:  SOUTH INDIAN                SERVINGS: 6 
 AUTHOR: Rajni Ram


   Ingredients:

   To Soak for 15 mins:

    Dhania/Coriander seeds 1 tbsp

   Jeera 1/2 tsp

   Chana dal 1.5 tsp

   Tuvar dal 1 tsp

   Dry red chilli  1

   Methi seeds a pinch(optional)

   To grind:

   Green chilli 1 big

   Ginger1/2 inch piece

   Coconut 2 tbsp +

    All soaked ingredients after draining water.

   Curd 300 ml or 2 cups(refer method) (1 cup=150ml)

    For the Bondas/lentil Dumplings:

    Idli/Dosa batter 1.5 cup

   Rice flour 1.5 tbsp

   Green chillies 2 chopped

   Ginger 1/2 inch piece chopped

   Cumin- pepper powder 1 tsp

   Curry leaves a few

   Oil for frying the dumplings

    For tempering:

    Oil 1 tbsp

   Mustard seeds 1 tsp

   Cumin seeds/Jeera 1/2 tsp

   Dry red chillies 2 broken 

   urad dal 1 tsp

   Chana dal 1/2 tsp

   Curry leaves a few

   salt to taste


   Directions: 

   Soak all ingredients mentioned under "to soak" for 15 minutes. After 15 minutes, drain water and put the soaked ingredients into a blender. Add the ingredients mentioned under "to grind" except the curd and grind them to a coarse mixture. Now add 2 tbsp curd to the coarse mixture and grind again to a smooth paste.

While the above ingredients are soaking, let's fry the Bondas. To the Idli/Dosa batter add the rice flour, green chillies, ginger, cumin-pepper powder, and curry leaves and mix nicely. Heat oil in a Kadai for deep frying the Bondas. Now drop a small amount of batter into the oil with your finger or one can use a tablespoon to do it. Drop tiny amounts of batter, because they fluff up in the oil. Repeat for all batter, drain in absorbent paper and keep aside.

Now put a Kadai on the flame and pour the ground paste into it. Reduce the flame and add 1 to 1.5 cups of water and simmer it. The paste has to cook well, for about 2 minutes or until the raw taste of the masalas is gone. Now smoothen the remaining curd(we used only 2 tbsp for the paste) with a whisk or give it a single spin in the blender and pour this curd into the cooking paste. Add turmeric powder and salt. The flame should be low throughout. Once the curd is poured, keep stirring constantly for a few minutes. This should take approximately 2 minutes and then switch off the flame. Once the curd is poured, it should not simmer for long. Now add the fried Bondas. Now in a small Kadai heat oil, add all the tempering ingredients, fry them and add to the Mor Kuzhambu.

 Let the Bondas soak for 10 minutes. The tasty Bonda Mor Kuzhambu is ready to relish.

Serving Suggestions: Hot rice and Parupu Usili on the sides. It is a match made in heaven with Coconut(Thengai ) Sevai(rice hoopers) or even with Coconut rice.


STEPWISE RECIPE FOLLOWS

1.  Assemble all ingredients. Soak all ingredients mentioned under "to soak" for 15 minutes. After 15 minutes, drain water and put the soaked ingredients into a blender.


2. Add the ingredients mentioned under "to grind" except the curd and grind them to a coarse mixture. Now add 2 tbsp curd to the coarse mixture and grind again to a smooth paste.


3. To the Idli/Dosa batter add the rice flour, green chillies, ginger, cumin-pepper powder, and curry leaves and mix nicely. Heat oil in a Kadai for deep frying the Bondas. Now drop a small amount of batter into the oil with your finger or one can use a tablespoon to do it. Repeat for all batter, drain in absorbent paper and keep aside.


4.  Now put a Kadai on the flame and pour the ground paste into it. Reduce the flame and add 1 to 1.5 cups of water and simmer it. The paste has to cook well, for about 2 minutes or until the raw taste of the masalas is gone. 


5. Now smoothen the remaining curd(we used only 2 tbsp for the paste) with a whisk or give it a single spin in the blender and pour this curd into the cooking paste. Add turmeric powder and salt.


6. Once the curd is poured, keep stirring constantly for a few minutes, approx. 2 minutes and put off the flame. Now in a Kadai heat oil, add all the tempering ingredients, fry them and add to the Mor Kuzhambu. Let the Bondas soak for a few minutes and then the Mor Kuzhambu is ready to serve.


NOTES:

1. The flame should always be low while cooking this dish, as curd on the high flame will split and the water will separate.

2. For the same reason once the curd is poured into the masala paste it has to be stirred constantly, to avoid separating of water and curd, which will turn the dish runny.

3. To fry the Bondas use a spoon to drop the batter, as it is safer. At a time a few Bondas can be fried. 


If you tried this recipe and liked it please comment below. I would love to hear from you. If you have a query about the recipe email us and ill respond as soon as I can.

If you would like to receive our recipes in your mail please leave your mail id at the homepage. Every time Rajjo's Kitchen has a new post we will mail the recipe to you.


TOFU AND STIR FRIED VEGETABLES IN HOT SCHEZWAN SAUCE

  Any Tofu lovers? I agree its an acquired taste,but going by the health benefits it has to offer, I try including it in my diet now and the...