Vegetarian cooking blog

Thursday 8 April 2021

MEDU VADA / URAD VADA

 Urad Vada or Medu Vada, as it is called, is probably one of the most simplest and yet difficult to make recipes. This is because the texture of the ground batter is very important for a perfect turn out and the quality of the Urad dal is important too. With time and practice one gets a hang of it. In this recipe I have tried to give detailed pictures of various steps of grinding so that the recipe becomes a no fail one, and I am depending on your feedback on this once you try it. The Medu Vada is different from its North Indian counter part, because of the hole in the center, and making that hole is what makes grinding the batter perfectly important.

Urad Vada can be a snack, an accompaniment to the mains or even a starter when made bite sized. In South India it is a part of Prasad / Bhog ( holy offering) to God and so is made many times during the year. In my house after eating a few plain with chutney or Sambar the rest are converted to Dahi Vada in the evening. If one doesn’t want to get into making Dahi Vadas, just  dunking them is tomato sauce is also a good option.

I prefer using the whole Urad dal without skin for these Vadas, as compared to the split urad dal as they almost are no fail. There are many add ins to into the batter like finely chopped onions, grated carrot, mix of finely grated veggies, the only rule- once the add in’s go in, pat and fry Vadas immediately. Another variation of this Vada is the dry Pepper Vada or Milagu Vadai. 

While you are here, check out my other snack recipes like Semolina Cheese Balls, Patra/ Pathrode, Ratlami Sev, Mirchi Bajji/Mirapakaya Bhajji, Potato Cheddar Bake, and more...


Here is the recipe for fluffy Medu Vadai for you--


PREP TIME: 5 Mins ( 1hr Soak time)         COOK TIME: 30 Mins
TOTAL TIME: 1 hr. mins                             COURSE:  BREAKFAST/TIFFIN/ SNACK
CUISINE:  INDIAN                                     SERVINGS: 15 pcs
AUTHOR: Rajni Ram


    Ingredients:

    Whole or Split Urad dal (without skin) 1 cup 

    Green chillies 2

    Ginger 1/2 inch piece

    Peppercorns 5 to 6 crushed

    Curry leaves a few

    Salt as required 

    Rice flour 1 tbsp (optional)

    Directions:  

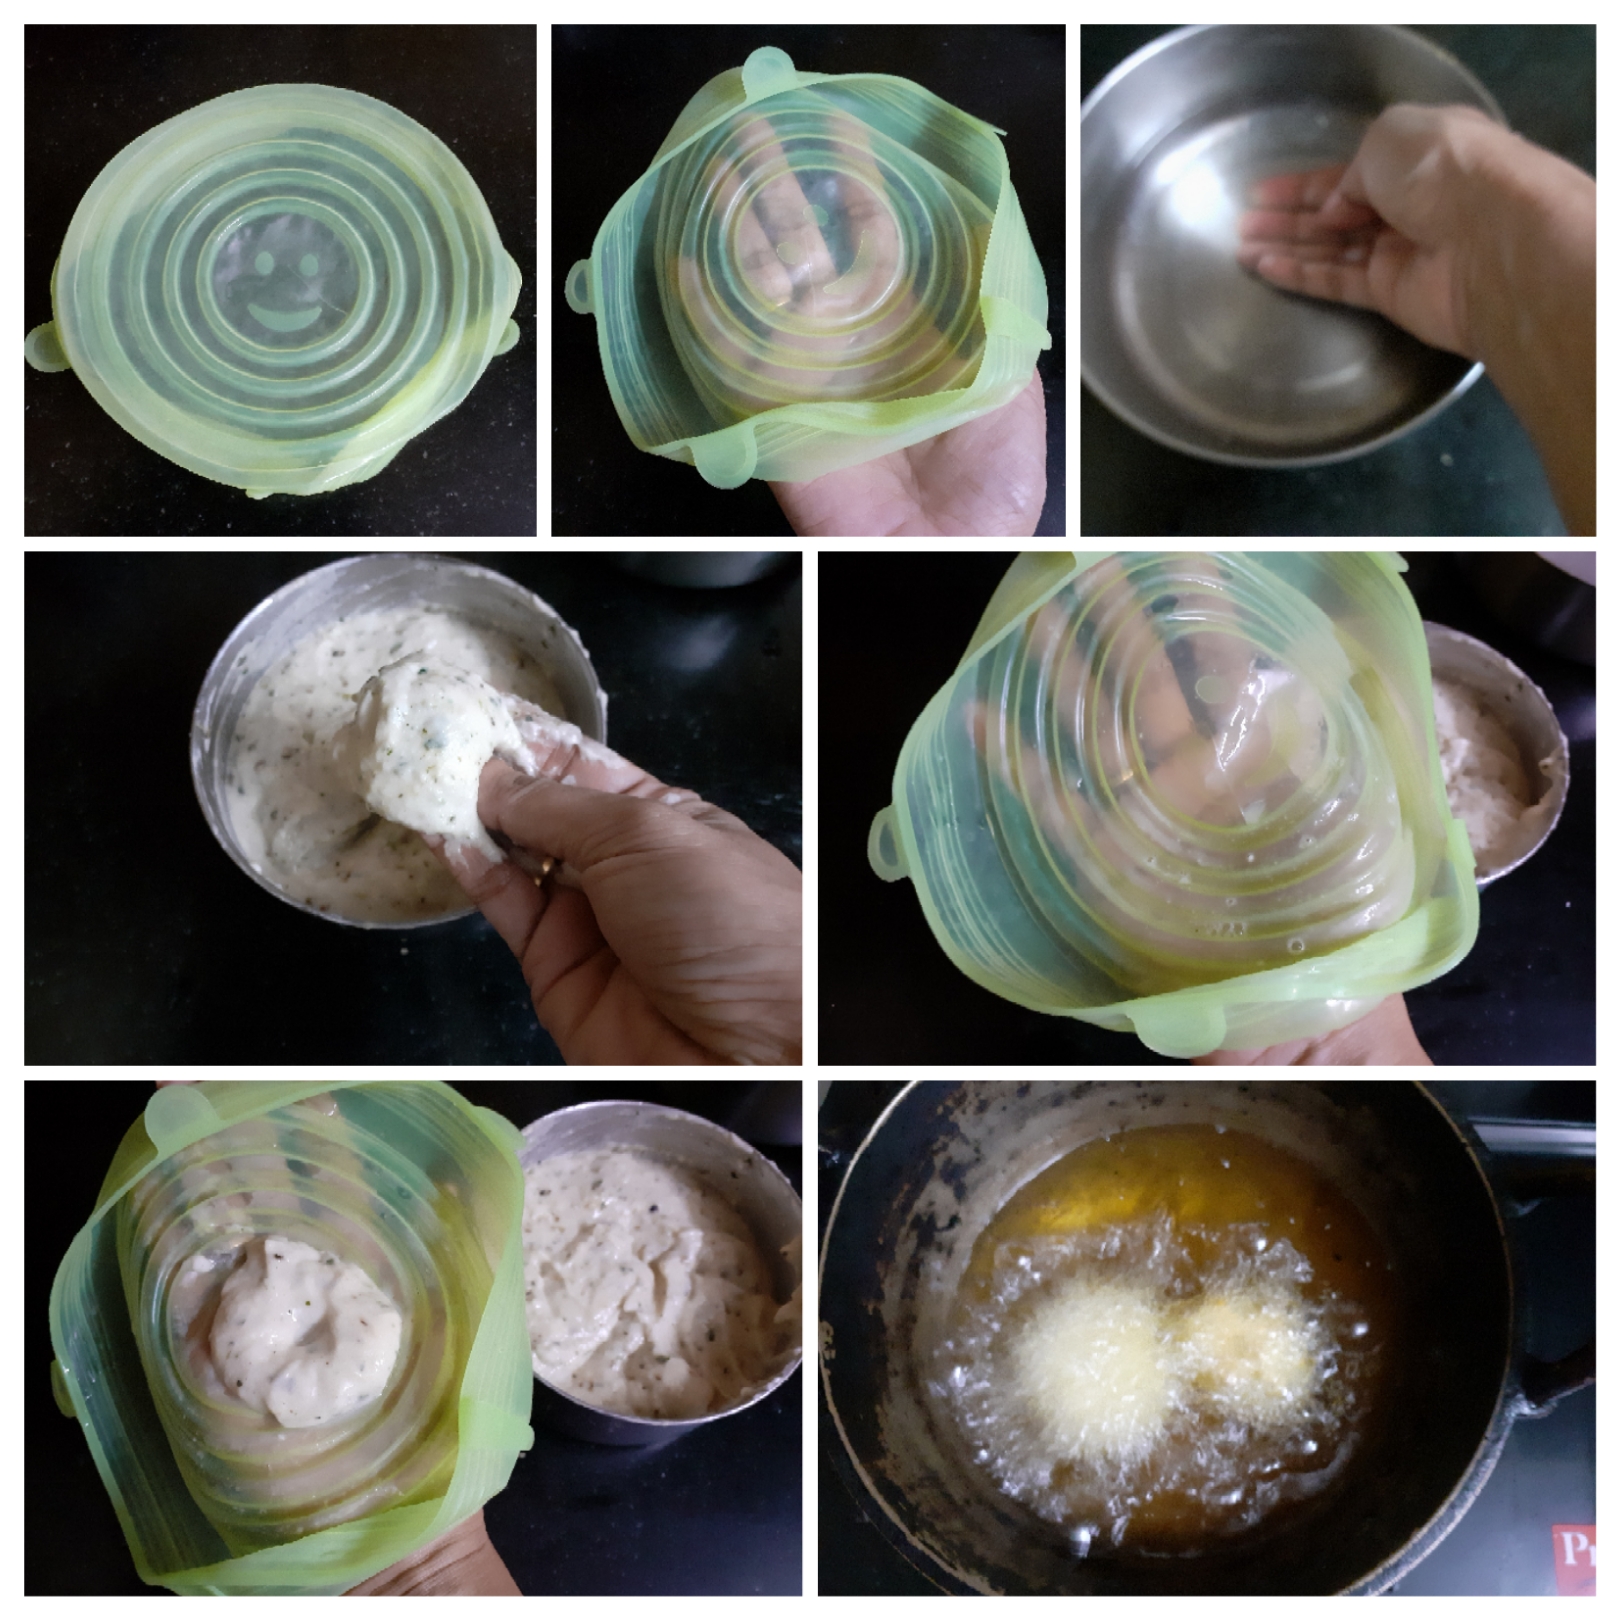
Soak the Urad dal in water for 1 hour. Grind the green chillies, ginger, and curry leaves to a coarse dry paste ( check picture). Now in a blender add the dal after draining all the water and grind to a smooth paste. Add water a little at a time, by sprinkling and not by pouring it. So, sprinkle water, grind, sprinkle, grind, until the batter is smooth and thick. Take care to see that the batter does not become runny or else Vadas cannot be formed. The right consistency of the batter is when it doesn't fall off your hand easily. Remove the batter from the blender into a bowl, add salt and the green chili and ginger paste, add few more curry leaves if required and rice flour in case using ( I have not used in this recipe), and mix well with your fingers. Next, take a banana leaf or a plastic cover( I have used a flexible plastic lid) for patting the Vada. Now, wipe the leaf/ plastic with some water, take a small lemon sized portion of the batter and place it in the centre of the leaf/plastic, do not flatten, just wet your index finger in water, and make a hole in the centre . Now carefully pick the Vada out of the leaf/ plastic and gently drop it on hot oil and fry until golden brown. Remove on to absorbent paper . Repeat the process for the entire batter. Enjoy hot with Sambar and Chutney.


    STEPWISE RECIPE FOLLOWS:

1. Soak the Urad dal in water for 1 hour.


2. Grind the green chillies, ginger, and curry leaves to a coarse dry paste ( check picture). 


3. Now in a blender add the dal after draining all the water and grind to a smooth paste. Add water a little at a time, by sprinkling and not by pouring it. So, sprinkle water, grind, sprinkle, grind, until the batter is smooth and thick. Take care to see that the batter does not become runny or else Vadas cannot be formed. The right consistency of the batter is when it doesn't fall off your hand easily. ( see pics for stages of grinding)


4. Remove the batter from the blender into a bowl, add salt and the green chili and ginger paste, ground pepper powder, add few more curry leaves if required and rice flour in case using ( I have not used in this recipe), and mix well with your fingers.


5. Next, take a banana leaf or a plastic cover( I have used a flexible plastic lid) for patting the Vada. Now, wipe the leaf/ plastic with some water, take a small lemon sized portion of the batter and place it in the centre of the leaf/plastic, do not flatten, just wet your index finger in water, and make a hole in the center . Now carefully pick the Vada out of the leaf/ plastic and gently drop it on hot oil and fry until golden brown. Remove on to absorbent paper .


    NOTES:

1. Sprinkling water a little at a time and not pouring it into the dal while grinding is critical.

2. The batter should be smooth, yet not lose or runny.

3. I usually add rice flour only if I find that the batter is not turning fluffy as we grind, and kind of flat. Anyway adding 1 tbsp does no harm, and gives crisp Vadas.

4. I prefer to grind in the wet grinder, as then, even with minimum water we are able to grind well. But those who don't have one can certainly use the blender and be patient while grinding.


To make these yummy Dahi Vadas - To a blender add 1/2 a bunch of coriander leaves, 1/2 inch piece ginger and two green chillies. Blend to a paste. Add little curd to it and now blend to a smooth paste. Add this mixture to 500 ml of curd, and add salt as required. Soak the Vadas in hot water for 2 minutes, squeeze lightly and put them into this spiced curd mixture. Let it soak in for 30 mins in the fridge, before serving. 


If you tried this recipe and liked it please comment below. I would love to hear from you. If you have a query about the recipe email us and ill respond as soon as I can.

If you would like to receive our recipes on your mail please leave your mail id at the homepage. Every time Rajjo's Kitchenn has a new post we will mail the recipe to you.


Thursday 1 April 2021

SWEET POTATO PURAN POLI

Every year during Vaikunta Ekadashi and Shiv Rathri the elders in my family like to have Sweet Potato, as is the custom. Shiva Rathri and Vaikunta Ekadashi both are celebrated in winter and the carbs from the Sweet potato give the much needed warmth. This could have been the reason this custom was formed. 

So instead of just giving them the plain boiled one, I prefer giving it to them as these Puran Polis. This is quite a simple recipe and needs no pre planing. Sweet potatoes are also high on fiber and minerals, therefore they are perfect for people on a fast. Sweet Potatoes promote gut health, they support healthy vision and also support the immune system. Isn't this reason enough for us to include this healthy  tuber.

While you choose the sweet Potatoes at the market, choose the fat ones, chop off the tips before boiling, as that's where you may find some rough fibres. 

There is a lot more one can do with Sweet Potatoes than just making a subji and I for sure am going to explore every one of them and bring it here for you all.

Let's get to the recipe of this yummy Sweet potato stuffed flat bread which can be had as dessert, can be a holi offering(prasad), or even a snack.

While you are here check out my other dessert recipes like Gajar ka Halwa, Carrot kheer, Eggless Pineapple cake, Strawberry and Lemon loaf, Dry fruit ladoo, Shrikand, Aval Kesari, Mal Pua, Akkaravadisal and more...

Here is the recipe of Sweet Potato Puran Poli--

PREP TIME: 30 Mins                                      COOK TIME:30 Mins
TOTAL TIME: 20Mins                                     COURSE: DESSERT/SWEET
CUISINE:   INDIAN                                         SERVINGS: 4
AUTHOR: Rajni Ram


Ingredients for dough:

Wheat flour 2 cups
salt a pinch
oil 1 tsp
water to knead

Ingredients for stuffing:

Sweet potatoes 2 large or 3 medium ( pressure cook for 3 whistles, peel skin and mash)
jaggery 1/2 cup
cardamom powder 1 tsp
Ghee/ clarified butter 1 tbsp
Ghee for cooking Polis

Directions:
 For dough- combine flour adding the salt and oil and little water at a time and combine to form a soft yet stiff dough, like that of Paratha dough.

For stuffing: Pressure cook, peel and mash the sweet potatoes. Now ina kadai put in the mashed sweet potatoes followed by the jaggery and keep stirring. The jaggery will begin to melt. Keep stirring so that the jaggery combines well with the sweet potato and thickens a little. Now add cardamom powder and ghee and mix well. Allow the stuffing to cool.
Now divide the dough into 10 equal parts and divide the stuffing also. Take one ball of the dough at a time, dust it with flour and roll into a small puri, put the stuffing in the centre, and seal the edges. dust with little flour again and roll out into a thick Chapathi. Heat a girdle/Tava and put the Poli ( stuffed roti) on it. Cook on one side and apply some ghee, flip over and cook on the other side and apply more ghee. Repeat for all the dough and stuffing. Enjoy hot. This can be stored in the fridge for uptio 4 das and warmed up as required.


STEPWISE RECIPE FOLLOWS: 

1. For dough- combine flour adding the salt and oil and little water at a time and combine to form a soft yet stiff dough, like that of Paratha dough.


2. For stuffing: Pressure cook, peel and mash the sweet potatoes. Now ina kadai put in the mashed sweet potatoes followed by the jaggery and keep stirring. The jaggery will begin to melt. Keep stirring so that the jaggery combines well with the sweet potato and thickens a little.


3. Now add cardamom powder and ghee and mix well. Allow the stuffing to cool.


4. Now divide the dough into 10 equal parts and divide the stuffing also. Take one ball of the dough at a time, dust it with flour and roll into a small puri, put the stuffing in the centre, and seal the edges. dust with little flour again and roll out into a thick Chapathi. 


5. Heat a girdle/Tava and put the Poli ( stuffed roti) on it. Cook on one side and apply some ghee, flip over and cook on the other side and apply more ghee. Repeat for all the dough and stuffing. Enjoy hot.


NOTES:

1. Let the  jaggery melt in the heat from the sweet potato, do not add any water. If the mixture is lose, the stuffing will tend to come out of the Roti.
2. Ghee can be smeared even after both sides are cooked.
3. Brown or unrefined sugar can be added in place  of jaggery.

If you tried this recipe and liked it please comment below. I would love to hear from you. If you have a query about the recipe email us and ill respond as soon as I can.

If you would like to receive our recipes on your mail please leave your mail id at the homepage. Every time Rajjo's Kitchen has a new post we will mail the recipe to you.


Tuesday 23 March 2021

PEPPER VADA/MILAGU VADAI

 Pepper Vada or Milagu Vadai as it is known, is a drier and crisper version of the regular Vada. Simple ingredients and a hack make this a foolproof recipe. Read ahead. This is similar to the Tirupathi style Milagu Vadai.

I tried this recipe the first time during Navarathri this year. It was an instant hit at home as well as my social media pages. A few of you even asked for the recipe and I could not post the recipe immediately as I had not clicked stepwise pictures. So, this time I clicked all the necessary pictures to blog it.

As I always say, some recipes don’t need a huge introduction. The recipe does all the talking. While you are here check out my other savoury recipes like Dhaniya wale Namak Pare, Ratlami Sev, Samosa pie, Masala Wheat flour Papdis, Thattai, Kothimbir Vadi, Moongdal Khastha kachori and more ...

Here is the recipe for Pepper Vada/ Milagu Vadai

PREP TIME: 15 Mins (SOAK 4 HRS)           COOK TIME: 15 Mins
 TOTAL TIME:30 Mins                                   COURSE:  SNACK
 CUISINE:SOUTH INDIAN                           SERVINGS: 25 NOS   
 AUTHOR: RAJNI RAM                                      


Ingredients:

    Urad Dal/ Black lentils( with skin) 1 cup soaked for 4 to 5 hours.

     Salt as required 

     Coarse Pepper powder 2 tsp ( add more if you like it spicy)

     Rice flour 2 tbsp

     Hot oil 2tbsp

     Oil for deep frying


Directions: 

Soak the Urad dal( use with skin for this colour and texture) for 4 to 5 hours. Drain water completely after it soaks and grind it to a coarse batter without adding( or by adding minimum) water. I have ground it without any water and later sprinkled a little over the coarse batter for the right consistency. Now to the coarse batter( check picture for consistency), add salt, coarse pepper powder, and rice flour and, mix well. If you feel the mixture is too dry, sprinkle a little more water. Mix using your fingers to combine well. Now heat the oil kept for deep frying, and when the oil is sizzling hot with a ladle pour 2tbsp into the batter and using a spoon or spatula mix the oil into the batter( don’t use your fingers now as the oil is too hot). Now pinch small portions from the mixture and make balls of it. Slit a zip pouch into two or use a Banana leaf to  flatten the balls. Flatten the ball using the back of a cup or you palm. Pat them quite thin to get them crisp. Make a hole in the centre for even cooking. Now gently drop them into hot oil and fry at medium high until all the bubbles in the oil subside. Repeat the process for the entire batter. These Vadas stay crisp up to a month when stored in an airtight container. They make for a good dry snack for school lunch of kids or adults as they are protein packed. 


STEPWISE RECIPE FOLLOWS:

1. Soak the Urad dal( use with skin for this colour and texture) for 4 to 5 hours. Drain water completely after it soaks and grind it to a coarse batter without adding( or by adding minimum) water. I have ground it without any water and later sprinkled a little over the coarse batter for the right consistency.


2. Now to the coarse batter( check picture for consistency), add salt, coarse pepper powder, and rice flour and, mix well. If you feel the mixture is too dry, sprinkle a little more water. Mix using your fingers to combine well.


3. Now heat the oil kept for deep frying, and when the oil is sizzling hot with a ladle pour 2 tbsp into the batter and using a spoon or spatula mix the oil into the batter( don’t use your fingers now as the oil is too hot). 


4. Now pinch small portions from the mixture and make balls of it. Slit a zip pouch into two or use a Banana leaf to  flatten the balls. Flatten the ball using the back of a cup or you palm. Pat them quite thin to get them crisp. Make a hole in the centre for even cooking.  Now gently drop them into hot oil and fry at medium high until all the bubbles in the oil subside. Repeat the process for the entire batter.


NOTES:

1. This Vada can be made with white Urad dal too ( the de skinned one) . The texture and taste remain the same. Just the colour varies.

2. If using white  Urad dal, just 1 hour of soaking will do. The black lentils take time to soak and so need to be soaked longer.

3. The batter as well as the pepper should be ground coarse for maximum taste.

4. In this Vada Curry leaves are usually not added to the batter as its for long keeping, and any moisture in the curry leaves can affect its shelf life.


If you tried this recipe and liked it please comment below. I would love to hear from you. If you have a query about the recipe email us and ill respond as soon as I can.

If you would like to receive our recipes in your mail please leave your mail id at the homepage. Every time Rajjo's Kitchen has a new post we will mail the recipe to you.


Friday 19 March 2021

RASAKALAN

Rasakalan is a traditional mixed vegetable dish from the Palakkad cuisine. The dish is so rustic and delicious and very easy to make. It is great to go with hot rice or can be served on the sides with Dosa or Idli. The vegetables mostly used in this dish are Ash gourd, Sweet potato, pumpkin, that are cooked in a tangy tamarind sauce and then a flavourful coconut masala paste is added. It is the paste that makes all the difference. Finally the seasoning in coconut oil enhances the flavours of the dish and takes it to a different level.

In our family my aunt makes this the best, so this recipe has been adapted from  her instructions. This recipe allows you to customize the vegetables as per your liking. I have used a mix of Ash gourd, Capsicum, Carrot, Beans and Potatoes. 

While you are here check out my other recipes from the Palakkad cuisine like Unni Appam/Nei appam, Sukhiyan, Avial, Keerai Molagootal with Mathan puli pachadi and more...


Here is the recipe of Rasakalan for you all-

  PREP TIME: 15                                          COOK TIME: 15Mins
 TOTAL TIME:30Mins                                   COURSE:  MAIN
 CUISINE: PALAKKAD                                 SERVINGS: 6
 AUTHOR: Rajni Ram


    Ingredients:

     Ash Gourd 100 gm skin removed and diced
     Potato 1 peeled and diced
     Beans about 5 chopped to 1 inch pieces
     Carrot 1 peeled and diced
     Capsicum 1 chopped to small pieces
   Tamarind paste 1 tbsp or soak gooseberry size tamarind ball and extract pulp appx 1.5 cup
      Turmeric powder 1/2 tsp
      Salt as required
      Coconut 2 tbsp
      Green chillies 2
      Dry red chillies 4 (or depending on spice choice)
      Jaggery 1 tsp
      Coconut oil or refined oil 1/2 tbsp
      Mustard seeds 1 tsp
      Chana dal ( gram dal) 1/2 tbsp
      Asafoetida 1/2 tsp
      Dry red chilli broken 1
      Curry leaves a few

Directions:

In a pan add the tamarind paste plus 2 cups water or tamarind pulp 1.5 cups and switch on the flame. Add turmeric powder and salt followed by chopped vegetables and cook until the vegetables are done. The vegetables should be well cooked but firm. Overcooking may ruin the taste of the dish. When the vegetables are cooked grind the coconut, green chillies, dry red chillies to a smooth paste adding a little water. Pour this paste into the vegetable and tamarind gravy and cook further for 2 to 3 minutes, or until the gravy comes together. Put off the flame. In a tempering Kadai take some coconut oil or any oil of our choice and heat. Add mustard seeds, when they crackle add the gram dal, asafoetida and curry leaves. Add this tempering to the cooked curry. The delicious Rasakalan is ready to serve. Enjoy with hot rice or with Dosa, pongal or upma.

STEPWISE RECIPE FOLLOWS:

1.  In a pan add the tamarind paste plus 2 cups water or tamarind pulp 1.5 cups and switch on the flame. Add turmeric powder and salt followed by chopped vegetables and cook until the vegetables are done.


2.  When the vegetables are cooked grind the coconut, green chillies, dry red chillies to a smooth paste adding a little water.


3. Pour this paste into the vegetable and tamarind gravy and cook further for 2 to 3 minutes, or until the gravy comes together. Add the jaggery and put off the flame.


4. In a tempering Kadai take some coconut oil or any oil of our choice and heat. Add mustard seeds, when they crackle add the gram dal, asafoetida and curry leaves. Add this tempering to the cooked curry. The delicious Rasakalan is ready to serve. Enjoy with hot rice or with Dosa, pongal or upma.


NOTES:
1. As said earlier the vegetables can be customized to ones liking, keeping the vegetables traditional and Indian helps in retaining the traditional taste.
2. Using coconut oil enhances the taste, but any other oil of preference can be used too. Note taste will vary though. 
3. The texture and consistency of this dish should be thicker then Sambar.


If you tried this recipe and liked it please comment below. I would love to hear from you. If you have a query about the recipe email us and ill respond as soon as I can.

If you would like to receive our recipes in your mail please leave your mail id at the homepage. Every time Rajjo's Kitchen has a new post we will mail the recipe to you.


.

Monday 15 March 2021

EGGLESS PINEAPPLE CAKE

Come Pineapple season and all I can think of is Pineapple Rasam, Pineapple Raita, Pineapple Mor Kuzhambu, Pineapple Rabri and Pineapple Cake. In short, main course to sides to desserts in Pineapple. Oh yes, and salad too...just love the fruit.

This Eggless Pineapple cake is simple and I have followed the same batter used for Upside down orange vanilla cakeI am giving you a base here to which you can add anything you like, be creative, and yet you will have a beautifully moist cake every time. Anyone can make this, no beating, no major whisking. You all know by now the recipes I choose to bake are mostly non-messy ones.

Being an eggless version, this cake is different from the other eggless cakes as I have not used condensed milk or flax egg, but one simple ingredient that we have in our refrigerators. Curd/ yogurt. Yes, that's the base, and I assure the cake will not taste of curd. 

While you are here check out my other cakes like Blueberry CheesecakeNutella fudge browniesApple cake,  Apple crumble, and more...

Here is the recipe for Eggless Pineapple Cake-


      PREP TIME: 10 Mins                                        COOK TIME: 35 Mins
     TOTAL TIME: 45 Mins                                        COURSE:  DESSERT
     CUISINE:  WORLD FOOD                                 SERVINGS: 6
     AUTHOR: Rajni Ram


Ingredients for Cake:

Pineapple 1 small, skin removed and chopped finely(follow instructions under Glaze)

Maida ( refined flour) 1.5 cups ( 1 cup=150 ml)

Curd/ yogurt 1 cup

Sugar ( white) 3/4 of a cup

Baking powder 1 tsp

Baking soda 1/2 tsp

Oil ( refined oil or coconut oil) 1/2 cup

Vanilla essence 2 drops

Sauteed Pineapple chunks(check step 1 under directions)

Requirement: Square or rectangle baking tin/tray


Ingredients for the topping/glaze


Whipping cream 1 cup

Sugar 4 tbsp

Pineapple  chunks 

Cinnamon powder


Directions for glaze/topping

STEP1:

Remove the skin of the Pineapple, and cut it into fine chunks. In a pan melt 1 tbsp butter and add the finely chopped Pineapple. saute. Add 1/4 tsp salt, 1/4 cup water and 1/2 cup brown sugar and start cooking. When the Pineapple is half cooked, add cinnamon powder and continue to cook until the Pineapple is well cooked and yet firm. Remove from flame and cool. The mixture will solidify a bit and appear saucy. Keep aside.

STEP2:

Pour 1 cup pf chilled whipping cream into a mixing bowl and using an electric beater whip it to a consistency where, when the beater whisk is lifted, the cream forms a soft peak and doses not fall of the whisk. (PS: pictures for this step are not here, as the whipped cream frosting was just an impulsive decision, but a good one😀. Picture for this step will be updated as soon as possible). When soft peaks appear to the cream, add 1/4 of the portion of the sauteed pineapple chunks and mix lightly. Keep some Pineapple chunks aside for topping up.


Directions for Cake:

 Preheat oven to 180 c for 10 minutes. Sift the flour and keep ready. In a bowl take the curd, add the sugar and combine until the sugar dissolves completely. Now add the baking powder and baking soda and set aside for 5 minutes. This makes the mixture to froth up and double in size.

After 5 minutes add oil to the curd mixture and combine well. Add the sifted flour and with a spatula or wire whisk combine nicely to form a batter. Add in the vanilla essence and half the quantity the sauteed pineapples(refer instructions for Glaze step1) and mix lightly. Now transfer the cake batter into a previously greased tray. Place the tray in the oven and bake for 35 minutes at 180 C. Check for doneness or keep for a couple of minutes more, if a toothpick comes out sticky, don't go beyond 5 minutes. Cool the cake for 30 minutes, or until completely cool. Now top with the whipped cream topping and remaining Pineapple chunks and dig in.


STEPWISE RECIPE FOLLOWS:


1. Remove the skin of the Pineapple, and cut it into fine chunks. In a pan melt 1 tbsp butter and add the finely chopped Pineapple. saute. Add 1/4 tsp salt, 1/4 cup water and 1/2 cup brown sugar and start cooking. When the Pineapple is half cooked, add cinnamon powder and continue to cook until the Pineapple is well cooked and yet firm. Remove from flame and cool. The mixture will solidify a bit and appear saucy. Keep aside.


2. Preheat oven to 180 c for 10 minutes. Sift the flour and keep ready.


3. In a bowl take the curd, add the sugar and combine until the sugar dissolves completely. Now add the baking powder and baking soda and set aside for 5 minutes. This makes the mixture to froth up and double in size.


4. After 5 minutes add oil to the curd mixture and combine well. Add the sifted flour and with a spatula or wire whisk combine nicely to form a batter. Add in the vanilla essence and half the quantity the sauteed pineapples(refer instructions for Glaze step1) and mix lightly. 


5. Now transfer the cake batter into a previously greased tray. Place the tray in the oven and bake for 35 minutes at 180 C. Check for doneness or keep for a couple of minutes more, if a toothpick comes out sticky, don't go beyond 5 minutes. Cool the cake for 30 minutes, or until completely cool. Now top with the whipped cream topping and remaining Pineapple chunks and dig in.


6. For the frosting:

Pour 1 cup pf chilled whipping cream into a mixing bowl and using an electric beater whip it to a consistency where, when the beater whisk is lifted, the cream forms a soft peak and doses not fall of the whisk. (PS: pictures for this step are not here, as the whipped cream frosting was just an impulsive decision, but a good one😀. Picture for this step will be updated as soon as possible). When soft peaks appear to the cream, add 1/4 of the portion of the sauteed pineapple chunks and mix lightly. Keep some Pineapple chunks aside for topping up.


NOTES:

1. The curd should not be very sour.

2. Feel free to add your choice of fruits, the process of making sauce remains same. But cinnamon does not go well with all fruits, so go easy with cinnamon.

3. If you have extra whipped cream topping left, you may want to consider sandwiching some between two layers of cake.

If you tried this recipe and liked it please comment below. I would love to hear from you. If you have a query about the recipe email us and ill respond as soon as I can.

If you would like to receive our recipes in your mail please leave your mail id at the homepage. Every time Rajjo's Kitchen has a new post we will mail the recipe to you.


Sunday 7 March 2021

MILONI BABYCORN AND BELL PEPPERS CURRY (MIXED VEGETABLE CURRY)

 Miloni Baby corn and Bell Peppers( both green and red) is a mixed vegetable curry that is simple and easy to make. With a little prep and chopping it can also be made on a working day. Some recipes use Spinach/Palak in Subz Miloni, but I have skipped it entirely, to bring out the flavours of the Baby corn and bell-peppers and some green peas too have been used, as they are in season now. 

The flavours of this dish are very delicate and go very well with both Rice and Rotis(flatbread). This is one of those recipes where I have just gone with the follow and created, without any pre planning. When I started, only Baby corn and bell-peppers were chopped, but as I proceeded kept adding things to create this dish. This happens when I am bored of my own cooking and am looking for some inspiration from within.

While you are here do check out other subji and curry recipes like- Kadai Paneer Gravy, Kadai Paneer (semi dry), Bhindi Aloo, Paneer Khurchan, Dum Aloo Ajwaini, Methi wale Baingan, Mava Paneer Curry, and more...

Here is the recipe for Miloni Baby corn and Bell Peppers for you-


 PREP TIME: 15                                          COOK TIME: 15Mins
 TOTAL TIME:30Mins                                  COURSE:  MAIN
 CUISINE: NORTH INDIAN                         SERVINGS: 6
 AUTHOR: Rajni Ram


    Ingredients:

    Baby Corn 12 to 15 cut lengthwise

    Red Bell Pepper 1 chopped to strips

    Capsicum/ Green bell pepper 1 chopped to strips

    Green Peas 1 handful (optional)

    Onion 1 large chopped 

    Ginger 1 inch piece

    Garlic 3 cloves

    Tomatoes 2 large chopped 

    Green chillies 2 

    Cashewnuts 10 to 12

    Salt as required

    Cumin Seeds 1 tsp

    Turmeric powder 1/2 tsp

    Red chilli powder 1 to 2 tsp (depending on spice preference)

    Kashmiri chilli powder 1 tsp for colour (optional)

    Coriander powder 2 tsp

    Sugar 1 tsp (optional)

    Cream 1 tbsp (optional)

    Garam Masala powder 1/2 tsp

    Oil for sauteing


    Directions:

Cook the chopped Baby Corn and peas until done. I put them in the Microwave, so that they don't overcook and the baby corn retains shape. Next, in a pan pour oil for sauteing and when hot add the cumin seeds, followed by turmeric powder. Now add the chopped onion, tomatoes, ginger, garlic and slit green chillies and saute. Add little salt(about 1/4 tsp) so that the tomatoes break, add the Cashewnuts and saute until the onion turns transparent and the tomatoes breakdown. Switch off flame and cool completely. On cooling, grind to a fine paste and keep it aside. Now in the same pan take some more oil. Add some Cumin seeeds and put in the chopped Bell Peppers(both red and green) and saute. Add a little sugar and continue to saute. When the Bell peppers appear cooked add the cooked baby corn and peas after draining all the water. Add turmeric powder and salt and stir. Now add the ground paste followed by red chilli powders(both regular and kashmiri), coriander powder and pour 1 to 1.5 cups of water( I poured water into my mixie jar, gave it a spin and used it so that is don't waste the stuck paste ). Stir nicely for the masalas to combine and cook until the water is partially absorbed, and gravy comes together. Finally, add the cream and put off the flame and sprinkle the garam masala giving the curry a final stir. The yummy Miloni Baby Corn and Bell peppers is ready to serve.


Serving Suggestions: With hot Phulkas, Roti, Parathas, Plain rice, Jeera rice, Peas Pulav and more.


    STEPWISE RECIPE FOLLOWS:


1. Cook the chopped Baby Corn and peas until done. I put them in the Microwave, so that they don't overcook and the baby corn retains shape. Next, in a pan pour oil for sauteing and when hot add the cumin seeds, followed by turmeric powder.


2. Now add the chopped onion, tomatoes, ginger, garlic and slit green chillies and saute. Add little salt(about 1/4 tsp) so that the tomatoes break, add the Cashewnuts and saute until the onion turns transparent and the tomatoes breakdown. Switch off flame and cool completely. On cooling, grind to a fine paste and keep it aside. 


3. Now in the same pan take some more oil. Add some Cumin seeds and put in the chopped Bell Peppers(both red and green) and saute. Add a little sugar and continue to saute. 


4. When the Bell peppers appear cooked add the cooked baby corn and peas after draining all the water. Add turmeric powder and salt and stir. 


5. Now add the ground paste followed by red chilli powders(both regular and Kashmiri), coriander powder and pour 1 to 1.5 cups of water( I poured water into my mixie jar, gave it a spin and used it so that is don't waste the stuck paste ). 


6. Stir nicely for the masalas to combine and cook until the water is partially absorbed, and gravy comes together. Finally, add the cream and put off the flame and sprinkle the garam masala giving the curry a final stir. The yummy Miloni Baby Corn and Bell peppers is ready to serve.


NOTES:

1. I have deliberately  stayed clear of the regular mixed assorted Vegetables for this curry. There is a recipe for the regular mixed vegetable curry without onion and garlic, in case you are interested. It is very simple and basic recipe, which can be done by beginners too. Check it out here.

2. Though I have listed Cream as optional, I would recommend adding if you are not vegan or allergic to it, as it surely enhances the taste. 
3. While sauteing the Bell Peppers we have added a little sugar to retain the colour of vegetables. This trick can be used wherever you are using colourful vegetables.


If you tried this recipe and liked it please comment below. I would love to hear from you. If you have a query about the recipe email us and i'll respond as soon as I can.


TOFU AND STIR FRIED VEGETABLES IN HOT SCHEZWAN SAUCE

  Any Tofu lovers? I agree its an acquired taste,but going by the health benefits it has to offer, I try including it in my diet now and the...